


 本文详细介绍Docker的安装配置、常用命令、镜像与容器操作,涵盖MySQL、Tomcat、Nginx、Redis、MongoDB等服务的Docker化部署过程,提供容器备份与迁移的方法。
文章目录
docker的资料
1 docker 安装与配置
1.0 简介
尽管有着光辉的历史,容器仍未得到广泛的认可。一个很重要的原因就是容器技术的复杂性:容器本身就比较复杂,不易安装,管理和自动化也很困难。而Docker就是为了改变这一切而生的。
1.0.1 容器与虚拟机比较
a 、本质上的区别
[外链图片转存失败(img-0p4i7ccl-1565937919758)(images\docker\1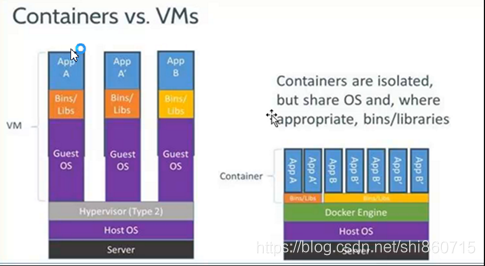 5464215836.png)]
b、使用上的区别
[外链图片转存失败(img-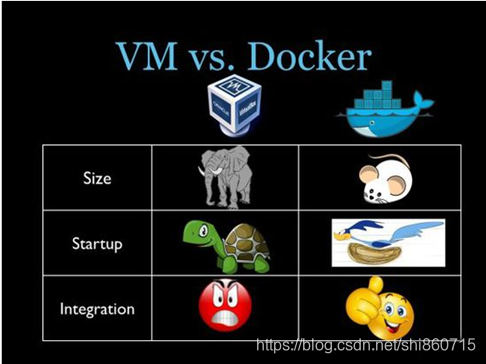 -1565937919760)(images\docker\1555465280125.png)]
1.0.2 docker 的优势和特点
a、上手快
b、职责逻辑分类
c、快速高效的开发生命周期
d、鼓励面向服务的架构
1.1 docker的安装
安装docker容器
[root@localhost ~]# yum install  docker -y
查看docker 容器版本
[root@localhost ~]# docker -v
Docker version 1.13.1, build b2f74b2/1.13.1
1.2 docker 常命令
启动docker
[root@localhost ~]# systemctl start docker
关闭docker
[root@localhost ~]# systemctl stop docker
查看docker的状态
[root@localhost ~]# systemctl status docker
docker容器重启
[root@localhost ~]# systemctl restart docker
开机启动docker
[root@localhost ~]# systemctl enable docker
开机不启动
[root@localhost ~]# systemctl disable docker
2 镜像操作
2.1 列出镜像
镜像的存储路径为:宿主机器 /var/lib/docker目录下
[root@localhost ~]# docker images
REPOSITORY   镜像在仓库中的名称
TAG          镜像的标签
IMAGE ID     镜像的ID
CREATED      镜像的创建时间(发布者创建的时间)
SIZE          镜像的大小
2.2 搜索镜像
[root@localhost ~]# docker search tomcat
搜索结果如图
name:仓库名称
description: 镜像描述
stars:用户评价、反应一个镜像的受欢迎程度
official:是否为官方
automated:自动构建,表示镜像有Docker-hub自动构建流程创建的
[外链图片转存失败(img-AZNZ5fZJ-1565937919760)(images\docker\1555466221435.png)]
2.3 拉去镜像
Docker镜像首页,包括官方镜像和其它公开镜像。Docker Hub上最受欢迎的10大镜像(通过Docker registry API获取不了镜像被pull的个数,只能通过镜像的stars数量,来衡量镜像的流行度。毫无疑问,拥有最高stars数量的库都是官方库)
[外链图片转存失败(img-su6E9cLc-1565937919761)(images\docker\1555466541270.png)]
国情的原因,国内下载 Docker HUB 官方的相关镜像比较慢,可以使用国内(docker.io)的一些镜像加速器,镜像保持和官方一致,关键是速度块,推荐使用。Mirror与Private Registry的区别:
Private Registry(私有仓库)是开发者或者企业自建的镜像存储库,通常用来保存企业内部的 Docker 镜像,用于内部开发流程和产品的发布、版本控制。
Mirror是一种代理中转服务,我们(比如daocloud)提供的Mirror服务,直接对接Docker Hub的官方Registry。Docker Hub 上有数以十万计的各类 Docker 镜像。
在使用Private Registry时,需要在Docker Pull 或Dockerfile中直接键入Private Registry 的地址,通常这样会导致与 Private Registry 的绑定,缺乏灵活性。
使用 Mirror 服务,只需要在 Docker 守护进程(Daemon)的配置文件中加入 Mirror 参数,即可在全局范围内透明的访问官方的 Docker Hub,避免了对 Dockerfile 镜像引用来源的修改。
简单来说,Mirror类似CDN,本质是官方的cache;Private Registry类似私服,跟官方没什么关系。对用户来说,由于用户是要拖docker hub上的image,对应的是Mirror。yum/apt-get的Mirror又有点不一样,它其实是把官方的库文件整个拖到自己的服务器上做镜像,并定时与官方做同步;而Docker Mirror只会缓存曾经使用过的image。
修改docker的国内镜像

[root@localhost ~]# vim /etc/docker/daemon.json
修改的文件内容为:
{
"registry-mirrors": ["https://docker.mirrors.ustc.edu.cn"]
}
 // 修改完成后重启宿主机,使得配置生效
[root@localhost ~]# reboot
// 拉去centos镜像
[root@localhost ~]# docker pull centos
Using default tag: latest
Trying to pull repository docker.io/library/centos ...
latest: Pulling from docker.io/library/centos
8ba884070f61: Pull complete
Digest: sha256:8d487d68857f5bc9595793279b33d082b03713341ddec91054382641d14db861
Status: Downloaded newer image for docker.io/centos:latest
//查看当前的镜像文件
[root@localhost ~]# docker images
REPOSITORY          TAG                 IMAGE ID            CREATED             SIZE
docker.io/tomcat    latest              5a069ba3df4d        4 days ago          465 MB
docker.io/centos    latest              9f38484d220f        4 weeks ago         202 MB
2.4 删除镜像
 删除制定镜像
[root@localhost ~]# docker rmi $image_id
 删除所有镜像
[root@localhost ~]# docker rmi `docker images -q`


PS:docker images -q 该命令是获取所有镜像的ID
3 容器操作
3.1 查看容器
查看正在运行的容器
[root@localhost ~]#docker ps
查看所有的容器(启动过的历史容器)
[root@localhost ~]#docker ps -a
查看最后一次运行的容器
[root@localhost ~]#docker ps -l
3.2 创建和启动容器
创建容器命令:
docker run
-i 表示运行容器
-t 表示启动容器后会进入其命令行,加入这个两个参数后,容器创建就能登录进去。即分配一个伪终端
--name 为创建的容器命名
-v 表示目录的映射关系,(前者为宿主机的目录,后者映射到宿主机的目录),可以使用多个-v做多个目录和文件的映射
(在生产环境中,使用该方式,在宿主机上修改,然后共享到容器中)
-d 在run 后面加-d 参数,则会创建一个守护式容器在后台运行,这样创建后期后不会自动登录容器,如果只加 -it两个参数,创建容器后会自动进入容器
-p 表示端口的映射,前者为宿主机的端口,后者为容器内部的端口,可以使用多个-p 做多个端口的映射
3.2.1 创建交互式容器
使用上面介绍的命令,我们很快就创建了第一个交互式的容器
[root@localhost ~]# docker run -it --name=mycenteos centos /bin/bash
[root@b7d7108b70c7 /]# ll
total 12
-rw-r--r--.   1 root root 12082 Mar  5 17:36 anaconda-post.log
lrwxrwxrwx.   1 root root     7 Mar  5 17:34 bin -> usr/bin
drwxr-xr-x.   5 root root   360 Apr 17 02:55 dev
drwxr-xr-x.   1 root root    66 Apr 17 02:55 etc
drwxr-xr-x.   2 root root     6 Apr 11  2018 home
lrwxrwxrwx.   1 root root     7 Mar  5 17:34 lib -> usr/lib
lrwxrwxrwx.   1 root root     9 Mar  5 17:34 lib64 -> usr/lib64
drwxr-xr-x.   2 root root     6 Apr 11  2018 media
drwxr-xr-x.   2 root root     6 Apr 11  2018 mnt
drwxr-xr-x.   2 root root     6 Apr 11  2018 opt
dr-xr-xr-x. 111 root root     0 Apr 17 02:55 proc
dr-xr-x---.   2 root root   114 Mar  5 17:36 root
drwxr-xr-x.   1 root root    21 Apr 17 02:55 run
lrwxrwxrwx.   1 root root     8 Mar  5 17:34 sbin -> usr/sbin
drwxr-xr-x.   2 root root     6 Apr 11  2018 srv
dr-xr-xr-x.  13 root root     0 Apr 17 02:17 sys
drwxrwxrwt.   7 root root   132 Mar  5 17:36 tmp
drwxr-xr-x.  13 root root   155 Mar  5 17:34 usr
drwxr-xr-x.  18 root root   238 Mar  5 17:34 var
退出容器,容器也随之停止运行
[root@b7d7108b70c7 /]# eixt
3.2.2 创建守护式
1、创建守护式容器
[root@localhost ~]# docker run -di --name=mycentos2 centos
5660c3cb91bc5841551b0c9b3137d22c1ddcb96da3ac80749a948a4ea556f35f
[root@localhost ~]#


2、查看容器运行中的容器
[root@localhost ~]# docker ps
CONTAINER ID        IMAGE               COMMAND             CREATED             STATUS              PORTS               NAMES
5660c3cb91bc        centos              "/bin/bash"         13 seconds ago      Up 12 seconds                           mycentos2

3、登录守护式容器的方式
[root@localhost ~]# docker exec -it mycentos2 /bin/bash
[root@5660c3cb91bc /]# ll
total 12
-rw-r--r--.   1 root root 12082 Mar  5 17:36 anaconda-post.log
lrwxrwxrwx.   1 root root     7 Mar  5 17:34 bin -> usr/bin
drwxr-xr-x.   5 root root   340 Apr 17 04:49 dev
drwxr-xr-x.   1 root root    66 Apr 17 04:49 etc
drwxr-xr-x.   2 root root     6 Apr 11  2018 home
lrwxrwxrwx.   1 root root     7 Mar  5 17:34 lib -> usr/lib
lrwxrwxrwx.   1 root root     9 Mar  5 17:34 lib64 -> usr/lib64
drwxr-xr-x.   2 root root     6 Apr 11  2018 media
drwxr-xr-x.   2 root root     6 Apr 11  2018 mnt
drwxr-xr-x.   2 root root     6 Apr 11  2018 opt
dr-xr-xr-x. 116 root root     0 Apr 17 04:49 proc
dr-xr-x---.   2 root root   114 Mar  5 17:36 root
drwxr-xr-x.   1 root root    21 Apr 17 04:49 run
lrwxrwxrwx.   1 root root     8 Mar  5 17:34 sbin -> usr/sbin
drwxr-xr-x.   2 root root     6 Apr 11  2018 srv
dr-xr-xr-x.  13 root root     0 Apr 17 02:17 sys
drwxrwxrwt.   7 root root   132 Mar  5 17:36 tmp
drwxr-xr-x.  13 root root   155 Mar  5 17:34 usr
drwxr-xr-x.  18 root root   238 Mar  5 17:34 var
4、在使用该命令登录守护式容器的时候,exit退出,容器继续运行
[root@5660c3cb91bc /]# exit
3.3 启动和停止容器
1、停止容器
[root@localhost ~]# docker ps -a
CONTAINER ID        IMAGE               COMMAND             CREATED             STATUS                           PORTS               NAMES
5660c3cb91bc        centos              "/bin/bash"         7 minutes ago       Up 7 minutes                                         mycentos2
5206dc323de5        centos              "/bin/bash"         About an hour ago   Exited (0) About an hour ago                         compassionate_goldwasser
b7d7108b70c7        centos              "/bin/bash"         2 hours ago         Exited (127) About an hour ago                       mycenteos

[root@localhost ~]# docker start mycenteos
mycenteos
[root@localhost ~]# docker ps
CONTAINER ID        IMAGE               COMMAND             CREATED             STATUS              PORTS               NAMES
5660c3cb91bc        centos              "/bin/bash"         7 minutes ago       Up 7 minutes                            mycentos2
b7d7108b70c7        centos              "/bin/bash"         2 hours ago         Up 2 seconds                            mycenteos

2、启动运行过的容器

[root@localhost ~]# docker stop mycenteos
mycenteos
[root@localhost ~]# docker ps
CONTAINER ID        IMAGE               COMMAND             CREATED             STATUS              PORTS               NAMES
5660c3cb91bc        centos              "/bin/bash"         7 minutes ago       Up 7 minutes     mycentos2
3.4 文件拷贝
docker cp 需要拷贝的文件或目录 容器名称:容器目录
docker cp 容器名称:容器目录 需要拷贝的文件或目录

[root@localhost ~]# echo "123123" > 1.txt
[root@localhost ~]# ll
总用量 8
-rw-r--r--. 1 root root    7 4月  17 12:59 1.txt
-rw-------. 1 root root 1217 3月  19 18:38 anaconda-ks.cfg

[root@localhost ~]# docker cp 1.txt mycenteos:/usr/local/2.txt
[root@localhost ~]# ll
总用量 8
-rw-r--r--. 1 root root    7 4月  17 12:59 1.txt
-rw-------. 1 root root 1217 3月  19 18:38 anaconda-ks.cfg

[root@localhost ~]# docker exec -it mycenteos /bin/bash
[root@b7d7108b70c7 /]# ll
total 12
-rw-r--r--.   1 root root 12082 Mar  5 17:36 anaconda-post.log
lrwxrwxrwx.   1 root root     7 Mar  5 17:34 bin -> usr/bin
drwxr-xr-x.   5 root root   360 Apr 17 04:57 dev
drwxr-xr-x.   1 root root    66 Apr 17 02:55 etc
drwxr-xr-x.   2 root root     6 Apr 11  2018 home
lrwxrwxrwx.   1 root root     7 Mar  5 17:34 lib -> usr/lib
lrwxrwxrwx.   1 root root     9 Mar  5 17:34 lib64 -> usr/lib64
drwxr-xr-x.   2 root root     6 Apr 11  2018 media
drwxr-xr-x.   2 root root     6 Apr 11  2018 mnt
drwxr-xr-x.   2 root root     6 Apr 11  2018 opt
dr-xr-xr-x. 119 root root     0 Apr 17 04:57 proc
dr-xr-x---.   1 root root    27 Apr 17 02:57 root
drwxr-xr-x.   1 root root    21 Apr 17 02:55 run
lrwxrwxrwx.   1 root root     8 Mar  5 17:34 sbin -> usr/sbin
drwxr-xr-x.   2 root root     6 Apr 11  2018 srv
dr-xr-xr-x.  13 root root     0 Apr 17 02:17 sys
drwxrwxrwt.   7 root root   132 Mar  5 17:36 tmp
drwxr-xr-x.   1 root root    19 Mar  5 17:34 usr
drwxr-xr-x.  18 root root   238 Mar  5 17:34 var

[root@b7d7108b70c7 /]# ll /usr/local/2.txt
-rw-r--r--. 1 root root 7 Apr 17 04:59 /usr/local/2.txt
[root@b7d7108b70c7 /]# cat /usr/local/2.txt
123123
[root@b7d7108b70c7 /]#
3.5 文件挂载
们可以在创建容器的时候,将宿主机的目录与容器内的目录进行映射,这样我们就可以通过修改宿主机某个目录的文件从而去影响容器。
创建容器 添加-v参数 后边为 宿主机目录:容器目录
将宿主机的目录映射到docker容器中的目录,当宿主机该文件发生修改,该目录也相应的改动
[root@localhost ~]# docker run -di -v /usr/local/myhtml:/usr/local/mh --name=mycentos3 centos:7
如果你共享的是多级的目录,可能会出现权限不足的提示。
[外链图片转存失败(img-FFcIlEf6-1565937919761)(images\docker\1555484940208.png)]
这是因为CentOS7中的安全模块selinux把权限禁掉了,我们需要添加参数 --privileged=true
来解决挂载的目录没有权限的问题
[root@localhost ~]# docker run -di -v /usr/local/myhtml:/usr/local/mh --name=mycentos3 centos:7 --privileged=true
3.6 查看容器IP地址
[root@localhost ~]# docker inspect mycenteos
使用格式化命令可以格式化
[root@localhost ~]# docker inspect  --format='{{.NetworkSettings.IPAddress}}' mycenteos
3.7 删除容器
容器删除的过程中,该容器不能处于运行状态,否则容器不能被删除。
容器运行过程中,该容器使用的镜像也不能被删除。
[root@localhost ~]# docker ps -a
CONTAINER ID        IMAGE               COMMAND             CREATED             STATUS                   PORTS               NAMES
5660c3cb91bc        centos              "/bin/bash"         2 hours ago         Up 2 hours                                   mycentos2
5206dc323de5        centos              "/bin/bash"         4 hours ago         Exited (0) 4 hours ago                       compassionate_goldwasser
b7d7108b70c7        centos              "/bin/bash"         4 hours ago         Up 2 hours                                   mycenteos
[root@localhost ~]# docker stop mycenteos
mycenteos
[root@localhost ~]# docker ps -a
CONTAINER ID        IMAGE               COMMAND             CREATED             STATUS                       PORTS               NAMES
5660c3cb91bc        centos              "/bin/bash"         2 hours ago         Up 2 hours                                       mycentos2
5206dc323de5        centos              "/bin/bash"         4 hours ago         Exited (0) 4 hours ago                           compassionate_goldwasser
b7d7108b70c7        centos              "/bin/bash"         4 hours ago         Exited (137) 2 seconds ago                       mycenteos
[root@localhost ~]# docker rm b7d7108b70c7
b7d7108b70c7
[root@localhost ~]# docker ps -a
CONTAINER ID        IMAGE               COMMAND             CREATED             STATUS                   PORTS               NAMES
5660c3cb91bc        centos              "/bin/bash"         2 hours ago         Up 2 hours                                   mycentos2
5206dc323de5        centos              "/bin/bash"         4 hours ago         Exited (0) 4 hours ago                       compassionate_goldwasser

删除所有的容器
docker rm `docker ps -a -q`
查询所有的docker容器的id
docker ps -a -q
注意:只能删除停止的容器。
4 Mysql 部署
4.1 拉取mysql 镜像
查询镜像文件
[root@localhost ~]# docker search mysql
INDEX       NAME                                                             DESCRIPTION                                     STARS     OFFICIAL   AUTOMATED
docker.io   docker.io/mysql                                                  MySQL is a widely used, open-source relati...   8037      [OK]
docker.io   docker.io/mariadb                                                MariaDB is a community-developed fork of M...   2709      [OK]
docker.io   docker.io/mysql/mysql-server                                     Optimized MySQL Server Docker images. Crea...   602                  [OK]
docker.io   docker.io/percona                                                Percona Server is a fork of the MySQL rela...   428       [OK]
拉取镜像文件
[root@localhost ~]# docker pull mysql
Using default tag: latest
Trying to pull repository docker.io/library/mysql ...
latest: Pulling from docker.io/library/mysql
27833a3ba0a5: Pull complete
864c283b3c4b: Pull complete
cea281b2278b: Pull complete
8f856c14f5af: Pull complete
9c4f38c23b6f: Pull complete
1b810e1751b3: Pull complete
5479aaef3d30: Pull complete
ded8fa2e1614: Pull complete
636033ba4d2e: Pull complete
902e6010661d: Pull complete
dbe44d2bf055: Pull complete
e906385f419d: Pull complete
Digest: sha256:a7cf659a764732a27963429a87eccc8457e6d4af0ee9d5140a3b56e74986eed7
Status: Downloaded newer image for docker.io/mysql:latest
4.2 运行创建容器,设置端口映射和
这里-p 表示设置端口映射,
-e 表示设置超级管理员登录密码
[root@localhost ~]# docker run -di --name=liubijun_mysql -p 3306:3306 -e MYSQL_ROOT_PASSWORD=123456 mysql
0a816c1be4f21a642935832907821b99679b227bf48e02f687da9931bf017986
4.3 登录容器
[root@localhost ~]# docker exec -it liubijun_mysql /bin/bash

通过账号密码登录mysql

root@0a816c1be4f2:/# mysql -u root -p
mysql> show databases;
+--------------------+
| Database           |
+--------------------+
| information_schema |
| mysql              |
| performance_schema |
| sys                |
+--------------------+
4 rows in set (0.01 sec)
4.4 设置mysql 远程登录,并刷新权限
mysql> alter user 'root'@'%' identified with mysql_native_password by '123456';
Query OK, 0 rows affected (0.01 sec)

mysql> flush privileges;
Query OK, 0 rows affected (0.01 sec)

mysql>
这样设置后,就可以使用客户端工具,链接我们的mysql 数据库了
4.5 链接测试
在创建容器的过程中,我们将容器的3306端口,映射给了宿主机的3306端口,这样我们访问数据库的时候,就可以使用宿主机的ip地址和端口号进行连接数据库。
[外链图片转存失败(img-LP B2q9rM-1565937919762)(images\docker\1555548531893.png)]
[外链图片转存失败(img-D1JS Ihwd-1565937919762)(images\docker\1555548565678.png)]
4.6 查看mysql 数据库的ip地址
[root@localhost ~]# docker inspect  --format='{{.NetworkSettings.IPAddress}}' liubijun_mysql
172.17.0.3
注意:这里的ip 和端口一样,只用于内部容器之间联通的作用,外面机器不能直接访问的。
5 tomcat 部署
5.1 拉取tomcat镜像
[root@localhost ~]# docker pull tomcat
5.2 创建容器
-di 创建守护式容器
–name 容器名称
-p 端口映射
-v 文件目录映射
–privilege 设置权限 要不然发布网站将没有文件访问权限
[root@localhost ~]# docker run -di --name=liubijun_tomcat -p 9000:8080 -v /usr/local/myhtml:/usr/local/ --privilege tomcat
cf0eefc03df72d7fe0710abc291dbf1bec9a005420642f1a3d5cc1379e844a27
[root@localhost ~]# docker exec -it liubijun_tomcat /bin/bash
5.3 上传网站文件
上传网站文件
[root@localhost ~]# rz
[root@localhost ~]# ll
总用量 16348
-rw-r--r--. 1 root root        7 4月  17 12:59 1.txt
-rw-------. 1 root root     1217 3月  19 18:38 anaconda-ks.cfg
-rw-r--r--. 1 root root 16729856 4月  18 09:49 test.war-----网站文件
[root@localhost ~]# mv test.war /usr/local/myhtml/
5.4 测试网站
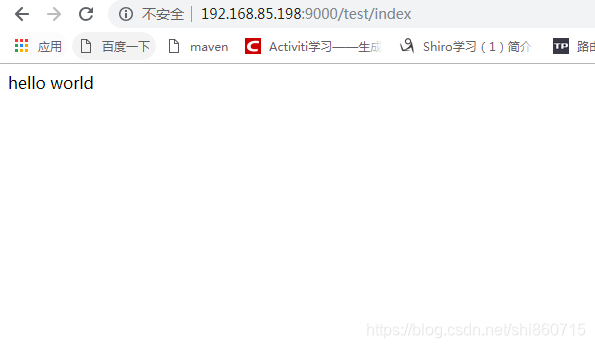
网站能够正常访问。tomcat docker化部署完成。
5.5 查看tomcat容器的ip
[root@localhost ~]#  docker inspect  --format='{{.NetworkSettings.IPAddress}}' liubijun_tomcat
172.17.0.4
6 nginx 部署
6.1 拉取nginx镜像查看镜像列表
[root@localhost myhtml]# docker pull nginx
Using default tag: latest
Trying to pull repository docker.io/library/nginx ...
latest: Pulling from docker.io/library/nginx
27833a3ba0a5: Already exists
ea005e36e544: Pull complete
d172c7f0578d: Pull complete
Digest: sha256:e71b1bf4281f25533cf15e6e5f9be4dac74d2328152edf7ecde23abc54e16c1c
Status: Downloaded newer image for docker.io/nginx:latest
[root@localhost myhtml]# docker images
REPOSITORY          TAG                 IMAGE ID            CREATED             SIZE
docker.io/nginx     latest              27a188018e18        30 hours ago        109 MB
docker.io/tomcat    latest              5a069ba3df4d        5 days ago          465 MB
docker.io/mysql     latest              7bb2586065cd        3 weeks ago         477 MB
docker.io/centos    latest              9f38484d220f        4 weeks ago         202 MB
6.2 创建nginx 容器
-p 设置映射端口为80
--name 为这是容器名称
-di 设置为守护式容器
[root@localhost myhtml]# docker run  -di --name=liubijun_nginx  -p 80:80 nginx
6a29f22caac9ed170f70891845ef9269e250daa803ce370b0b42679b0da7ab1e
6.3 测试nginx
浏览器中输入宿主机的ip 就可以访问到nginx了

6.4 配置反向代理
官方的nginx镜像文件,nginx配置文件为ngin.conf,存放在/etc/nginx 目录下
在容器中编辑配置文件不方便?
a、将容器中的配置文件拷贝到宿主机
[root@localhost ~]# docker cp liubijun_nginx:/etc/nginx/nginx.conf nginx.conf


添加一下配置:

upstream tomcat-cas {
	server 172.17.0.4:8080;
}
server {
	listen 80;
	server_name test.liubijun.com;
	location / {
		proxy_pass http://tomcat-cas;
		index index.html index.htm;
	}
}
b、将编辑好的配置文件在拷到容器中
[root@localhost ~]# docker cp liubijun_nginx:/etc/nginx/nginx.conf nginx.conf
[root@localhost ~]# docker restart liubijun_nginx
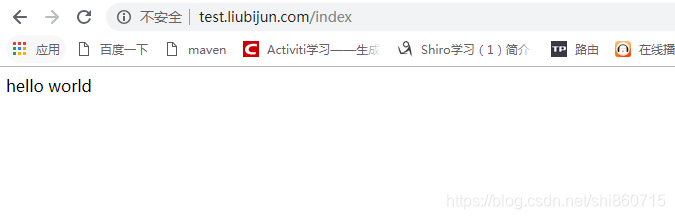
6.5 修改hosts文件
将测试机的hosts文件添加以下记录,就可以通过本地测试
192.168.85.198 test.liubijun.com
6.6 修改默认访问路径去项目名
将tomcat中的server.xml 文件添加以下内容:
docBase为项目名称
<Host name="localhost" appBase="webapps"
unpackWARs="true" autoDeploy="true">
<!-- SingleSignOn valve, share authentication between web applications
Documentation at: /docs/config/valve.html -->
<!--
<Valve className="org.apache.catalina.authenticator.SingleSignOn" />
-->
<!-- Access log processes all example.
Documentation at: /docs/config/valve.html
Note: The pattern used is equivalent to using pattern="common" -->
<Valve className="org.apache.catalina.valves.AccessLogValve" directory="logs"
prefix="localhost_access_log" suffix=".txt"
pattern="%h %l %u %t "%r" %s %b" />
<Context path="" docBase="test" reloadable="true" />
</Host>
6.7 反向代理测试
7 redis 部署
7.1 拉取redis镜像
[root@localhost ~]# docker pull  redis
Using default tag: latest
Trying to pull repository docker.io/library/redis ...
latest: Pulling from docker.io/library/redis
27833a3ba0a5: Already exists
cde8019a4b43: Pull complete
97a473b37fb2: Pull complete
c6fe0dfbb7e3: Pull complete
39c8f5ba1240: Pull complete
cfbdd870cf75: Pull complete
Digest: sha256:000339fb57e0ddf2d48d72f3341e47a8ca3b1beae9bdcb25a96323095b72a79b
Status: Downloaded newer image for docker.io/redis:latest
7.2 创建redis容器
[root@localhost ~]# docker run -di --name=liubijun_redis -p 6379:6379 redis
c34d96964e7ed945324d615a7989782ed06be712aadc0c6b587b4a43b59c3d16
7.3 客户端测试
D:\Redis>redis-cli -h 192.168.85.198

192.168.85.198:6379> set "name" 123
OK
192.168.85.198:6379> get name
"123"
192.168.85.198:6379>
8 mongodb 安装
8.1 拉去镜像
[root@sxkj ~]# docker images
REPOSITORY            TAG                 IMAGE ID            CREATED             SIZE
mongo                 4.2                 3991efabdaf6        3 days ago          388MB
mysql                 8.0                 dd7265748b5d        3 days ago          545MB
mysql                 latest              dd7265748b5d        3 days ago          545MB
redis                 5.0                 aa27923130e6        5 days ago          98.4MB
redis                 latest              74d107221092        5 days ago          104MB
nginx                 latest              daee903b4e43        5 days ago          133MB
portainer/portainer   latest              62771b0b9b09        4 months ago        79.1MB
registry              latest              2d4f4b5309b1        5 months ago        26.2MB
[root@sxkj ~]# docker run -di --name liubijun_mongo -P 27017:27017 mongo:4.2
8.2 安装mongodb
[root@sxkj ~]# docker run -di --name liubijun_mongo -p 27017:27017 mongo:4.2
e41f3ebb59abe87907dbe7f813f9d0c11c59becf668336eebb5d0e03ead735db
8.3 登录容器,创建数据库
[root@sxkj ~]# docker exec -it liubijun_mongo /bin/bash
root@e41f3ebb59ab:/# mongo
MongoDB shell version v4.2.11
connecting to: mongodb://127.0.0.1:27017/?compressors=disabled&gssapiServiceName=mongodb
Implicit session: session { "id" : UUID("71eca933-6349-457f-88c5-1a6011fbb1a9") }
MongoDB server version: 4.2.11
Welcome to the MongoDB shell.
For interactive help, type "help".
For more comprehensive documentation, see
	https://docs.mongodb.com/
Questions? Try the MongoDB Developer Community Forums
	https://community.mongodb.com
Server has startup warnings:
2020-11-24T02:31:14.083+0000 I  CONTROL  [initandlisten]
2020-11-24T02:31:14.083+0000 I  CONTROL  [initandlisten] ** WARNING: Access control is not enabled for the database.
2020-11-24T02:31:14.083+0000 I  CONTROL  [initandlisten] **          Read and write access to data and configuration is unrestricted.
2020-11-24T02:31:14.083+0000 I  CONTROL  [initandlisten]
2020-11-24T02:31:14.084+0000 I  CONTROL  [initandlisten]
2020-11-24T02:31:14.085+0000 I  CONTROL  [initandlisten] ** WARNING: You are running on a NUMA machine.
2020-11-24T02:31:14.085+0000 I  CONTROL  [initandlisten] **          We suggest launching mongod like this to avoid performance problems:
2020-11-24T02:31:14.085+0000 I  CONTROL  [initandlisten] **              numactl --interleave=all mongod [other options]
2020-11-24T02:31:14.085+0000 I  CONTROL  [initandlisten]
2020-11-24T02:31:14.085+0000 I  CONTROL  [initandlisten] ** WARNING: /sys/kernel/mm/transparent_hugepage/enabled is 'always'.
2020-11-24T02:31:14.085+0000 I  CONTROL  [initandlisten] **        We suggest setting it to 'never'
2020-11-24T02:31:14.085+0000 I  CONTROL  [initandlisten]
2020-11-24T02:31:14.085+0000 I  CONTROL  [initandlisten] ** WARNING: /sys/kernel/mm/transparent_hugepage/defrag is 'always'.
2020-11-24T02:31:14.085+0000 I  CONTROL  [initandlisten] **        We suggest setting it to 'never'
2020-11-24T02:31:14.085+0000 I  CONTROL  [initandlisten]
---
Enable MongoDB's free cloud-based monitoring service, which will then receive and display
metrics about your deployment (disk utilization, CPU, operation statistics, etc).

The monitoring data will be available on a MongoDB website with a unique URL accessible to you
and anyone you share the URL with. MongoDB may use this information to make product
improvements and to suggest MongoDB products and deployment options to you.

To enable free monitoring, run the following command: db.enableFreeMonitoring()
To permanently disable this reminder, run the following command: db.disableFreeMonitoring()
---

> use esaymock;
switched to db esaymock
> show databases
admin   0.000GB
config  0.000GB
local   0.000GB
9 备份与迁移
9.1 容器保存为镜像
在实际开发中,我们可以将我们配置好的容器,保存到镜像中,这样我们的服务就能够打包成一个镜像,在其他服务器上,使用的时候,只需要创建容器,就能够运行我们配置好的容器,在测试和运维使用的时候,只需要启动容器就可以。
[root@localhost ~]# docker commit liubijun_nginx mynginx_1.0
sha256:242f3c6e0f81523894a0a9cb5f2cf9d54b670332121198a35b4c5dba3c7c7e59
[root@localhost ~]# docker images
REPOSITORY          TAG                 IMAGE ID            CREATED             SIZE
mynginx_1.0         latest              242f3c6e0f81        26 seconds ago      109 MB
docker.io/nginx     latest              27a188018e18        2 days ago          109 MB
docker.io/tomcat    latest              5a069ba3df4d        6 days ago          465 MB
docker.io/redis     latest              a55fbf438dfd        3 weeks ago         95 MB
docker.io/mysql     latest              7bb2586065cd        3 weeks ago         477 MB
docker.io/centos    latest              9f38484d220f        5 weeks ago         202 MB


[root@localhost ~]# docker rmi mynginx_1.0
Untagged: mynginx_1.0:latest
Deleted: sha256:242f3c6e0f81523894a0a9cb5f2cf9d54b670332121198a35b4c5dba3c7c7e59
Deleted: sha256:b99402d379137a9628e9f4a1b138c4756409393676430ae955c380f70511732e
[root@localhost ~]# docker load -i mynginx.tar
ddff8c8590d5: Loading layer [==================================================>] 9.728 kB/9.728 kB
Loaded image: mynginx_1.0:latest

[root@localhost ~]# docker images
REPOSITORY          TAG                 IMAGE ID            CREATED             SIZE
mynginx_1.0         latest              242f3c6e0f81        3 minutes ago       109 MB
docker.io/nginx     latest              27a188018e18        2 days ago          109 MB
docker.io/tomcat    latest              5a069ba3df4d        6 days ago          465 MB
docker.io/redis     latest              a55fbf438dfd        3 weeks ago         95 MB
docker.io/mysql     latest              7bb2586065cd        3 weeks ago         477 MB
docker.io/centos    latest              9f38484d220f        5 weeks ago         202 MB
[root@localhost ~]#
9.2 将镜像打包导出到tar文件
[root@localhost ~]# docker save -o mynginx.tar mynginx_1.0
[root@localhost ~]# ll
总用量 110452
-rw-r--r--. 1 root root         7 4月  17 12:59 1.txt
-rw-------. 1 root root      1217 3月  19 18:38 anaconda-ks.cfg
-rw-------. 1 root root 113080320 4月  19 09:15 mynginx.tar
-rw-r--r--. 1 root root       834 4月  18 13:21 nginx.conf
-rw-r--r--. 1 root root      7569 4月  18 13:31 server.xml
9.3 删除本地镜像文件然后恢复
[root@localhost ~]# docker rmi mynginx_1.0
Untagged: mynginx_1.0:latest
Deleted: sha256:242f3c6e0f81523894a0a9cb5f2cf9d54b670332121198a35b4c5dba3c7c7e59
Deleted: sha256:b99402d379137a9628e9f4a1b138c4756409393676430ae955c380f70511732e
[root@localhost ~]# docker load -i mynginx.tar
ddff8c8590d5: Loading layer [==================================================>] 9.728 kB/9.728 kB
Loaded image: mynginx_1.0:latest

[root@localhost ~]# docker images
REPOSITORY          TAG                 IMAGE ID            CREATED             SIZE
mynginx_1.0         latest              242f3c6e0f81        3 minutes ago       109 MB
docker.io/nginx     latest              27a188018e18        2 days ago          109 MB
docker.io/tomcat    latest              5a069ba3df4d        6 days ago          465 MB
docker.io/redis     latest              a55fbf438dfd        3 weeks ago         95 MB
docker.io/mysql     latest              7bb2586065cd        3 weeks ago         477 MB
docker.io/centos    latest              9f38484d220f        5 weeks ago         202 MB
[root@localhost ~]#


 951
951

 被折叠的 条评论
为什么被折叠?
被折叠的 条评论
为什么被折叠?
 到【灌水乐园】发言


