


 本文档详细介绍了如何创建一个简单的Vue工程,包括使用`vue init webpack-simple`初始化项目,安装依赖,启动并访问应用。接着,文章深入分析了工程结构,如webpack配置、App.vue组件和main.js的Promise应用。此外,还探讨了Vuex的使用,展示了如何通过action异步更改状态。
创建一个VUE基础工程
PS D:\Development\web\webpack-study> vue list

  Available official templates:

  ★  browserify - A full-featured Browserify + vueify setup with hot-reload, linting & unit testing.
  ★  browserify-simple - A simple Browserify + vueify setup for quick prototyping.
  ★  pwa - PWA template for vue-cli based on the webpack template
  ★  simple - The simplest possible Vue setup in a single HTML file
  ★  webpack - A full-featured Webpack + vue-loader setup with hot reload, linting, testing & css extraction.
  ★  webpack-simple - A simple Webpack + vue-loader setup for quick prototyping.

PS D:\Development\web\webpack-study> vue init webpack-simple vuex

? Project name vuex
? Project description A Vue.js project
? Author shenzhen_zsw@163.com <shenzhen_zsw@163.com>
? License MIT
? Use sass? No

   vue-cli · Generated "vuex".

   To get started:

     cd vuex
     npm install
     npm run dev

PS D:\Development\web\webpack-study>
查看VUE提供哪些模板
vue list
初始化webpack-simple模板的工程
vue init webpack-simple 工程名
安装依赖
进入到工程根目录下
npm install
启动
npm run dev
访问
说明:
若8080端口,没有占用,默认是8080;

工程分析
用webstorm打开
webpack.config.js
entry: './src/main.js',说明:
1)入口配置的是从src/main.js开始的;
index.html
<!DOCTYPE html>
<html lang="en">
  <head>
    <meta charset="utf-8">
    <title>vuex</title>
  </head>
  <body>
    <div id="app"></div>
    <script type="text/javascript" src="/dist/main.js"></script>
  </body>
</html>
src/App.vue
<template>
  <div>
    <router-view></router-view>
  </div>
</template>

<script>
  export default {

  }
</script>
main.js
import Vue from 'vue';
import VueRouter from 'vue-router';
import Vuex from 'vuex'
import App from './App.vue'
Vue.use(VueRouter)
Vue.use(Vuex)
//路由配置
const Routers = [
{
path:'/index',
meta: {
title: '首页'
},
component:(resolve) => require(['./views/index.vue'],resolve)
},{
path: '*',
redirect:'/index'
}
];
const RouterConfig = {
//使用html5的history路由模式
mode: 'history',
routes: Routers
};
const router = new VueRouter(RouterConfig);
router.beforeEach((to,from,next) => {
window.document.title = to.meta.title;
next();
});
router.afterEach((to,from,next) => {
window.scrollTo(0,0); //回到顶部
});
const store = new Vuex.Store({
state: {
count: 0,
list:[1,5,8,10,30,50]
},
getters: {
filteredList: state => {
//过滤小于10的数据
return state.list.filter(item => item < 10);
},
listCount: (state, getters) => {
return getters.filteredList.length;
}
},
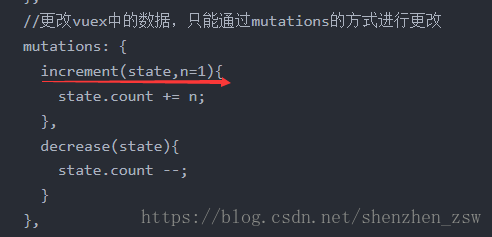
//更改vuex中的数据,只能通过mutations的方式进行更改
mutations: {
increment(state,n=1){
state.count += n;
},
decrease(state){
state.count --;
}
},
actions: {
increment(context){
context.commit('increment');
},
asyncIncrement(context){
//异步执行
return new Promise(resolve => {
setTimeout(()=>{
context.commit('increment');
resolve();
},1000)
});
}
}
});
new Vue({
el: '#app',
router:router,
store: store,
render: h => {
return h(App)
}
// render: h => h(App)
});
说明:
1)Promise 是异步编程的一种解决方案,比传统的解决方案–回调函数和事件--更合理和更强大。
2)所谓Promise ,简单说就是一个容器,里面保存着某个未来才回结束的事件(通常是一个异步操作)的结果。从语法上说,Promise是一个对象,从它可以获取异步操作的消息。
3)定义mutations中的方法,可以设置方法中的参数默认值,也可以为其设置数值;
src/views/index.vue
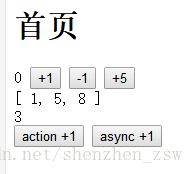
页面效果:
1)可以+1;
2)可以-1;
3)可以指定参数,然后累加;
4)通过action的方式,更改vuex中的值;
5)通过异步的方式,更改vuex中的值;
<template>
  <div>
    <h1>首页</h1>
    {{ count }}
    <button @click="handleIncrement">+1</button>
    <button @click="handleDecrease">-1</button>
    <button @click="handleIncrementMore">+5</button>
    <div>{{ list }}</div>
    <div>{{ listCount }}</div>
    <button @click="handleActionIncrement">action +1</button>
    <button @click="handleAsyncIncrement">async +1</button>
  </div>
</template>

<script>
    export default {
      //计算属性
      computed:{
        count(){
          return this.$store.state.count; //获取计数器
        },
        list(){
          return this.$store.getters.filteredList; //过滤数据
        },
        listCount(){
          return this.$store.getters.listCount; //获取过滤后的数据总数
        }
      },
      methods:{
        handleIncrement(){
          this.$store.commit('increment');
        },
        handleDecrease(){
          this.$store.commit('decrease');
        },
        handleIncrementMore(){
          this.$store.commit('increment',5);
        },
        handleActionIncrement(){
          //通过action的方式更改vuex中的值
          this.$store.dispatch('increment');
        },
        handleAsyncIncrement(){
          //异步执行的方式更改vuex中的值
          this.$store.dispatch('asyncIncrement').then(() => {
            console.log(this.$store.state.count);
          });
        }
      }
    }
</script>

<style scoped>

</style>
说明:
1)this.$store.dispatch('asyncIncrement')获取到的是Promise对象;
2)Promise对象.then()是指Promise对象中的resolve()执行后,就可以执行then中的方法了;


 976
976

 被折叠的 条评论
为什么被折叠?
被折叠的 条评论
为什么被折叠?
 到【灌水乐园】发言


