


In continuation of the previous text:第二章:模块的编译与运行-1, let's GO ahead .
You can test the module with the insmod and rmmod utilities, as shown below. Note that only the superuser can load and unload a module.
你可以使用 insmod 和 rmmod 这两个工具来测试该模块,如下所示。注意,只有超级用户(root)才能加载和卸载模块。
% make
make[1]: Entering directory `/usr/src/linux-2.6.10'
CC [M] /home/ldd3/src/misc-modules/hello.o
Building modules, stage 2.
MODPOST
CC
/home/ldd3/src/misc-modules/hello.mod.o
LD [M] /home/ldd3/src/misc-modules/hello.ko
make[1]: Leaving directory `/usr/src/linux-2.6.10'
% su
root# insmod ./hello.ko
Hello, world
root# rmmod hello
Goodbye cruel world
root#
补充说明:
-
insmod(install module):用于将模块加载到内核中
-
rmmod(remove module):用于从内核中卸载模块
-
超级用户(superuser):拥有系统最高权限的用户,在类 Unix 系统中通常指 root 用户,只有该用户能执行内核模块的加载 / 卸载等特权操作
Please note once again that, for the above sequence of commands to work, you must have a properly configured and built kernel tree in a place where the makefile is able to find it (/usr/src/linux-2.6.10 in the example shown). We get into the details of how modules are built in the section “Compiling and Loading.”
请再次注意,要让上述命令序列正常执行,你必须拥有一个配置和编译都正确的内核源码树,且该源码树需位于 Makefile 能够找到的路径下(在所示示例中,该路径为 /usr/src/linux-2.6.10)。关于模块的编译方式,我们会在 “编译与加载” 一节中详细介绍。
补充说明:
-
kernel tree:即 “内核源码树”,指 Linux 内核源代码按特定目录结构组织形成的文件集合,包含内核核心代码、驱动框架、头文件等,是编译内核模块的基础。
-
makefile:一种用于指定编译规则的文件,内核模块的编译需依赖 Makefile 来定位内核源码树、确定编译选项及链接方式,若路径错误会导致编译失败。
-
/usr/src/linux-2.6.10:这是示例中内核源码树的具体路径,
2.6.10是内核版本号,实际路径需根据你系统中安装的内核版本及源码存放位置调整(例如常见的还有/usr/src/linux-5.4.0等)。
According to the mechanism your system uses to deliver the message lines, your output may be different. In particular, the previous screen dump was taken from a text console; if you are running insmod and rmmod from a terminal emulator running under the window system, you won’t see anything on your screen. The message goes to one of the system log files, such as /var/log/messages (the name of the actual file varies between Linux distributions). The mechanism used to deliver kernel messages is described in Chapter 4.
根据你的系统用于传递消息行的机制不同,输出结果可能会有所差异。具体来说,前面的屏幕输出示例是在文本控制台(text console)中截取的;如果你是在窗口系统(window system)下运行的终端模拟器(terminal emulator)中执行 insmod 和 rmmod 命令,那么屏幕上不会显示任何内容。此时,消息会被发送到某个系统日志文件中,例如 /var/log/messages(实际日志文件名会因 Linux 发行版的不同而有所差异)。关于内核消息的传递机制,我们将在第 4 章中进行说明。
补充说明:
-
text console:即 “文本控制台”,是 Linux 系统中不依赖图形界面的纯文本交互界面,通常可通过
Ctrl+Alt+F1至F6切换进入,内核消息在这类界面中常能直接显示。 -
terminal emulator:即 “终端模拟器”,是图形界面(如 GNOME、KDE)下模拟文本终端的应用程序(如 Ubuntu 的 “终端”、macOS 的 “终端”),默认不直接显示内核打印的消息。
-
/var/log/messages:是传统 Linux 系统中存储系统日志(包括内核消息、服务运行日志等)的核心文件,但部分现代发行版(如 CentOS 7+、Ubuntu)可能改用
journald日志系统,需通过journalctl -k命令查看内核消息。
As you can see, writing a module is not as difficult as you might expect—at least, as long as the module is not required to do anything worthwhile. The hard part is understanding your device and how to maximize performance. We go deeper into modularization throughout this chapter and leave device-specific issues for later chapters.
正如你所见,编写一个模块并不像你想象的那么困难 —— 至少,在模块不需要实现任何实际有用功能的情况下是这样。真正困难的部分在于理解你的设备,以及如何最大限度地提升其性能。本章中,我们会深入探讨模块化的相关内容,而与设备相关的具体问题,则留到后续章节再进行讲解。
补充说明:
-
“do anything worthwhile”:此处指实现具有实际功能的逻辑(如硬件驱动的设备控制、数据处理、资源调度等),简单的 “Hello World” 模块仅演示了内核模块的基础结构,未涉及复杂的功能实现。
-
“understanding your device”:对于内核模块开发(尤其是设备驱动开发)而言,理解硬件设备的工作原理(如寄存器配置、数据传输协议、中断机制等)是核心前提,这也是区别于普通应用开发的关键难点。
-
“modularization”:即 “模块化”,是 Linux 内核的重要设计思想,通过将功能拆分为独立模块,实现内核的可扩展性和灵活性,本章后续会围绕模块的编译、加载、符号导出等核心机制展开。
Kernel Modules Versus Applications
Before we go further, it’s worth underlining the various differences between a kernel module and an application.
在深入讨论之前,有必要强调内核模块与应用程序之间的各种差异。
While most small and medium-sized applications perform a single task from begin-ning to end, every kernel module just registers itself in order to serve future requests,
and its initialization function terminates immediately. In other words, the task of the module’s initialization function is to prepare for later invocation of the module’s functions; it’s as though the module were saying, “Here I am, and this is what I can do.” The module’s exit function (hello_exit in the example) gets invoked just before the module is unloaded. It should tell the kernel, “I’m not there anymore; don’t ask me to do anything else.” This kind of approach to programming is similar to event- driven programming, but while not all applications are event-driven, each and every kernel module is. Another major difference between event-driven applications and kernel code is in the exit function: whereas an application that terminates can be lazy in releasing resources or avoids clean up altogether, the exit function of a module must carefully undo everything the init function built up, or the pieces remain around until the system is rebooted.
大多数中小型应用程序会从头到尾执行单一任务,而每个内核模块仅仅是注册自身以响应未来的请求,其初始化函数会立即终止。换句话说,模块初始化函数的任务是为后续调用模块功能做准备;就好像模块在宣告:“我在这里,这是我能做的事情。”
模块的退出函数(示例中的hello_exit)会在模块卸载前被调用。它需要告知内核:“我已经不在了,不要再请求我执行任何操作。”
这种编程方式类似于事件驱动编程,但并非所有应用程序都是事件驱动的,而每一个内核模块都必然是事件驱动的。
事件驱动应用程序与内核代码之间的另一个主要区别在于退出函数:一个终止的应用程序可以不必费心释放资源,甚至完全不做清理工作;而模块的退出函数必须仔细地撤销初始化函数所建立的一切,否则这些残留的部分会一直存在,直到系统重启。
Incidentally, the ability to unload a module is one of the features of modularization that you’ll most appreciate, because it helps cut down development time; you can test successive versions of your new driver without going through the lengthy shut-down/reboot cycle each time.
顺便提一句,模块的可卸载能力是模块化机制中最值得你关注的特性之一,因为它有助于缩短开发时间:你可以测试新驱动程序的多个版本,而无需每次都经历漫长的关机 / 重启过程。
补充说明:
-
cut down development time:对内核模块(尤其是设备驱动)开发者而言,传统无模块化设计需通过 “修改代码→编译内核→重启系统” 验证功能,单次测试可能耗时数分钟;而支持卸载的模块可通过 “rmmod 卸载旧模块→insmod 加载新模块” 完成更新,整个过程仅需数秒,大幅提升开发迭代效率。
-
successive versions:指开发过程中不断优化、修复 bug 的多个模块版本,模块化的可卸载特性让开发者能快速在不同版本间切换测试,无需频繁中断开发流程。
As a programmer, you know that an application can call functions it doesn’t define: the linking stage resolves external references using the appropriate library of func-tions. printf is one of those callable functions and is defined in libc. A module, on the other hand, is linked only to the kernel, and the only functions it can call are the ones exported by the kernel; there are no libraries to link to. The printk function used in hello.c earlier, for example, is the version of printf defined within the kernel and exported to modules. It behaves similarly to the original function, with a few minor differences, the main one being lack of floating-point support.
作为程序员,你知道应用程序可以调用自身未定义的函数:链接阶段会通过相应的函数库解析外部引用。printf 就是这类可调用函数之一,它定义在 libc 中。
而模块则不同,它只与内核链接,只能调用内核导出的函数,不存在可链接的库。例如,前面 hello.c 中使用的 printk 函数,就是内核中定义并导出给模块使用的 printf 版本。它的行为与标准 printf 类似,但有一些细微差别,最主要的是不支持浮点数。
补充说明:
-
linking stage:链接阶段是程序编译过程的最后一步,负责将编译生成的目标文件与所需的库文件组合,解析外部函数和变量引用,最终生成可执行文件。
-
libc:即标准 C 库,包含了
printf等基础函数实现,应用程序通过链接该库获得这些功能。 -
kernel-exported functions:内核通过符号导出机制(如
EXPORT_SYMBOL宏)向模块开放有限的函数接口,模块只能使用这些经过明确导出的内核函数,确保内核稳定性和安全性。 -
floating-point support:内核通常禁用浮点数运算以减少开销并避免上下文切换问题,因此
printk不支持浮点数格式化输出,这是与用户态printf的关键区别之一。
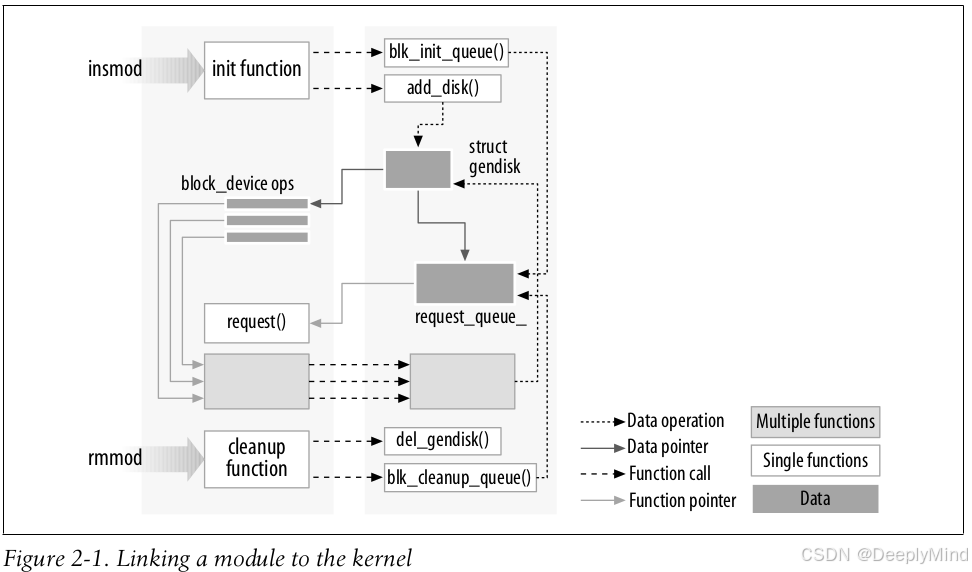
Figure 2-1 shows how function calls and function pointers are used in a module to add new functionality to a running kernel.
图 2-1 展示了模块中如何通过函数调用与函数指针,为运行中的内核添加新功能。
补充说明:
-
函数调用(function calls):此处指模块调用内核导出的函数(如之前提到的
printk、module_init相关底层接口等),这是模块与内核交互的基础,确保模块能借助内核已有的能力完成初始化、资源申请等操作。 -
函数指针(function pointers):是模块向内核 “注册” 新功能的核心方式。内核中许多子系统(如中断处理、文件系统、设备驱动框架)会提供带有函数指针参数的注册接口,模块可将自身实现的功能函数(如设备的读 / 写函数、中断处理函数)通过函数指针传递给内核。当内核需要执行对应操作时,会通过该函数指针调用模块的函数,从而让模块的新功能融入内核工作流程(例如,字符设备驱动通过
file_operations结构体中的函数指针,将自定义的设备操作函数注册到内核文件系统框架中)。
Because no library is linked to modules, source files should never include the usual header files, <stdarg.h> and very special situations being the only exceptions. Only functions that are actually part of the kernel itself may be used in kernel modules. Anything related to the kernel is declared in headers found in the kernel source tree you have set up and configured; most of the relevant headers live in include/linux and include/asm, but other subdirectories of include have been added to host material associated to specific kernel subsystems.
由于模块不会链接任何库,因此源文件绝不应该包含常规的头文件(唯一例外是 <stdarg.h> 以及极少数特殊场景)。内核模块中只能使用内核本身实际包含的函数。
所有与内核相关的内容,其声明都位于你已搭建并配置好的内核源码树的头文件中;大部分相关头文件存放在 include/linux 和 include/asm 目录下,但 include 目录下的其他子目录也用于存放与特定内核子系统相关的文件。
补充说明:
-
<stdarg.h>例外原因:该头文件用于处理变长参数(如printk支持的格式化输出参数),而内核中部分函数(如printk)依赖变长参数机制,因此允许模块包含此头文件,这是内核对 “无库链接” 规则的特殊兼容。 -
内核头文件目录:
-
include/linux:存放内核核心功能的头文件,如模块开发常用的module.h(包含module_init/module_exit宏定义)、kernel.h(包含内核基础函数声明)等。 -
include/asm:存放与特定 CPU 架构相关的头文件(如寄存器定义、架构特有指令接口),在不同架构(如 x86、ARM)的内核源码树中,该目录内容会有差异,用于适配硬件底层特性。
-
-
“不包含常规头文件” 的意义:常规头文件(如
<stdio.h>、<stdlib.h>)属于 C 库(libc),其声明的函数(如printf、malloc)在内核态不可用。模块若包含这类头文件,会导致编译时引用无效函数,最终引发编译错误或运行时崩溃。
The role of individual kernel headers is introduced throughout the book as each of them is needed.
Another important difference between kernel programming and application pro-gramming is in how each environment handles faults: whereas a segmentation fault is harmless during application development and a debugger can always be used to trace the error to the problem in the source code, a kernel fault kills the current process at least, if not the whole system. We see how to trace kernel errors in Chapter 4.
本书会在需要用到各个内核头文件时,逐一介绍它们各自的作用。
内核编程与应用程序编程之间还有一个重要区别,在于两种环境对错误的处理方式:在应用程序开发中,段错误(segmentation fault)通常不会造成严重影响,而且总能通过调试器追踪错误根源,定位到源码中的问题;但内核发生错误时,至少会终止当前进程,严重时甚至会导致整个系统崩溃。关于如何追踪内核错误,我们会在第 4 章进行讲解。
补充说明:
-
segmentation fault(段错误):是程序试图访问不属于自己的内存空间(如非法指针访问、数组越界)时触发的内存访问错误。在用户态(应用程序)中,操作系统会阻止这种非法访问并终止程序,但不会影响系统整体运行;而在内核态,内核直接操作硬件和系统资源,非法内存访问可能破坏内核数据结构或硬件状态,进而引发系统死机(如 “蓝屏”“内核恐慌”)。
-
内核错误追踪:由于内核运行在特权态,无法使用调试应用程序的常规工具(如
gdb直接调试),通常需要借助内核专属的调试机制,例如第 4 章可能会介绍的printk日志、dmesg命令查看内核环形缓冲区、kdb/kgdb内核调试器等工具。


 被折叠的 条评论
为什么被折叠?
被折叠的 条评论
为什么被折叠?
 到【灌水乐园】发言


