这篇文章主要介绍了Android入门之TabHost与TabWidget,对于Android初学者有一定的学习借鉴价值,需要的朋友可以参考下。
本文实例介绍的是Android的Tab控件,Tab控件可以达到分页的效果,让一个屏幕的内容尽量丰富,当然也会增加开发的复杂程度,在有必要的时候再使用。Android的Tab控件使用起来有点奇怪,必须包含和按照以下的顺序:
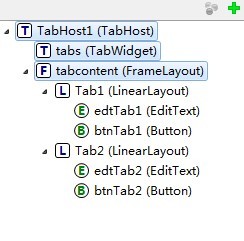
TabHost控件->TabWidget(必须命名为tabs)->FrameLayout(必须命名为tabcontent)。
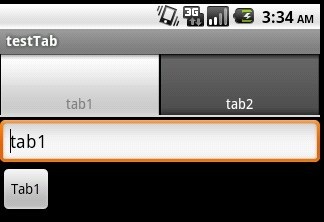
先来贴出本例运行的截图:
main.xml的源码如下:
01 | <?xmlversion="1.0"encoding="utf-8"?> |
02 | <TabHostandroid:layout_width="fill_parent" |
04 | <TabWidgetandroid:id="@android:id/tabs" |
05 | android:layout_height="wrap_content"android:layout_width="fill_parent"> |
07 | <FrameLayoutandroid:id="@android:id/tabcontent" |
08 | android:paddingTop="65px"android:layout_width="fill_parent"android:layout_height="fill_parent"> |
09 | <LinearLayoutandroid:layout_height="wrap_content"android:id="@+id/Tab1"android:orientation="vertical"android:layout_width="fill_parent"> |
10 | <EditTextandroid:layout_height="wrap_content"android:id="@+id/edtTab1"android:layout_width="fill_parent"></EditText> |
11 | <Buttonandroid:layout_width="wrap_content"android:layout_height="wrap_content"android:id="@+id/btnTab1"android:text="Tab1"></Button> |
13 | <LinearLayoutandroid:layout_height="wrap_content"android:id="@+id/Tab2"android:layout_width="fill_parent"android:orientation="horizontal"> |
14 | <EditTextandroid:layout_height="wrap_content"android:id="@+id/edtTab2"android:layout_width="wrap_content"android:layout_weight="300"></EditText> |
15 | <Buttonandroid:layout_width="wrap_content"android:layout_height="wrap_content"android:id="@+id/btnTab2"android:text="Tab2"></Button></LinearLayout> |
java程序源码如下:
02 | import android.app.TabActivity; |
03 | import android.os.Bundle; |
04 | import android.view.View; |
05 | import android.widget.Button; |
06 | import android.widget.EditText; |
07 | import android.widget.TabHost; |
08 | import android.widget.TabHost.TabSpec; |
09 | public classtestTab extends TabActivity { |
11 | Button btnTab1,btnTab2; |
12 | EditText edtTab1,edtTab2; |
13 | /** Called when the activity is first created. */ |
15 | publicvoid onCreate(Bundle savedInstanceState) { |
16 | super.onCreate(savedInstanceState); |
17 | setContentView(R.layout.main); |
19 | TabHost tabs = getTabHost(); |
21 | TabSpec tab1 = tabs.newTabSpec("tab1"); |
22 | tab1.setIndicator("tab1"); |
23 | tab1.setContent(R.id.Tab1); |
26 | btnTab1=(Button)this.findViewById(R.id.btnTab1); |
27 | edtTab1=(EditText)this.findViewById(R.id.edtTab1); |
28 | btnTab1.setOnClickListener(newClickEvent()); |
31 | TabSpec tab2 = tabs.newTabSpec("tab2"); |
32 | tab2.setIndicator("tab2"); |
33 | tab2.setContent(R.id.Tab2); |
36 | btnTab2=(Button)this.findViewById(R.id.btnTab2); |
37 | edtTab2=(EditText)this.findViewById(R.id.edtTab2); |
38 | btnTab2.setOnClickListener(newClickEvent()); |
40 | tabs.setCurrentTab(0); |
43 | classClickEvent implements View.OnClickListener { |
45 | public void onClick(View v) { |
48 | edtTab1.setText("tab1"); |
52 | edtTab2.setText("tab2"); |


 本文详细介绍了Android中Tab控件的使用方法,包括TabHost与TabWidget的基本布局配置及Java程序实现,通过实例展示了如何创建分页效果。


 141
141

 被折叠的 条评论
为什么被折叠?
被折叠的 条评论
为什么被折叠?
 到【灌水乐园】发言


