


 本文详细介绍了CSS中的五种选择器,包括基本选择器、层次选择器、属性选择器、伪类选择器及伪元素选择器。通过具体示例展示了每种选择器的应用场景及其语法特点。
提示:文章写完后,目录可以自动生成,如何生成可参考右边的帮助文档
一、基本选择器
代码如下(示例):
```html
<!DOCTYPE html>
<html lang="en">
<head>
    <meta charset="UTF-8">
    <meta http-equiv="X-UA-Compatible" content="IE=edge">
    <meta name="viewport" content="width=device-width, initial-scale=1.0">
    <title>基本选择器</title>
</head>
<style>
    /* 初始化页面元素的样式 */
    /* *{
        margin: 0;
        padding: 0;
        list-style: none;
    } */
    /* 逗号选择器:同时选中多个元素 */
    body,ul,li,h1{
        margin: 0;
        list-style: none;
        padding: 0;
    }
    /* 标签选择器:选择文件中该标签所对应的元素 */
    div{
        font-size: 30px;
    }
    /* 类名选择器:选中文件中所有具有该类名的元素,类名的值可以在同一文件中重复 */
    /* .header{
        color: red;
    } */
    .center{
        /* 水平自适应居中 */
        margin: 0 auto;
        width: 500px;
        background-color: red;
    }
    /* id选择器:唯一值 */
    #one{
        background-color: rosybrown;
    }
    /* 组合选择器:先选中第一个选择器选中的元素,在选中第二个选择器选中的元素 */
    p.one{
        color: seagreen;
    }
</style>
<body>
    <div class="header">
        <div class="center">头部</div>
    </div>
    <div id="one">id选择器</div>

    <div class="footer">
        <div class="center">底部</div>
    </div>
    <p class="one">段落</p>

    <div class="header">头部</div>
    <ul>
        <li>1</li>
        <li>2</li>
    </ul>
    <h1>标题一</h1>
</body>
</html>```

二、层次选择器
代码如下(示例):
<!DOCTYPE html>
<html lang="en">
<head>
    <meta charset="UTF-8">
    <meta http-equiv="X-UA-Compatible" content="IE=edge">
    <meta name="viewport" content="width=device-width, initial-scale=1.0">
    <title>层次选择器</title>
</head>
<style>
    /* 后代选择器:先选中第一个选择器对应的元素,再选中该元素下面的所有的第二个选择器选中的元素 */
    .outer li{
        background-color: red;
    }
    /* 子代选择器:先选中第一个选择器对应的元素,再选中该元素下面第一代选择器选中的元素 */
    .outer>li{
        color: pink;
    }
    /* 相邻兄弟选择器:第一个选择器对应的元素,再选中该元素后面相邻的第一的元素 */
    .inner+li{
        color: skyblue;
    }
    /* 通用兄弟选择器:选中第一个选择器对应的元素,再选中该元素后面相邻的所有的元素 */
    .inner~li{
        font-size: 30px;
    }
</style>
<body>
    <ul class="outer">
        <li>卫衣</li>

            <ul>
                <li>格子衫</li>
                <li>牛仔裤</li>
            </ul>

        <li class="inner">帽子</li>
        <li>连衣裙</li>
        <li>衬衫</li>
        <li>鞋子</li>
    </ul>
</body>
</html>

三、属性选择器
代码如下(示例):
<!DOCTYPE html>
<html lang="en">
<head>
    <meta charset="UTF-8">
    <meta http-equiv="X-UA-Compatible" content="IE=edge">
    <meta name="viewport" content="width=device-width, initial-scale=1.0">
    <title>属性选择器</title>
</head>
<style>
    /* 选中所有具有type属性的input框 */
    input[type]{
        height: 100px;
    }
    /* 选中所有具有type属性并且值为radio的input框 */
    input[type='radio']{
        width: 100px;
    }
    /* 选中具有value属性并且以1开始的input框 */
    input[value^='1']{
        background-color: blue;
    }
      /* 选中具有value属性并且以2结尾的input框 */
      input[value$='2']{
        background-color: red;
    }
</style>
<body>
    <input type="text">
    <input type="text">
    <input type="radio">
    <input type="text" value="111">
    <input type="text" value="222">
</body>
</html>

四、伪类选择器
关于a标签
代码如下(示例):
<!DOCTYPE html>
<html lang="en">
<head>
    <meta charset="UTF-8">
    <meta http-equiv="X-UA-Compatible" content="IE=edge">
    <meta name="viewport" content="width=device-width, initial-scale=1.0">
    <title>伪类选择器</title>
</head>
<style>
    a:link  {
        color: blue;
    }
    a:hover {
        color: blueviolet;
    }
    a:active {
        color: brown;
    }
    a:visited {
        color: chartreuse;
    }
</style>
<body>
    <a href="#">登录</a>
</body>
</html>
其他
代码如下(示例):
<!DOCTYPE html>
<html lang="en">
<head>
<meta charset="UTF-8">
<meta http-equiv="X-UA-Compatible" content="IE=edge">
<meta name="viewport" content="width=device-width, initial-scale=1.0">
<title>伪类选择器</title>
</head>
<style>
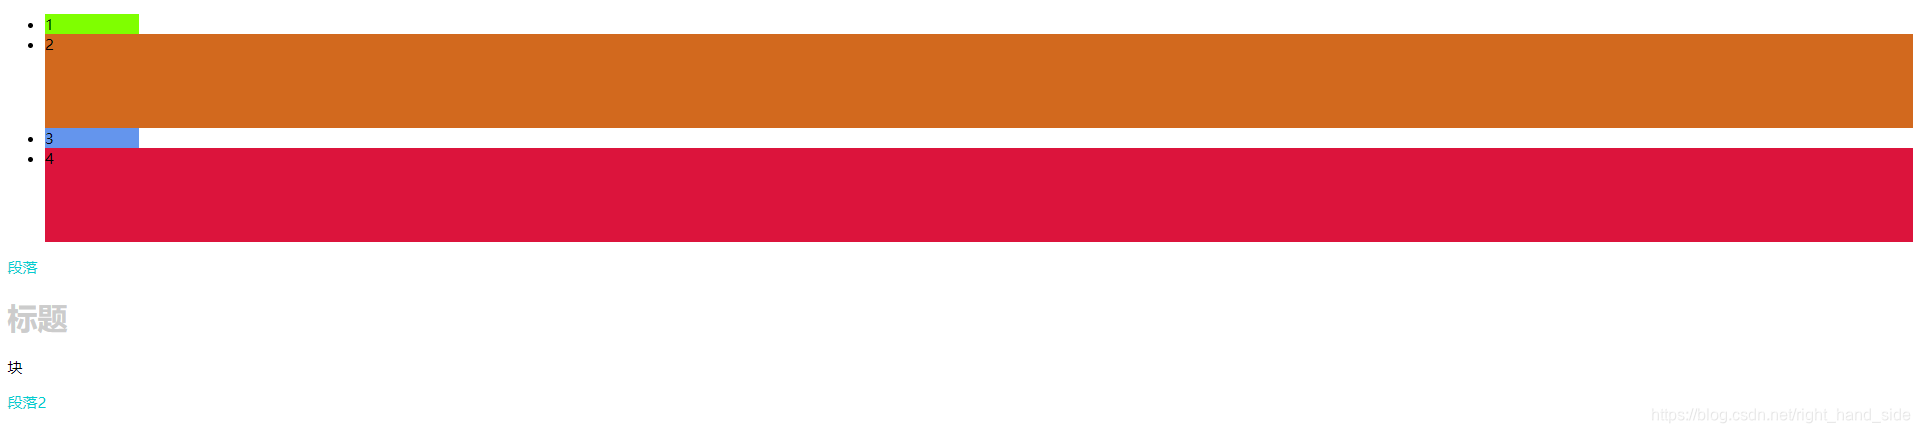
/* 选中ul下方的第一个li */
ul li:first-child{
background-color: chartreuse;
}
/* 选中ul下方的第二个li */
ul li:nth-child(2){
background-color:chocolate
}
ul li:nth-child(3){
background-color: cornflowerblue;
}
/* 选中ul下方的最后一个li */
ul li:last-child{
background-color: crimson;
}
/* 选中偶数 */
ul li:nth-child(even){
height: 100px;
}
/* 选中奇数 */
ul li:nth-child(odd){
width: 100px;
}
/* div p:first-child{
color: darkmagenta;
}
div h1:nth-child(2){
color: darkred;
}
div span:nth-child(3){
color: darkslateblue;
} */
/* 先选中div,再找出所有p标签,最后找出第一次出现的p标签 */
div p:first-of-type{
color: darkturquoise;
}
/* 第二次出现的p标签 */
div p:nth-of-type(2){
color: darkturquoise;
}
div h1:first-of-type{
color:#ccc;
}
</style>
<body>
<ul>
<li>1</li>
<li>2</li>
<li>3</li>
<li>4</li>
</ul>
<div>
<p>段落</p>
<h1>标题</h1>
<span>块</span>
<p>段落2</p>
</div>
</body>
</html>
五、伪元素选择器
代码如下(示例):
<!DOCTYPE html>
<html lang="en">
<head>
    <meta charset="UTF-8">
    <meta http-equiv="X-UA-Compatible" content="IE=edge">
    <meta name="viewport" content="width=device-width, initial-scale=1.0">
    <title>伪元素选择器</title>
</head>
<style>
    .container div::before{
        height: 20px;
        width: 20px;
        border: 1px solid #333;
        /* 伪元素的内容 */
        content: '1';
        /* 行内块元素 :可以与其他元素共享一行空间,并且可以设置宽高*/
        display: inline-block;
        text-align: center;
    }
    /* 选中content第一个div,再选中div中第一个文本字符 */
    .content div:first-child::first-letter{
        font-weight: 800;
    }
    /* 选中content中所有div,设置光标选中后文本字符样式 */
    .content div::selection{
       color: darkturquoise;
    }
</style>
<body>
    <div class="container">
        <div>html</div>
        <div>css</div>
        <div>js</div>
        <div>vue</div>
    </div>
    <div class="content">
        <div>html</div>
        <div>css</div>
        <div>js</div>
        <div>vue</div>
    </div>
</body>
</html>


 312
312

 被折叠的 条评论
为什么被折叠?
被折叠的 条评论
为什么被折叠?
 到【灌水乐园】发言


