


在本专题前面相关博客中已经讲述了 pyqt + yolo + lprnet 实现的车牌检测识别功能。带qt界面的。
本博文将结合前面训练好的模型来实现车牌的检测与识别。并用pyqt实现界面。最终通过检测车牌检测识别功能。
1)、通过pyqt5设计界面
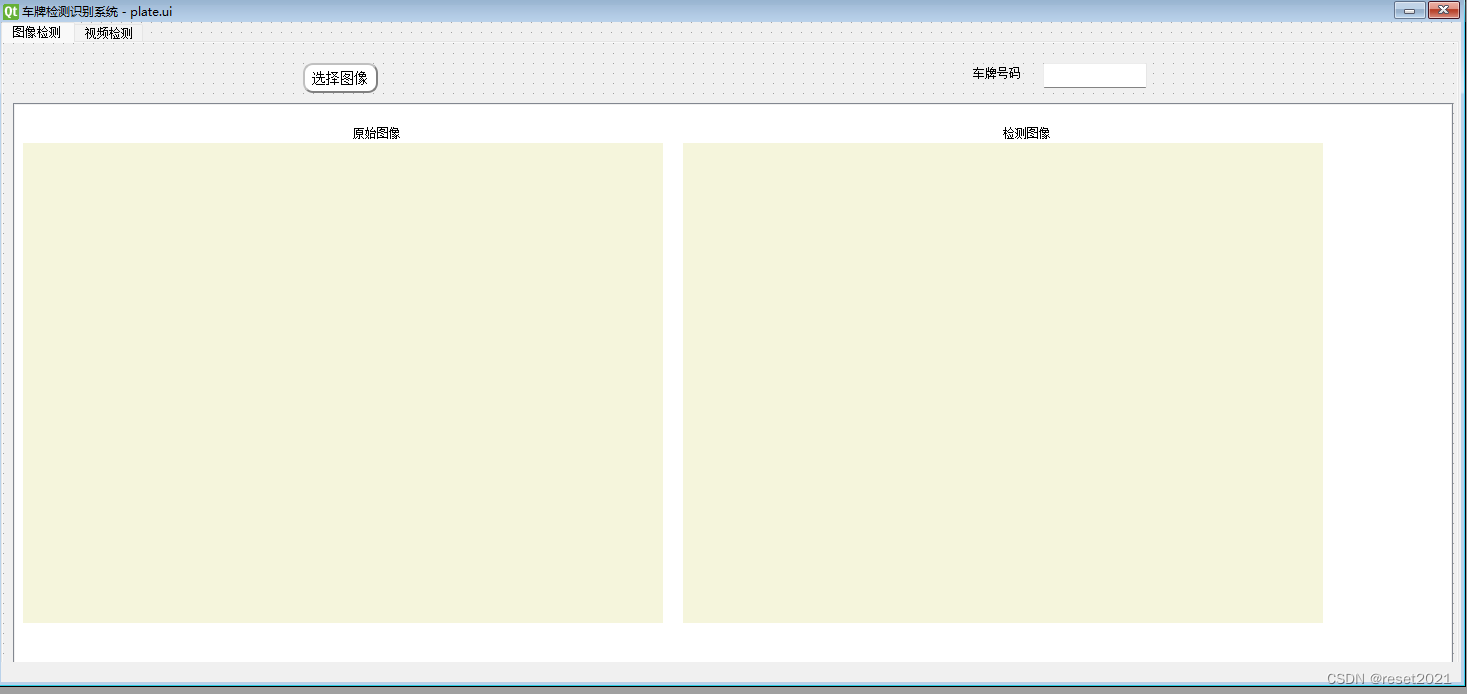
ui文件如下:
<?xml version="1.0" encoding="UTF-8"?>
<ui version="4.0">
<class>mainWindow</class>
<widget class="QMainWindow" name="mainWindow">
<property name="geometry">
<rect>
<x>0</x>
<y>0</y>
<width>1460</width>
<height>660</height>
</rect>
</property>
<property name="windowTitle">
<string>车牌检测识别系统</string>
</property>
<widget class="QWidget" name="centralwidget">
<widget class="QTabWidget" name="tabWidget">
<property name="geometry">
<rect>
<x>0</x>
<y>0</y>
<width>1460</width>
<height>660</height>
</rect>
</property>
<property name="autoFillBackground">
<bool>false</bool>
</property>
<property name="currentIndex">
<number>0</number>
</property>
<widget class="QWidget" name="pandian_page">
<property name="enabled">
<bool>true</bool>
</property>
<attribute name="title">
<string>图像检测</string>
</attribute>
<widget class="QTextEdit" name="pandian_video_number">
<property name="geometry">
<rect>
<x>1040</x>
<y>20</y>
<width>104</width>
<height>25</height>
</rect>
</property>
</widget>
<widget class="QListWidget" name="listWidget_pandian">
<property name="geometry">
<rect>
<x>10</x>
<y>60</y>
<width>1440</width>
<height>660</height>
</rect>
</property>
</widget>
<widget class="QLabel" name="label_pandian_yuanshi_video">
<property name="geometry">
<rect>
<x>350</x>
<y>80</y>
<width>55</width>
<height>20</height>
</rect>
</property>
<property name="text">
<string>原始图像</string>
</property>
</widget>
<widget class="QLabel" name="label_pandian_video">
<property name="geometry">
<rect>
<x>1000</x>
<y>80</y>
<width>55</width>
<height>20</height>
</rect>
</property>
<property name="text">
<string>检测图像</string>
</property>
</widget>
<widget class="QLabel" name="label_yuanshi_picture">
<property name="geometry">
<rect>
<x>20</x>
<y>100</y>
<width>640</width>
<height>480</height>
</rect>
</property>
<property name="autoFillBackground">
<bool>false</bool>
</property>
<property name="styleSheet">
<string notr="true">font: 10pt "宋体";
color:rgb(300,300,300,120);
background:#F5F5DC;
font-weight:bold;</string>
</property>
<property name="text">
<string/>
</property>
</widget>
<widget class="QLabel" name="label_pandian_video_channel_number_2">
<property name="geometry">
<rect>
<x>970</x>
<y>20</y>
<width>55</width>
<height>20</height>
</rect>
</property>
<property name="text">
<string>车牌号码</string>
</property>
</widget>
<widget class="QLabel" name="label_detect_picture">
<property name="geometry">
<rect>
<x>680</x>
<y>100</y>
<width>640</width>
<height>480</height>
</rect>
</property>
<property name="autoFillBackground">
<bool>false</bool>
</property>
<property name="styleSheet">
<string notr="true">font: 10pt "宋体";
color:rgb(300,300,300,120);
background:#F5F5DC;
font-weight:bold;</string>
</property>
<property name="text">
<string/>
</property>
</widget>
<widget class="QPushButton" name="pushButton">
<property name="geometry">
<rect>
<x>300</x>
<y>20</y>
<width>75</width>
<height>30</height>
</rect>
</property>
<property name="styleSheet">
<string notr="true">QPushButton
{text-align : center;
background-color : white;
font: bold;
border-color: gray;
border-width: 2px;
border-radius: 10px;
padding: 6px;
height : 14px;
border-style: outset;
font : 14px;}
QPushButton:pressed
{text-align : center;
background-color : light gray;
font: bold;
border-color: gray;
border-width: 2px;
border-radius: 10px;
padding: 6px;
height : 14px;
border-style: outset;
font : 14px;}</string>
</property>
<property name="text">
<string>选择图像</string>
</property>
</widget>
</widget>
<widget class="QWidget" name="action_page">
<attribute name="title">
<string>视频检测</string>
</attribute>
<widget class="QListWidget" name="listWidget_action">
<property name="geometry">
<rect>
<x>10</x>
<y>60</y>
<width>1440</width>
<height>660</height>
</rect>
</property>
</widget>
<widget class="QLabel" name="label_action_yuanshi_video">
<property name="geometry">
<rect>
<x>350</x>
<y>80</y>
<width>55</width>
<height>20</height>
</rect>
</property>
<property name="text">
<string>原始视频</string>
</property>
</widget>
<widget class="QLabel" name="label_action_video_channel_number">
<property name="geometry">
<rect>
<x>900</x>
<y>20</y>
<width>55</width>
<height>20</height>
</rect>
</property>
<property name="text">
<string>车牌号码</string>
</property>
</widget>
<widget class="QLabel" name="label_action_video">
<property name="geometry">
<rect>
<x>1000</x>
<y>80</y>
<width>55</width>
<height>20</height>
</rect>
</property>
<property name="text">
<string>检测视频</string>
</property>
</widget>
<widget class="QTextEdit" name="action_video_number">
<property name="geometry">
<rect>
<x>960</x>
<y>20</y>
<width>104</width>
<height>25</height>
</rect>
</property>
</widget>
<widget class="QTextEdit" name="textEdit_drink_number">
<property name="geometry">
<rect>
<x>1360</x>
<y>235</y>
<width>71</width>
<height>25</height>
</rect>
</property>
</widget>
<widget class="QLabel" name="label_action_drinking">
<property name="geometry">
<rect>
<x>1330</x>
<y>240</y>
<width>31</width>
<height>20</height>
</rect>
</property>
<property name="text">
<string>喝水</string>
</property>
</widget>
<widget class="QTextEdit" name="textEdit_eating_number">
<property name="geometry">
<rect>
<x>1360</x>
<y>285</y>
<width>71</width>
<height>25</height>
</rect>
</property>
</widget>
<widget class="QLabel" name="label_action_eating">
<property name="geometry">
<rect>
<x>1330</x>
<y>290</y>
<width>31</width>
<height>20</height>
</rect>
</property>
<property name="text">
<string>上槽</string>
</property>
</widget>
<widget class="QLabel" name="label_action_mounting">
<property name="geometry">
<rect>
<x>1330</x>
<y>380</y>
<width>31</width>
<height>20</height>
</rect>
</property>
<property name="text">
<string>爬跨</string>
</property>
</widget>
<widget class="QTextEdit" name="textEdit_lying_number">
<property name="geometry">
<rect>
<x>1360</x>
<y>325</y>
<width>71</width>
<height>25</height>
</rect>
</property>
</widget>
<widget class="QLabel" name="label_action_lying">
<property name="geometry">
<rect>
<x>1330</x>
<y>330</y>
<width>31</width>
<height>20</height>
</rect>
</property>
<property name="text">
<string>躺卧</string>
</property>
</widget>
<widget class="QTextEdit" name="textEdit_mounting_number">
<property name="geometry">
<rect>
<x>1360</x>
<y>375</y>
<width>71</width>
<height>25</height>
</rect>
</property>
</widget>
<widget class="QLabel" name="frame_ation_yuanshi_video">
<property name="geometry">
<rect>
<x>20</x>
<y>100</y>
<width>640</width>
<height>480</height>
</rect>
</property>
<property name="autoFillBackground">
<bool>false</bool>
</property>
<property name="styleSheet">
<string notr="true">font: 10pt "宋体";
color:rgb(300,300,300,120);
background:#F5F5DC;
font-weight:bold;</string>
</property>
<property name="text">
<string/>
</property>
</widget>
<widget class="QLabel" name="label_detect_video">
<property name="geometry">
<rect>
<x>680</x>
<y>100</y>
<width>640</width>
<height>480</height>
</rect>
</property>
<property name="autoFillBackground">
<bool>false</bool>
</property>
<property name="styleSheet">
<string notr="true">font: 10pt "宋体";
color:rgb(300,300,300,120);
background:#F5F5DC;
font-weight:bold;</string>
</property>
<property name="text">
<string/>
</property>
</widget>
<widget class="QPushButton" name="pushButton_2">
<property name="geometry">
<rect>
<x>260</x>
<y>20</y>
<width>75</width>
<height>23</height>
</rect>
</property>
<property name="text">
<string>选择视频</string>
</property>
</widget>
</widget>
</widget>
</widget>
<widget class="QStatusBar" name="statusbar"/>
</widget>
<resources/>
<connections/>
</ui>
2)修改检测函数,将lprnet车牌识别模型融合到yolov5检测代码中,实现端对端车牌检测识别功能。
在yolov5检测函数的基础上进行修改,增加识别车牌的功能
import argparse
import sys
from pathlib import Path

import cv2
import numpy as np
import torch
import random
import torch.backends.cudnn as cudnn

FILE = Path(__file__).resolve()
#ROOT = FILE.parents[0]  # YOLOv5 root directory
#if str(ROOT) not in sys.path:
##    sys.path.append(str(ROOT))  # add ROOT to PATH
#ROOT = ROOT.relative_to(Path.cwd())  # relative

from models.experimental import attempt_load
from utils.dataloaders import LoadImages, LoadStreams
from utils.general import lpr_apply_classifier, check_img_size, check_imshow, check_requirements, check_suffix, colorstr, \
    increment_path, non_max_suppression, print_args,  scale_coords, set_logging, \
    strip_optimizer, xyxy2xywh

from utils.plots import Annotator, colors,plot_one_box
from utils.torch_utils import  select_device, time_sync
from utils.augmentations import letterbox

from LPRNet.model.LPRNet import *

class v5detect:
    def __init__(self):
        self.model, self.modelc,self.stride, self.pt, self.dt, self.seen, self.names, self.device = self.myloadModelInitialize()

    def detect(self,img):
        #img为数组形式
        return self.run(img, self.model,self.modelc, self.stride, self.pt, self.dt, self.seen, self.names, self.device)

    @torch.no_grad()
    def myloadModelInitialize(self):
        half = False
        weights =  'BIT_car_plate/exp/weights/best.pt'
        rec_weight  = 'LPRNet/runs/lprnet_best.pth'
        imgsz = [640, 640]
        # Initialize
        set_logging()
        device = select_device(' ')
        model = attempt_load(weights, device=device)  # load FP32 model

        modelc = LPRNet(lpr_max_len=8, phase=False, class_num=len(CHARS), dropout_rate=0).to(device)
        modelc.load_state_dict(torch.load(rec_weight, map_location=torch.device('cpu')))
        print("load rec pretrained model successful!")
        modelc.to(device).eval()

        half &= device.type != 'cpu'  # half precision only supported on CUDA

        # Load model
        w = weights[0] if isinstance(weights, list) else weights
        classify, suffix, suffixes = False, Path(w).suffix.lower(), ['.pt', '.onnx', '.tflite', '.pb', '']
        check_suffix(w, suffixes)  # check weights have acceptable suffix
        pt, onnx, tflite, pb, saved_model = (suffix == x for x in suffixes)  # backend booleans
        stride, names = 64, [f'class{i}' for i in range(1000)]  # assign defaults
        if pt:
            stride = int(model.stride.max())  # model stride
            names = model.module.names if hasattr(model, 'module') else model.names  # get class names

        imgsz = check_img_size(imgsz, s=stride)  # check image size

        # Dataloader

        # Run inference
        if pt and device.type != 'cpu':
            model(torch.zeros(1, 3, *imgsz).to(device).type_as(next(model.parameters())))  # run once
        dt, seen = [0.0, 0.0, 0.0], 0
        # for path, img, im0s, vid_cap in dataset:
        return model,modelc, stride, pt, dt, seen, names, device

    def myLoadImages(self,img0, img_size, stride, auto):
        '''

        :param img: np数组形式的图像
        :return: 填充后的图像
        '''
        # print("myLoadImages")
        img = letterbox(img0, img_size, stride, auto)[0]

        # Convert
        img = img.transpose((2, 0, 1))[::-1]  # HWC to CHW, BGR to RGB
        img = np.ascontiguousarray(img)
        return img

    @torch.no_grad()
    def run(self,im0s, model,modelc, stride, pt, dt, seen, names, device,
            imgsz=[640,640],  # inference size (pixels)
            conf_thres=0.25,  # confidence threshold
            iou_thres=0.45,  # NMS IOU threshold
            max_det=1000,  # maximum detections per image

            view_img=True,  # show results
            save_img=True,  # save cropped prediction boxes
            classes=None,  # filter by class: --class 0, or --class 0 2 3
            agnostic_nms=False,  # class-agnostic NMS
            augment=False,  # augmented inference
            line_thickness=3,  # bounding box thickness (pixels)
            hide_labels=False,  # hide labels
            hide_conf=False,  # hide confidences
            half=False,  # use FP16 half-precision inference
            ):

        '''上面代码运行一次即可,下面代码直接替换im0s变量,可以检测不同文件'''
        img = self.myLoadImages(im0s, imgsz, stride, pt)
        t1 = time_sync()

        qt_colors = [[random.randint(0, 255) for _ in range(3)] for _ in range(len(names))]

        img = torch.from_numpy(img).to(device)
        img = img.half() if half else img.float()  # uint8 to fp16/32
        img = img / 255.0  # 0 - 255 to 0.0 - 1.0
        if len(img.shape) == 3:
            img = img[None]  # expand for batch dim
        t2 = time_sync()
        dt[0] += t2 - t1

        # Inference
        if pt:
            visualize = False
            pred = model(img, augment=augment, visualize=visualize)[0]

        else :
            return -1

        t3 = time_sync()
        dt[1] += t3 - t2

        # NMS
        pred = non_max_suppression(pred, conf_thres, iou_thres, 6, agnostic_nms, max_det=max_det)

        pred, plat_num = lpr_apply_classifier(pred, modelc, img, im0s)
        dt[2] += time_sync() - t3
        line = None
        # Process predictions
        myRes = []

        for i, det in enumerate(pred):  # per image
            seen += 1

            s, im0 =  '', im0s.copy()

            s += '%gx%g ' % img.shape[2:]  # print string

            #annotator = Annotator(im0, line_width=line_thickness, example=str(names))
            if len(det):
                # Rescale boxes from img_size to im0 size
                det[:, :4] = scale_coords(img.shape[2:], det[:, :4], im0.shape).round()

                # Print results
                for c in det[:, -1].unique():
                    n = (det[:, -1] == c).sum()  # detections per class
                    s += f"{n} {names[int(c)]}{'s' * (n > 1)}, "  # add to string


                for de, lic_plat in zip(det, plat_num):
                    # xyxy,conf,cls,lic_plat=de[:4],de[4],de[5],de[6:]
                    *xyxy, conf, cls=de
                    xywh = (xyxy2xywh(torch.tensor(xyxy).view(1, 4)) ).view(-1).tolist()  #  xywh
                    #line = (int(cls), *xywh, float(conf))   # label format
                    #myRes.append(line)


                    if save_img or view_img:  # Add bbox to image
                        # label = '%s %.2f' % (names[int(cls)], conf)
                        lb = ""
                        for a,i in enumerate(lic_plat):
                            # if a ==0:
                            #     continue
                            lb += CHARS[int(i)]
                        #label = '%s %.2f' % (lb, conf)
                        c = int(cls)  # integer class

                        label = None if hide_labels else (lb if hide_conf else f'{lb} {conf:.2f}')
                        myRes.append(label)

                        im0 = plot_one_box(xyxy, im0, label=label, color=colors(c, True), line_thickness=3)


        # Print results
        t = tuple(x / seen * 1E3 for x in dt)  # speeds per image

        return myRes, im0
主要改动 为在 yolov5检测函数的基础上增加分类识别功能
        modelc = LPRNet(lpr_max_len=8, phase=False, class_num=len(CHARS), dropout_rate=0).to(device)
        modelc.load_state_dict(torch.load(rec_weight, map_location=torch.device('cpu')))
        print("load rec pretrained model successful!")
        modelc.to(device).eval()
pred, plat_num = lpr_apply_classifier(pred, modelc, img, im0s)
因为需要进行界面调用,所以最终将检测识别的车牌进行了返回
return myRes, im0
3)结果检测

备注:这篇博文中涉及到的模型都是前面博文中训练来的。
完整的代码见

 4172


 扫一扫


 被折叠的 条评论
为什么被折叠?
 到【灌水乐园】发言


