


springmvc入门
什么是mvc: m模型 v用户看的视图 c 控制器
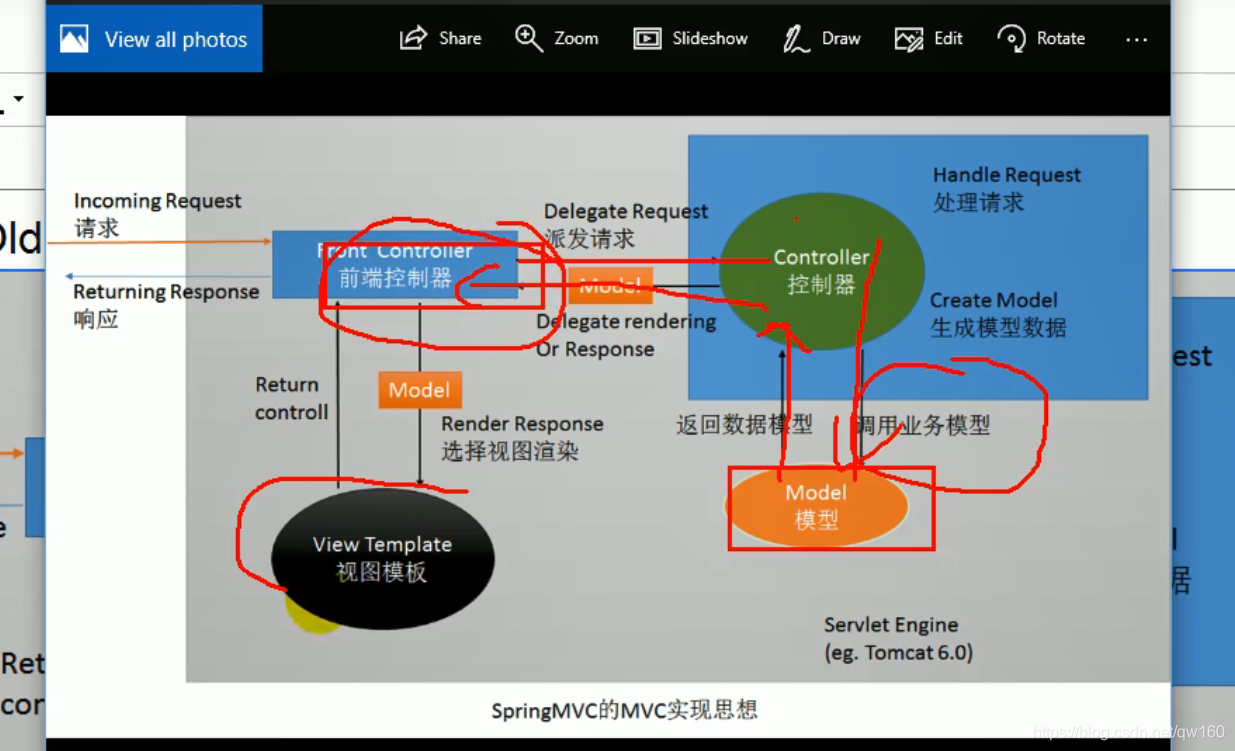
springmvc干什么:这个入门例子是使index.jsp的url=hello请求(点击helloworld跳转success.jsp页面)在一个普通的java class中相应而不是专门的servlet
具体步骤参见https://www.bilibili.com/video/BV1d4411g7tv?p=123
插播1. @controller等@注释如果报错鼠标轻触红色波浪线点import.**.导包 999 2.alt+/ alt+1
一个错误解决:正常写完代在tomcat运行index.jsp点击hellowworld报错404找不到资源,原因是在eclipse右下角好像在读条下载,重启eclipse解决。。。
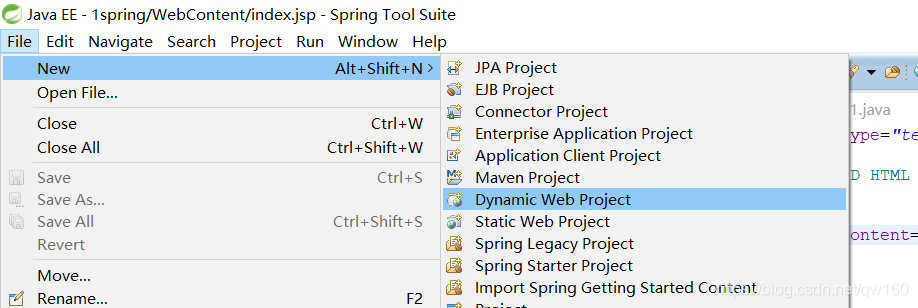
第一步:由于用spring专用eclipse,调整到javaee视图
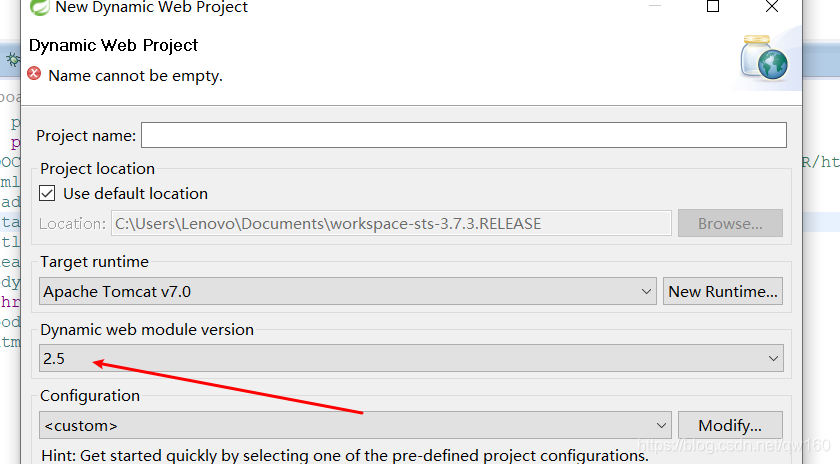
第二步:新建项目
写代码
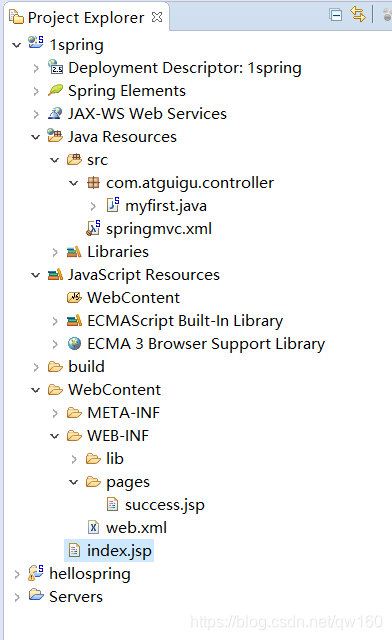
整体结构
web.xml 声明一个前端控制器controller
<?xml version="1.0" encoding="UTF-8"?>
<web-app xmlns:xsi="http://www.w3.org/2001/XMLSchema-instance" xmlns="http://java.sun.com/xml/ns/javaee" xsi:schemaLocation="http://java.sun.com/xml/ns/javaee http://java.sun.com/xml/ns/javaee/web-app_2_5.xsd" id="WebApp_ID" version="2.5">
  <display-name>1spring</display-name>
  <welcome-file-list>
    <welcome-file>index.html</welcome-file>
    <welcome-file>index.htm</welcome-file>
    <welcome-file>index.jsp</welcome-file>
    <welcome-file>default.html</welcome-file>
    <welcome-file>default.htm</welcome-file>
    <welcome-file>default.jsp</welcome-file>
  </welcome-file-list>

  <!-- The front controller of this Spring Web application, responsible for handling all application requests -->
	<servlet>
		<servlet-name>springDispatcherServlet</servlet-name>
		<servlet-class>org.springframework.web.servlet.DispatcherServlet</servlet-class>
		<init-param>
			<param-name>contextConfigLocation</param-name>
			<param-value>classpath:springmvc.xml</param-value>
		</init-param>
		<load-on-startup>1</load-on-startup>
	</servlet>

	<!-- Map all requests to the DispatcherServlet for handling -->
	<servlet-mapping>
		<servlet-name>springDispatcherServlet</servlet-name>
		<!-- / 拦截所有请求,除了jsp页面 -->
		<url-pattern>/</url-pattern>
	</servlet-mapping>
</web-app>
spring配置和普通spring一样
<?xml version="1.0" encoding="UTF-8"?>
<beans xmlns="http://www.springframework.org/schema/beans"
	xmlns:xsi="http://www.w3.org/2001/XMLSchema-instance"
	xmlns:context="http://www.springframework.org/schema/context"
	xsi:schemaLocation="http://www.springframework.org/schema/beans http://www.springframework.org/schema/beans/spring-beans.xsd
		http://www.springframework.org/schema/context http://www.springframework.org/schema/context/spring-context-4.0.xsd">

<context:component-scan base-package="com.atguigu"></context:component-scan>
</beans>
这个入门例子是使index.jsp的url=hello请求(点击helloworld跳转success.jsp页面)在一个普通的java class中相应而不是专门的servlet
index.jsp
<%@ page language="java" contentType="text/html; charset=UTF-8"
    pageEncoding="UTF-8"%>
<!DOCTYPE html PUBLIC "-//W3C//DTD HTML 4.01 Transitional//EN" "http://www.w3.org/TR/html4/loose.dtd">
<html>
<head>
<meta http-equiv="Content-Type" content="text/html; charset=UTF-8">
<title>Insert title here</title>
</head>
<body>
<a href="hello"> helloworld</a>
</body>
</html>
success.jsp
<%@ page language="java" contentType="text/html; charset=UTF-8"
    pageEncoding="UTF-8"%>
<!DOCTYPE html PUBLIC "-//W3C//DTD HTML 4.01 Transitional//EN" "http://www.w3.org/TR/html4/loose.dtd">
<html>
<head>
<meta http-equiv="Content-Type" content="text/html; charset=UTF-8">
<title>Insert title here</title>
</head>
<body>
<h3>成功!!</h3>
</body>
</html>
一个普通的javaclass
package com.atguigu.controller;

import org.springframework.stereotype.Controller;
import org.springframework.web.bind.annotation.RequestMapping;
//表示控制器
@Controller
public class myfirst {

	//处理当前项目的hello请求
	@RequestMapping("/hello")
	public String myfirstrequest()
	{
		System.out.print("收到请求,正在处理。。。");
		return "/WEB-INF/pages/success.jsp";
	}
}


 1172
1172

 被折叠的 条评论
为什么被折叠?
被折叠的 条评论
为什么被折叠?
 到【灌水乐园】发言


