


 该博客介绍了如何在Android应用中实现顶部和底部导航栏布局,并通过Java代码展示了如何管理四个Fragment,分别为微信、朋友、联系人和设置。点击不同导航栏项时,会显示对应的Fragment内容。
一,界面布局
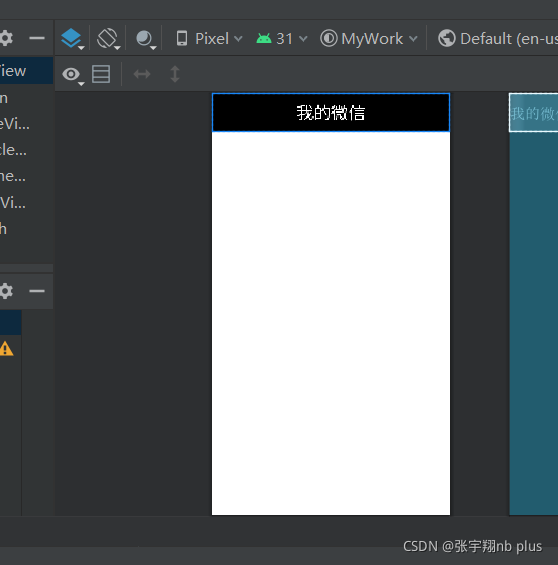
1.top
<?xml version="1.0" encoding="utf-8"?>
<LinearLayout xmlns:android="http://schemas.android.com/apk/res/android"
    android:layout_width="match_parent"
    android:layout_height="65dp"
    android:layout_gravity="top"
    android:background="@color/black">

    <TextView
        android:id="@+id/textView6"
        android:layout_width="0dp"
        android:layout_height="65dp"
        android:layout_weight="1"
        android:gravity="center"
        android:textColor="@color/design_default_color_background"
        android:text="我的微信"
        android:textSize="30sp" />
</LinearLayout>
2.bottom
<?xml version="1.0" encoding="utf-8"?>
<LinearLayout xmlns:android="http://schemas.android.com/apk/res/android"
    xmlns:app="http://schemas.android.com/apk/res-auto"
    xmlns:tools="http://schemas.android.com/tools"
    android:id="@+id/bottom"
    android:layout_width="match_parent"
    android:layout_height="80dp"
    android:layout_gravity="bottom"
    android:baselineAligned="true"
    android:orientation="horizontal">

    <LinearLayout
        android:id="@+id/wechat"
        android:layout_width="match_parent"
        android:layout_height="match_parent"
        android:layout_weight="1"
        android:gravity="center"
        android:orientation="vertical"
        tools:ignore="InvalidId">

        <ImageButton
            android:id="@+id/wechat_img"
            android:layout_width="match_parent"
            android:layout_height="wrap_content"
            android:layout_weight="1"
            app:srcCompat="@android:drawable/sym_action_chat"
            tools:ignore="SpeakableTextPresentCheck" />

        <TextView
            android:id="@+id/textView2"
            android:layout_width="match_parent"
            android:layout_height="wrap_content"
            android:gravity="center_horizontal"
            android:text="@string/wechat" />
    </LinearLayout>

    <LinearLayout
        android:id="@+id/friend"
        android:layout_width="match_parent"
        android:layout_height="match_parent"
        android:layout_weight="1"
        android:gravity="center"
        android:orientation="vertical"
        tools:ignore="InvalidId">

        <ImageButton
            android:id="@+id/friend_img"
            android:layout_width="match_parent"
            android:layout_height="wrap_content"
            android:layout_weight="1"
            app:srcCompat="@android:drawable/sym_action_chat"
            tools:ignore="SpeakableTextPresentCheck" />

        <TextView
            android:id="@+id/textView3"
            android:layout_width="match_parent"
            android:layout_height="wrap_content"
            android:layout_gravity="bottom"
            android:gravity="center_horizontal"
            android:text="@string/friend" />
    </LinearLayout>

    <LinearLayout
        android:id="@+id/contact"
        android:layout_width="match_parent"
        android:layout_height="match_parent"
        android:layout_weight="1"
        android:gravity="center"
        android:orientation="vertical"
        tools:ignore="InvalidId">

        <ImageButton
            android:id="@+id/contact_img"
            android:layout_width="match_parent"
            android:layout_height="wrap_content"
            android:layout_weight="1"
            app:srcCompat="@android:drawable/sym_action_chat"
            tools:ignore="SpeakableTextPresentCheck" />

        <TextView
            android:id="@+id/textView4"
            android:layout_width="match_parent"
            android:layout_height="wrap_content"
            android:gravity="center_horizontal"
            android:text="@string/contact" />
    </LinearLayout>

    <LinearLayout
        android:id="@+id/config"
        android:layout_width="match_parent"
        android:layout_height="match_parent"
        android:layout_weight="1"
        android:gravity="center"
        android:orientation="vertical">

        <ImageButton
            android:id="@+id/config_img"
            android:layout_width="match_parent"
            android:layout_height="wrap_content"
            android:layout_weight="1"
            app:srcCompat="@android:drawable/sym_action_chat"
            tools:ignore="SpeakableTextPresentCheck" />

        <TextView
            android:id="@+id/textView5"
            android:layout_width="match_parent"
            android:layout_height="wrap_content"
            android:gravity="center_horizontal"
            android:text="@string/config" />
    </LinearLayout>
</LinearLayout>
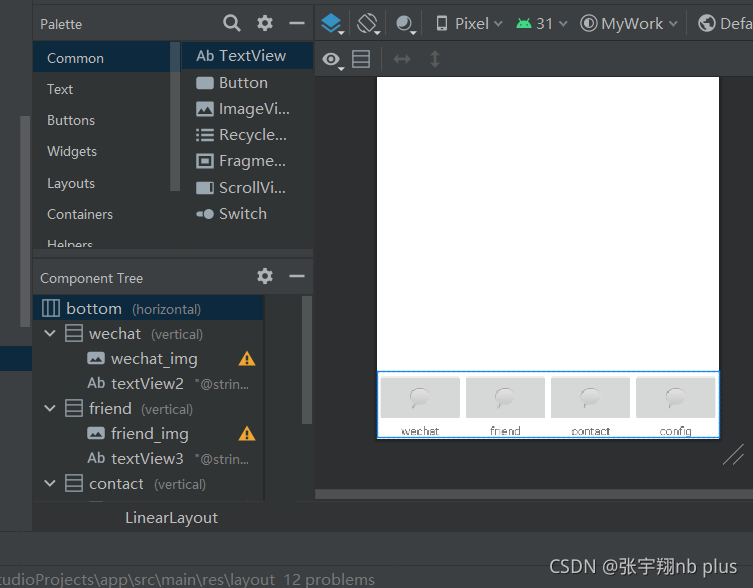
3.中间部分创建四个fragment
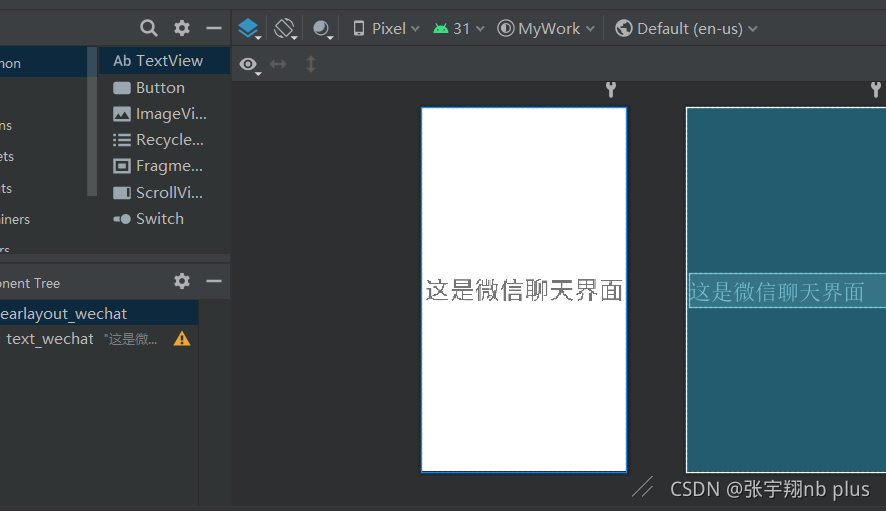
以其中一个wechat为例:
<?xml version="1.0" encoding="utf-8"?>
<FrameLayout xmlns:android="http://schemas.android.com/apk/res/android"
    xmlns:tools="http://schemas.android.com/tools"
    android:layout_width="match_parent"
    android:layout_height="match_parent"
    android:id="@+id/linearlayout_wechat"
    tools:context=".wechat">


    <TextView
        android:id="@+id/text_wechat"
        android:layout_width="wrap_content"
        android:layout_height="wrap_content"
        android:layout_gravity="center"
        android:text="这是微信聊天界面"
        android:textSize="50sp" />
</FrameLayout>
二,java文件
MainActivity
package com.example.mywork;

import android.graphics.Color;
import android.os.Bundle;
import android.view.View;
import android.view.Window;
import android.widget.ImageButton;
import android.widget.ImageView;
import android.widget.LinearLayout;
import android.widget.NumberPicker;
import android.widget.TextView;

import androidx.appcompat.app.AppCompatActivity;
import androidx.fragment.app.Fragment;
import androidx.fragment.app.FragmentManager;
import androidx.fragment.app.FragmentTransaction;

public class MainActivity extends AppCompatActivity  {
    private final Fragment wechat=new wechat();
    private final Fragment friend=new friend();
    private final Fragment contact=new contact();
    private final Fragment config=new config();
    private FragmentManager fm;
    private LinearLayout linearLayout1,linearLayout2,linearLayout3,linearLayout4;
    private TextView text_wechat,text_friend,text_contact,text_config;

    public MainActivity() {
    }

    @Override
    protected void onCreate(Bundle savedInstanceState) {
        super.onCreate(savedInstanceState);
        supportRequestWindowFeature(Window.FEATURE_NO_TITLE);
        setContentView(R.layout.activity_main);
        linearLayout1 = findViewById(R.id.wechat);
        linearLayout2 = findViewById(R.id.friend);
        linearLayout3 = findViewById(R.id.contact);
        linearLayout4 = findViewById(R.id.config);
        linearLayout1.setOnClickListener(this::onClick);
        linearLayout2.setOnClickListener(this::onClick);
        linearLayout3.setOnClickListener(this::onClick);
        linearLayout4.setOnClickListener(this::onClick);
        initFragment();
        showfragment(0);

    }
    private void initFragment(){
        fm=getSupportFragmentManager();
        FragmentTransaction transaction=fm.beginTransaction();
        transaction.add(R.id.content,wechat);
        transaction.add(R.id.content,friend);
        transaction.add(R.id.content,contact);
        transaction.add(R.id.content,config);
        transaction.commit();
    }
    private void hideFragment(FragmentTransaction transaction){
        transaction.hide(wechat);
        transaction.hide(friend);
        transaction.hide(contact);
        transaction.hide(config);
    }
    public void onClick(View v){
        switch (v.getId()){
            case R.id.wechat:
                showfragment(0);
                break;
            case R.id.friend:
                showfragment(1);

                break;
            case R.id.contact:
                showfragment(2);

                break;
            case R.id.config:
                showfragment(3);

                break;
        }
    }
    private void showfragment(int i){//加图标颜色切换
        FragmentTransaction transaction= fm.beginTransaction();
        hideFragment(transaction);

        switch (i){
            case 0:
                transaction.show(wechat);
                break;
            case 1:
                transaction.show(friend);
                break;
            case 2:
                transaction.show(contact);
                break;
            case 3:
                transaction.show(config);
                break;
            default:
                break;
        }
        transaction.commit();
    }
}
package com.example.mywork;

import android.os.Bundle;

import androidx.fragment.app.Fragment;

import android.view.View;
import android.view.LayoutInflater;
import android.view.ViewGroup;

public class wechat extends Fragment {

    @Override
    public View onCreateView(LayoutInflater inflater, ViewGroup container,
                             Bundle savedInstanceState) {
        // Inflate the layout for this fragment
        return inflater.inflate(R.layout.fragment_wechat, container, false);
    }

}
三,最终界面

四,其余完整代码
我的gitee仓库:完整代码


 1万+
1万+

 被折叠的 条评论
为什么被折叠?
被折叠的 条评论
为什么被折叠?
 到【灌水乐园】发言


