


服务器治理
Spring Cloud 封装了 Netflix 公司开发的 Eureka 模块来实现服务治理
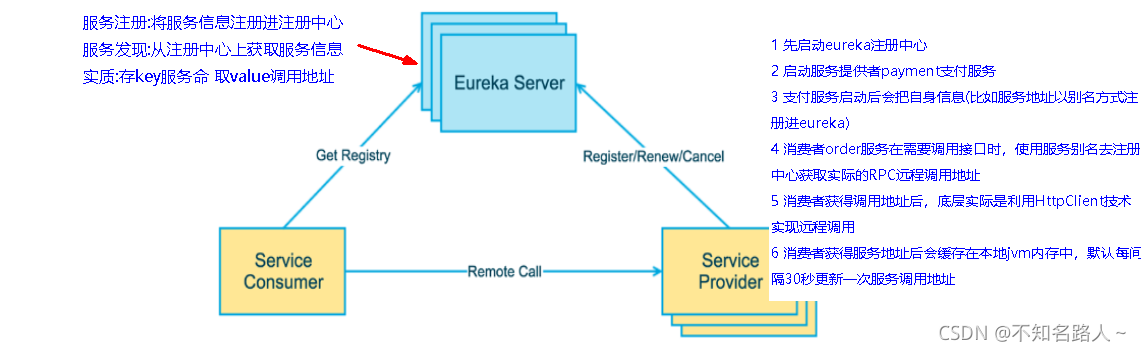
在传统的rpc远程调用框架中,管理每个服务与服务之间依赖关系比较复杂,管理比较复杂,所以需要使用服务治理,管理服务于服务之间依赖关系,可以实现服务调用、负载均衡、容错等,实现服务发现与注册。
服务注册与发现
Eureka采用了CS的设计架构,Eureka Server 作为服务注册功能的服务器,它是服务注册中心。而系统中的其他微服务,使用 Eureka的客户端连接到 Eureka Server并维持心跳连接。这样系统的维护人员就可以通过 Eureka Server 来监控系统中各个微服务是否正常运行。
在服务注册与发现中,有一个注册中心。当服务器启动的时候,会把当前自己服务器的信息 比如 服务地址通讯地址等以别名方式注册到注册中心上。另一方(消费者|服务提供者),以该别名的方式去注册中心上获取到实际的服务通讯地址,然后再实现本地RPC调用RPC远程调用框架核心设计思想:在于注册中心,因为使用注册中心管理每个服务与服务之间的一个依赖关系(服务治理概念)。在任何rpc远程框架中,都会有一个注册中心(存放服务地址相关信息(接口地址))
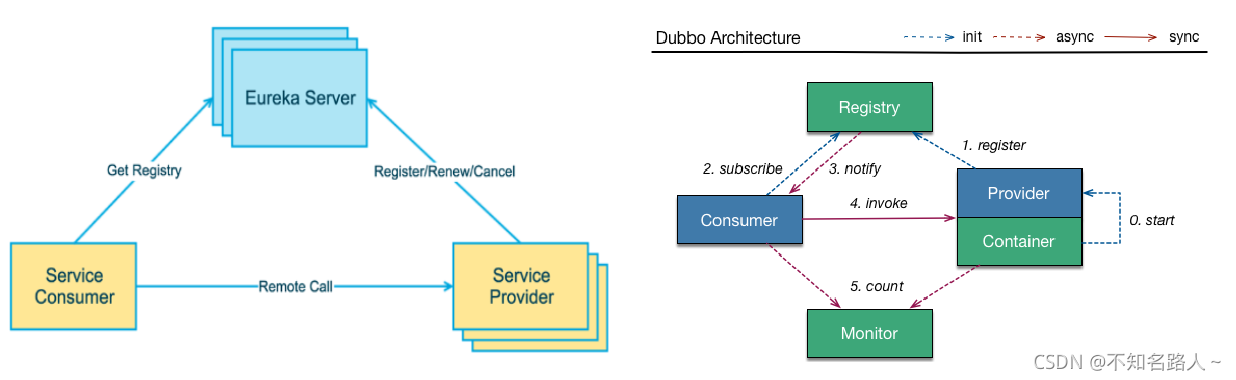
左图是Eureka系统架构,右图是Dubbo的架构
Eureka包含两个组件
Eureka Server和Eureka Client
Eureka Server提供服务注册服务
各个微服务节点通过配置启动后,会在EurekaServer中进行注册,这样EurekaServer中的服务注册表中将会存储所有可用服务节点的信息,服务节点的信息可以在界面中直观看到。
Eureka Client通过注册中心进行访问
是一个Java客户端,用于简化Eureka Server的交互,客户端同时也具备一个内置的、使用轮询(round-robin)负载算法的负载均衡器。在应用启动后,将会向Eureka Server发送心跳(默认周期为30秒)。如果Eureka Server在多个心跳周期内没有接收到某个节点的心跳,EurekaServer将会从服务注册表中把这个服务节点移除(默认90秒)
Eureka Server
cloud-eureka-server7001
Eureka服务端jar
<dependencies>
        <!--eureka-server-->
        <dependency>
            <groupId>org.springframework.cloud</groupId>
            <artifactId>spring-cloud-starter-netflix-eureka-server</artifactId>
        </dependency>

        <!--boot web actuator-->
        <dependency>
            <groupId>org.springframework.boot</groupId>
            <artifactId>spring-boot-starter-web</artifactId>
        </dependency>
        <dependency>
            <groupId>org.springframework.boot</groupId>
            <artifactId>spring-boot-starter-actuator</artifactId>
        </dependency>
        <!--一般通用配置-->
        <dependency>
            <groupId>org.springframework.boot</groupId>
            <artifactId>spring-boot-devtools</artifactId>
            <scope>runtime</scope>
            <optional>true</optional>
        </dependency>
        <dependency>
            <groupId>org.projectlombok</groupId>
            <artifactId>lombok</artifactId>
        </dependency>
        <dependency>
            <groupId>org.springframework.boot</groupId>
            <artifactId>spring-boot-starter-test</artifactId>
            <scope>test</scope>
        </dependency>
        <dependency>
            <groupId>junit</groupId>
            <artifactId>junit</artifactId>
        </dependency>
    </dependencies>
application.yml中的配置

server:
  port: 7001

eureka:
  instance:
    hostname: localhost #eureka服务端的实例名称
  client:
    #false表示不向注册中心注册自己。
    register-with-eureka: false
    #false表示自己端就是注册中心,我的职责就是维护服务实例,并不需要去检索服务
    fetch-registry: false
    service-url:
    #设置与Eureka Server交互的地址查询服务和注册服务都需要依赖这个地址。
      defaultZone: http://${eureka.instance.hostname}:${server.port}/eureka/
//主启动类
@SpringBootApplication
@EnableEurekaServer //开启Eureka服务端
public class EurekaMain7001
{
public static void main(String[] args)
{
SpringApplication.run(EurekaMain7001.class,args);
}
}在浏览器中访问地址http://localhost:7001/可以看到一下界面
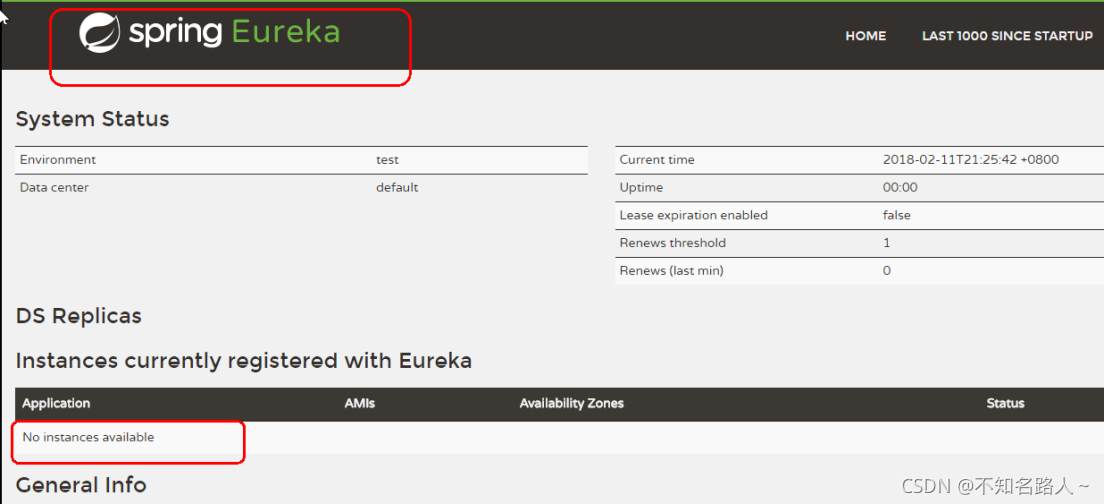
No application available 没有服务被发现,因为没有注册服务进来所以没有服务被发现。
Eureka Client
cloud-provider8001
将注册进EurekaServer成为服务提供者provider。类似于写字楼中的公司对外提供服务。
<dependencies>
        <!--eureka-client-->
        <dependency>
            <groupId>org.springframework.cloud</groupId>
            <artifactId>spring-cloud-starter-netflix-eureka-client</artifactId>
        </dependency>

        <dependency>
            <groupId>org.springframework.boot</groupId>
            <artifactId>spring-boot-starter-web</artifactId>
        </dependency>
        <dependency>
            <groupId>org.springframework.boot</groupId>
            <artifactId>spring-boot-starter-actuator</artifactId>
        </dependency>
        <dependency>
            <groupId>org.mybatis.spring.boot</groupId>
            <artifactId>mybatis-spring-boot-starter</artifactId>
        </dependency>
        <dependency>
            <groupId>com.alibaba</groupId>
            <artifactId>druid-spring-boot-starter</artifactId>
            <version>1.1.10</version>
        </dependency>
        <!--mysql-connector-java-->
        <dependency>
            <groupId>mysql</groupId>
            <artifactId>mysql-connector-java</artifactId>
        </dependency>
        <!--jdbc-->
        <dependency>
            <groupId>org.springframework.boot</groupId>
            <artifactId>spring-boot-starter-jdbc</artifactId>
        </dependency>
        <dependency>
            <groupId>org.springframework.boot</groupId>
            <artifactId>spring-boot-devtools</artifactId>
            <scope>runtime</scope>
            <optional>true</optional>
        </dependency>
        <dependency>
            <groupId>org.projectlombok</groupId>
            <artifactId>lombok</artifactId>
            <optional>true</optional>
        </dependency>
        <dependency>
            <groupId>org.springframework.boot</groupId>
            <artifactId>spring-boot-starter-test</artifactId>
            <scope>test</scope>
        </dependency>
    </dependencies>
application.yml中
server:
port: 8001
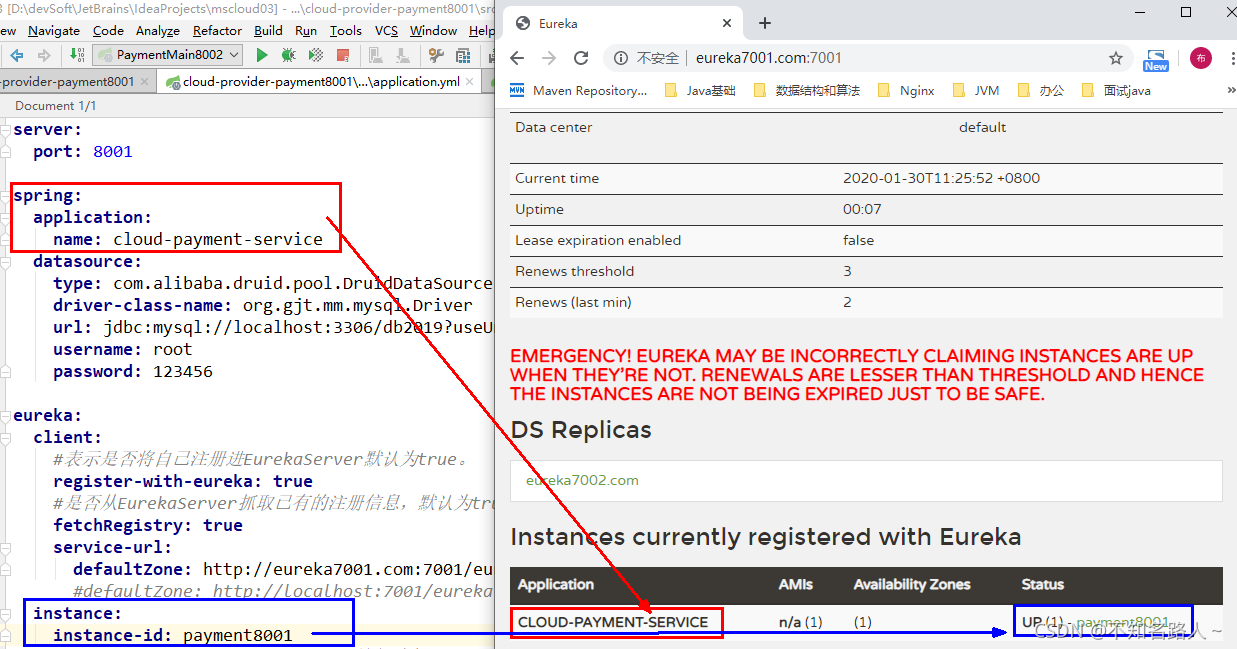
spring:
application:
name: cloud-payment-service
datasource:
type: com.alibaba.druid.pool.DruidDataSource # 当前数据源操作类型
driver-class-name: org.gjt.mm.mysql.Driver # mysql驱动包
url: jdbc:mysql://localhost:3306/db2019?useUnicode=true&characterEncoding=utf-8&useSSL=false
username: root
password: 123456
eureka:
client:
#表示是否将自己注册进EurekaServer默认为true。
register-with-eureka: true
#是否从EurekaServer抓取已有的注册信息,默认为true。单节点无所谓,集群必须设置为true才能配合ribbon使用负载均衡
fetchRegistry: true
service-url:
defaultZone: http://localhost:7001/eureka
mybatis:
mapperLocations: classpath:mapper/*.xml
type-aliases-package: com.atguigu.springcloud.entities # 所有Entity别名类所在包
//cloud-provider8001主启动类

@SpringBootApplication
@EnableEurekaClient
public class PaymentMain8001
{
    public static void main(String[] args)
    {
        SpringApplication.run(PaymentMain8001.class,args);
    }
}
EurekaClient端cloud-provider-payment8001
将注册进EurekaServer成为服务提供者provider,类似公司对外的服务
cloud-consumer-order80
<dependencies>
        <!--eureka-client-->
        <dependency>
            <groupId>org.springframework.cloud</groupId>
            <artifactId>spring-cloud-starter-netflix-eureka-client</artifactId>
        </dependency>

        <dependency>
            <groupId>org.springframework.boot</groupId>
            <artifactId>spring-boot-starter-web</artifactId>
        </dependency>
        <dependency>
            <groupId>org.springframework.boot</groupId>
            <artifactId>spring-boot-starter-actuator</artifactId>
        </dependency>
        <dependency>
            <groupId>org.mybatis.spring.boot</groupId>
            <artifactId>mybatis-spring-boot-starter</artifactId>
        </dependency>
        <dependency>
            <groupId>com.alibaba</groupId>
            <artifactId>druid-spring-boot-starter</artifactId>
            <version>1.1.10</version>
        </dependency>
        <!--mysql-connector-java-->
        <dependency>
            <groupId>mysql</groupId>
            <artifactId>mysql-connector-java</artifactId>
        </dependency>
        <!--jdbc-->
        <dependency>
            <groupId>org.springframework.boot</groupId>
            <artifactId>spring-boot-starter-jdbc</artifactId>
        </dependency>
        <dependency>
            <groupId>org.springframework.boot</groupId>
            <artifactId>spring-boot-devtools</artifactId>
            <scope>runtime</scope>
            <optional>true</optional>
        </dependency>
        <dependency>
            <groupId>org.projectlombok</groupId>
            <artifactId>lombok</artifactId>
            <optional>true</optional>
        </dependency>
        <dependency>
            <groupId>org.springframework.boot</groupId>
            <artifactId>spring-boot-starter-test</artifactId>
            <scope>test</scope>
        </dependency>
    </dependencies>
server:
  port: 80

spring:
    application:
        name: cloud-order-service

eureka:
  client:
    #表示是否将自己注册进EurekaServer默认为true。
    register-with-eureka: true
    #是否从EurekaServer抓取已有的注册信息,默认为true。单节点无所谓,集群必须设置为true才能配合ribbon使用负载均衡
    fetchRegistry: true
    service-url:
      defaultZone: http://localhost:7001/eureka
//主启动类

@SpringBootApplication
@EnableEurekaClient
public class OrderMain80
{
    public static void main(String[] args)
    {
        SpringApplication.run(OrderMain80.class,args);
    }
}
先要启动EurekaServer,7001服务,再要启动服务提供者provider,8001服务
EurekaServer集群环境构建步骤
微服务RPC远程服务调用最核心的是
高可用,试想你的注册中心只有一个only one, 它出故gg了,会导致整个为服务环境不可用,所以
解决办法:搭建Eureka注册中心集群 ,实现负载均衡+故障容错
主要是defaultZone的改变
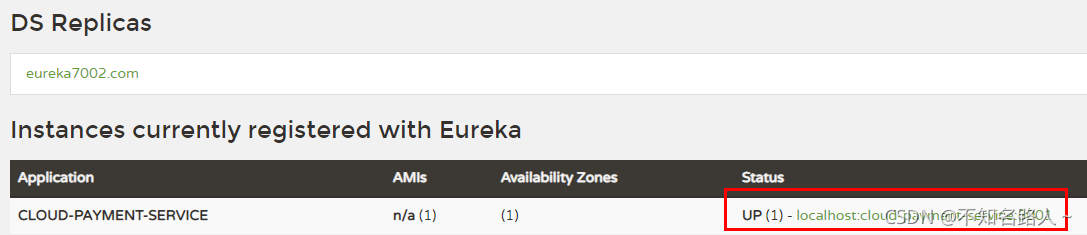
参考cloud-eureka-server7001,新建cloud-eureka-server7002
7001的yml
其中eureka7002.com是修改了本地的hosts文件添加上
127.0.0.1 eureka7001.com
127.0.0.1 eureka700.com
server:
  port: 7001


eureka:
  instance:
    hostname: eureka7001.com #eureka服务端的实例名称
  client:
    register-with-eureka: false     #false表示不向注册中心注册自己。
    fetch-registry: false     #false表示自己端就是注册中心,我的职责就是维护服务实例,并不需要去检索服务
    service-url:
      defaultZone: http://eureka7002.com:7002/eureka/
7001的yml
server:
  port: 7002


eureka:
  instance:
    hostname: eureka7002.com #eureka服务端的实例名称
  client:
    register-with-eureka: false     #false表示不向注册中心注册自己。
    fetch-registry: false     #false表示自己端就是注册中心,我的职责就是维护服务实例,并不需要去检索服务
    service-url:
      defaultZone: http://eureka7001.com:7001/eureka/
7001和7002相互守望
将80端口部署到Eureka中
server:
  port: 80

spring:
    application:
        name: cloud-order-service

eureka:
  client:
    #表示是否将自己注册进EurekaServer默认为true。
    register-with-eureka: true
    #是否从EurekaServer抓取已有的注册信息,默认为true。单节点无所谓,集群必须设置为true才能配合ribbon使用负载均衡
    fetchRegistry: true
    service-url:
      #defaultZone: http://localhost:7001/eureka
      defaultZone: http://eureka7001.com:7001/eureka,http://eureka7002.com:7002/eureka  # 集群版
将8001 8002端口部署到Eureka集群中
defaultZone: http://eureka7001.com:7001/eureka,http://eureka7002.com:7002/eureka # 集群版支付服务提供者8001集群环境构建
参考cloud-provider-payment8001,新建cloud-provider-payment8002
使用同一个服务名称
spring:
application:
name: cloud-payment-service
8002 的yml
server:
  port: 8002

spring:
  application:
    name: cloud-payment-service
  datasource:
    type: com.alibaba.druid.pool.DruidDataSource            # 当前数据源操作类型
    driver-class-name: org.gjt.mm.mysql.Driver              # mysql驱动包
    url: jdbc:mysql://localhost:3306/db2019?useUnicode=true&characterEncoding=utf-8&useSSL=false
    username: root
    password: 123456

eureka:
  client:
    #表示是否将自己注册进EurekaServer默认为true。
    register-with-eureka: true
    #是否从EurekaServer抓取已有的注册信息,默认为true。单节点无所谓,集群必须设置为true才能配合ribbon使用负载均衡
    fetchRegistry: true
    service-url:
      defaultZone: http://eureka7001.com:7001/eureka,http://eureka7002.com:7002/eureka  # 集群版
      #defaultZone: http://localhost:7001/eureka  # 单机版


mybatis:
  mapperLocations: classpath:mapper/*.xml
  type-aliases-package: com.atguigu.springcloud.entities    # 所有Entity别名类所在包
主机名称:服务名称修改
修改yml
eureka:
  client:
    #表示是否将自己注册进EurekaServer默认为true。
    register-with-eureka: true
    #是否从EurekaServer抓取已有的注册信息,默认为true。单节点无所谓,集群必须设置为true才能配合ribbon使用负载均衡
    fetchRegistry: true
    service-url:
      defaultZone: http://eureka7001.com:7001/eureka,http://eureka7002.com:7002/eureka  # 集群版
      #defaultZone: http://localhost:7001/eureka  # 单机版
  instance:
    instance-id: payment8001
修改后
访问信息有IP信息提示
修改yml
eureka:
  client:
    #表示是否将自己注册进EurekaServer默认为true。
    register-with-eureka: true
    #是否从EurekaServer抓取已有的注册信息,默认为true。单节点无所谓,集群必须设置为true才能配合ribbon使用负载均衡
    fetchRegistry: true
    service-url:
      defaultZone: http://eureka7001.com:7001/eureka,http://eureka7002.com:7002/eureka  # 集群版
      #defaultZone: http://localhost:7001/eureka  # 单机版
  instance:
    instance-id: payment8001
    prefer-ip-address: true     #访问路径可以显示IP地址
服务发现Discovery
对于注册进eureka里面的微服务,可以通过服务发现来获得该服务的信息
主启动类中使用注解@EnableDiscoveryClient
controller中
@Resource
    private DiscoveryClient discoveryClient;


@GetMapping(value = "/payment/discovery")
    public Object discovery()
    {
        List<String> services = discoveryClient.getServices();
        for (String element : services) {
            System.out.println(element);
        }

        List<ServiceInstance> instances = discoveryClient.getInstances("CLOUD-PAYMENT-SERVICE");
        for (ServiceInstance element : instances) {
            System.out.println(element.getServiceId() + "\t" + element.getHost() + "\t" + element.getPort() + "\t"
                    + element.getUri());
        }
        return this.discoveryClient;
    }
Eureka自我保护
概述:
保护模式主要用于一组客户端和Eureka Server之间存在网络分区场景下的保护。一旦进入保护模式,
Eureka Server将会尝试保护其服务注册表中的信息,不再删除服务注册表中的数据,也就是不会注销任何微服务。
如果在Eureka Server的首页看到以下这段提示,则说明Eureka进入了保护模式:
EMERGENCY! EUREKA MAY BE INCORRECTLY CLAIMING INSTANCES ARE UP WHEN THEY'RE NOT.
RENEWALS ARE LESSER THAN THRESHOLD AND HENCE THE INSTANCES ARE NOT BEING EXPIRED JUST TO BE SAFE

为什么会产生Eureka自我保护机制?
为了防止EurekaClient可以正常运行,但是 与 EurekaServer网络不通情况下,EurekaServer不会立刻将EurekaClient服务剔除
什么是自我保护模式?
默认情况下,如果EurekaServer在一定时间内没有接收到某个微服务实例的心跳,EurekaServer将会注销该实例(默认90秒)。但是当网络分区故障发生(延时、卡顿、拥挤)时,微服务与EurekaServer之间无法正常通信,以上行为可能变得非常危险了——因为微服务本身其实是健康的,此时本不应该注销这个微服务。Eureka通过“自我保护模式”来解决这个问题——当EurekaServer节点在短时间内丢失过多客户端时(可能发生了网络分区故障),那么这个节点就会进入自我保护模式。

自我保护模式是一种应对网络异常的安全保护措施。它的架构哲学是宁可同时保留所有微服务(健康的微服务和不健康的微服务都会保留)也不盲目注销任何健康的微服务。使用自我保护模式,可以让Eureka集群更加的健壮、稳定
一句话:某时刻某一个微服务不可用了,Eureka不会立刻清理,依旧会对该微服务的信息进行保存。属于CAP里面的AP分支
server:
  port: 7001

spring:
  application:
    name: eureka-cluster-server

eureka:
  instance:
    hostname: eureka7001.com
  client:
    register-with-eureka: false
    fetch-registry: false
    service-url:
      #defaultZone: http://eureka7002.com:7002/eureka,http://eureka7003.com:7003/eureka
      defaultZone: http://eureka7001.com:7001/eureka
  server:
    #关闭自我保护机制,保证不可用服务被及时踢除
       enable-self-preservation: false
    eviction-interval-timer-in-ms: 2000
instance:
#Eureka客户端向服务端发送心跳的时间间隔,单位为秒(默认是30秒)
lease-renewal-interval-in-seconds: 1
#Eureka服务端在收到最后一次心跳后等待时间上限,单位为秒(默认是90秒),超时将剔除服务
lease-expiration-duration-in-seconds: 2
没有提到的模块见 :Rest微服务工程构建_不知名路人~的博客-优快云博客


 491
491

 被折叠的 条评论
为什么被折叠?
被折叠的 条评论
为什么被折叠?
 到【灌水乐园】发言


