


 本文详细介绍了Java SE中的多线程基础,包括线程概念、创建线程(继承Thread和Runnable接口)、线程优先级、生命周期管理、同步机制(synchronized和Lock)、死锁案例以及线程间的通信(wait/notify机制)。实例演示了生产者消费者问题和JDK 5.0新线程创建方式,如Callable接口和线程池的使用。
JavaSE——多线程
1、基本概念:程序、进程、线程
-
程序:为了完成特定任务,用某种语言编写的一组指令的集合,即指一段静态代码、静态对象。
-
进程:是程序的一次执行过程,是一个动态过程,进程作为资源分配的单位,运行时会为每个进程分配不同的内存区域。
-
线程:进程进一步细化为线程,是程序内部的一条执行路径;线程作为调度和执行的单位,每个线程拥有独立的运行栈和程序计数器,线程切换的开销小;一个进程中多个线程共享相同的内存单元/内存地址空间–>从同一堆中分配对象,可以访问相同的变量和对象。
-
单核CPU和多核CPU
单核CPU是假的多线程,因为在同一个时间单元内,也只能执行一个线程的任务。 -
并行和并发
并行:多个CPU同时执行多个任务
并发:一个CPU(采用时间片)同时执行多个任务
2、创建多线程
2.1、继承Thread类
规范写法
public class test {
    public static void main(String[] args) {
        testThread testThread = new testThread();
        testThread.start();//启动当前线程;调用当前现成的run()
        for (int i = 0; i < 100; i++) {
            if (i % 2 == 0) System.out.println(Thread.currentThread.getName()+":"+i);//仍然是再main中执行
        }
    }
}

class testThread extends Thread {
    @Override
    public void run() {
        for (int i = 0; i < 100; i++) {
            if (i % 2 == 0) System.out.println(Thread.currentThread.getName()+":"+i);
        }
    }
}
//结果会变化的
匿名子类的写法
public class test {
    public static void main(String[] args) {
        new Thread(){
            @Override
            public void run() {
                for (int i = 0; i < 100; i++) {
                    if (i % 2 == 0) System.out.println(i);
                }
            }
        }.run();
        for (int i = 0; i < 100; i++) {
            if (i % 2 == 0) System.out.println(i+"####");
        }
    }
}
2.1.1、Thread中的常用方法
- start():创建线程;调用run()。
- run():需要重写Thread方法,将创建的线程执行的操作生命在此方法中。
- currentThread():静态方法,返回执行当前代码的线程。
- getName():获取当前线程的名字
- setName()::设置当前线程的名字
- yield():释放当前CPU执行权
- join():在线程1中调用线程2的join,则需要等线程执行完再执行
- sleep(long millsec )
- isAlive():查看进程是否存活
2.1.2、线程的优先级
1、线程的优先级
MAX_PRIORITY:10
MIN_PRIORITY:1
NORM_PRIORITY:5
2、如何获取和设置当前线程的优先级
getPriority:
setPriority:
2.1.3、练习
public class test {
    public static void main(String[] args) {
        windows w1 = new windows();
        windows w2 = new windows();
        windows w3 = new windows();

        w1.setName("窗口1");
        w2.setName("窗口2");
        w3.setName("窗口3");

        w1.start();
        w2.start();
        w3.start();
    }
}

class windows extends Thread{
    private static int num=100;
    @Override
    public void run() {
        while(num>0) {
            System.out.println(getName()+"第"+num+"张票被买走");
            num--;
        }
//        while(true){
//            if(num>0){
//                System.out.println(getName()+"第"+num+"张票被买走");
//                num--;
//            }else break;
//        }
    }
}
2.2、实现Runnable接口方式
public class test {
    public static void main(String[] args) {
        myThread myThread = new myThread();
        Thread thread1 = new Thread(myThread);
        thread1.setName("线程1");
        Thread thread2 = new Thread(myThread);
        thread2.setName("线程2");

        thread1.start();
        thread2.start();
    }
}

class myThread implements Runnable{

    @Override
    public void run() {
        for(int i=0;i<100;i++){
            if(i%2==0) System.out.println(Thread.currentThread().getName()+":"+i);
        }
    }

}
2.3、两者比较
- 开发中优先选择实现Runnable接口的方式:实现的方法没有类的单继承限制;实现的方式更适合来处理多个线程共有数据的情况。
- 两者的联系:Thread实现了Runnable接口,两种方式都需要实现run方法。
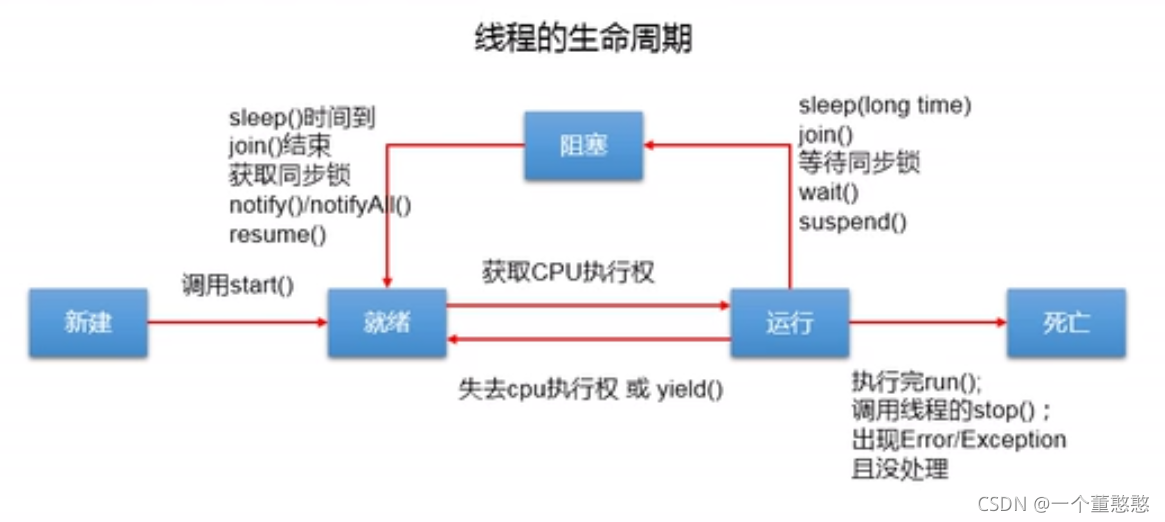
2.4、线程的生命周期
- 新建
- 就绪
- 运行
- 阻塞
- 死亡
3、同步机制
- 方法1:同步代码块
1、操作共享数据的代码,即为需要被同步的代码
2、共享数据,多个线程共同操作的数据
3、同步监视器:俗称锁,任何一个类的对象都可以充当锁,多个线程必须共用同一个锁
synchronized(同步监视器){
}
public class test {
    public static void main(String[] args) {
        window window = new window();
        Thread thread1 = new Thread(window);
        Thread thread2 = new Thread(window);
        Thread thread3 = new Thread(window);

        thread1.setName("窗口1");
        thread2.setName("窗口2");
        thread3.setName("窗口3");

        thread2.start();
        thread1.start();
        thread3.start();
    }
}

class window implements Runnable{
    int tickets=100;
    Object o=new Object();
    @Override
    public void run() {
        while (true) {
            synchronized(o){//可以使用this替代这个类
                if(tickets>0){
                    System.out.println(Thread.currentThread().getName() + "第" + tickets + "张票被取走");
                    tickets--;
                }else{
                    break;
                }
            }
        }
    }
}
public class test {
    public static void main(String[] args) {
        window window1 = new window();
        window window2 = new window();
        window window3 = new window();

        window1.setName("窗口1");
        window2.setName("窗口2");
        window3.setName("窗口3");

        window1.start();
        window2.start();
        window3.start();
    }
}

class window extends Thread{

    private static int tickets=100;
    static Object o=new Object();

    @Override
    public void run() {
        try {
            Thread.sleep(1);
        } catch (InterruptedException e) {
            e.printStackTrace();
        }
        synchronized(o){//window.class也可以进行替代
            while(tickets>0){
                System.out.println(Thread.currentThread().getName()+"第"+tickets--+"被抢走");
            }
        }
    }
}
解决了线程安全问题,操作同步代码的时候,只能有一个线程参见,相当于一个单线程的方式。
- 方法2:同步方法
public class test {
    public static void main(String[] args) {
        window window = new window();
        Thread thread1 = new Thread(window);
        Thread thread2 = new Thread(window);
        Thread thread3 = new Thread(window);

        thread1.setName("窗口1");
        thread2.setName("窗口2");
        thread3.setName("窗口3");

        thread2.start();
        thread1.start();
        thread3.start();
    }
}

class window implements Runnable{
    int tickets=100;
    Object o=new Object();
    private boolean flag=true;

    private synchronized void fun(){
        if(tickets>0){
            System.out.println(Thread.currentThread().getName() + "第" + tickets + "张票被取走");
            tickets--;
        }else flag=false;
    }


    @Override
    public void run() {
        while (flag) {
            fun();
        }
    }
}
public class test {
    public static void main(String[] args) {
        window window1 = new window();
        window window2 = new window();
        window window3 = new window();
        window1.start();
        window2.start();
        window3.start();
    }
}

class window extends Thread{
    private static int tickets=100;
    private static boolean flag=true;

    private static synchronized void fun(){
        if(tickets>0){
            System.out.println(Thread.currentThread().getName() + "第" + tickets + "张票被取走");
            tickets--;
        }else flag=false;
    }


    @Override
    public void run() {
        while (flag) {
            fun();
        }
    }
}
- Lock()方式
import java.util.concurrent.locks.ReentrantLock;

public class test {
    public static void main(String[] args) {
        window window = new window();
        Thread thread1 = new Thread(window);
        Thread thread2 = new Thread(window);
        Thread thread3 = new Thread(window);

        thread1.setName("窗口1");
        thread2.setName("窗口2");
        thread3.setName("窗口3");

        thread2.start();
        thread1.start();
        thread3.start();
    }
}

class window implements Runnable{
    int tickets=100;
    private ReentrantLock lock=new ReentrantLock();//如果使用Thread继承的方式,则需要设置为静态的lock
    @Override
    public void run() {
        while (true) {
            try{

                lock.lock();

                if(tickets>0){

                    try {
                        Thread.sleep(10);
                    } catch (InterruptedException e) {
                        e.printStackTrace();
                    }

                    System.out.println(Thread.currentThread().getName() + "第" + tickets + "张票被取走");
                    tickets--;
                }else{
                    break;
                }
            }finally {
                lock.unlock();
            }
        }
    }
}
synchronized和lock方式的相同和不同
相同:二者都可以解决线程安全问题
不同:synchronized自动释放同步监视器,lock需要手动启动同步和结束
4、死锁
public class test {
    public static void main(String[] args) {
        StringBuffer s1 = new StringBuffer();
        StringBuffer s2 = new StringBuffer();

        new Thread() {
            @Override
            public void run() {
                synchronized (s1) {
                    s1.append("a");
                    s2.append("1");

                    try {
                        Thread.sleep(100);
                    } catch (InterruptedException e) {
                        e.printStackTrace();
                    }

                    synchronized (s2) {
                        s1.append("b");
                        s2.append("2");

                        System.out.println(s1);
                        System.out.println(s2);
                    }
                }
            }
        }.start();


        new Thread(new Runnable() {
            @Override
            public void run() {
                synchronized (s2) {
                    s1.append("c");
                    s2.append("3");

                    try {
                        Thread.sleep(100);
                    } catch (InterruptedException e) {
                        e.printStackTrace();
                    }


                    synchronized (s1) {
                        s1.append("d");
                        s2.append("4");

                        System.out.println(s1);
                        System.out.println(s2);
                    }
                }
            }
        }).start();
    }
}
5、线程通信
5.1、基础概念
涉及到三个方法:必须使用在synchronized代码块或者方法中
1、wait():线程阻塞,释放锁
2、notify():唤醒被wait()的线程,若有多个线程,则唤醒优先级高的线程
3、notifyAll():唤醒所有wait的线程
注意
这三个方法调用的对象必须是锁,如果不一致会出错,又因为锁的类型是Object,所以这些方法都是定义在Object里面的
sleep和wait的区别
相同点:都可以使得线程阻塞
不同点:1、Thread下声明sleep(),Object类中声明wait()。2、sleep()可以在任何场景下调用,wait()只能在同步代码块和同步方法中调用。3、两个方法在同一个代码块中使用的时候,sleep()不释放锁,wait()释放。
public class test {
    public static void main(String[] args) {
        numTest a=new numTest();
        Thread thread1 = new Thread(a);
        Thread thread2 = new Thread(a);

        thread1.setName("玩家1:");
        thread2.setName("玩家2:");

        thread1.start();
        thread2.start();
    }
}

class numTest implements Runnable{

    private int num=100;

    @Override
    public void run() {
        while(true){
                synchronized (this) {

                    notify();//this.notify

                    if(num>0){
                        try {
                            Thread.sleep(10);
                        } catch (InterruptedException e) {
                            e.printStackTrace();
                        }
                        System.out.println(Thread.currentThread().getName()+num);
                        num--;
                        try {
                            wait();//this.wait()
                        } catch (InterruptedException e) {
                            e.printStackTrace();
                        }
                    }else break;
            }
        }
    }
}
5.2、生产者消费者例题
public class test {
    public static void main(String[] args) {
        Clerk clerk = new Clerk();
        productor productor1 = new productor(clerk);
        customer customer1 = new customer(clerk);
        customer customer2 = new customer(clerk);

        productor1.setName("生产者1号");
        customer1.setName("消费者1号");
        customer2.setName("消费者2号");

        productor1.start();
        customer1.start();
        customer2.start();

    }
}


class Clerk{
    private int productNum=0;

    public synchronized void productClerk() {
        if(productNum<20){
            try {
                Thread.sleep(10);
            } catch (InterruptedException e) {
                e.printStackTrace();
            }


            productNum++;
            System.out.println(Thread.currentThread().getName()+"生产第"+productNum+"件产品");
            notify();
        }else{
            try {
                wait();
            } catch (InterruptedException e) {
                e.printStackTrace();
            }
        }
    }

    public synchronized void customerClerk() {
        if(productNum>0){
            try {
                Thread.sleep(10);
            } catch (InterruptedException e) {
                e.printStackTrace();
            }

            System.out.println(Thread.currentThread().getName()+"开始消费第"+productNum+"件商品");
            productNum--;
            notify();
        }else{
            try {
                wait();
            } catch (InterruptedException e) {
                e.printStackTrace();
            }
        }
    }
}

class productor extends Thread{
    private Clerk clerk;

    public productor() {}
    public productor(Clerk clerk) {
        this.clerk = clerk;
    }

    @Override
    public void run() {
        while(true) clerk.productClerk();
    }
}

class customer extends Thread{
    private Clerk clerk;

    public customer(){}
    public customer(Clerk clerk) {
        this.clerk = clerk;
    }

    @Override
    public void run() {
        while(true) clerk.customerClerk();
    }
}
6、JDK 5.0 新增线程创建方式
- 实现Callable接口
实现callable接口比实现Runnable更强大
1、call()有返回值
2、call()可以抛出异常,获取异常信息
3、callable()支持泛型
import java.util.concurrent.Callable;
import java.util.concurrent.ExecutionException;
import java.util.concurrent.FutureTask;

public class test {
    public static void main(String[] args) {
        //3.创建callable接口实现的类的对象
        NumThread numThread = new NumThread();
        //4.将该对象传入FutureTask类对象中。
        FutureTask futureTask=new FutureTask(numThread);
        //5.创建Thread对象,将FutureTask对象传入
        new Thread(futureTask).start();

        //6.获取返回值

        try {
            Object sum=futureTask.get();
            System.out.println("总和为:"+sum);
        } catch (InterruptedException e) {
            e.printStackTrace();
        } catch (ExecutionException e) {
            e.printStackTrace();
        }


    }
}
//1.创建一个实现了callable的类
class NumThread implements Callable{
    //2.实现call方法
    @Override
    public Object call() throws Exception {
        int sum=0;
        for(int i=0;i<100;i++){
            if(i%2==0){
                System.out.println(i);
                sum+=i;
            }
        }
        return sum;
    }
}
- 实现线程池
提前创建好多个线程,放入线程池中,使用时直接获取,使用完放入池中,可以避免频繁创建销毁,实现重复利用。
1、提高响应速度
2、降低资源消耗
3、便于线程管理
import java.util.concurrent.Callable;
import java.util.concurrent.ExecutorService;
import java.util.concurrent.Executors;

public class test {
    public static void main(String[] args) {
        ExecutorService executorService = Executors.newFixedThreadPool(10);
        //方法一:只是接口,无法进行线程池的设置
        //executorService.submit(new NumThread());
        //executorService.execute();使用于Runnnable接口
        //executorService.shutdown();
        //方法二:找到接口的实现类,可以进行设置
        ThreadPoolExecutor service=(ThreadPoolExecutor) executorService;
        service.submit(new NumThread());
        service.shutdown();
    }
}
//1.创建一个实现了callable的类
class NumThread implements Callable{
    //2.实现call方法
    @Override
    public Object call() throws Exception {
        int sum=0;
        for(int i=0;i<100;i++){
            if(i%2==0){
                System.out.println(Thread.currentThread().getName()+":"+i);
                sum+=i;
            }
        }
        return sum;
    }
}


 474
474

 被折叠的 条评论
为什么被折叠?
被折叠的 条评论
为什么被折叠?
 到【灌水乐园】发言


