


 本文介绍了一个使用Vue实现的TodoList高级版,通过组件间传值完成添加、修改和删除任务功能。用户可在输入框填写任务,点击添加将其显示在列表中,选中任务行会变色。点击任务的修改按钮,会切换到编辑组件预填充数据,修改后保存到相应任务行。同时,任务行设有删除按钮,方便快速移除任务。
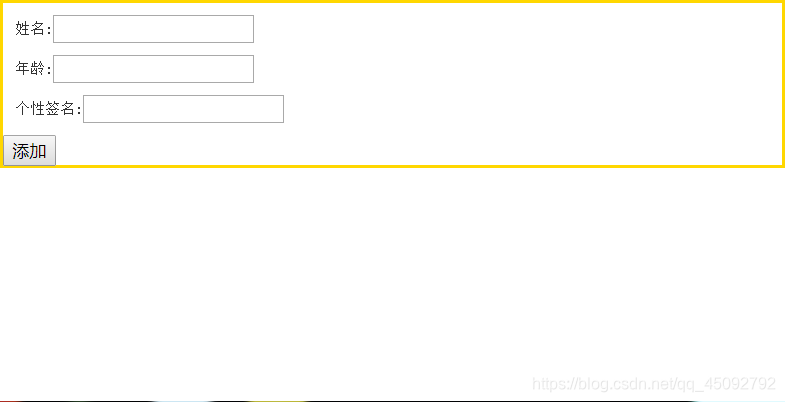
效果图
第一部分,填写信息,点击添加将信息在黄色框外显示(框内,框外是连个不同的组件)
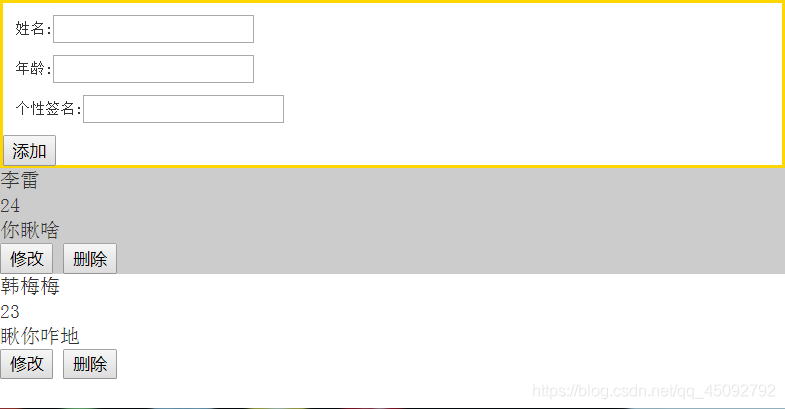
点击相应的信息行会变色(灰色)
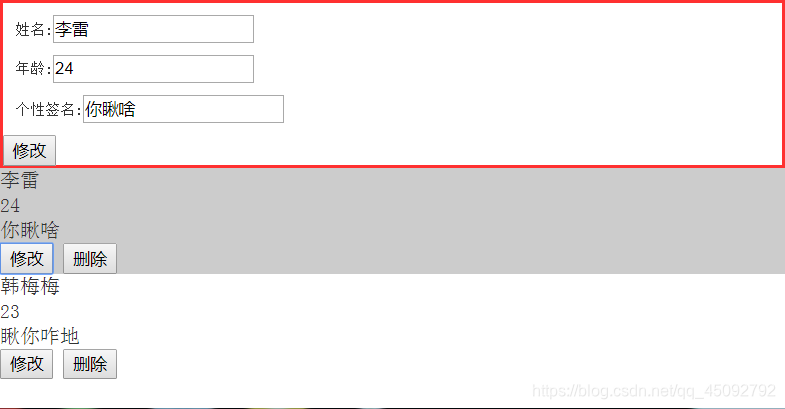
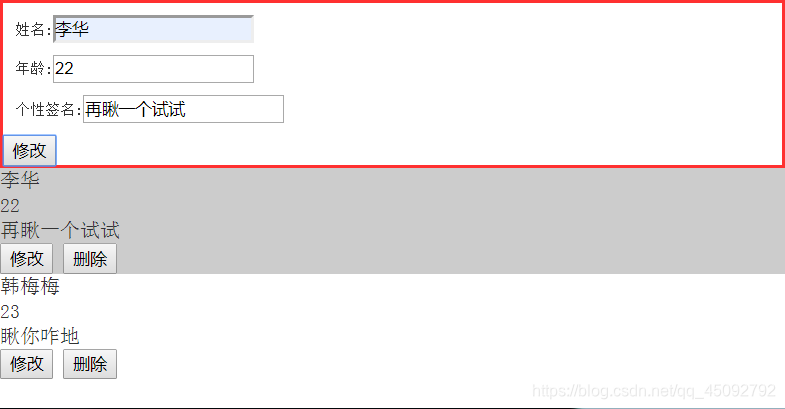
第二部分,点击某一信息行的修改按钮,将上方组件更换为修改信息组件
并将相应的数据传递给上方的输入框中,修改数据,点击红色修改框内的修改按钮,将信息替换到相应的信息行的位置
第三部分,不论是添加还是修改过程中只要点击删除按钮,就可以删除相应的一个信息行的信息。
以下是代码部分:
main.js:
import Vue from "vue";
import App from "./App.vue"
//Vue.prototype.$observer = new Vue()
import observer from "./observer";
Vue.prototype.$observer = observer
// import "./flexble"
import "./reset.css"
new Vue({
    render:h=>h(App)
}).$mount("#app")
observer是封装好的事件订阅:
const eventList = {}

const $on = (eventName,callback)=>{
    if(!eventList[eventName]){
        eventList[eventName] = [];
    }
    eventList[eventName].push(callback)
}

const $emit = (eventName,params)=>{
    if(eventList[eventName]){
        let arr = eventList[eventName];
        arr.map((cb)=>{
            cb(params);
        })
    }

}

const $off = (eventName,callback)=>{
    if(eventList[eventName]){
        if(callback){
            let index = eventList[eventName].indexOf(callback);
            eventList[eventName].splice(index,1);
        }else{
            eventList[eventName].length = 0;
        }
    }
}

export default {
    $on,
    $emit,
    $off
}
整体src文件结构
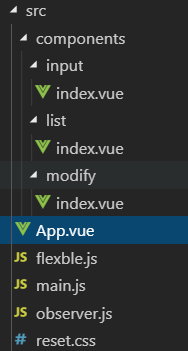
1、父组件:App.vue 将子组件整合切换显示
<template>
    <div id="app">
      <InputCom v-show="bool"></InputCom>
      <Modify v-show="bools" @clickHandleAdd="modifyHandle" ></Modify>
      <Lists @handleCon="listHanleAdd"></Lists>
    </div>
</template>

<script>
import InputCom from "./components/input/index.vue";
import Lists from "./components/list/index.vue";
import Modify from "./components/modify/index.vue";
export default {
    name:"App",
    components:{
      InputCom,
      Lists,
      Modify
    },
    data(){
        return {
          bool:true,
          bools:false,
        }
    },
    methods:{
      listHanleAdd(type){
        if(type){
          this.bool=false;
          this.bools=true;
        }
      },
      modifyHandle(item){
        if(item){
          this.bools=false;
          this.bool=true;
        }
      }
    }
}
</script>

<style>

</style>
2 . 1子组件input 用来放黄色添加框
<template>
    <div>
        <label for="name">
            姓名:<input type="text" id="name" v-model="nameVal">
        </label>
        <label for="age">
            年龄:<input type="text" id="age" v-model="ageVal">
        </label>
        <label for="word">
            个性签名:<input type="text" id="word" v-model="wordVal">
        </label>
        <button @click="handleAdd()">添加</button>
    </div>
</template>

<script>
export default {
    name:"InputCom",
    data(){
        return{
           nameVal:"",
           ageVal:"",
           wordVal:"",
        }
    },
    methods:{
        handleAdd(){
            var obj={};
            obj.name=this.nameVal;
            obj.age=this.ageVal;
            obj.word=this.wordVal;
            this.$observer.$emit("handle",obj);
            this.nameVal="";
            this.ageVal="";
            this.wordVal="";
        }
    }
}
</script>

<style scoped>
    div{
        width: 100%;
        border:2px solid #FFD700;
    }
    label{
        display: block;
        margin: 10px;
    }

</style>
2 . 2子组件list 用来放信息行
<template>
    <div>
        <ul>
            <li
                v-for="(item,index) in list"
                :key="index"
                @click="handleColor(index)"
                :class="{active:index==num}">
                <span>{{item.name}}</span>
                <span>{{item.age}}</span>
                <span>{{item.word}}</span>
                <button @click="handleModify(item,index)">修改</button>
                <button @click="handleDel(index)">删除</button>
            </li>
        </ul>
    </div>
</template>

<script>
export default {
    name:"Lists",
    data(){
        return{
            name:"",
            age:"",
            word:"",
            num:"",
            list:[]
        }
    },
    created(){
        this.$observer.$on("handle",val=>{
            this.list.push(val);
        })
    },
    updated(){
        this.$observer.$on("modify",val=>{
            // console.log(val)
            this.list.map((item,i)=>{
                // console.log(item)
                if(i==val.index){
                    item.name=val.name;
                    item.age=val.age;
                    item.word=val.word;
                }
            })
        })
    },
    methods:{
        handleDel(index){
            this.list.splice(index,1)
        },
        handleModify(item,index){
            item.index=index;
            this.$observer.$emit("handleM",item);
            this.$emit("handleCon",this);
        },
        handleColor(index){
                this.num=index
        }
    }
}
</script>

<style scoped>
    li{
        width: 100%;
        font-size: 16px;
        line-height: 20px;
    }
    .active{
        background:rgba(0,0,0,0.2)
    }

    span{
        display: block;
    }
</style>
2 . 3子组件modify 用来放红色修改框
<template>
    <div>
        <label for="name">
            姓名:<input type="text" id="name" v-model="nameChangeVal">
        </label>
        <label for="age">
            年龄:<input type="text" id="age" v-model="ageChangeVal">
        </label>
        <label for="word">
            个性签名:<input type="text" id="word" v-model="wordChangeVal">
        </label>
        <button @click="handleModify()">修改</button>
    </div>
</template>

<script>
export default {
    name:"Modify",
    data(){
        return{
           nameChangeVal:"",
           ageChangeVal:"",
           wordChangeVal:"",
           index:""
        }
    },
    created(){
        this.$observer.$on("handleM",(val)=>{
          this.nameChangeVal=val.name;
          this.ageChangeVal=val.age;
          this.wordChangeVal=val.word;
          this.index=val.index;
        })
    },
    methods:{
        handleModify(){
            var obj={};
            obj.name=this.nameChangeVal;
            obj.age=this.ageChangeVal;
            obj.word=this.wordChangeVal;
            obj.index=this.index;
            this.$observer.$emit("modify",obj);
            this.$emit("handleModify",this)
        }
    }
}
</script>

<style scoped>
    div{
        width: 100%;
        border:2px solid #FF3030;
    }
    label{
        display: block;
        margin: 10px;
    }

</style>


 3420
3420

 被折叠的 条评论
为什么被折叠?
被折叠的 条评论
为什么被折叠?
 到【灌水乐园】发言


