文章目录
- 《快速上手spring篇——参考狂神视频》
- 详细篇:《spring学习---参考动力节点》
《快速上手spring篇——参考狂神视频》
0、介绍
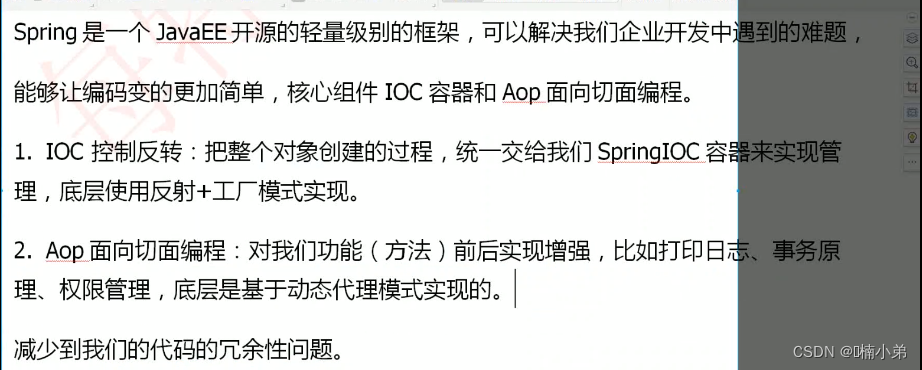
- 优势
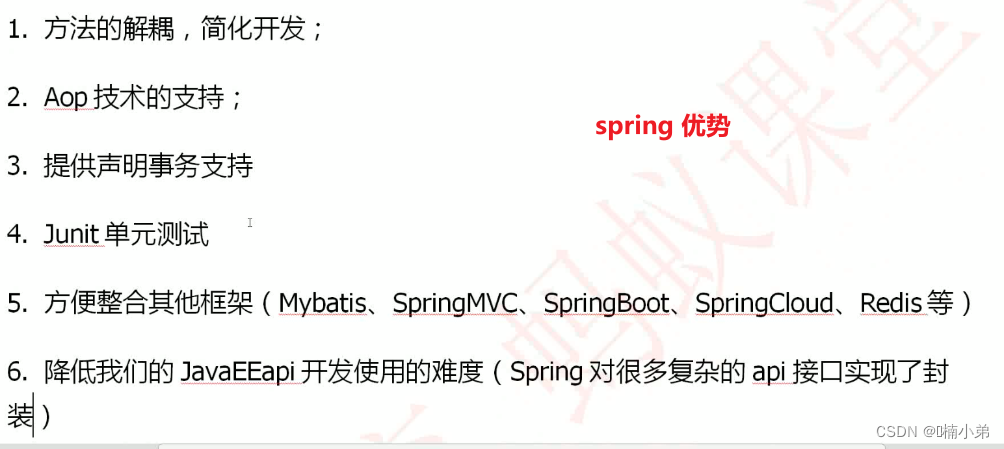
1、初步操作:
第一步:配置pom.xml文件
 <dependencies>
        <dependency>
            <groupId>org.springframework</groupId>
            <artifactId>spring-context</artifactId>
            <version>5.3.13</version>
        </dependency>

        <dependency>
            <groupId>junit</groupId>
            <artifactId>junit</artifactId>
            <version>4.11</version>
            <scope>test</scope>
        </dependency>

    </dependencies>
第二步:编写dao层、service层
a、在com.liu.dao中编写一个SqlTest接口:
public interface SqlTest {
    public void getConn();

}
b、在com.liu.dao中有两个SqlTest接口的实现类:
1、MySqlTest
public class MySqlTest implements SqlTest{
    @Override
    public void getConn() {
        System.out.println("~~~~~MysqlLianjie");
    }
}
2、OracleTest
public class OracleTest implements SqlTest{
    @Override
    public void getConn() {
        System.out.println("~~~~Oracle获取链接");
    }
}
c、在com.liu.service中写一个SqlService接口:
public interface SqlService {
    public void getConn();
}
编写实现SqlService接口的实现类:
public class SqlServiceImpl implements SqlService{

    private SqlTest ssli;
    //为了能让spring代理
    public void setSsli(SqlTest ssl) {
        this.ssli = ssl;
    }
    @Override
    public void getConn() {
        ssli.getConn();
    }
}
第三步:编写spring的核心文件:bean.xml
<?xml version="1.0" encoding="UTF-8"?>
<beans xmlns="http://www.springframework.org/schema/beans"
       xmlns:xsi="http://www.w3.org/2001/XMLSchema-instance"
       xsi:schemaLocation="http://www.springframework.org/schema/beans
        https://www.springframework.org/schema/beans/spring-beans.xsd">

    <bean id="mtSqll" class="com.liu.dao.MySqlTest"/>
    <bean id="oraclee" class="com.liu.dao.OracleTest"/>
    <bean id="getConn" class="com.liu.service.SqlServiceImpl">
        <property name="ssli" ref="mtSqll"/>
    </bean>

</beans>
注意:property中的属性:value:为基本类型赋值,ref:为引用(对象)
第四步:测试
public class TestSqll {
    @Test
    public void tesss(){
        //获取资源文件
        ApplicationContext context = new ClassPathXmlApplicationContext("bean.xml");
        //获取spring配置文件中的bean
        SqlServiceImpl serviceImpl =(SqlServiceImpl) context.getBean("getConn");
        serviceImpl.getConn();
    }
}
2、IOC创建对象的方式:
IOC创建对象(构造器注入)的二种方式
第一种:无参构造
使用无参构造创建对象,默认选项
第二种有参构造:3种方式
1、通过下标赋值
<bean id="user" class="com.liu.pojo.User">
	<constructor-arg index="0" value="楠小弟"/>
</bean>
*注意:*constructor-arg为有参构造是使用的
2、通过类的属性进行创建,不建议使用
<bean id="user" class="com.liu.pojo.User">
	<constructor-arg type="java.lang.String" value="楠小弟"/>
</bean>
*注:*type类型:需要写全称
3、通过参数名进行创建,推荐
<bean id="user" class="com.liu.pojo.User">
	<constructor-arg name="userName" value="楠小弟"/>
</bean>
总结:在配置文件加载时,容器中的管理的对象就已经初始化了!
3、spring配置:
1、别名
<!--如果添加了别名,可通过别名获取到这个对象-->
<alias name="userName" alias="userLiu"/>
2、Bean的配置
<bean id="getUser" class="com.liu.pojo.User" name="userOne,userliu">
	<property name="userName" value="楠小弟"/>
</bean>
注意:
id:bean的唯一标识符,也就是相当于对象名(eg:User us=new User()中的us)。
class:bean 对象所对应的全限定名:包名+类型(就是哪个类)。
name:bean 里的name是别名,且name可同时取多个别名
3、import
一般用于团队开发使用,可将多个配置文件,导入合并为一个。
假设项目有三个人开发,复制不同的类开发,不同的类需要注册在不同的bean中,
此时可使用 import将所有人的bean.xml合并为一个总的。
-
eg:
applicationContext.xml中
<import resource="bean.xml"/>
<import resource="bean1.xml"/>
<import resource="bean2.xml"/>
使用的时候,直接使用 总的配置就可以了。
4、依赖注入:
依赖注入有三种
第一种:构造器注入
前面已经说过
第二种:Set方式注入【重点】
-
依赖注入:Set注入
- 依赖:bean对象的创建依赖于容器!
- 注入:bean对象中的所有属性,由容器来注入。
-
【环境搭建】:
-
1、复杂类型:
public class Address { private String address; //getter setter方法 } -
2、真是测试对象:
public class Student { private String name;//姓名 private Address address;//住址 private String[] books;//书本 private List<String> hobbys;//爱好 private Map<String,String>card;//卡 private Set<String>games;//游戏 private String wife;//是否结婚 private Properties info;//信息 //getter setter方法 } -
3、applicationContext.xml:
<?xml version="1.0" encoding="UTF-8"?> <beans xmlns="http://www.springframework.org/schema/beans" xmlns:xsi="http://www.w3.org/2001/XMLSchema-instance" xsi:schemaLocation="http://www.springframework.org/schema/beans https://www.springframework.org/schema/beans/spring-beans.xsd"> <bean id="address" class="com.liu.pojo.Address"> <property name="address" value="湖南"/> </bean> <bean id="getStu" class="com.liu.pojo.Student"> <!--第一种,普通值注入,value--> <property name="name" value="楠小弟"/> <!-- 第二种,Bean注入(引用注入),ref--> <property name="address" ref="address"/> <!--第三种,数组注入--> <property name="books"> <array> <value>天路历程</value> <value>神曲</value> <value>忏悔录</value> </array> </property> <!--第四种,List注入--> <property name="hobbys"> <list> <value>慢跑</value> <value>胡思</value> <value>乱想</value> </list> </property> <!--第五种,Map注入--> <property name="card"> <map> <entry key="ID" value="123456789"/> <entry key="Phone" value="987654321"/> </map> </property> <!--第六种,Set注入--> <property name="games"> <set> <value>卡通农场</value> <value>植物大战僵尸</value> </set> </property> <!--第七种,null注入--> <!--第一种--> <!-- <property name="wife" value=""/>--> <!--第二种--> <property name="wife" > <null/> </property> <!--第八种,properties注入--> <property name="info"> <props> <prop key="xueHao">3320010219</prop> <prop key="name">楠小弟</prop> <prop key="driver">com.mysql.jdbc.Drive</prop> <prop key="url">127.0.0.1</prop> <prop key="root">root</prop> <prop key="pwd">123456</prop> </props> </property> </bean> </beans> -
4、测试类
public class MyTest { @Test public void stuTest(){ ApplicationContext context = new ClassPathXmlApplicationContext("applicationContext.xml"); Student stu = (Student) context.getBean("getStu"); System.out.println(stu); } } -
5、结果
 /*
        * Student{
        * name='楠小弟',
        * address=Address{address='湖南'},
        * books=[天路历程, 神曲, 忏悔录],
        * hobbys=[慢跑, 胡思, 乱想],
        * card={ID=123456789, Phone=987654321},
        * games=[卡通农场, 植物大战僵尸],
        * wife='null',
        * info={
        * root=root, name=楠小弟,
        * url=127.0.0.1,
        * driver=com.mysql.jdbc.Drive,
        * pwd=123456,
        * xueHao=3320010219
        * }}
        *
*/
-
第三种:其他方式(拓展方式)
可使用P命令空间 和 c命令空间进行注入:
1、实体类User
public class User {
    private String name;
    private String sex;
    private int age;
    }
2、userBean.xml
<?xml version="1.0" encoding="UTF-8"?>
<beans xmlns="http://www.springframework.org/schema/beans"
       xmlns:xsi="http://www.w3.org/2001/XMLSchema-instance"
       xmlns:p="http://www.springframework.org/schema/p"
       xmlns:c="http://www.springframework.org/schema/c"
       xsi:schemaLocation="http://www.springframework.org/schema/beans
        https://www.springframework.org/schema/beans/spring-beans.xsd">

    <!--p命名空间注入,可直接注入属性的值:property-->
  <bean id="getUser" class="com.liu.pojo.User" p:name="楠小弟" p:sex="楠" p:age="23"/>

    <!--c命名空间注入,通过构造器注入属性的值:construct-args-->
    <bean id="getUser2" class="com.liu.pojo.User" c:name="哈哈" c:age="23" c:sex="男"/>
</beans>
3、测试类:
public class UserTest {
    @Test
    public void userTest(){
        ApplicationContext context = new ClassPathXmlApplicationContext("userBean.xml");
        User us = context.getBean("getUser", User.class);
        User us1 = context.getBean("getUser2", User.class);
        System.out.println("p标签的使用:"+us);
        System.out.println("c标签的使用:"+us1);
    }
}
4、结果:
p标签的使用:User{name='楠小弟', sex='楠', age=23}
c标签的使用:User{name='哈哈', sex='男', age=23}
注意:使用标签不要忘记导入依赖文件
xmlns:p="http://www.springframework.org/schema/p"
       xmlns:c="http://www.springframework.org/schema/c"
5、Bean作用域:
Bean作用域(Bean scopes)
1、单例模式(singleton):
spring默认机制。
多个使用同一个对象,则引用的地址一样
<bean id="user" class="com.liu.User" scope="singleton"/>
2、原型模式:
每次从容器中get的时候,都会产生一个新对象。
<bean id="user" class="com.liu.User" scope="prototype"/>
3、request、session、application:
这些只能在web开发中使用到。
6、Bean自动装配:
-
自动装配是 spring 满足bean依赖一种方式!
-
Spring会在上下文中自动寻找,并自动给bean装配属性!
-
在Spring中有三种装配的方式:
-
1、在xml中显示的配置
-
2、在Java中显示配置
-
3、隐式的自动装配。【重要!!】
-
byName:会自动在容器上下文中查找,和自己对象set方法后面的值对应的 beanid!
-
byType:会自动在容器上下文中查找,和自己对象属性类型相同的bean!
-
1、一个人有猫、狗两动物
public class Cat {
    public void shout(){
        System.out.println("喵喵喵~~~~叫");
    }
}

public class Dog {
    public void shout(){
        System.out.println("汪汪汪~~~~叫");
    }
}


public class Person {
    private Cat cat;
    private Dog dog;
    private String name;
    }
2、PersonBean.xml
<?xml version="1.0" encoding="UTF-8"?>
<beans xmlns="http://www.springframework.org/schema/beans"
       xmlns:xsi="http://www.w3.org/2001/XMLSchema-instance"
       xsi:schemaLocation="http://www.springframework.org/schema/beans
        https://www.springframework.org/schema/beans/spring-beans.xsd">

    <bean id="cat" class="com.liu.pojo.Cat"/>
    <bean id="dog" class="com.liu.pojo.Dog"/>
    <!--byName:会自动在容器上下文中查找,和自己对象set方法后面的值对应的 beanid!-->
    <bean id="per" class="com.liu.pojo.Person" autowire="byName">
        <property name="name" value="楠小弟"/>
    </bean>
    <!--byType:会自动在容器上下文中查找,和自己对象属性类型相同的bean!-->
    <bean id="per" class="com.liu.pojo.Person" autowire="byType">
        <property name="name" value="楠小弟"/>
    </bean>
</beans>
3、测试类:
public class PerTest {
    @Test
    public void perTest(){
        ApplicationContext context = new ClassPathXmlApplicationContext("PersonBean.xml");
        Person per = context.getBean("per", Person.class);
       per.getCat().shout();
       per.getDog().shout();
    }
}
4、结果:
喵喵喵~~~~叫 汪汪汪~~~~叫 -
使用注解方式
- 1、applicationContext.xml中添加:
<?xml version="1.0" encoding="UTF-8"?> <beans xmlns="http://www.springframework.org/schema/beans" xmlns:xsi="http://www.w3.org/2001/XMLSchema-instance" xmlns:context="http://www.springframework.org/schema/context" xsi:schemaLocation="http://www.springframework.org/schema/beans https://www.springframework.org/schema/beans/spring-beans.xsd http://www.springframework.org/schema/context https://www.springframework.org/schema/context/spring-context.xsd"> <!--开启注解--> <context:annotation-config/> </beans> -
2、还是一人两动物:
public class Cat { public void shout(){ System.out.println("喵喵-----"); } } public class Dog { public void shout(){ System.out.println("汪汪----"); } } public class Person { @Autowired private Cat cat; @Autowired private Dog dog; public Cat getCat() { return cat; } public Dog getDog() { return dog; } }- 3、spring配置文件
<beans xmlns="http://www.springframework.org/schema/beans" xmlns:xsi="http://www.w3.org/2001/XMLSchema-instance" xmlns:context="http://www.springframework.org/schema/context" xsi:schemaLocation="http://www.springframework.org/schema/beans https://www.springframework.org/schema/beans/spring-beans.xsd http://www.springframework.org/schema/context https://www.springframework.org/schema/context/spring-context.xsd"> <!--开启自动注解--> <context:annotation-config/> <bean class="pojo.Cat"/> <bean class="pojo.Dog"/> <bean id="getPer" class="pojo.Person"/> </beans>- 4、测试类:
public class TestAuto { @Test public void testAu(){ ApplicationContext context = new ClassPathXmlApplicationContext("applicationContext.xml"); Person getPer = context.getBean("getPer", Person.class); getPer.getCat().shout(); getPer.getDog().shout(); } }- 5、结果:
喵喵----- 汪汪---- -
-
小结:
-
@Autowried:
直接在属性上使用即可!也可以在set方式上使用,保证IOC容器中(配置文件)中且是唯一出现 -
@Nullable:
字段标记了此属性,说明这个字段可以为null且不会报错 -
@Autowired(required=false):
若定义了required=false,说明对象可以为null;反之不允许为空(默认值) -
@Qualifier(value=“xxx”):
指定一个唯一的bean对象注入。就是说:当有好多个指向一个类,需要指定名字。需要和@Autowired一起使用。 -
@Resource注解:
Java提供的注解 -
@Resource注解 和 @Autowired的区别:
1、都是用来自动装配的,都可以放在属性字段上。
2、@Autowired 通过byType的方式实现,且必须要求这个对象存在!
3、@Resource默认通过byName的方式实现,若找不到名字,则通过byType实现,若都找不到则报错!
4、执行顺序不同:@Autowired通过byType的方式实现。@Resource默认通过byName方式实现。
-
-
7、 使用注解开发:
a、在applicationContext.xml中配置:
<?xml version="1.0" encoding="UTF-8"?>
<beans xmlns="http://www.springframework.org/schema/beans"
    xmlns:xsi="http://www.w3.org/2001/XMLSchema-instance"
    xmlns:context="http://www.springframework.org/schema/context"
    xsi:schemaLocation="http://www.springframework.org/schema/beans
        https://www.springframework.org/schema/beans/spring-beans.xsd
        http://www.springframework.org/schema/context
        https://www.springframework.org/schema/context/spring-context.xsd">

    <!--扫描使用注解的包-->
    <context:component-scan base-package="org.example"/>
    <!--开启使用注解配置-->
     <context:annotation-config/>

</beans>
b、属性的注入:
@Component
public class User{
    public String name;
    @value("楠小弟")
    public void setName(String name){
        this.name=name;
    }
}
注意:
@Component(组件)相当于手动配置的:
<bean id="user" class="com.liu.pojo.User"/>
@value(值)相当于手动配置的:
<bean id="user" class="com.liu.pojo.User">
    <property name="name" value="楠小弟"/>
</bean>
c、衍生的注解:
@Component有几个衍生注解,在Web开发中,会按照mvc三层架构分层!
- dao层 使用【@Repository】
- service层使用【@Service】
- controller层(servlet)使用【@Controller】
- 这四个注解功能都是一样的,都代表将某个类注册到Spring中,装配到Bean。
d、自动装配配置:
- @Autowired:自动装配通过类型、名字。
	若Autowired不能唯一自动装配上属性,则需要通过@Qualifier(value="xxx")
- @Nullable:字段标记了这个注释,说明这个字段可以为null。
- @Resource:自动装配通过名字、类型。
e、作用域:
@Scope(“”):可指定作用域的方式:单例、原型…
@Component
@Scope("prototype")
public class User{
    public String name;
    @value("楠小弟")
    public void setName(String name){
        this.name=name;
    }
}
f、小结:
-
xml 与 注解 :
- **xml:**更加万能,适用于任何场合!维护简单方便
- **注解:**不是自己类使用不了,维护相对复杂!
-
xml 与 注解 最佳实践:
-
**xml:**用来管理bean;
-
**注解:**只负责完成属性的注入;
-
在使用过程中,需注意一个问题:必须让注解生效,就需要开启注解的支持
 <!--扫描使用注解的包-->
    <context:component-scan base-package="org.example"/>
    <!--开启使用注解配置-->
     <context:annotation-config/>
-
g、使用Java配置spring:
springboot中会使用到此方法。
8、代理模式:
为什么要学习代理模式呢?因为这是SpringAOP的底层【SpringAOP 和 SpringMVC】。
代理模式的分类:
- 静态代理
- 动态代理
8.1、静态代理:
角色分析:
- 抽象角色:一般会使用接口或者抽象类来解决。
- 真实角色:被代理的角色。
- 代理角色:代理真实角色,代理真实角色后,我们一般会做一些附属操作。
- 客户:访问代理对象的人!
代理模式的好处:
- 可使真实角色的操作更加纯粹!不用去关注一些公共的业务。
- 公共也就是交给代理角色!实现了业务的分工!
- 公共业务发生扩展的时候,方便集中管理。
缺点:
- 一个真实角色就会产生一个代理角色,代码量会翻倍,开发效率会变低。
8.2、动态代理:
-
动态代理 和 静态代理角色一样。
-
动态代理的代理类是动态生成的,不是我们直接写好的。
-
动态代理分为两大类:
- ①基于接口的动态代理
- JDK动态代理,【使用这个】
- ②基于类的动态代理。
- cglib
- java字节码实现:javasist
需要了解两个类:Proxy代理,InvocationHandler:调用处理程序
- ①基于接口的动态代理
-
动态代理的好处:
- 可使真实角色的操作更加纯粹!不用去关注一些公共的业务。
- 公共也就是交给代理角色!实现了业务的分工!
- 公共业务发生扩展的时候,方便集中管理。
- 一个动态代理类代理的是一个接口,一般就是对应的一类业务
- 一个动态代理类可代理多个类,只要是实现了同一个接口即可。
9、AOP:
9.1、什么是AOP?
AOP(Aspect Oriented Programming)意为:面向切面编程,通过预编译方式和运行期动态代理实现程序功能的统一维护的一种技术。AOP是OOP的延续,是软件开发的一个热点,也是Spring框架中的一个重要内容,是函数式编程的一种衍生泛型。利用AOP可以对业务逻辑的各个部分进行隔离,从而使得业务逻辑各部分之间的耦合度降低,提高程序的可重用性,同时提高了开发的效率。
9.2、AOP在spring中的作用:
提供声明式事务;允许用户自定义切面
- 横切关注点:跨越应用程序多个模块的方法或功能。既是,与我们业务逻辑无关的,但我们需要关注的部分,就是横切关注点。如:日志,安全、缓存,事务等等…
- 切面(ASPECT):横切关注点 被模块化的特殊对象。即,他是一个类。
- 通知(Advice):切面必须要完成的工作。即,他是类中一个方法。
- 目标(Target):被通知对象。
- 代理(Proxy):向目标对象应用通知之后创建的对象。
- 切入点(PointCut):切面通知 执行的“地点”的定义。
- 连接点(JointPoint):与切入点匹配的执行点。
方式一:使用原生springAPI实现AOP【主要springAPI接口实现】:
- 1、service接口及实现类:
public interface UserService {
    public void add();
    public void delete();
    public void update();
    public void select();
}


public class UserServiceImpl implements UserService{
    @Override
    public void add() {
        System.out.println("增加....");
    }

    @Override
    public void delete() {
        System.out.println("删除.....");
    }

    @Override
    public void update() {
        System.out.println("修改....");
    }

    @Override
    public void select() {
        System.out.println("查询....");
    }
}
- 2、编写log类在log包中:
public class BeforeLog implements MethodBeforeAdvice {
    @Override
    /*
    * method:要执行的目标对象的方法
    * args:参数
    * target:目标对象
    * */
    public void before(Method method, Object[] args, Object target) throws Throwable {
        System.out.println(target.getClass().getName()+"的"+method.getName()+"被执行了");
    }
}


public class AfterLog implements AfterReturningAdvice {
    @Override
    //returnValue返回值
    public void afterReturning(Object returnValue, Method method, Object[] args, Object target) throws Throwable {
        System.out.println("执行了:"+method.getName()+"方法,返回结果为:"+returnValue);
    }
}
- 3、applicationContext.xml配置文件:
<?xml version="1.0" encoding="UTF-8"?>
<beans xmlns="http://www.springframework.org/schema/beans"
       xmlns:xsi="http://www.w3.org/2001/XMLSchema-instance"
       xmlns:context="http://www.springframework.org/schema/context"
       xmlns:aop="http://www.springframework.org/schema/aop"
       xsi:schemaLocation="http://www.springframework.org/schema/beans
        https://www.springframework.org/schema/beans/spring-beans.xsd
        http://www.springframework.org/schema/context
        https://www.springframework.org/schema/context/spring-context.xsd
        http://www.springframework.org/schema/aop
        https://www.springframework.org/schema/aop/spring-aop.xsd">
    <!--注册bean-->
    <bean id="userService" class="com.liu.service.UserServiceImpl"/>
    <bean class="com.liu.log.BeforeLog" id="beforeLog"/>
    <bean id="afterLog" class="com.liu.log.AfterLog"/>
    <!--方式一:使用原生Spring API接口-->
    <!--配置aop:需要导入aop的约束-->
    <aop:config>
    <!--切入点:expression是表达式,execution(要执行的位置!....)-->
        <aop:pointcut id="pointcut" expression="execution(* com.liu.service.UserServiceImpl.*(..))"/>
    <!-- 执行环绕增加-->
        <aop:advisor advice-ref="beforeLog" pointcut-ref="pointcut"/>
        <aop:advisor advice-ref="afterLog" pointcut-ref="pointcut"/>
    </aop:config>

</beans>
- 4、测试类:
public class TestSix {
    @Test
    public void testLo(){
        ApplicationContext context = new ClassPathXmlApplicationContext("applicationContext.xml");
        //动态代理  代理的是接口:注意点
        UserService userService =(UserService) context.getBean("userService");
        userService.select();
    }
}
- 5、结果:
com.liu.service.UserServiceImpl的select被执行了
查询....
执行了:select方法,返回结果为:null
方式二:自定义实现AOP【主要是切面定义】(推荐)
- 1、编写service以及实现类,同上例子一样
- 2、编写diy类在diy包中
//自定义方法
public class Diy {
    public void before(){
        System.out.println("=======在前面执行=======");
    }
    public void after(){
        System.out.println("=====在后面执行====");
    }
}
- 3、配置文件
<?xml version="1.0" encoding="UTF-8"?>
<beans xmlns="http://www.springframework.org/schema/beans"
xmlns:xsi="http://www.w3.org/2001/XMLSchema-instance"
xmlns:context="http://www.springframework.org/schema/context"
xmlns:aop="http://www.springframework.org/schema/aop"
xsi:schemaLocation="http://www.springframework.org/schema/beans
https://www.springframework.org/schema/beans/spring-beans.xsd
http://www.springframework.org/schema/context
https://www.springframework.org/schema/context/spring-context.xsd
http://www.springframework.org/schema/aop
https://www.springframework.org/schema/aop/spring-aop.xsd">
<!--注册bean-->
<bean id="userImpl" class="com.liu.service.UserServiceImpl"/>
<bean class="com.liu.log.BeforeLog" id="beforeLog"/>
<bean id="afterLog" class="com.liu.log.AfterLog"/>
<!--方式一:使用原生Spring API接口-->
<!--配置aop:需要导入aop的约束-->
<!-- <aop:config>-->
<!-- <!–切入点:expression是表达式,execution(要执行的位置!....)–>-->
<!-- <aop:pointcut id="pointcut" expression="execution(* com.liu.service.UserServiceImpl.*(..))"/>-->
<!-- <!– 执行环绕增加–>-->
<!-- <aop:advisor advice-ref="beforeLog" pointcut-ref="pointcut"/>-->
<!-- <aop:advisor advice-ref="afterLog" pointcut-ref="pointcut"/>-->
<!-- </aop:config>-->
<!--方式二:使用自定义类实现AOP-->
<bean class="com.liu.diy.Diy" id="diy"/>
<aop:config>
<!--自定义切面,ref要引用的类-->
<aop:aspect ref="diy">
<!--切入点-->
<aop:pointcut id="point" expression="execution(* com.liu.service.UserServiceImpl.*(..))"/>
<!--通知-->
<aop:before method="before" pointcut-ref="point"/>
<aop:after method="after" pointcut-ref="point"/>
</aop:aspect>
</aop:config>
</beans>
- 4、测试类,和上例子一样
- 5、结果:
=======在前面执行=======
增加....
=====在后面执行====
方式三:使用注解进行切面
1、编写AnnotationPointCut类
//标注这个类是一个切面
@Aspect
public class AnnotationPointCut {

    @Before("execution(* com.liu.service.UserServiceImpl.*(..))")
    public void before(){
        System.out.println("===前面=====");
    }
    @After("execution(* com.liu.service.UserServiceImpl.*(..))")
    public void after(){
        System.out.println("===后面-====");
    }

    //在环绕增强中,我们可给定一个参数,代表要获取处理切入的点
    @Around("execution(* com.liu.service.UserServiceImpl.*(..))")
    public void around(ProceedingJoinPoint jp) throws Throwable {
        System.out.println("环绕前");
        Signature signature = jp.getSignature();//获取签名
        System.out.println("signature签名为:"+signature);
        Object proceed = jp.proceed();//执行方法
        System.out.println("----环绕后----");
        System.out.println(proceed);
    }
}
*注意:*若不显示@Aspect提示:①查看是否有相关依赖②作用域是否没去掉
2、配置文件类:
<?xml version="1.0" encoding="UTF-8"?>
<beans xmlns="http://www.springframework.org/schema/beans"
       xmlns:xsi="http://www.w3.org/2001/XMLSchema-instance"
       xmlns:aop="http://www.springframework.org/schema/aop"
       xsi:schemaLocation="http://www.springframework.org/schema/beans
        https://www.springframework.org/schema/beans/spring-beans.xsd
        http://www.springframework.org/schema/aop
        https://www.springframework.org/schema/aop/spring-aop.xsd">
    <!--注册bean-->
    <bean id="userImpl" class="com.liu.service.UserServiceImpl"/>
    <bean class="com.liu.log.BeforeLog" id="beforeLog"/>
    <bean id="afterLog" class="com.liu.log.AfterLog"/>

	<!--方式三:使用注解进行AOp-->
    <bean class="com.liu.diy.AnnotationPointCut" id="annotationPointCut"/>
    <!--开启注解支持
    JDK默认的是使用接口代理( proxy-target-class="false")
    cglib:使用类代理是( proxy-target-class="true")
    -->
    <aop:aspectj-autoproxy/>

</beans>
3、测试类:和上例子一样。
4、结果:
环绕前
signature签名为:void com.liu.service.UserService.add()
===前面=====
增加....
===后面-====
----环绕后----
null
10、Mybatis-spring整合:
一:第一种方式
1、导入相应的pom配置文件:
 <dependencies>
        <!--测试时用到-->
        <dependency>
            <groupId>junit</groupId>
            <artifactId>junit</artifactId>
            <version>4.11</version>
            <scope>test</scope>
        </dependency>
        <!--mysql连接数据库-->
        <dependency>
            <groupId>mysql</groupId>
            <artifactId>mysql-connector-java</artifactId>
            <version>5.1.47</version>
        </dependency>

        <!--mybatis需要的-->
        <dependency>
            <groupId>org.mybatis</groupId>
            <artifactId>mybatis</artifactId>
            <version>3.5.2</version>
        </dependency>

        <!--为Spring核心提供了大量扩展-->
        <dependency>
            <groupId>org.springframework</groupId>
            <artifactId>spring-context</artifactId>
            <version>5.3.13</version>
        </dependency>

        <!-- 包含对Spring对JDBC数据访问进行封装的所有类。 -->
        <dependency>
            <groupId>org.springframework</groupId>
            <artifactId>spring-jdbc</artifactId>
            <version>5.3.13</version>
        </dependency>


        <!--支持切面编程(AOP)-->
        <dependency>
            <groupId>org.aspectj</groupId>
            <artifactId>aspectjweaver</artifactId>
            <version>1.9.7</version>
        </dependency>
        <!--spring与mybatis的整合-->
        <dependency>
            <groupId>org.mybatis</groupId>
            <artifactId>mybatis-spring</artifactId>
            <version>2.0.6</version>
        </dependency>
    </dependencies>
注意:此处还需要配置 资源加载失败的文件:
 <!--解决资源加载的问题-->
    <build>
        <resources>
            <resource>
                <directory>src/main/resources</directory>
                <includes>
                    <include>**/*.properties</include>
                    <include>**/*.xml</include>
                </includes>
                <filtering>true</filtering>
            </resource>
            <resource>
                <directory>src/main/java</directory>
                <includes>
                    <include>**/*.properties</include>
                    <include>**/*.xml</include>
                </includes>
                <filtering>true</filtering>
            </resource>
        </resources>
    </build>
2、编写spring整合mybatis的核心文件:spring-mybatis.xml
<?xml version="1.0" encoding="UTF-8"?>
<beans xmlns="http://www.springframework.org/schema/beans"
xmlns:xsi="http://www.w3.org/2001/XMLSchema-instance"
xsi:schemaLocation="http://www.springframework.org/schema/beans
https://www.springframework.org/schema/beans/spring-beans.xsd">
<!--
DataSource:使用Spring的数据源替换Mybatis的配置(有:c3p0、dbcp、druid)
这里使用 Spring提供的JDBC:org.springframework.jdbc.datasource
-->
<bean id="dataSource" class="org.springframework.jdbc.datasource.DriverManagerDataSource">
<property name="driverClassName" value="com.mysql.jdbc.Driver"/>
<property name="url" value="jdbc:mysql://localhost:3306/mybatis?useSSL=false&useUnicode=true&characterEncoding=utf-8"/>
<property name="username" value="root"/>
<property name="password" value="123456"/>
</bean>
<!--SqlSessionFactory-->
<bean id="sqlSessionFactory" class="org.mybatis.spring.SqlSessionFactoryBean">
<property name="dataSource" ref="dataSource"/>
<property name="configLocation" value="classpath:mybatis-config.xml"/>
<property name="mapperLocations" value="classpath:com/liu/dao/*.xml"/>
</bean>
<!--SqlSessionTemplate:就是我们使用的sqlSession-->
<bean id="sqlSessionTemplate" class="org.mybatis.spring.SqlSessionTemplate">
<!--只能使用构造器注入sqlSessionFactory,因为他没有set方法-->
<constructor-arg index="0" ref="sqlSessionFactory"/>
</bean>
<!--装配sqlSessionTemplate到需要的地方-->
<bean id="userMapper" class="com.liu.dao.UserMapperImpl">
<property name="template" ref="sqlSessionTemplate"/>
</bean>
</beans>
3、编写实体类:User以及接口、实现类:
1、数据库中:
    id
    name
    pwd
    sex

2、实体User类:
    public class User {
    private int id;
    private String name;
    private String pwd;
    private String sex;
        //省略setter和getter方法
    }

3、UserMapper接口:
    public interface UserMapper {
    //查询所有的信息
  		 public List<User> getUsers();
	}

4、操作数据库(Mybatis)UserMapper.xml:
    <?xml version="1.0" encoding="UTF-8" ?>
	<!DOCTYPE mapper
        PUBLIC "-//mybatis.org//DTD Config 3.0//EN"
        "http://mybatis.org/dtd/mybatis-3-mapper.dtd">
	<mapper namespace="com.liu.dao.UserMapper">
        <select id="getUsers" resultType="user">
            select * from User;
        </select>
	</mapper>

5、UserMapperImpl实现类:
    public class UserMapperImpl implements UserMapper{
        //我们的所有的操作,在原来:都使用SQLSession来执行,
        //现在:都使用SqlSessionTemplate
        private SqlSessionTemplate template;
        public void setTemplate(SqlSessionTemplate template){
            this.template=template;
        }
        @Override
        public List<User> getUsers() {
            UserMapper mapper = template.getMapper(UserMapper.class);
            return mapper.getUsers();
        }
	}
4、测试类
public class Spring_MybatisTest {
    @Test
    public void testThis(){
        ApplicationContext context = new ClassPathXmlApplicationContext("spring-mybatis.xml");
        UserMapper userMapper = context.getBean("userMapper", UserMapper.class);
        List<User> users = userMapper.getUsers();
        for (User user : users) {
            System.out.println(user);
        }
    }
}
结果:
User{id=1, name='返回', pwd='456123', sex='h'}
User{id=2, name='dd', pwd='ty', sex='s'}
User{id=3, name='gd', pwd='为', sex='让'}
User{id=4, name='khd', pwd='456', sex='k'}
二:第二种方式(继承官方提供的类:SqlSessionDaoSupport):
1、再次编写一个UserMapperImpl2实现类:
public class UserMapperImpl2 extends SqlSessionDaoSupport implements UserMapper{
    @Override
    public List<User> getUsers() {
        return getSqlSession().getMapper(UserMapper.class).getUsers();
    }
}

直接省去了工厂类
2、配置文件中:
 <bean id="impl2" class="com.liu.dao.UserMapperImpl2">
        <property name="sqlSessionFactory" ref="sqlSessionFactory"/>
    </bean>
3、测试、结果一样
11、声明式事务:
a、回顾事务:
- 把一组业务当成一个业务来做;要么都成功,要么都失败!
- 事务在项目开发中,十分的重要,涉及到数据的一致性问题,不能马虎!
- 确保完整性和一致性;
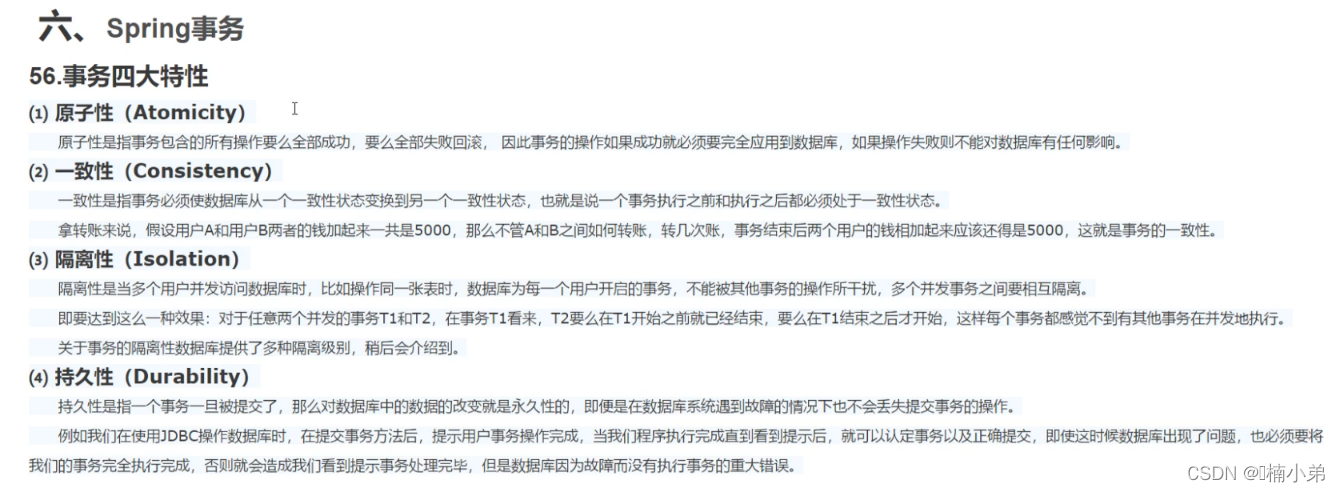
事务ACID原则:
- 原子性
- 一致性
- 隔离性
- 多个业务可能操作同一个资源,防止数据损坏。
- 持久性
- 事务一旦提交,无论系统发生什么问题,结果都不会再被影响,被持久化的写到存储器中
b、spring中的事务管理
- 声明式事务:AOP
- 编程式事务:需要在代码中,进行事务的管理
- 为什么需要事务?
- 若不配置事务,可能存在数据提交不一致的情况下;
- 若我们不在spring中去配置声明式事务,我们就需要在代码中手动配置事务
- 事务在项目的开发中十分重要,设计到数据的一致性和完整性问题,不容马虎!
1、接口UserMapper:
public interface UserMapper {
     List<User> getUsers();

     int add(User user);

     int delete(@Param("id") int id);
}
2、操作数据库的UserMapper.xml
<?xml version="1.0" encoding="UTF-8" ?>
<!DOCTYPE mapper
        PUBLIC "-//mybatis.org//DTD Mapper 3.0//EN"
        "http://mybatis.org/dtd/mybatis-3-mapper.dtd">
<mapper namespace="com.liu.dao.UserMapper">
    <select id="getUsers" resultType="user">
        select * from User
    </select>

    <insert id="add">
        insert into user(id,name,pwd,sex)values(#{id},#{name},#{pwd},#{sex})
    </insert>

    <delete id="delete">
        delete from USER where id=#{id}
    </delete>
</mapper>
3、实现UserMapper接口的UserMapperImpl实现类
public class UserMapperImpl implements UserMapper {
    private SqlSessionTemplate template;

    public void setTemplate(SqlSessionTemplate template) {
        this.template = template;
    }
    @Override
    public List<User> getUsers() {
        add(new User(11,"uuu","100","女"));

        int delete = delete(10);
        if(delete>0) System.out.println("ok");
        else System.out.println("shibi");
        return template.getMapper(UserMapper.class).getUsers();
    }
        @Override
    public int add(User user) {
        return template.getMapper(UserMapper.class).add(user);
    }

    @Override
    public int delete(int id) {
        return template.getMapper(UserMapper.class).delete(id);
    }
}
4、spring和mybatis整合的文件中 事务的文件:
....
<!--配置声明事务支持-->
    <bean id="transactionManager" class="org.springframework.jdbc.datasource.DataSourceTransactionManager">
        <constructor-arg ref="dataSource" />
    </bean>

    <!--结合AOP实现事务的织入-->
    <!--配置事务通知-->
    <tx:advice id="txAdvice" transaction-manager="transactionManager">
        <!--给那些方法配置事务-->
        <!--配置事务的传播性-->
        <tx:attributes>
            <tx:method name="add" propagation="REQUIRED"/>
            <tx:method name="delete" propagation="REQUIRED"/>
            <tx:method name="update" propagation="REQUIRED"/>
            <tx:method name="query" propagation="REQUIRED"/>
            <tx:method name="*" propagation="REQUIRED"/>
        </tx:attributes>
    </tx:advice>
    <!--配置事务切入-->
    <aop:config>
        <aop:pointcut id="txPoint" expression="execution(* com.liu.dao.*.*(..))"/>
        <aop:advisor advice-ref="txAdvice" pointcut-ref="txPoint"/>
    </aop:config>

    <bean id="mapper" class="com.liu.dao.UserMapperImpl">
        <property name="template" ref="sessionTemplate"/>
    </bean>
5、测试:
public class SmaTEst {
    @Test
    public void TestSpM(){
        ApplicationContext context = new ClassPathXmlApplicationContext("mybatis-Spring.xml");
        UserMapper mapper = context.getBean("mapper", UserMapper.class);
        List<User> users = mapper.getUsers();
        for (User user : users) {
            System.out.println(user);
        }
    }
}
———————————分割线————————————
详细篇:《spring学习—参考动力节点》
一、简单介绍
- spring的核心功能:
- 控制反转(IOC)
- 是一个理论,概念,思想。
- 依赖注入(DI)
- 面向切面编程(AOP)
- 控制反转(IOC)
- 为什么要使用ioc ?:
目的就是减少对代码的改动,实现不同的功能,实现解耦合。
- java 中创建对象有哪些方式 ?
1、构造方法(new 对象())
2、反射
3、序列化
4、克隆
5、ioc:容器创建对象
6、动态代理
- IOC在以前的体现

- IOC的技术实现
DI 是ioc的技术实现
DI(Dependency Injection):
		依赖注入,只需要在程序中提供要使用的对象名称就可以,
		对象的创建、赋值、查找都由容器内部实现。
spring 是使用的di 实现了ioc 的功能,spring底层创建对象,
		使用的是反射机制。
二、第一个简单的例子
1、添加依赖
<!--junit环境-->
        <dependency>
            <groupId>junit</groupId>
            <artifactId>junit</artifactId>
            <version>4.13.1</version>
            <scope>test</scope>
        </dependency>

        <!--spring依赖-->
        <dependency>
            <groupId>org.springframework</groupId>
            <artifactId>spring-context</artifactId>
            <version>5.3.15</version>
        </dependency>
2、在com.liu.dao包下建个liu.Java接口
public interface liu {
    void shout();
}
3、在com.liu.dao.impl包下建个LiuImpl.Java实现类
public class Liuimpl implements liu {
    @Override
    public void shout() {
        System.out.println("哦我来了~~~~~");
    }
}
4、resources包建个bean.xml spring文件
- idea中 :
点一下resources包 --> 右击 --> new --> xml Configuration file --> spring config
- 注意:
1、若发现没有 spring config 请检查是否已添加 spring的相关依赖?
2、若是maven工程,点击一下刷新试试。
- bean.xml
<?xml version="1.0" encoding="UTF-8"?>
<beans xmlns="http://www.springframework.org/schema/beans"
       xmlns:xsi="http://www.w3.org/2001/XMLSchema-instance"
       xsi:schemaLocation="http://www.springframework.org/schema/beans
       http://www.springframework.org/schema/beans/spring-beans.xsd">
    <!--告诉spring创建对象
        声明bean:就是告诉spring要创建某个类的对象
        id:对象的自定义名称,唯一值。spring通过id名找到对象
        class:类的全限定名称(不能是接口,因为spring是反射机制创建对象,必须使用类)

        实现原理:
        spring是把创建好的对象放入到map中,spring框架有一个map存放对象的,
        springMap.put(id的值,对象);
        eg:
        springMap。put("liuimpl",new com.liu.dao.impl.Liuimpl());
        一个bean标签声明一个对象。
        -->
    <bean id="liuimpl" class="com.liu.dao.impl.Liuimpl"/>
    <!--
        spring的配置文件
        1、beans:是根标签,spring把java对象成为bean。
        2、spring-beans.xsd 是约束文件,和mybatis指定 dtd是一样的。
    -->
5、测试
- 在test包下建个com.liu包,在建的包中new一个 TestLiu.java类
public class TestLiu {
    @Test
    public void testOfBean(){
        //使用spring容器创建的对象
        //1、指定spring配置文件的名称

        String config="bean.xml";

        //2、创建表示spring容器的对象,ApplicationContext
        //ApplicationContext 就是表示spring容器,通过容器获取对象了
        //ClassPathXmlApplicationContext:表示从类路径中加载sprig的配置文件

        //spring默认创建对象的时间:在创建spring的容器时,会创建配置文件中的所有的对象。
        //spring创建对象:默认调用的是无参数构造方法。

        ApplicationContext ac=new ClassPathXmlApplicationContext(config);
        //从容器中获取某个对象,你要调用对象的方法
        //getBean(“配置文件中的bean的id值”)

        liu ll = (liu) ac.getBean("liuimpl");

        //使用spring创建好的对象
        ll.shout();

 		//获取对象的数量
        System.out.println(ac.getBeanDefinitionCount());

        //获取对象中的名字
        String[] names = ac.getBeanDefinitionNames();
        for ( String a:names){
            System.out.println(a);
        }
    }
}
6、spring中也能加载非自定义的类
- xml
 <!--spring能创建一个非自定义类的对象(别人写好的类)-->
    <bean id="myDate" class="java.util.Date"/>
- test
 //获取一个非自定义的类对象
    @Test
    public void test04(){
        String config="bean.xml";
        ApplicationContext ac=new ClassPathXmlApplicationContext(config);
        Date myDate =(Date) ac.getBean("myDate");
        System.out.println("time:"+myDate);

        //获取 “bean.xml” 中对象的个数
        System.out.println(ac.getBeanDefinitionCount());
        //获取对象的 id 名
        String[] b = ac.getBeanDefinitionNames();
        for (String bb:b){
            System.out.println(bb);
        }
    }
三、基于xml的DI(依赖注入)
A、注入分类
- DI:依赖注入,表示创建对象,给属性赋值。
- 注入:就是赋值的意思。
- 简单类型:spring中规定Java的基本数据类型和String都是简单类型。
1、依赖注入的实现有两种:
- 1、在spring配置文件中,使用标签和属性完成,叫基于XML的DI实现。
- 2、使用spring中的注解,完成属性赋值,叫做基于注解的id实现。
2、DI的语法分类:
1、set注入(设值注入)
spring 调用类的set方法,在set方法可以实现属性的赋值。
80%左右都是使用的 set 注入。

可分为:1、简单类型的set注入
		2、引用类型的set注入
- A、简单类型的set注入
- Student.java类
public class Student { private String name; private int age; public void setName(String name) { this.name = name; } public void setAge(int age) { this.age = age; } @Override public String toString() { return "Student{" + "name='" + name + '\'' + ", age=" + age + '}'; }- 配置文件
<?xml version="1.0" encoding="UTF-8"?> <beans xmlns="http://www.springframework.org/schema/beans" xmlns:xsi="http://www.w3.org/2001/XMLSchema-instance" xsi:schemaLocation="http://www.springframework.org/schema/beans http://www.springframework.org/schema/beans/spring-beans.xsd"> <!--声明student对象 注入:就是赋值的意思 简单类型:spring中规定Java的基本数据类型和String都是简单类型。 DI:给属性赋值 1、set注入(设置注入):spring调用类的set方法,可以在set方法中完成属性赋值 1)简单类型的set注入 <bean id="xxx" class="yyy"> <property name="属性名字" value="此属性的值"/> 一个property只能给一个属性赋值 </bean> 2)引用类型的set注入:spring调用类的set方法 <bean id="xxx" class="yyy"> <property name="属性名字" ref="bean的id(对象的名称)"/> </bean> --> <bean id="myStudent" class="com.liu.service.Student"> <property name="name" value="liu"/><!--setName("liu")--> <property name="age" value="24"/><!--setAge("24")--> </bean> </beans>- 简单类型的测试
public class TestStu { @Test public void testOne(){ String config="service/applicationContext.xml"; ApplicationContext ac=new ClassPathXmlApplicationContext(config); Student stu =(Student) ac.getBean("myStudent"); System.out.println("对象:"+stu); } } - B、引用类型的set注入
- 包下有两个类:Student.java、School.java
Student类: public class School { private String name; private String address; ···setter and getter 方法··· ···tostring方法··· } School类: public class Student { private String name; private int age; private School school; ···setter and getter 方法··· ···tostring方法··· }- 配置文件
<?xml version="1.0" encoding="UTF-8"?> <beans xmlns="http://www.springframework.org/schema/beans" xmlns:xsi="http://www.w3.org/2001/XMLSchema-instance" xsi:schemaLocation="http://www.springframework.org/schema/beans http://www.springframework.org/schema/beans/spring-beans.xsd"> <bean id="stu" class="com.liu.dao.Student"> <property name="name" value="liu"/> <property name="age" value="24"/> <property name="school" ref="school"/><!--引用类型--> </bean> <!--被引用的类--> <bean id="school" class="com.liu.dao.School"> <property name="name" value="天国"/> <property name="address" value="天路历程"/> </bean> </beans>- 引用类型的测试
public class TestDao {
@Test
public void testOne(){
    //引入配置文件
    String config="dao/beans.xml";
    ApplicationContext ac=new ClassPathXmlApplicationContext(config);
    Student stu = (Student) ac.getBean("stu");
    System.out.println(stu);
}
}
2、构造注入
spring 调用类的有参数构造方法,创建对象。在构造方法中完成赋值。

使用方法:
	构造注入使用:<constructor-arg>标签,
	<constructor-arg>标签:一个<constructor-arg>表示构造方法一个参数。
	<constructor-arg>标签属性:
		name:表示构造方法的形参名
		index:表示构造方法的参数的位置,参数从左往右位置是 0,1,2的顺序。
		value:构造放法的形参类型是简单类型的,使用value
		ref:构造方法的形参是引用类型的,使用ref

构造注入是指:
	在构造调用者实例的同时,完成被调用者的实例化,
	就是,使用 构造器设置依赖关系。

构造注入有3中方式:
	1、使用name属性实现构造注入(推荐)
	2、使用 index 属性
	3、省略 index 属性
1、使用name属性实现构造注入(推荐)
- Student.java、School.java
//Student.java:

	public class Student {
	    private String name;
	    private String age;
	    private School school;

	    public Student() {
	        System.out.println("Student的无参构造.....");
	    }

	    public Student(String name, String age, School school) {
	        System.out.println("Student的有参构造.....");
	        this.name = name;
	        this.age = age;
	        this.school = school;
	    }

	    @Override
	    public String toString() {
	        return "Student{" +
	                "name='" + name + '\'' +
	                ", age='" + age + '\'' +
	                ", school=" + school +
	                '}';
	    }

//School.java:

		public class School {
	    private String name;
	    private String address;

	    //这里使用set注入方法
	    public void setName(String name) {
	        this.name = name;
	    }

	    public void setAddress(String address) {
	        this.address = address;
	    }

	// 使用构造注入请写有参构造方法
	//    public School(String name, String address) {
	//        this.name = name;
	//        this.address = address;
	//    }

	    @Override
	    public String toString() {
	        return "School{" +
	                "name='" + name + '\'' +
	                ", address='" + address + '\'' +
	                '}';
	    }
	}
- 配置文件
<?xml version="1.0" encoding="UTF-8"?>
<beans xmlns="http://www.springframework.org/schema/beans"
       xmlns:xsi="http://www.w3.org/2001/XMLSchema-instance"
       xsi:schemaLocation="http://www.springframework.org/schema/beans http://www.springframework.org/schema/beans/spring-beans.xsd">

    <!--使用name属性实现构造注入方式-->
    <bean id="stu" class="com.liu.pojo.Student">
        <constructor-arg name="name" value="haha"/>
        <constructor-arg name="age" value="16"/>
        <constructor-arg name="school" ref="sch"/>
    </bean>

<!--    school的set注入-->
    <bean id="sch" class="com.liu.pojo.School">
        <property name="name" value="货啊u大学"/>
        <property name="address" value="蝌蚪"/>
    </bean>

<!--    school的构造注入-->
<!--    <bean id="sch" class="com.liu.pojo.School">-->
<!--        <constructor-arg name="name" value="巴啦啦"/>-->
<!--        <constructor-arg name="address" value="黑挂了了"/>-->
<!--    </bean>-->
</beans>
- 测试:
public class TestPojo {
    @Test
    public void testOne(){
        String config="pojo/beans.xml";
        ApplicationContext ac=new ClassPathXmlApplicationContext(config);
        Student stu = (Student) ac.getBean("stu");
        System.out.println(stu);
    }
}
2、使用 index 属性
- 配置文件中
<bean id="stu" class="com.liu.pojo.Student">
        <constructor-arg index="0" value="haha"/>
        <constructor-arg index="1" value="16"/>
        <constructor-arg index="2" ref="sch"/>
    </bean>
3、省略 index 属性
- 配置中
 <bean id="stu" class="com.liu.pojo.Student">
        <constructor-arg  value="haha"/>
        <constructor-arg  value="16"/>
        <constructor-arg  ref="sch"/>
    </bean>
- 推荐使用:使用name属性实现构造注入的方式。
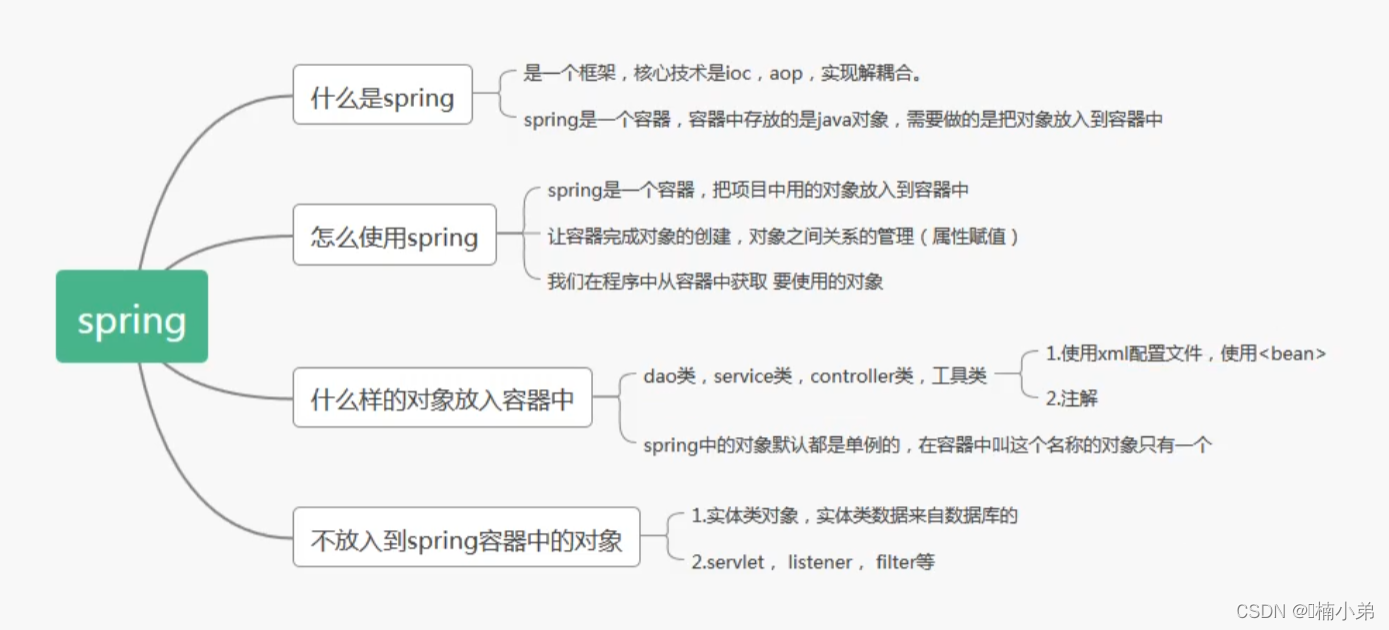
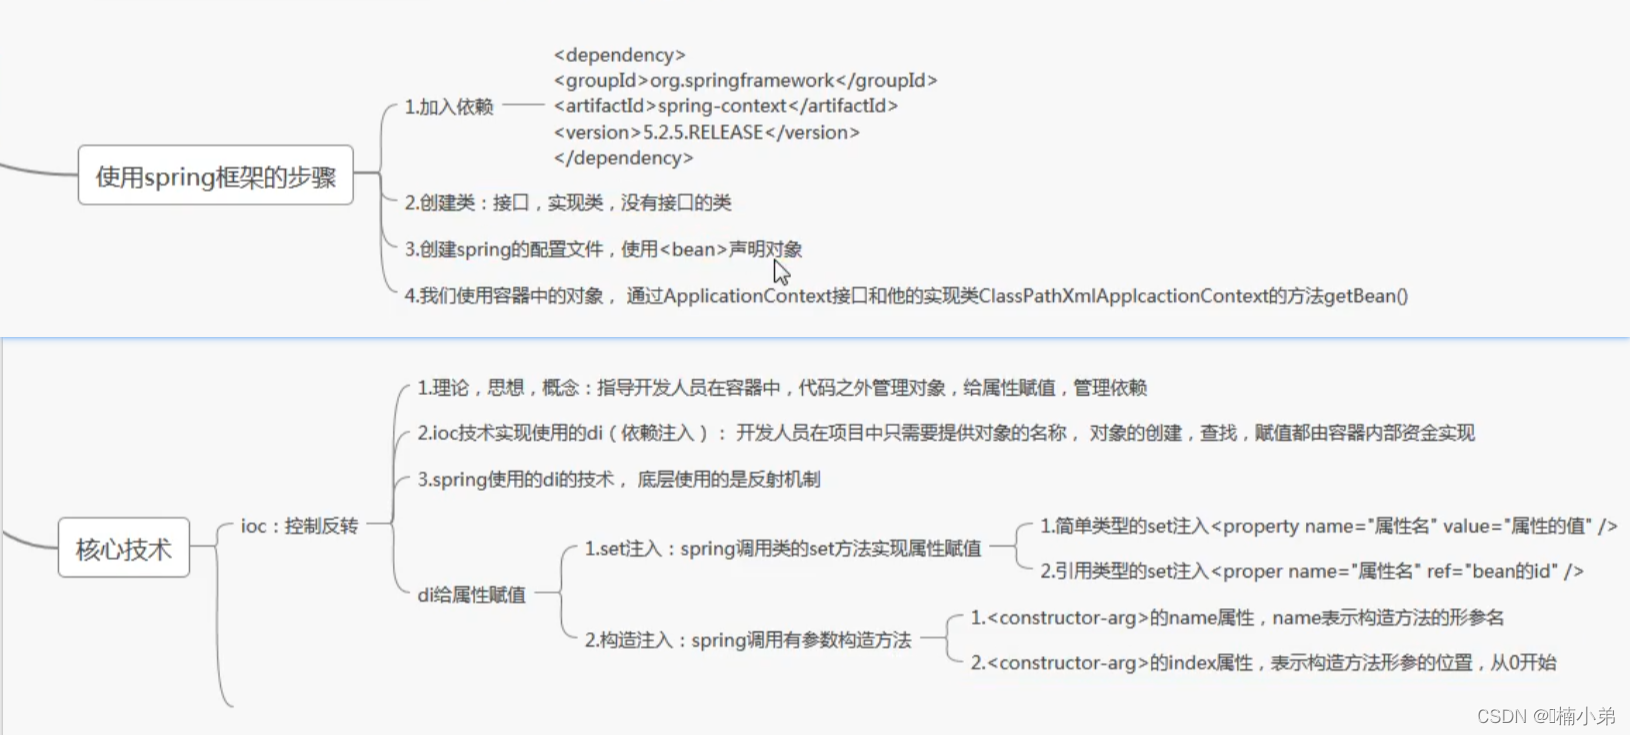
3、小结
B、引用类型属性自动注入
- 引用类型的自动注入:
spring框架根据某些规则可以给引用类型赋值。
- 使用的规则常用的是:byName,byType。
1、byName方式自动注入(按名称):
java类中引用类型的属性名和spring容器中(配置文件)<bean>的id名称一样,
且数据类型是一致的,如此,spring能根据容器中的bean 给引用类型赋值。

语法:
<bean id="xx" class="yyy" autowire="byName">
	简单类型属性赋值
<bean>
- 就是说:使用byName方式,引用类型的bean id名必须和其属性名一样。
public class Student {
    private String name;
    private Integer age;
    private School school;//此处的属性名必须和bean中的id一致

	....setter and getter....
<bean id="stu" class="com.liu.one.Student" autowire="byName">
        <property name="name" value="伙食"/>
        <property name="age" value="19"/>
    </bean>
    <!--下方的id必须和属性名一致-->
    <bean id="school" class="com.liu.one.School">
        <property name="name" value="活石"/>
        <property name="address" value="海边哟吗"/>
    </bean>
2、byType方式自动注入
- 只看类型是否相同或是否是继承,不看bean中的id是否和属性名一致。
java类中引用类型的数据类型和spring容器中(配置文件)<bean>的class属性
是同源关系的,这样的bean能够赋值给引用类型。

同源就是一类的意思:
	1、java类中引用类型的数据类型和bean的class的值是一样的。
	2、java类中引用类型的数据类型和bean的class的值父子类关系的。
	3、java类中引用类型的数据类型和bean的class的值接口和实现类关系的。

语法:
	<bean id="xxx" class="yyyy" autowire="byType">
		简单类型属性赋值
	</bean>

注意:
	在byType中,在xml配置文件中声明bean只能有一个符合条件的,
	若有多个符合的,则会报错。
例子1:
- Student.java、Teacher.java类
Teacher.java类:
	public class Teacher {
    private String name;
    private String sex;

	setter 和 getter 方法
	...tostring...
	}

Student.java类:
	public class Student {
    private String name;
    private Integer age;
    private Teacher teacher;

	 ...setter 和 getter 方法...
	 ...toString... 方法
	}
- 配置文件
<?xml version="1.0" encoding="UTF-8"?>
<beans xmlns="http://www.springframework.org/schema/beans"
       xmlns:xsi="http://www.w3.org/2001/XMLSchema-instance"
       xsi:schemaLocation="http://www.springframework.org/schema/beans http://www.springframework.org/schema/beans/spring-beans.xsd">

    <bean id="stu" class="com.liu.two.Student" autowire="byType">
        <property name="name" value="张静"/>
        <property name="age" value="22"/>
    </bean>

	byType方式只和类型有关
    <bean id="MyTeacher" class="com.liu.two.Teacher">
        <property name="name" value="罗西"/>
        <property name="sex" value="楠"/>
    </bean>
例子2:子类的情况
- 编写MiddleTeacher.java继承Teacher.java类
public class MiddleTeacher extends Teacher{
}
- 配置文件
<?xml version="1.0" encoding="UTF-8"?>
<beans xmlns="http://www.springframework.org/schema/beans"
       xmlns:xsi="http://www.w3.org/2001/XMLSchema-instance"
       xsi:schemaLocation="http://www.springframework.org/schema/beans http://www.springframework.org/schema/beans/spring-beans.xsd">

    <bean id="stu" class="com.liu.two.Student" autowire="byType">
        <property name="name" value="张静"/>
        <property name="age" value="22"/>
    </bean>

父类的需要注释掉,因为byType方式暂时只需:有且唯一对应的类型
<!--    <bean id="MyTeacher" class="com.liu.two.Teacher">-->
<!--        <property name="name" value="罗西"/>-->
<!--        <property name="sex" value="楠"/>-->
<!--    </bean>-->

    <bean id="middleTea" class="com.liu.two.MiddleTeacher">
        <property name="name" value="动工"/>
        <property name="sex" value="女"/>
    </bean>
</beans>
C、多个配置的优势
- 指的是每个模块配置一个文件,然后再综合起来,ssm框架就是这样弄的,这样好管理。

- 优势:
1、每个文件的大小比一个文件小很多,so,效率高
2、避免多个文件带来的冲突
3、eg;
	if你的项目有多个模块(相关的功能在一起),一个模块一个配置文件。
	学生考勤模块一个配置文件,eg:张三
	学生成绩一个配置文件,eg:李四
- 多文件的分配方式:
1、接功能模块,一个模块一个配置文件
2、按类的功能,数据库相关的配置一个文件配置文件,做事务的功能一个配置文件,
					做service功能的一个配置文件等等。
- 主配置文件(综合文件):
包含其他的配置文件,主配置文件一般是不定义对象。

语法:
	<import resource:"其他配置文件的路径"/>

关键字:
	“classpath:”表示类路径(class文件所在的目录),
	在spring的配置文件中要指定其他文件的位置,需要使用classpath,
	告诉spring到哪去加载读取文件。

注意:
	1、在包含关系的配置文件中,可以通配符(*:表示任意字符)
	2、主配置文件名称不能包含在通配符的范围内,否则会死循环(会报错)。
<?xml version="1.0" encoding="UTF-8"?>
<beans xmlns="http://www.springframework.org/schema/beans"
       xmlns:xsi="http://www.w3.org/2001/XMLSchema-instance"
       xsi:schemaLocation="http://www.springframework.org/schema/beans http://www.springframework.org/schema/beans/spring-beans.xsd">

<!--    <import resource="classpath:three/spring-school.xml"/>-->
<!--    <import resource="classpath:three/spring-student.xml"/>-->
			========通配符==========
    <import resource="classpath:three/spring-*.xml"/>
</beans>
四、基于注解的DI
- 通过注解完成Java对象创建,属性赋值。
- 步骤:
1、加入maven的依赖 spring-context,在加入spring-context的同时,
间接加入了spring-aop的依赖(使用注解必须使用spring-aop依赖)。
2、在类中加入spring的注解(多个不同功能的注解)
3、在spring的配置文件中,加入一个组件扫描器的标签,说明注解在项目中的位置
- 学习的注解:
1、@Component    创建对象,相当于bean
2、@Respotory    创建对象,使用在dao层
3、@Service      创建对象,使用在service层
4、@Controller   创建对象,使用在controller层
5、@Value
6、@Autowried
7、@Resource
4.1、定义Bean的注解@Component
a、 介绍:
 在类中:

@Component:创建对象的,等同于<bean>的功能。
属性:value 就是对象的名称,也就是bean的id值,
	 value的值是唯一的,创建的对象在整个spring容器中就一个,
位置:在类的上面。

在配置文件中:

声明组件扫描器(component-scan),组件就是Java对象。
base-package:指定注解在你的项目中的包名。

component-scan工作方式:
	spring会扫描遍历base-package指定的包,把包中和子包中的所有类,
	找到类中的注解,按照注解的功能创建对象,或给属性赋值。
b、 @Component的3种使用方式
1、使用value属性,指定对象名称
	@Component(value = “属性名”)
2、省略value (推荐)
	@Component("属性名")
3、不指定对象名,由spring提供默认名:类名的首字母小写
	@Component
c、与@Component功能一致,创建对象的注解还有:
1、@Repository(用在持久层类的上面):
		放在dao的实现类上面,表示创建dao对象,dao对象是能访问数据库的。
2、@Service(用在业务层类的上面):
		放在service的实现类上面,创建service对象,service对象是做
		业务处理 ,可以有事务等功能的。
3、@Controller(用在控制器的上面):
		放在控制器(处理器)类的上面,创建控制器对象的,控制器对象
		能接收用户提交的参数,显示请求的处理结果。

注意:
	以上三个注解使用语法和@Component 一样,都能创建对象,但这三个注解
	还有额外的功能:
	@Repository、@Service、@Controller是给项目的对象分层的。
d、指定扫描多个包的 三种方式:
- 第一种:多次使用组件扫描器,指定不同的包
<context:component-scan base-package="com.liu.pojo"/>
<context:component-scan base-package="com.liu.pojo1"/>
- 第二种:使用分隔符(; 或 ,)分隔多个包名
<context:component-scan base-package="com.liu.pojo;com.liu.pojo1"/>
- 第三种:指定父包(不建议指定父包为根目录,因会影响效率)
<context:component-scan base-package="com.liu"/>
4.2、简单类型属性注入@Value
a、介绍
@Value:简单类型的属性赋值。

	属性:value是String类型,表示简单类型的属性值。
	位置:
		1、在属性定义的上面,无需set方法(推荐)
		2、在set方法的上面。
b、举例子(第一种方式):
- Student.java类
@Component(value = "student")
public class Student {
    @Value("李四")
    private String name;
    @Value("26")
    private Integer age;

   ...setter 和 getter 方法...
   ...toString....
}
- 配置文件
<?xml version="1.0" encoding="UTF-8"?>
<beans xmlns="http://www.springframework.org/schema/beans"
       xmlns:xsi="http://www.w3.org/2001/XMLSchema-instance"
       xmlns:context="http://www.springframework.org/schema/context"
       xsi:schemaLocation="http://www.springframework.org/schema/beans
       http://www.springframework.org/schema/beans/spring-beans.xsd
       http://www.springframework.org/schema/context
       https://www.springframework.org/schema/context/spring-context.xsd">

    <!--开启包扫描-->
    <context:component-scan base-package="com.liu.pojo"/>
</beans>
- 测试类
public class TestOne {
    @Test
    public void test01(){
        ApplicationContext ac=new ClassPathXmlApplicationContext("applicationContext.xml");
        Student stu = (Student) ac.getBean("student");//名字是在@Component那的。

        System.out.println(stu);
    }
}
4.3、byType自动注入@Autowired
a、@Autowired用于引用类型
1、@Autowired:spring框架提供的注解,实现引用类型的赋值。
2、spring中通过注解给引用类型赋值,使用的是自动注入原理,支持byName,byType。
3、@Autowired:默认使用的是byType自动注入。

4、属性:
	required:是一个boolean类型,默认为true。
	required=true:表示引用类型赋值失败,程序报错,并终止执行。
	required=false:引用类型若赋值失败,程序正常执行,引用类型为null。

5、位置:
	1》在属性定义的上面,无需set方法(推荐)
	2》在set方法的上面。
b、举例子:
- School.java类
@Component//默认类名的首字母小写
public class School {
    @Value("加利顿")
    private String name;
    @Value("凤仙花交叉路口")
    private String address;

    @Override
    public String toString() {
        return "School{" +
                "name='" + name + '\'' +
                ", address='" + address + '\'' +
                '}';
    }
}
- Student.java类中引用School属性
@Component(value = "student")
public class Student {
    @Value("李四")
    private String name;
    @Value("26")
    private Integer age;
    @Autowired     //spring会自动按byType查找
    private School school;

    @Override
    public String toString() {
        return "Student{" +
                "name='" + name + '\'' +
                ", age=" + age +
                ", school=" + school +
                '}';
    }
}
- 测试类
public class TestOne {
    @Test
    public void test01(){
        ApplicationContext ac=new ClassPathXmlApplicationContext("applicationContext.xml");
        Student stu = (Student) ac.getBean("student");
        System.out.println(stu);
    }
}
4.4、byName自动注入@Autowired与@Qualifier
a、若使用byName方式,需要做的是:
1、在属性上面加入@Autowired
2、在属性上面加入@Qualifier(value="bean的id"):表示使用指定名称的bean完成赋值。
b、举例子:
- School.java类
@Component
public class School {
    @Value("空间的")
    private String name;
    @Value("的角色")
    private String address;

    @Override
    public String toString() {
        return "School{" +
                "name='" + name + '\'' +
                ", address='" + address + '\'' +
                '}';
    }
}
- Student.java
@Component
public class Student {
    @Value("李四")
    private String name;
    @Value("25")
    private Integer age;
    @Autowired
    @Qualifier(value = "school")
    private School school;

    @Override
    public String toString() {
        return "Student{" +
                "name='" + name + '\'' +
                ", age=" + age +
                ", school=" + school +
                '}';
    }
}
- 配置文件
<context:component-scan base-package="com.liu.pojo1"/>
- 测试类
  @Test
    public void test02(){
        ApplicationContext ac=new ClassPathXmlApplicationContext("pojo1/applicationContext.xml");
        com.liu.pojo1.Student student = (com.liu.pojo1.Student) ac.getBean("student");
        System.out.println(student);
    }
4.5、JDK注解@Resource自动注解
a、介绍:
spring提供了对jdk中@Resource注解的支持。
@Resource注解既可以 按 名称 匹配bean,也可以按 类型 匹配bean。
默认按名称注入 。

注意:
	要求jdk必须是6及以上版本。
	@Resource可在属性上,也可在set方法上。
b、byType注入引用类型属性
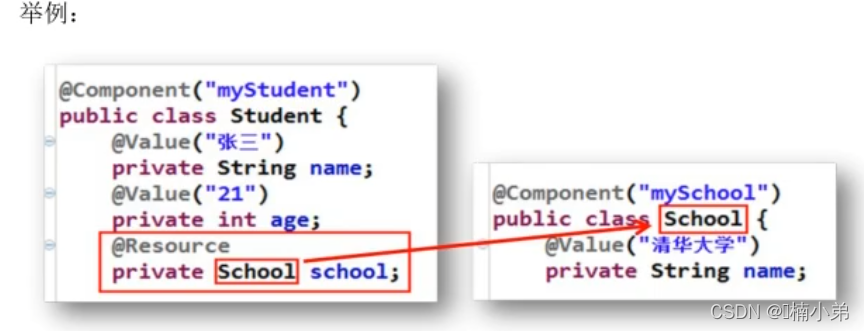
@resource注解若不带任何参数,采用默认 按名称 的方式注入,若按 名称不能注入bean,则会按照类型进行bean的匹配注入。
c、byName注入引用类型属性
@Resource:来自jdk中的注解,spring框架提供了对这个注解的支持,
可使用它给引用类型赋值。使用的是自动注入原理,支持byName、byType,
默认byName。

位置:
	1、在属性定义的上面,无需set方法,推荐使用。
	2、在set方法的上面。
- 只使用byName方式,需要使用 name属性(name的值是bean的id)。
- eg:
@Resource(name=“mySchool”)
public class School{
…
}
4.6、注解与XML的对比
- 各有优势 ,也同时各有劣势
- 建议:
- 不经常改动的地方 使用注解
- 经常改动的地方 使用xml
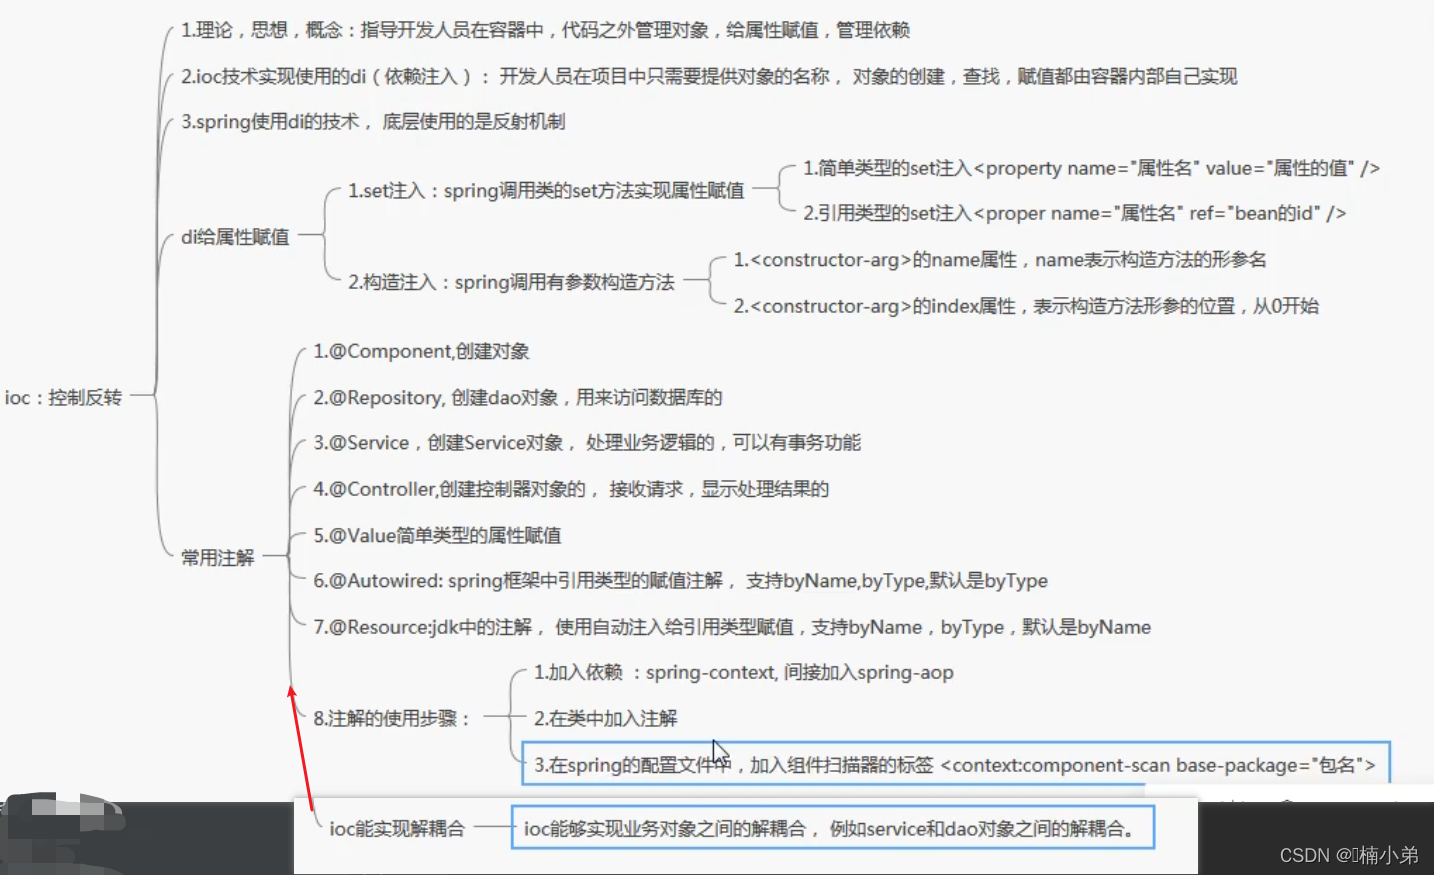
4.7、小结

五、AOP面向切面编程
5.1、动态代理
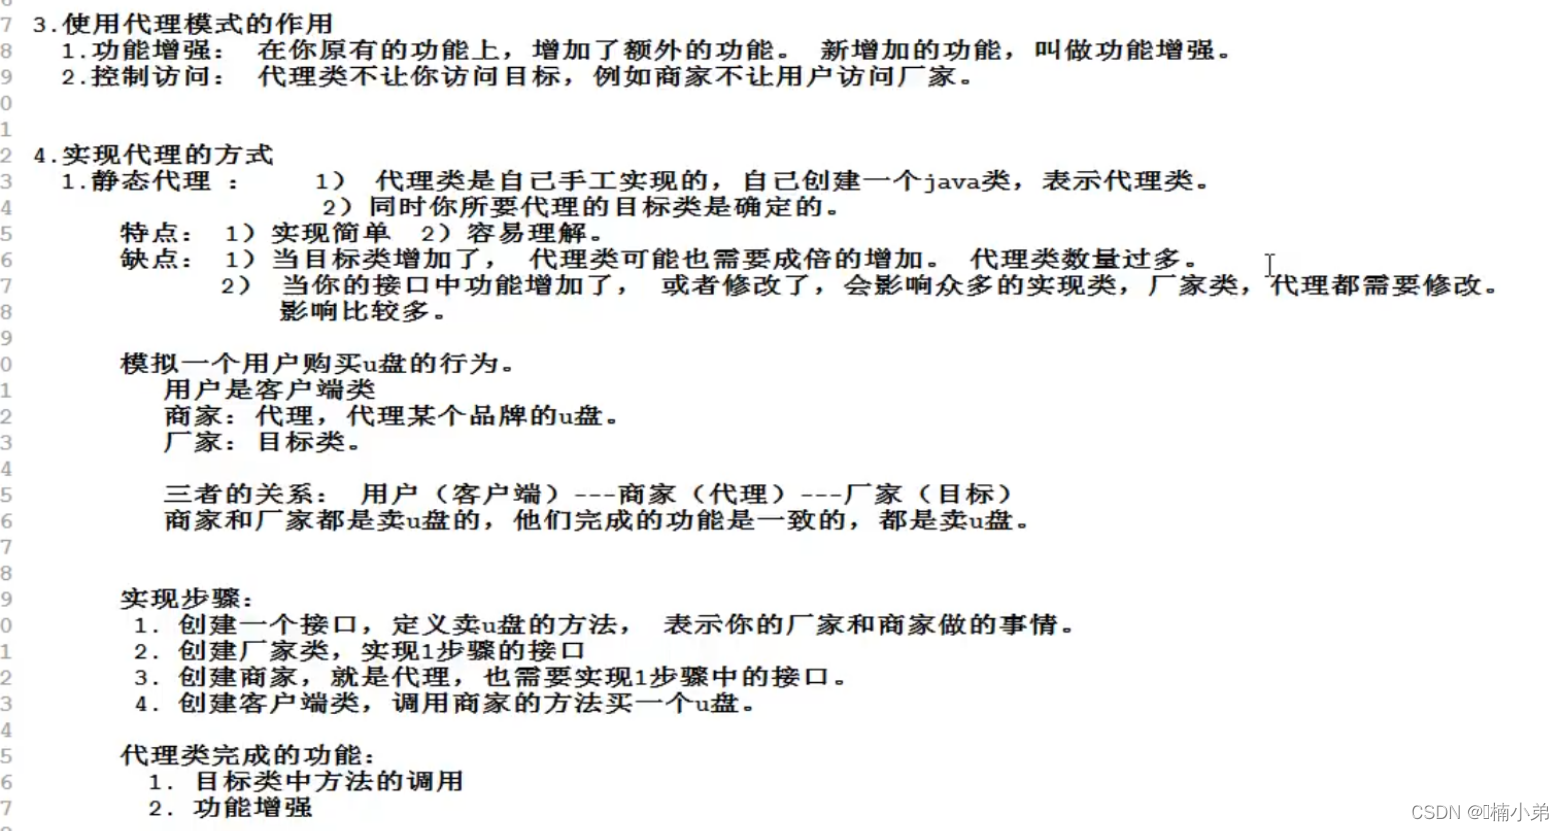
0、回顾动态代理
- 静态代理的例子:
在service包下建个UsbSell接口
public interface UsbSell {
    //u盘的价格接口
    float sell(int num);

}
在factory包下建个JSDUsb.Java类:需要被代理的厂家
public class JSDUsb implements UsbSell {
    //金士顿的价格
    @Override
    public float sell(int num) {
        return 85.0f;
    }
}
在shangJia包下建个TaoBao.Java类:代理者
public class TaoBao implements UsbSell {
    //此类要帮谁卖U盘?
    //帮金士顿卖
    UsbSell usbSell=new JSDUsb();
    @Override
    public float sell(int num) {

        //告诉厂家需要订购几个
        float price = usbSell.sell(num);//厂家的价格
        //平台不可能按原价出售
        price=(price+5)*num;//每个在原价加5元
        return price;
    }
}
在ShopMain.java类中运行
public class ShopMain {
    public static void main(String[] args) {
        //创建淘宝代理对象
        TaoBao tb=new TaoBao();
        float sell = tb.sell(2);
        System.out.println("价格总共为:"+sell);
        }
      }
a、介绍
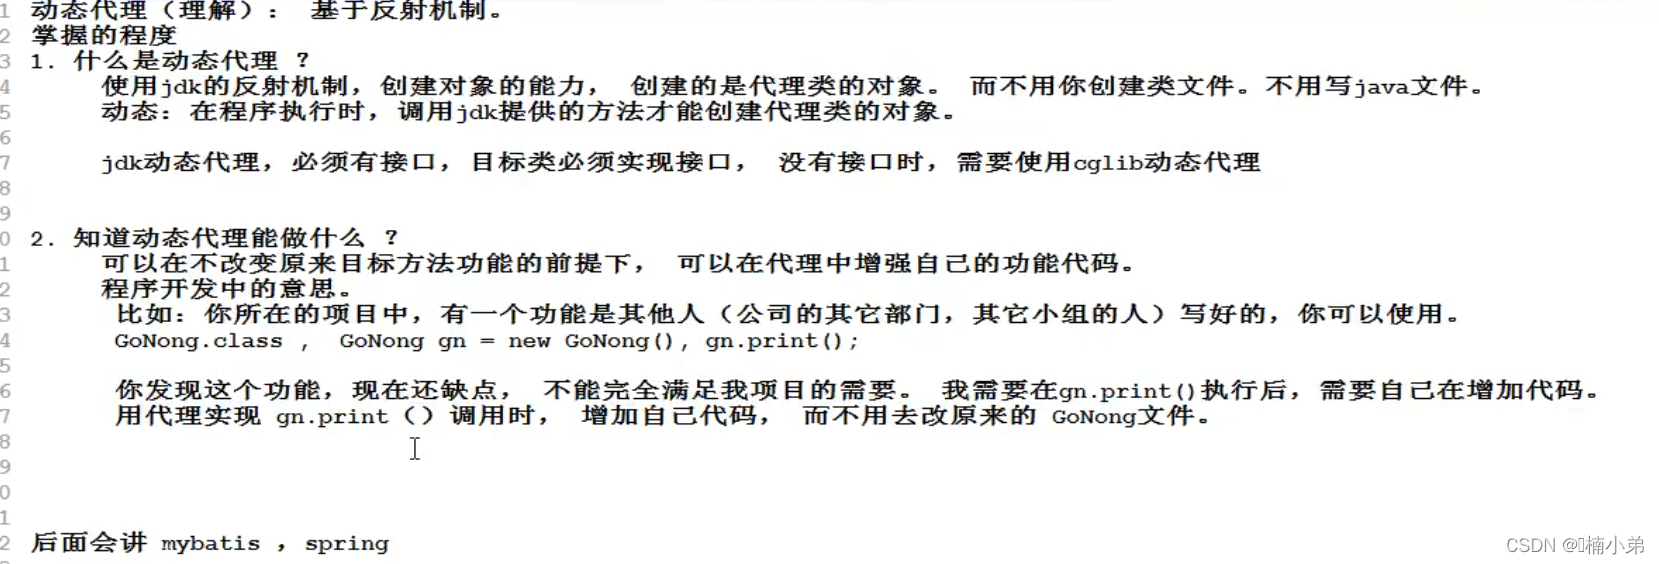
- 动态代理:可在程序的执行过程中,创建代理对象。
- 通过代理对象执行方法,给目标类的方法增加额外的功能(共能增强)

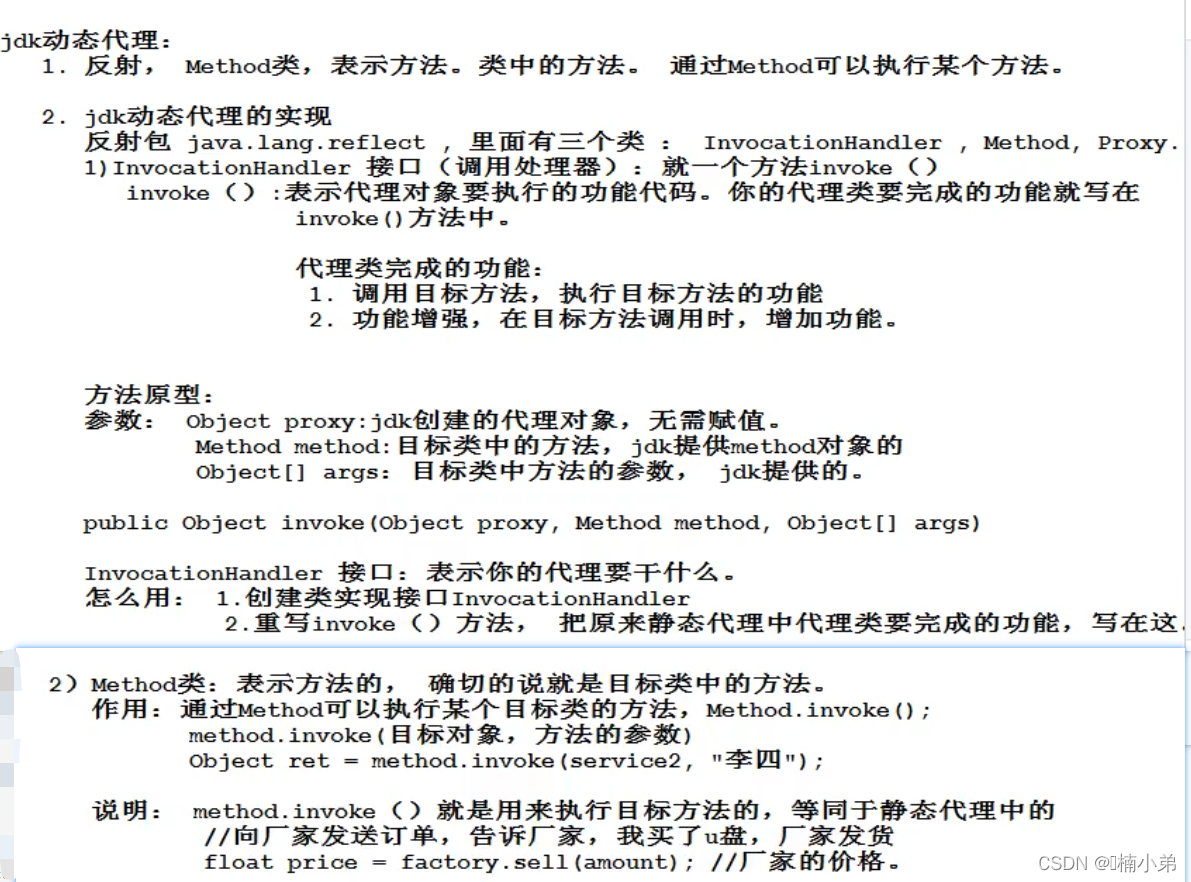
b、jdk动态代理实现步骤:
1、创建目标类,SomeServiceImpl目标类,给它的dosome,doOther增加 输出时间,事务。

2、创建InvocationHandler接口的实现类,在这个类实现给目标方法增加功能。

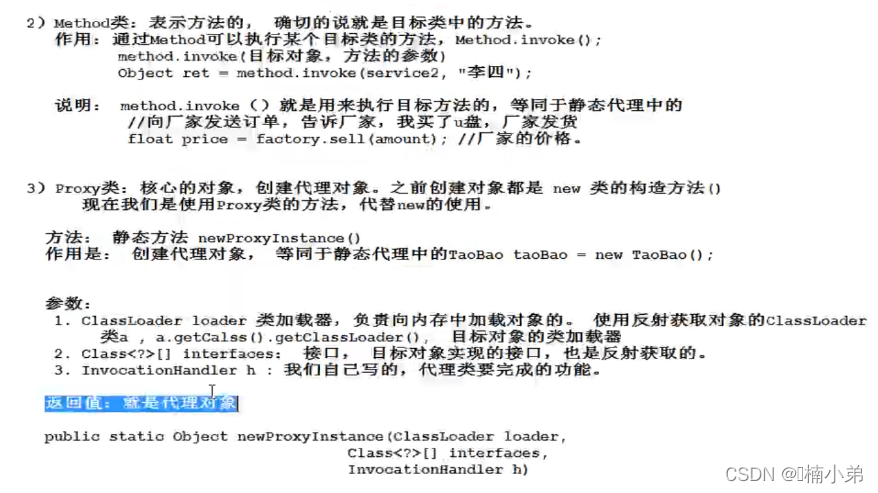
3、使用jdk中 类Proxy,创建代理对象。实现创建对象的能力。
c、动态代理的例子
eg:模拟淘宝卖U盘
- 在service包下建个UsbSell接口
public interface UsbSell {
    float sell(int num);
}
- 在factory包下建个Shandi.java类
public class ShanDi implements UsbSell {
    //闪迪出厂价格
    @Override
    public float sell(int num) {
        return 50.0f;
    }
}
- 创建InvocationHandler接口的实现类:myHandler.java
public class MyHandler implements InvocationHandler {
    //用来动态接收对象
    private Object target=null;
    //使用有参构造赋值
    public MyHandler(Object target) {
        this.target = target;
    }

    @Override
    public Object invoke(Object proxy, Method method, Object[] args) throws Throwable {
        //向厂家发送订单,告诉厂家,我买了U盘,厂家发货
        //执行目标方法
        Object res = method.invoke(target, args);

        System.out.println("args="+args[0]);
        //商家 需要加价,也就是代理要增加价格。
        if (res!=null){//表示获取到了对象
            //获取厂家价格
            Float price= (Float) res;
            //获取要的数量
            Integer num= (Integer) args[0];
            //在厂家价格上加价
            price=(price+25)*num;
            res=price;

        }
        //在目标类的方法调用后,你做的其他功能,都是增强的意思。
        System.out.println("淘宝商家,给你返回一个优惠卷,或者红包");
        //返回增加的价格
        return res;
    }
}
- 在更目录建个ShopMain.java
public class ShopMain {
    public static void main(String[] args) {

        //创建代理对象,使用Proxy
        //1、创建目标对象
        UsbSell ub=new ShanDi();
        //2、创建对象
        InvocationHandler handler=new MyHandler(ub);
        //3、创建代理对象
        UsbSell proxy = (UsbSell) Proxy.newProxyInstance(ub.getClass().getClassLoader(), ub.getClass().getInterfaces(), handler);
        //4、通过代理执行方法
        float sell = proxy.sell(2);
        System.out.println("通过动态代理对象,调用方法:"+sell);
    }
}
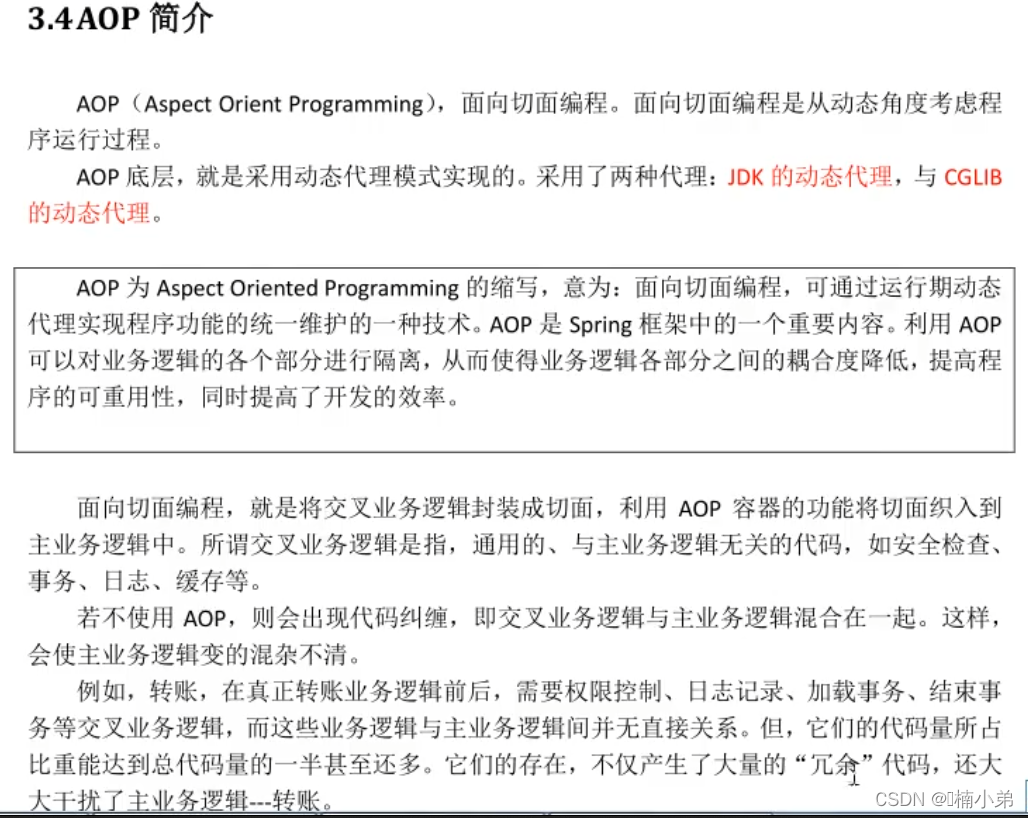
5.2、AOP简介

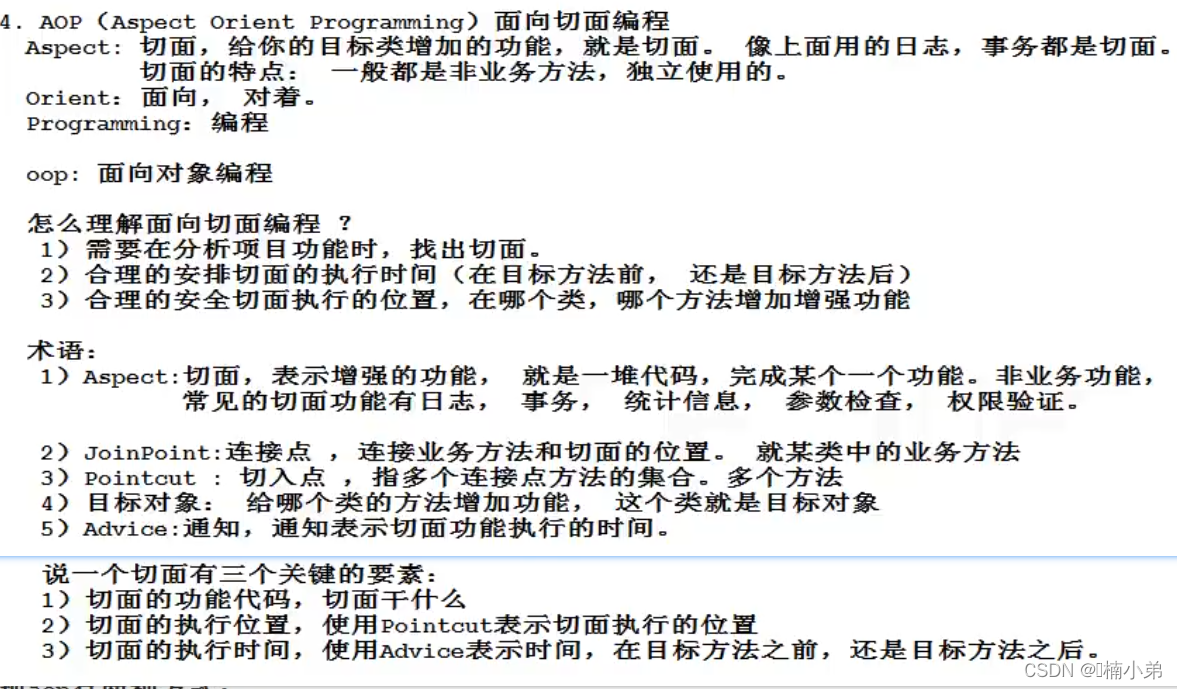

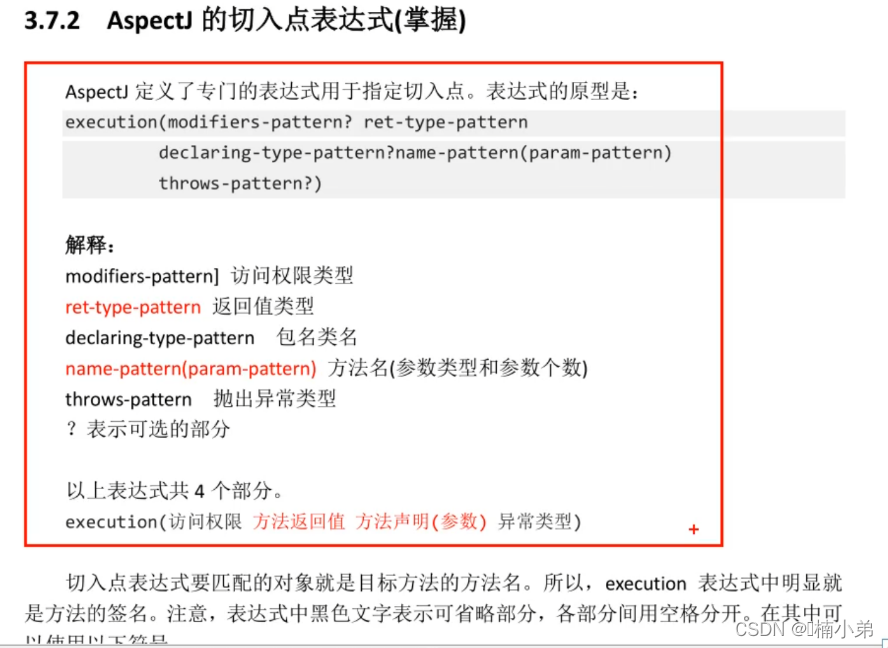

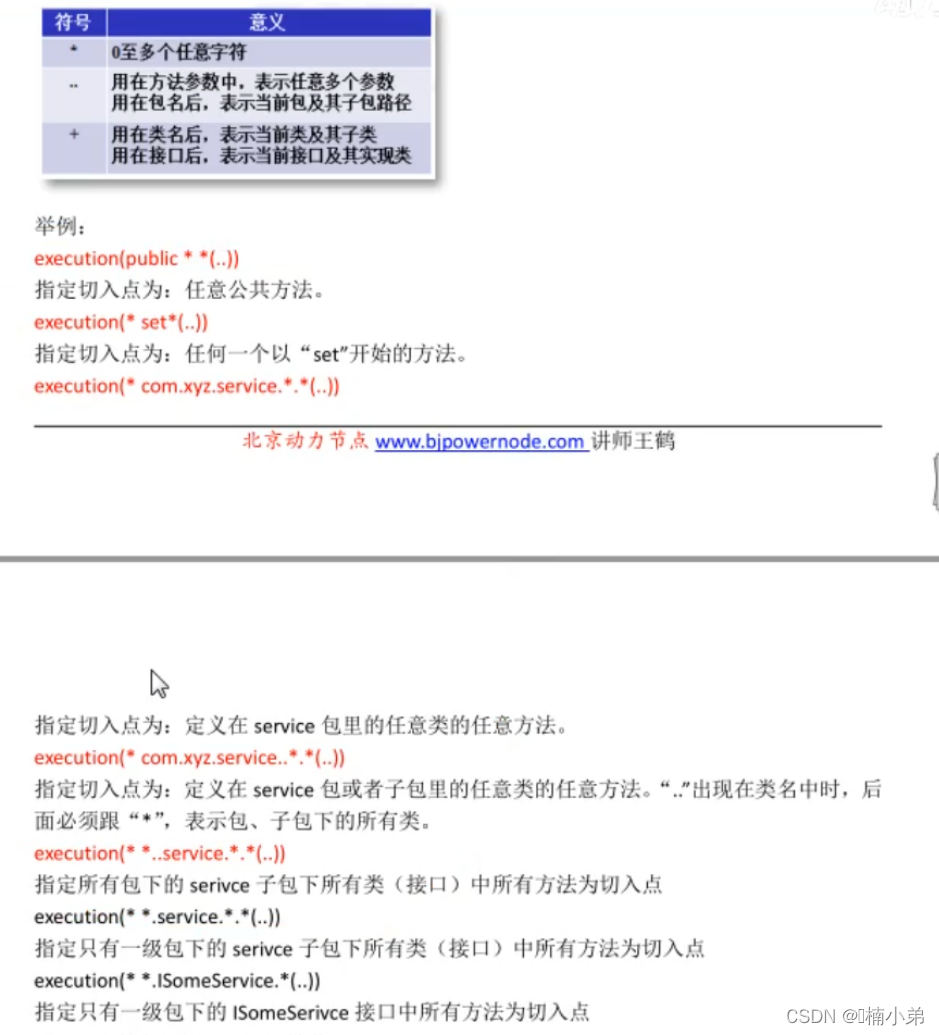
5.3、使用aspectj实现AOP的基本步骤:
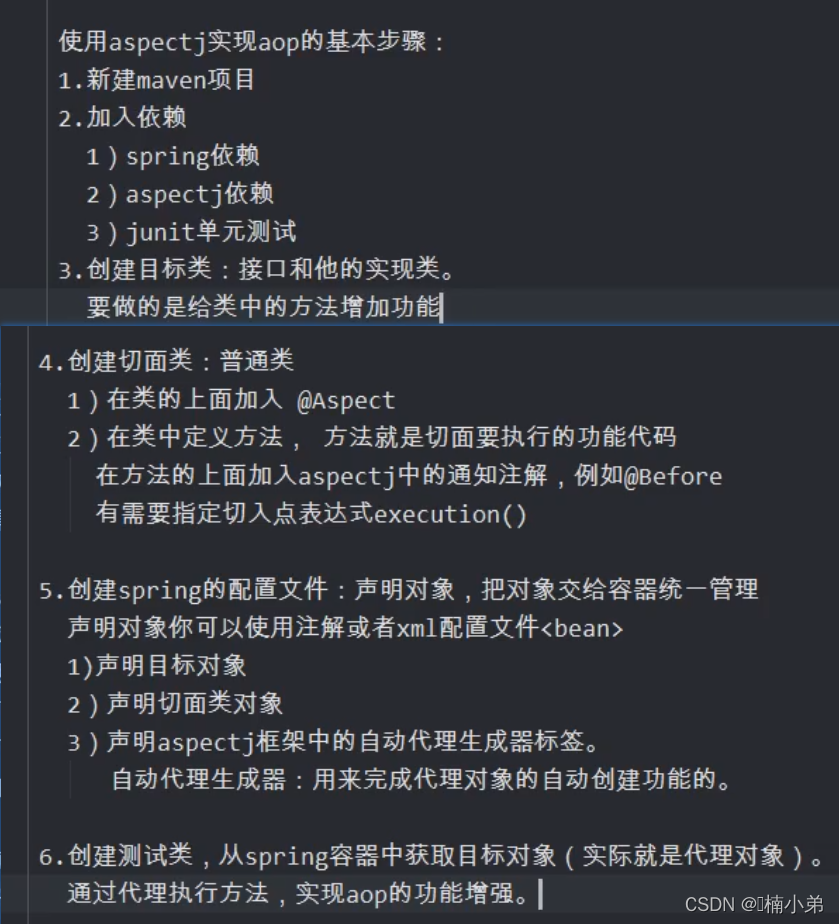
5.3.1、举个小李子:
- 一:在pom.xml中添加相关依赖文件
 <!--spring依赖-->
        <dependency>
            <groupId>org.springframework</groupId>
            <artifactId>spring-context</artifactId>
            <version>5.3.15</version>
        </dependency>

        <!--aspectj依赖-->
        <dependency>
            <groupId>org.springframework</groupId>
            <artifactId>spring-aspects</artifactId>
            <version>5.3.15</version>
        </dependency>

        <!--junit依赖-->
        <dependency>
            <groupId>junit</groupId>
            <artifactId>junit</artifactId>
            <version>4.13.1</version>
            <scope>test</scope>
        </dependency>
- 二:在com.liu包下建个 MyMethod接口
package com.liu;

public interface MyMethod {
     void toShow(String name,Integer age);
}
- 三:在com.liu包下建个接口的实现类MyMethodImpl.java
package com.liu;

public class MyMethodImpl implements MyMethod{
    @Override
    public void toShow(String name, Integer age) {
        System.out.println("数据输出:"+name+"--"+age);
    }
}
- 四:在com.liu包下建个 切面类 MyAspectj.java
/**
 * @Aspect:是aspectj框架中的注解。
 * 作用:表示当前类是切面类。
 * 切面类:是用来给业务方法增加功能的类,
 *         在这个类中有切面的功能代码。
 * 位置:在类定义的上面。
 * */
@Aspect
public class MyAspectj {
    /**
     * 定义方法,方法是实现切面功能的。
     * 方法的定义要求:
     * 1、公共方法 public
     * 2、方法没有返回值
     * 3、方法名称自定义
     * 4、方法可以有参数,也可以没有参数。
     *      如果有参数,参数不是自定义的,有几个参数类型可以使用。
     * */

    /**
    * @Before:前置通知注解
    * 属性:value,是切入点表达式,表示切面的功能执行的位置。
    * 位置:在方法的上面
    * 特点:
    * 1、在目标方法之前先执行的,
    * 2、不会改变目标方法的执行结果
    * 3、不会影响目标方法的执行
    * */
    @Before(value = "execution(public void com.liu.MyMethodImpl.toShow(String,Integer))")
    public void myBefore(){
        //这就是你切面要执行的功能代码
        System.out.println("前置通知,切面功能:在目标方法之前输出执行时间:"+new Date());
    }
}
- 五:配置spring的文件
<?xml version="1.0" encoding="UTF-8"?>
<beans xmlns="http://www.springframework.org/schema/beans"
       xmlns:xsi="http://www.w3.org/2001/XMLSchema-instance" xmlns:aop="http://www.springframework.org/schema/aop"
       xsi:schemaLocation="http://www.springframework.org/schema/beans http://www.springframework.org/schema/beans/spring-beans.xsd http://www.springframework.org/schema/aop https://www.springframework.org/schema/aop/spring-aop.xsd">

    <!--把对象交给spring容器,由spring容器统一创建,管理对象-->
    <!--声明目标对象-->
    <bean id="myMeth" class="com.liu.MyMethodImpl"/>

    <!--声明切面类对象-->
    <bean id="myAsp" class="com.liu.MyAspectj"/>


    <!--
    声明自动代理生成器:使用aspectj框架内部的功能,创建目标对象的代理对象。
    创建代理对象是在内存中实现的,修改目标对象的内存中的结构,
    创建为代理对象,所以目标对象就是被修改后的代理对象。

    aspectj-autoproxy:会把spring容器中的所有的目标对象,一次性都生成代理对象。
    -->
    <aop:aspectj-autoproxy/>
</beans>
- 六:在com.liu包下建个MyMain.java主程序类
public class MyMain {
    public static void main(String[] args) {
        String config="applicationContext.xml";
        ApplicationContext ac=new ClassPathXmlApplicationContext(config);
        //从容器中获取目标对象
        MyMethod meth = ac.getBean("myMeth", MyMethod.class);
        //通过代理的对象执行方法,实现目标方法执行时,增强了功能
        meth.toShow("tom",25);
    }
}
- 七、运行结果:
前置通知,切面功能:在目标方法之前输出执行时间:Sat Mar 05 16:29:40 CST 2022
数据输出:tom--25
- 小结
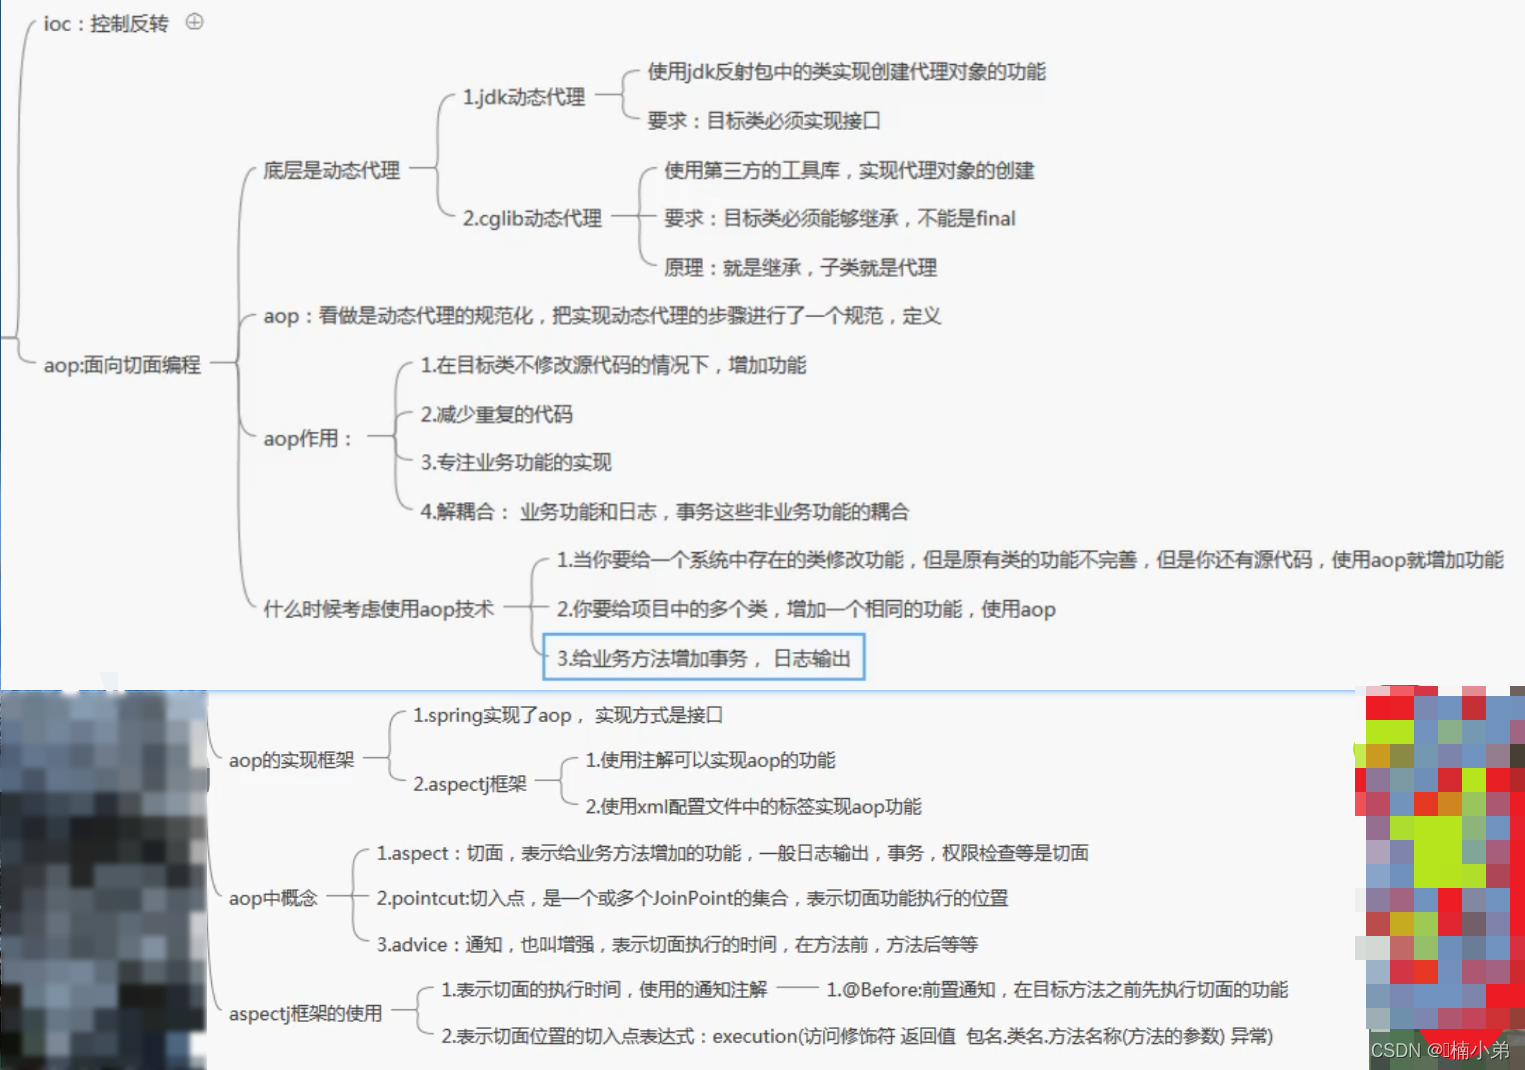
5.3.2、Aspectj基于注解的AOP实现
- (1)@Before前置通知-方法有JoinPoint参数
- (2)@AfterReturning后置通知-注解有returning属性
- (3)@Around环绕通知-增强方法有ProceedingJoint
- (4)@AfterThrowing异常通知-注解中有throwing
- (5)@After最终通知
- (6)@Pointcut定义切入点
a、@Before前置通知
- 指定通知方法的JoinPonit
指定通知方法的参数:JoinPoint
JoinPoint:业务方法,要加入切面功能的业务方法
	作用是:可在通知方法中获取方法执行时的信息,例如方法名称,方法的实参。
	若你的切面功能中需要用到方法的信息,就加入JoinPoint。
	这个JoinPoint参数的值是由框架赋予,位置必须是第一个参数那里。
- 举个例子
0、配置pom.xml
<dependency>
   <groupId>org.springframework</groupId>
    <artifactId>spring-context</artifactId>
    <version>5.3.15</version>
</dependency>

<dependency>
    <groupId>org.springframework</groupId>
    <artifactId>spring-aspects</artifactId>
    <version>5.3.15</version>
</dependency>
1、定义一个Person.java接口
public interface Person {
    void speak(String name,int age);
}
2、定义实现接口的实现类:EnglishImpl.java,ChineseImpl.java
public class ChineseImpl implements Person{
    @Override
    public void speak(String name,int age) {
        System.out.println(name+" is 中国人 说中文....");
    }
}

//=======englishImpl类======

public class EnglishImpl implements Person{
    @Override
    public void speak(String name,int age) {
        System.out.println(name+" is 英国人 说英语.....");
    }
}
3、定义一个切面类MyAspect .java来进行前置通知
@Aspect
public class MyAspect {
    /**
     * 指定通知方法的参数:JoinPoint
     * JoinPoint:业务方法,要加入切面功能的业务方法
     *      作用是:可在通知方法中获取方法执行时的信息,例如方法名称,方法的实参。
     *      若你的切面功能中需要用到方法的信息,就加入JoinPoint。
     *      这个JoinPoint参数的值是由框架赋予,位置必须是第一个参数那里。
     * */
    @Before(value = "execution(public  void com.liu.*Impl.*(..))")
    public void doSome(JoinPoint jp){
        System.out.println("方法的签名(定义):"+jp.getSignature());
        System.out.println("方法的名称:"+jp.getSignature().getName());

        //获取方法的实参,注:若方法无参数,则返回方法名。
        Object[] args = jp.getArgs();
        for (Object a:args){
            System.out.println("参数:"+a);
        }
        //切面要执行的功能代码
        System.out.println("你说哪种语言?");
    };
}
4、编写配置文件applicationContext.xml
   <aop:aspectj-autoproxy/>
    <bean id="english" class="com.liu.EnglishImpl"/>
    <bean id="chinese" class="com.liu.ChineseImpl"/>
    <bean id="asp" class="com.liu.MyAspect"/>
5、编写MyMain.java进行测试
public class MyMain {
    public static void main(String[] args) {
        ApplicationContext ac=new ClassPathXmlApplicationContext("applicationContext.xml");
        Person english = ac.getBean("english", Person.class);
        english.speak("tom",18);

        System.out.println("=====================================");
        Person chinese = ac.getBean("chinese", Person.class);
        chinese.speak("哈克i",25);
    }
}
6、运行结果:
方法的签名(定义):void com.liu.Person.speak(String,int)
方法的名称:speak
参数:tom
参数:18
你说哪种语言?
tom is 英国人 说英语.....
=====================================
方法的签名(定义):void com.liu.Person.speak(String,int)
方法的名称:speak
参数:哈克i
参数:25
你说哪种语言?
哈克i is 中国人 说中文....
b、@AfterReturning:后置通知
后置通知定义方法,方法是实现切面功能的。
方法的定义要求:
	1、公共方法 public
	2、方法没有返回值
	3、方法名称自定义
	4、方法有参数的,推荐是Object,参数名自定义。
- 属性
1、value 切入点表达式
2、returning 自定义的变量,表示目标方法的返回值的。
	自定义变量名必须和通知方法的形参名一样。
位置:
	在方法定义的上面。

特点:
	1、在目标方法之后执行。
	2、能够获取到目标方法的返回值,可以根据这个返回值做不同的处理功能。
	3、可以修改这个返回值。
- 小栗子:
0、添加pom文件
<dependency>
   <groupId>org.springframework</groupId>
      <artifactId>spring-aspects</artifactId>
      <version>5.3.15</version>
</dependency>
<dependency>
      <groupId>org.springframework</groupId>
      <artifactId>spring-context</artifactId>
      <version>5.3.15</version>
</dependency>
1、在com.nan包下建个接口:Person.java
public interface Person {
    //姓名接口
     void perName();
}
2、在com.nan包下建个类:Man.java类
public class Man implements Person{
    @Override
    public void perName() {
        System.out.println("----男人========");
    }
}
3、在com.nan包下建个后置切面类:MyAspec.java
@Aspect
public class MyAspec {
    @AfterReturning(value = "execution(public void com.nan.Man.*(..))")
    public void afterAspect(){
        System.out.println("--后置通知来了··········");
    }
}
4、配置applicationContext.xml文件
<aop:aspectj-autoproxy/>
    <bean id="man" class="com.nan.Man"/>
    <bean id="myAsp" class="com.nan.MyAspec"/>
5、测试程序,在com.nan包下建个MyMain.java
public class MyMain {
    public static void main(String[] args) {
        ApplicationContext ac=new ClassPathXmlApplicationContext("applicationContext.xml");
        Person man = ac.getBean("man", Person.class);
        man.perName();
    }
6、测试结果
----男人========
--后置通知来了··········
c、@Around:环绕通知
- 环绕通知方法的定义格式:
1、public
2、必须有一个返回值,推荐使用Object
3、方法名称自定义
4、方法有参数,固定的参数 ProceedingJoinPoint
- @Around:环绕通知
属性:value 切入点表达式
位置:在方法的定义上

特点:
	1、它是功能最强的通知
	2、在目标方法的前和后都能增强功能。
	3、控制目标方法是否被调用执行
	4、修改原来的目标方法的执行结果。影响最后的调用结果。
注意:
	环绕通知,等同于jdk动态代理的,InvocationHandler接口

参数:
	ProceedingJoinPoint就等同于 Method(动态代理中的)
	作用:
		执行目标方法的
返回值:
	就是目标方法的执行结果,可以被修改。
- 经常用之地:做事务
在目标方法之前开启事务,执行目标方法,在目标方法之后提交事务。
- 举个例子:
1、添加pom依赖
 <!--切面使用到的依赖-->
        <dependency>
            <groupId>org.springframework</groupId>
            <artifactId>spring-aspects</artifactId>
            <version>5.3.15</version>
        </dependency>
        <!--spring的相关依赖-->
        <dependency>
            <groupId>org.springframework</groupId>
            <artifactId>spring-context</artifactId>
            <version>5.3.15</version>
        </dependency>
2、在com.nan包下建个接口Phone.java
public interface Phone {
    //手机的种类
    String  phoneStyle(String name);
}
3、在com.nan包下建个AndroidPhone.java类
public class AndroidPhone implements Phone{
    @Override
    public String phoneStyle(String name) {
        System.out.println("******"+name+"手机占有一席之地*****");
        return name;
    }
}
4、在com.nan包下建个切面MyAspect.java类
@Aspect
public class MyAspect {
    @Around(value = "execution(* com.nan.AndroidPhone.*(..))")
    public Object  aroundAspect(ProceedingJoinPoint pjp) throws Throwable {
        Object target=null;//返回值
        String name="";//获取传的值
        //获取第一个参数值
        Object[] args = pjp.getArgs();
        if(args!=null && args.length>0){
            name= (String) args[0];
        }
        //实现环绕通知
        System.out.println("------环绕通知前期,时间为:"+new Date());
        //1、目标方法调用
        if("HuaWei".equals(name)){
            //符合条件,调用目标方法
            //2、在目标方法的前或后 加入功能
            target= pjp.proceed();//method.incoke();Object result=doFirst();
            System.out.println("***我是环绕通知核心内容*****");
        }

        System.out.println("------环绕通知:在目标方法之后,提交事务------");
        //修改目标方法的执行结果,影响方法最后的调用结果
        if(target!=null){
            target="Hello Aspectj AOP 环绕通知**";
        }
        return target;
    }
}
5、编写applicationContext.xml文件
<aop:aspectj-autoproxy/>
    <bean id="an" class="com.nan.AndroidPhone"/>
    <bean id="myasp" class="com.nan.MyAspect"/>
6、在com.nan包下建个MyMain测试程序
public class MyMain {
    public static void main(String[] args) {
        ApplicationContext ap = new ClassPathXmlApplicationContext("applicationContext.xml");
        Phone an = ap.getBean("an", Phone.class);
        String hw = an.phoneStyle("HuaWei");
        System.out.println("****************");
        System.out.println(hw);
    }
}
7、测试结果
------环绕通知前期,时间为:Mon Apr 11 14:19:13 CST 2022
******HuaWei手机占有一席之地*****
***我是环绕通知核心内容*****
------环绕通知:在目标方法之后,提交事务------
****************
Hello Aspectj AOP 环绕通知**
d、@AfterThrowing:异常通知
- 异常通知方法的定义格式:
1、public
2、没有返回值
3、方法名称自定义
4、方法有一个Exception,如果还有 是JoinPoint。
- @AfterThrowing:异常通知的属性:
属性:
	1、value切入点表达式
	2、throwing 自定义的变量,表示目标方法抛出的异常对象。
		变量名必须和方法的参数名一样。
特点:
	1、在目标方法抛出异常时执行的。
	2、可以做异常的监控程序,监控目标方法执行时是不是有异常。
		若有异常,可以发送邮件。短信进行通知。
- 小栗子:
1、添加依赖
 <dependency>
            <groupId>org.springframework</groupId>
            <artifactId>spring-aspects</artifactId>
            <version>5.3.15</version>
        </dependency>
        <dependency>
            <groupId>org.springframework</groupId>
            <artifactId>spring-context</artifactId>
            <version>5.3.15</version>
        </dependency>
2、在com.nan包下建个TestThrowing接口
public interface TestThrowing {
    //测试一下异常通知
    void testShow();
}
3、在com.nan包下建个TestThrowingImpl类
public class TestThrowingImpl implements TestThrowing{
    @Override
    public void testShow() {
        System.out.println("我在测试异常通知.."+(10/0));
    }
}
4、在com.nan包下建个切面MyAspect类
@Aspect
public class MyAspect {
    @AfterThrowing(value = "execution(* com.nan.TestThrowingImpl.*(..))",throwing = "ep")
    public void throwingAspect(Exception ep){
        System.out.println("异常通知:我出现就代表有bug了,bug出现原因:"+ep.getMessage());
    }
}
5、配置applicationContext.xml文件
 <aop:aspectj-autoproxy/>
    <bean id="thr" class="com.nan.TestThrowingImpl"/>
    <bean id="asp" class="com.nan.MyAspect"/>
6、在com.nan包下建个主程序类MyMain.java
public class MyMain {
    public static void main(String[] args) {
        ApplicationContext ac=new ClassPathXmlApplicationContext("applicationContext.xml");
        TestThrowing thr = ac.getBean("thr", TestThrowing.class);
        thr.testShow();
    }
7、测试结果如下:
异常通知:我出现就代表有bug了,bug出现原因:/ by zero
Exception in thread "main" java.lang.ArithmeticException: / by zero
	at com.nan.TestThrowingImpl.testShow(TestThrowingImpl.java:6)
	at sun.reflect.NativeMethodAccessorImpl.invoke0(Native Method)
	at sun.reflect.NativeMethodAccessorImpl.invoke(NativeMethodAccessorImpl.java:62)
	at sun.reflect.DelegatingMethodAccessorImpl.invoke(DelegatingMethodAccessorImpl.java:43)
	at java.lang.reflect.Method.invoke(Method.java:498)
e、@After:最终通知
- 定义格式
1、public
2、没有返回值
3、方法名称自定义
4、方法没有参数,若有则是 JoinPoint

属性:
	value 切入点表达式
位置:
	在方法上面。
特点:
	1、总会执行
	2、在目标方法之后执行。
	3、好比在finally代码框中,无论程序有无bug都会执行。
- 举个例子:
同上个例子
把MyAspect修改为
@Aspect
public class MyAspect {
    @AfterThrowing(value = "execution(* com.nan.TestThrowingImpl.*(..))",throwing = "ep")
    public void throwingAspect(Exception ep){
        System.out.println("异常通知:我出现就代表有bug了,bug出现原因:"+ep.getMessage());
    }

    @After(value = "execution(* com.nan.TestThrowingImpl.*(..))")
    public void afterAspect(){
        System.out.println("最终通知:我是最终通知,什么情况下我都执行!!!");
    }
}
运行结果:
异常通知:我出现就代表有bug了,bug出现原因:/ by zero
最终通知:我是最终通知,什么情况下我都执行!!!
Exception in thread "main" java.lang.ArithmeticException: / by zero
	at com.nan.TestThrowingImpl.testShow(TestThrowingImpl.java:6)
	at sun.reflect.NativeMethodAccessorImpl.invoke0(Native Method)
	at sun.reflect.NativeMethodAccessorImpl.invoke(NativeMethodAccessorImpl.java:62)
...
f、@Pointcut定义切入点
- 介绍:
定义:
	定义和管理切入点,如果你的项目中有多个切入点表达式是重复的,
	可以复用的。
属性:
	value切入点表达式
位置:
	在自定义的方法上面
特点:
	当使用@Pointcut定义在一个方法的上面,
	此时这个方法的名称就是切入点表达式的别名。
	其他的通知中,value属性就可以使用这个方法名称,
	代替切入点表达式了。
- 举个例子:
同 ”最终通知“例子一样
把切面类改为:
@Aspect
public class MyAspect {
    @AfterThrowing(value = "myCut()",throwing = "ep")
    public void throwingAspect(Exception ep){
        System.out.println("异常通知:我出现就代表有bug了,bug出现原因:"+ep.getMessage());
    }

    @After(value = "myCut()")
    public void afterAspect(){
        System.out.println("最终通知:我是最终通知,什么情况下我都执行!!!");
    }

    //使用@Pointcut给相同切入表达式起别名,好复用
    @Pointcut(value = "execution(* com.nan.TestThrowingImpl.*(..))")
    public void myCut(){
		//无需代码
	}
}
- 测试结果和 上个例子结果一样。
六、spring整合mybatis
6.1、介绍说明
 用到的技术为:
 	ioc 。
问:
	ioc为什么能把mybatis和spring集成在一起,象一个框架?
答:
	因为ioc 能创建对象。开发人员就不用同时面对两个或多个框架了,
	就面对一个spring。

一:mybatis使用步骤
	1、定义dao接口, StudentDao
	2、定义mapper文件,StudentDao.xml
	3、定义mybatis的主配置文件,mybatis.xml
	4、创建dao的代理对象,
		StudentDao dao=SqlSession。getMapper(StudentDao.class);
		List<Student> stu=dao.selectStudents();

注意:
	要使用dao对象,需要使用getMapper()方法。
	问:
		使用getMapper()方法,需要哪些条件?
	答:
		1、获取SqlSession对象,
			需要使用SqlSessionFactory的openSession()方法。
		2、创建SqlSessionFactory对象。通过读取mybatis.xml配置文件,
		   能创建SqlsessionFactory对象。使用Factory能获取SqlSession,
		   有了SqlSession就能有dao,目的就是获取dao对象,
		   Factory创建需要读取主配置文件。
	----------------------------------------------
	可以使用独立的连接池(druid)替换mybatis默认自带的,
	连接池也交给spring管理。
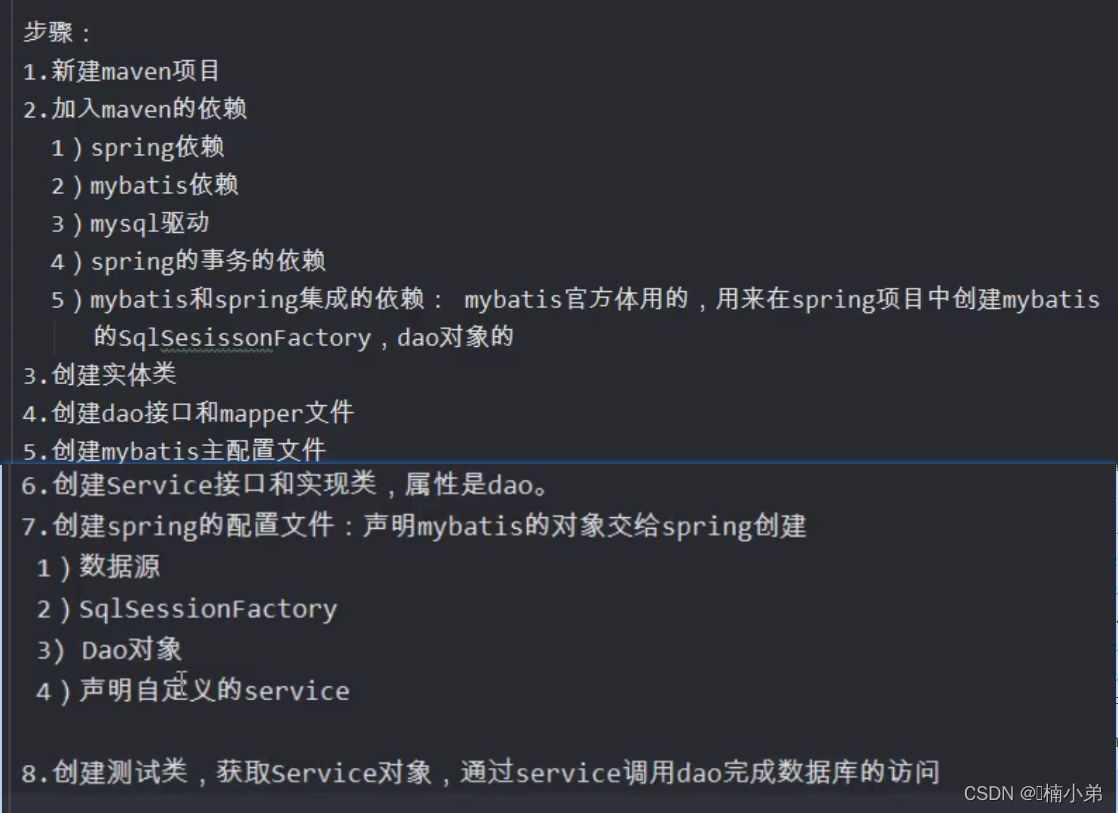
6.2、添加依赖以及配置
a、spring和mybais整合需要用的依赖
 <!--spring核心依赖-->
        <dependency>
            <groupId>org.springframework</groupId>
            <artifactId>spring-context</artifactId>
            <version>5.3.15</version>
        </dependency>
        <!--spring事务依赖-->
        <dependency>
            <groupId>org.springframework</groupId>
            <artifactId>spring-tx</artifactId>
            <version>5.3.15</version>
        </dependency>
        <!--mybatis核心依赖-->
        <dependency>
            <groupId>org.mybatis</groupId>
            <artifactId>mybatis</artifactId>
            <version>3.5.9</version>
        </dependency>
        <!--mybatis和spring的集成依赖-->
        <dependency>
            <groupId>org.mybatis</groupId>
            <artifactId>mybatis-spring</artifactId>
            <version>2.0.7</version>
        </dependency>
        <!--jdbc驱动-->
        <dependency>
            <groupId>org.springframework</groupId>
            <artifactId>spring-jdbc</artifactId>
            <version>5.3.15</version>
        </dependency>
        <!--mysql驱动-->
        <dependency>
            <groupId>mysql</groupId>
            <artifactId>mysql-connector-java</artifactId>
            <version>5.1.47</version>
        </dependency>
        <!--连接池:druid-->
        <dependency>
            <groupId>com.alibaba</groupId>
            <artifactId>druid</artifactId>
            <version>1.2.6</version>
        </dependency>
        <dependency>
            <groupId>junit</groupId>
            <artifactId>junit</artifactId>
            <version>4.13.1</version>
            <scope>test</scope>
        </dependency>
b、配置以及插件
<build>
        <!--目的是把src/main/java目录中的xml文件包含到输出结果中。输出到classes目录中-->
        <resources>
            <resource>
                <!--所在的目录-->
                <directory>src/main/java</directory>
                <!--包括目录下的  .properties,.xml 文件都会扫描到-->
                <includes>
                    <include>**/*.properties</include>
                    <include>**/*.xml</include>
                </includes>
                <filtering>false</filtering>
            </resource>
        </resources>
        <plugins>
            <plugin>
                <groupId>org.apache.maven.plugins</groupId>
                <artifactId>maven-compiler-plugin</artifactId>
                <version>3.8.1</version>
                <!--指定jdk的版本-->
                <configuration>
                    <source>1.8</source>
                    <target>1.8</target>
                </configuration>
            </plugin>
        </plugins>
    </build>
6.3、举个例子
- 相关依赖同上。
a、建数据库表
- 在springdb数据库中建个studnet表
- 表的结构如下

b、编写实体类,在com.nan.pojo包下建Student类
public class Student {
    private int id;
    private String name;
    private String email;
    private  int age;

    public Student(int id, String name, String email, int age) {
        this.id = id;
        this.name = name;
        this.email = email;
        this.age = age;
    }

    public Student() {
    }

  setter 和 getter 方法....

   toString方法....
}
c、在包com.nan.dao下编写dao层
- StudentDao接口
public interface StudentDao {

    //添加数据
    int insertDate(Student stu);

    //查询所有的数据
    List<Student> selectAllStu();
}
- StudentDaoMapper.xml文件,此mybatis模板可在idea中自定义为模板,下次可直接生成。
<?xml version="1.0" encoding="UTF-8" ?>
<!DOCTYPE mapper
        PUBLIC "-//mybatis.org//DTD Mapper 3.0//EN"
        "http://mybatis.org/dtd/mybatis-3-mapper.dtd">
<mapper namespace="com.nan.dao.StudentDao">

    <insert id="insertDate" parameterType="com.nan.pojo.Student">
        insert into student(id,name,email,age) values (#{id},#{name},#{email},#{age})
    </insert>

    <select id="selectAllStu" resultType="com.nan.pojo.Student">
        select * from student  order by id asc
    </select>
</mapper>
d、在com.nan.service包下编写service层
- 编写StudentService接口
public interface StudentService {
    //添加数据
    int addStu(Student stu);
    //查询所有的数据
    List<Student> queryStus();
}
- 在其包下建个impl包,在其中编写StudentServiceImpl类
public class StudentServiceImpl implements StudentService {
    //引用类型
    private StudentDao dao;
    //使用set注入,赋值
    public void setDao(StudentDao dao) {
        this.dao = dao;
    }

    @Override
    public int addStu(Student stu) {
        return dao.insertDate(stu);
    }

    @Override
    public List<Student> queryStus() {
        return dao.selectAllStu();
    }
}
e、在resources包下编写文件
- 编写mybatis的核心文件,此也可在idea中定义为模板,方便下次使用。
<?xml version="1.0" encoding="UTF-8" ?>
<!DOCTYPE configuration
        PUBLIC "-//mybatis.org//DTD Config 3.0//EN"
        "http://mybatis.org/dtd/mybatis-3-config.dtd">
<configuration>
    <!--开启mybatis自带的日志-->
    <settings>
        <setting name="logImpl" value="STDOUT_LOGGING"/>
    </settings>

    <!--加载sqlMapper的位置-->
    <mappers>
        <mapper resource="com/nan/dao/StudentDaoMapper.xml"/>
    </mappers>
</configuration>
- 编写spring相关的配置
<?xml version="1.0" encoding="UTF-8"?>
<beans xmlns="http://www.springframework.org/schema/beans"
       xmlns:xsi="http://www.w3.org/2001/XMLSchema-instance"
       xmlns:context="http://www.springframework.org/schema/context"
       xsi:schemaLocation="http://www.springframework.org/schema/beans http://www.springframework.org/schema/beans/spring-beans.xsd http://www.springframework.org/schema/context https://www.springframework.org/schema/context/spring-context.xsd">

    <!--
        把数据库的配置信息,写在一个独立的文件,编译修改数据库的配置内容,
        spring知道jdbc.properties文件的位置。
    -->
    <context:property-placeholder location="classpath:myData.properties"/>

    <!--声明数据源DataSource,作用是连接数据库的-->
    <bean id="myDataSource" class="com.alibaba.druid.pool.DruidDataSource"
          init-method="init" destroy-method="close">
        <!--set注入给DruidDataSource提供连接数据库信息-->
        <!--使用属性配置文件中的数据,语法为 ${key}-->
        <property name="url" value="${jdbc.url}"/>
        <property name="username" value="${jdbc.username}"/>
        <property name="password" value="${jdbc.password}"/>
        <property name="maxActive" value="${jdbc.max}"/>
    </bean>

    <!--声明的是mybatis中提供的SqlSessionFactoryBean类,
    这个类内部创建SqlSessionFactory的-->
    <bean id="sqlSessionFactory" class="org.mybatis.spring.SqlSessionFactoryBean">
        <!--set注入,把数据库连接池付给了dataSource属性-->
        <property name="dataSource" ref="myDataSource"/>
        <!--mybatis主配置文件的位置
        configLocation属性是Resource类型,读取配置文件
        它的赋值,使用value,指定文件的路径,使用classpath:表示文件的位置。
        -->
        <property name="configLocation" value="classpath:mybatis.xml"/>
    </bean>

    <!--创建dao对象,使用SqlSession的getMapper(StudentDao.class)
        MapperScannerConfigurer:在内部调用getMapper()生成每个dao接口的代理对象。
    -->
    <bean class="org.mybatis.spring.mapper.MapperScannerConfigurer">
        <!--指定SqlSessionFactory对象的id-->
        <property name="sqlSessionFactoryBeanName" value="sqlSessionFactory"/>


        <!--指定包名:包名是dao接口所在的包名。
            MapperScannerConfigurer会扫描这个包中的接口,
            把每个接口都执行一次getMapper()方法,得到每个接口的dao对象。
            创建好的dao对象放入到spring的容器中。
            dao对象的默认名称是:接口名首字母小写。
            若要扫描多个包,使用”,“分隔。
        -->
        <property name="basePackage" value="com.nan.dao"/>
    </bean>

    <!--把service交给spring管理-->
    <bean id="studentService" class="com.nan.service.impl.StudentServiceImpl">
        <property name="dao" ref="studentDao"/>
    </bean>
</beans>
- 编写数据库信息的properties文件
#driver=com.mysql.jdbc.Driver #because the druid may auto found the driver
jdbc.url=jdbc:mysql://localhost:3306/springdb?useUnicode=true
jdbc.username=root
jdbc.password=123456
jdbc.max=20
f、编写测试类
- 在test包下建com.nan包,在其中建个测试类MyTest
public class MyTest {
    @Test
    public void serviceTest02(){
        String config="applicationContext.xml";
        ApplicationContext ac=new ClassPathXmlApplicationContext(config);
        StudentServiceImpl ser = ac.getBean("studentService", StudentServiceImpl.class);
        List<Student> students = ser.queryStus();
        for (Student stu:students){
            System.out.println(stu);
        }
    }
}
- 测试结果为:
arameters:
<==    Columns: id, name, email, age
<==        Row: 1001, 李四, lisi@qq.com, 20
<==        Row: 1002, 张三, zs@sina.com, 28
<==        Row: 1003, 张飞, zhangfei@163.com, 20
<==        Row: 1004, 刘备, liubei@163.com, 20
<==        Row: 1005, 楠小弟, nanxiaodi@QQ.com, 20
<==        Row: 1006, 楠da弟, nandadi@QQ.com, 20
<==        Row: 1007, 海的的, hahha@QQ.com, 25
<==      Total: 7
6.4、mybaties相关文件可在idea中定义为模板
a、在idea中自定义模板的方法:
File--》Settings--》Editor--》File and Code Templates中点击加号。
b、mapper配置模板
<?xml version="1.0" encoding="UTF-8" ?>
<!DOCTYPE mapper
  PUBLIC "-//mybatis.org//DTD Mapper 3.0//EN"
  "http://mybatis.org/dtd/mybatis-3-mapper.dtd">
<mapper namespace="org.mybatis.example.BlogMapper">
  <select id="selectBlog" resultType="Blog">
    select * from Blog where id = #{id}
  </select>
</mapper>
c、mybatis的核心配置
<?xml version="1.0" encoding="UTF-8" ?>
<!DOCTYPE configuration
  PUBLIC "-//mybatis.org//DTD Config 3.0//EN"
  "http://mybatis.org/dtd/mybatis-3-config.dtd">
<configuration>
    <!--settings:控制mybatis全局行为-->
    <settings>
        <!--设置mybatis的输出日志-->
        <setting name="logImpl" value="STDOUT_LOGGING"/>
    </settings>

    <!--设置别名-->
    <typeAliases>
        <!--name:实体类所在的包名-->
        <package name=""/>
    </typeAliases>
  <!--sql mapper(sql映射文件)的位置-->
  <mappers>
    <!--方式一:加载单个资源文件-->
    <mapper resource="org/mybatis/example/BlogMapper.xml"/>
    <!--方式二:加载包
    <package name="com.nan.dao"/>
    -->
  </mappers>
</configuration>
d、mybatis和spring集合的相关配置
<?xml version="1.0" encoding="UTF-8"?>
<beans xmlns="http://www.springframework.org/schema/beans"
       xmlns:xsi="http://www.w3.org/2001/XMLSchema-instance"
       xmlns:context="http://www.springframework.org/schema/context"
       xsi:schemaLocation="http://www.springframework.org/schema/beans http://www.springframework.org/schema/beans/spring-beans.xsd http://www.springframework.org/schema/context https://www.springframework.org/schema/context/spring-context.xsd">

    <!--
        把数据库的配置信息,写在一个独立的文件,编译修改数据库的配置内容,
        spring知道jdbc.properties文件的位置。
    -->
    <context:property-placeholder location="classpath:myData.properties"/>

    <!--声明数据源DataSource,作用是连接数据库的-->
    <bean id="myDataSource" class="com.alibaba.druid.pool.DruidDataSource"
          init-method="init" destroy-method="close">
        <!--set注入给DruidDataSource提供连接数据库信息-->
        <!--使用属性配置文件中的数据,语法为 ${key}-->
        <property name="url" value="${jdbc.url}"/>
        <property name="username" value="${jdbc.username}"/>
        <property name="password" value="${jdbc.password}"/>
        <property name="maxActive" value="${jdbc.max}"/>
    </bean>

    <!--声明的是mybatis中提供的SqlSessionFactoryBean类,
    这个类内部创建SqlSessionFactory的-->
    <bean id="sqlSessionFactory" class="org.mybatis.spring.SqlSessionFactoryBean">
        <!--set注入,把数据库连接池付给了dataSource属性-->
        <property name="dataSource" ref="myDataSource"/>
        <!--mybatis主配置文件的位置
        configLocation属性是Resource类型,读取配置文件
        它的赋值,使用value,指定文件的路径,使用classpath:表示文件的位置。
        -->
        <property name="configLocation" value="classpath:mybatis.xml"/>
    </bean>

    <!--创建dao对象,使用SqlSession的getMapper(StudentDao.class)
        MapperScannerConfigurer:在内部调用getMapper()生成每个dao接口的代理对象。
    -->
    <bean class="org.mybatis.spring.mapper.MapperScannerConfigurer">
        <!--指定SqlSessionFactory对象的id-->
        <property name="sqlSessionFactoryBeanName" value="sqlSessionFactory"/>


        <!--指定包名:包名是dao接口所在的包名。
            MapperScannerConfigurer会扫描这个包中的接口,
            把每个接口都执行一次getMapper()方法,得到每个接口的dao对象。
            创建好的dao对象放入到spring的容器中。
            dao对象的默认名称是:接口名首字母小写。
            若要扫描多个包,使用”,“分隔。
        -->
        <property name="basePackage" value="com.nan.dao"/>
    </bean>

    <!--把service交给spring管理-->
    <bean id="studentService" class="com.nan.service.impl.StudentServiceImpl">
        <property name="dao" ref="studentDao"/>
    </bean>
</beans>
- 复习AOP
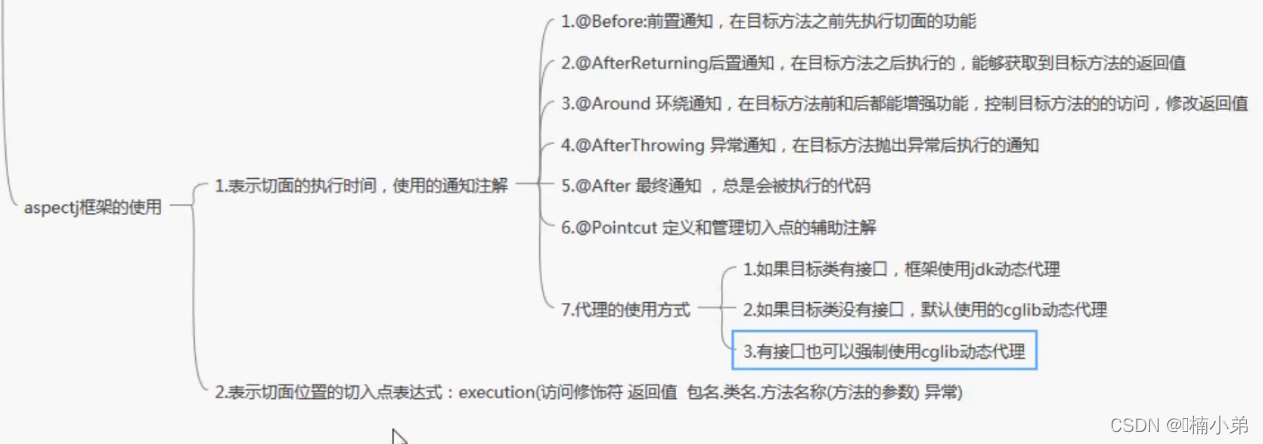
七、spring事务
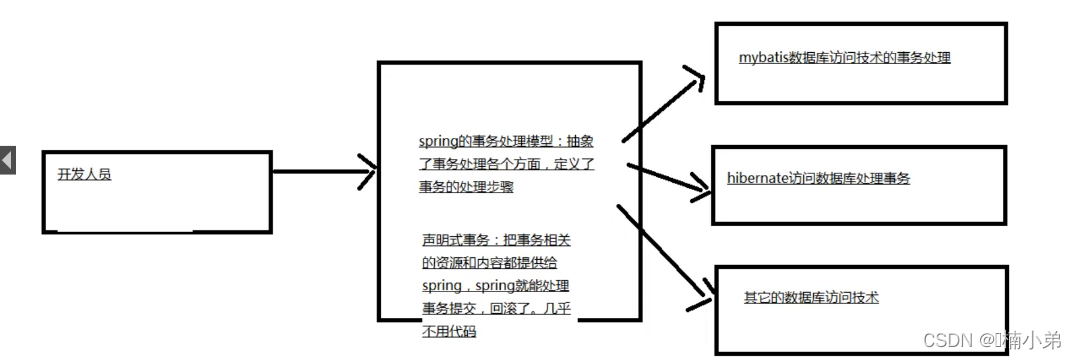
7.1、相关问题
a、什么是事务?
事务是指一组sql语句的集合,集合中有多条sql语句可能是insert、update、
select、delete,我们希望这些多个sql语句都能成功,或者都失败,
这些sql语句的执行是一致的,作为一个整体执行。
b、在什么时候想到使用事务?
当操作,涉及到多个表或者多个sql语句的insert、update、delete时,
需要保证这些语句都是成功才能完成我的功能,或者都失败,
保证操作是符合要求的。
b.1、在java代码中写程序,控制事务,此时的事务应放在哪里呢?
service类的业务方法上,因为业务方法会调用多个dao方法,
执行多个sql语句。
c、使用JDBC访问数据库或mybatis访问数据库怎么处理事务?
1、jdbc访问数据库,处理事务
	 Connection conn;
	 conn.commit();//提交
	 conn.rollback();//回滚
2、mybatis访问数据库,处理事务
	SqlSession.commit();
	SqlSession.rollback();
3、hibernate访问数据库,处理事务
	Session.commit();
	Session.rollback();
d、在上个问题中事务的处理方式,有什么不足?
1、
	不同的数据库访问技术,处理事务的对象,方法不同,
	需要了解不同数据库访问技术使用事务的原理。
2、
	掌握多种数据库中事务的处理逻辑。
	什么时候提交事务,什么时候回滚事务。
3、
	处理事务的多种方法。

总结:
	就是多种数据库的访问技术,有不同的事务处理机制、对象、方法。
e、怎么解决不足?
1、spring提供一种处理事务的统一模型,能使用统一步骤,
	方式完成多种不同数据库访问技术的事务处理。
2、使用spring的事务处理机制,可以完成mybatis访问数据库的事务处理
3、使用spring的事务处理机制,可以完成hibernate访问数据库的事务处理。
f、处理事务,需要怎么做,做什么?
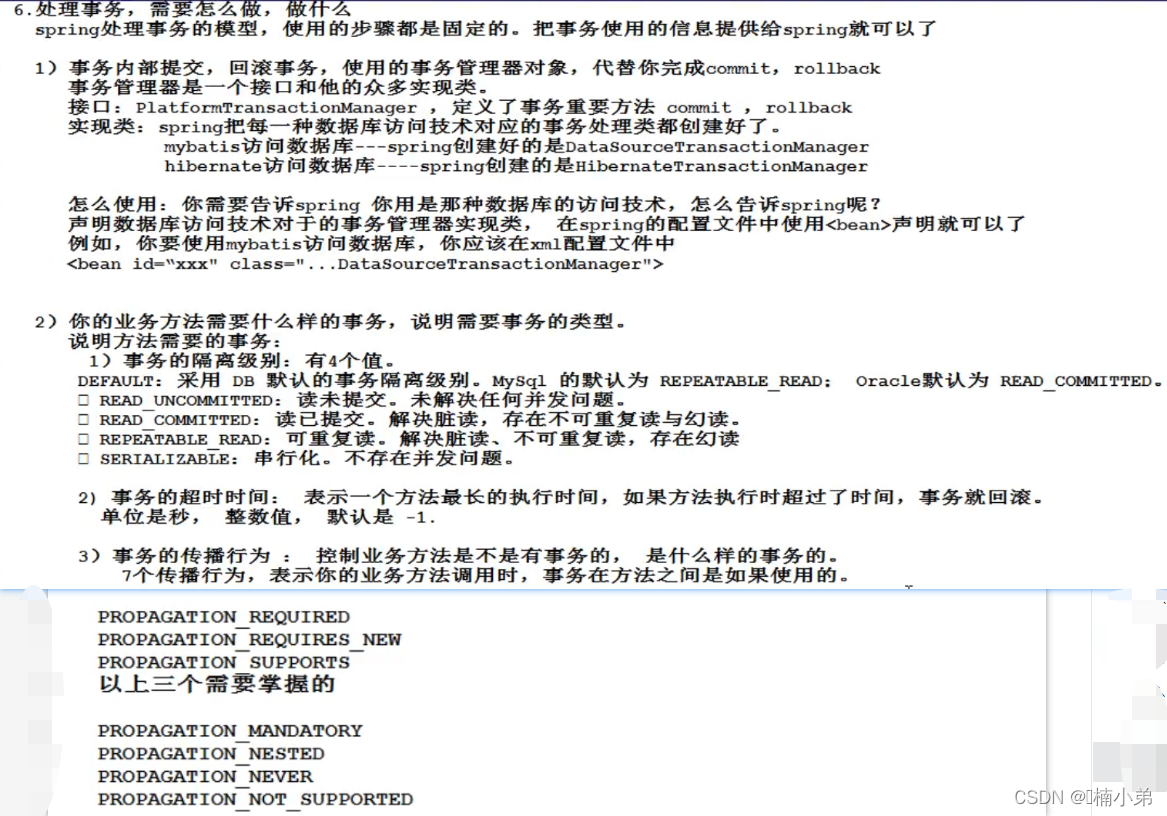

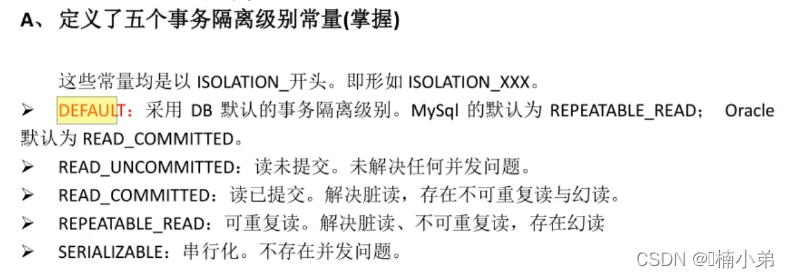
7.2、spring框架中提供的事务处理方案
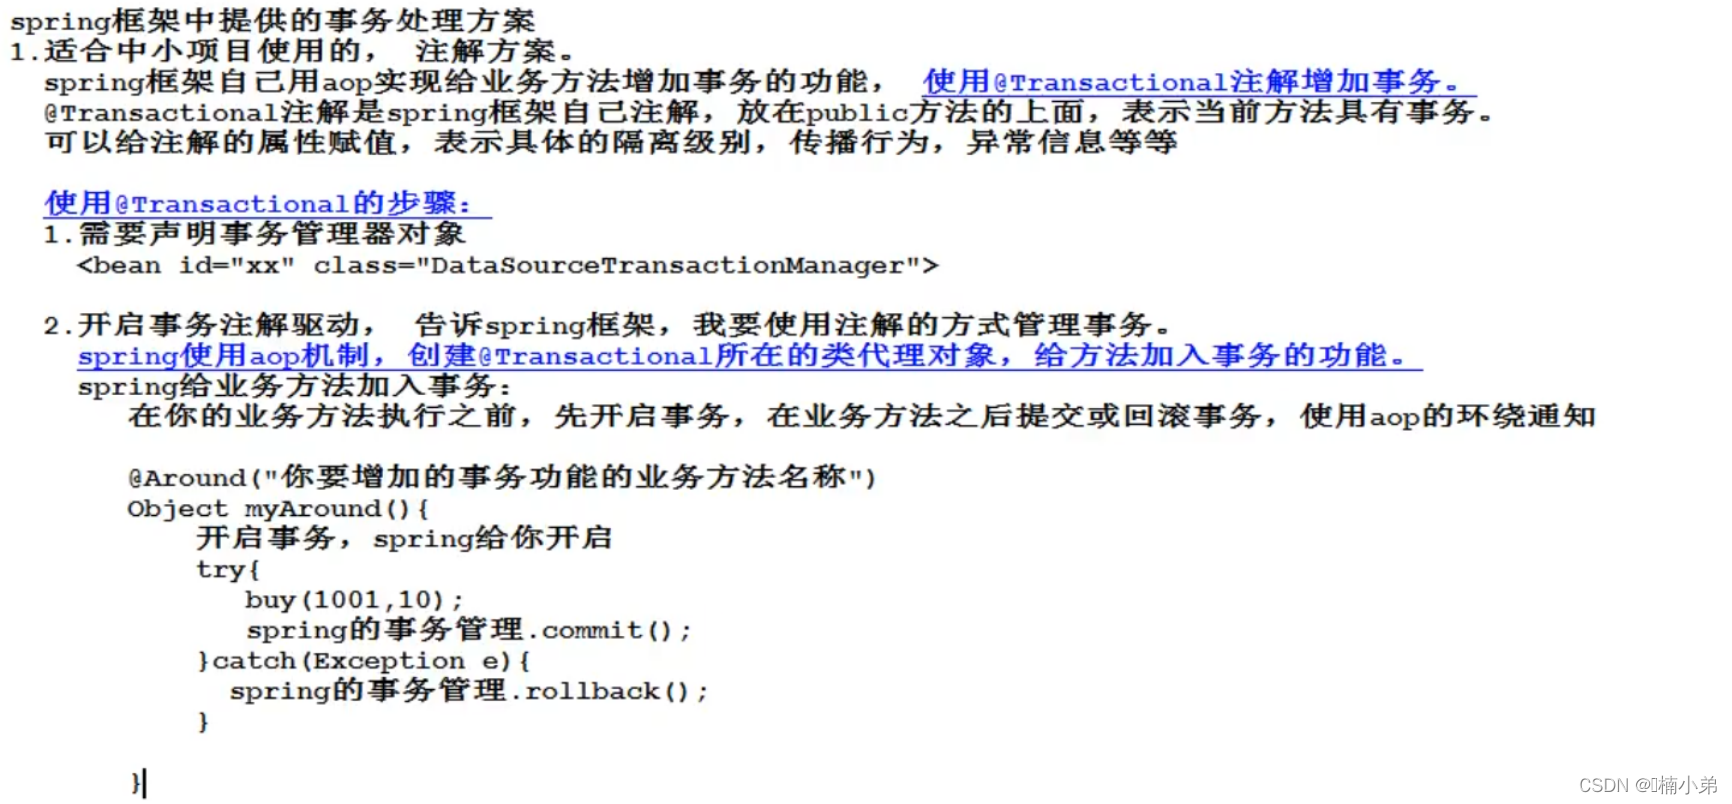
八、适合小型项目的事务
8.1、练习内容:电商购买商品项目
举例:购买商品trans_sale项目
本例要实现购买商品,模拟用户下订单,向订单表添加销售记录,
从商品表减少库存。
8.2、实现步骤:
step0:创建数据库表
创建两个数据库表sale、goods。
- sale为销售表
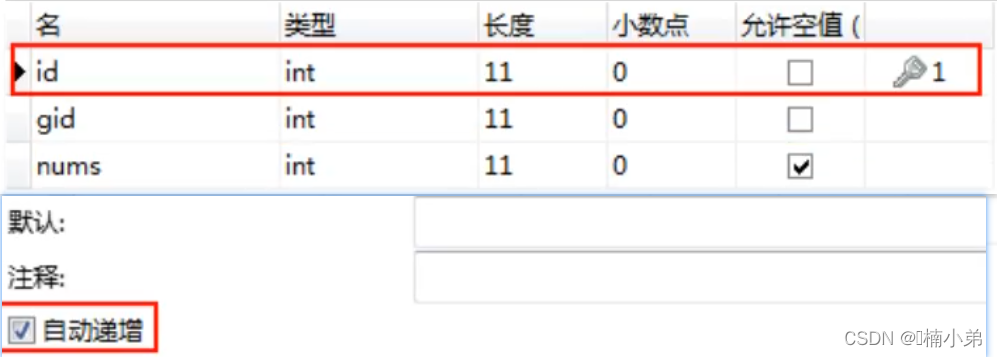
- goods商品表

- goods表数据

step1:pom.xml文件
<dependencies>
        <dependency>
            <groupId>org.springframework</groupId>
            <artifactId>spring-context</artifactId>
            <version>5.3.15</version>
        </dependency>
        <dependency>
            <groupId>org.springframework</groupId>
            <artifactId>spring-jdbc</artifactId>
            <version>5.3.15</version>
        </dependency>
        <dependency>
            <groupId>org.springframework</groupId>
            <artifactId>spring-tx</artifactId>
            <version>5.3.15</version>
        </dependency>
        <dependency>
            <groupId>org.springframework</groupId>
            <artifactId>spring-aspects</artifactId>
            <version>5.3.15</version>
        </dependency>

        <dependency>
            <groupId>org.mybatis</groupId>
            <artifactId>mybatis</artifactId>
            <version>3.5.9</version>
        </dependency>
        <dependency>
            <groupId>org.mybatis</groupId>
            <artifactId>mybatis-spring</artifactId>
            <version>2.0.7</version>
        </dependency>
        <dependency>
            <groupId>mysql</groupId>
            <artifactId>mysql-connector-java</artifactId>
            <version>5.1.47</version>
        </dependency>
        <dependency>
            <groupId>junit</groupId>
            <artifactId>junit</artifactId>
            <version>4.13.1</version>
            <scope>test</scope>
        </dependency>

        <dependency>
            <groupId>com.alibaba</groupId>
            <artifactId>druid</artifactId>
            <version>1.2.6</version>
        </dependency>
    </dependencies>
    <build>
        <!--目的是把src/main/java目录中的xml文件包含到输出结果中。输出到classes目录中-->
        <resources>
            <resource>
                <!--所在的目录-->
                <directory>src/main/java</directory>
                <!--包括目录下的  .properties,.xml 文件都会扫描到-->
                <includes>
                    <include>**/*.properties</include>
                    <include>**/*.xml</include>
                </includes>
                <filtering>false</filtering>
            </resource>
        </resources>
        <plugins>
            <plugin>
                <groupId>org.apache.maven.plugins</groupId>
                <artifactId>maven-compiler-plugin</artifactId>
                <version>3.8.1</version>
                <!--指定jdk的版本-->
                <configuration>
                    <source>1.8</source>
                    <target>1.8</target>
                </configuration>
            </plugin>
        </plugins>
    </build>
step2:建实体类
- 在com.nan.pojo包下建Sales.java
public class Sales {
    private Integer id;
    private Integer gid;
    private Integer nums;

    public Sales( Integer gid, Integer nums) {
        this.gid = gid;
        this.nums = nums;
    }

    public Sales() {
    }

		....getter setter 方法.....

   .....toString方法......
}
- 在com.nan.pojo建Goods.java
public class Goods {
private Integer id;
private String name;
private Integer amount;
private BigDecimal price;
public Goods(Integer id, String name, Integer amount, BigDecimal price) {
this.id = id;
this.name = name;
this.amount = amount;
this.price = price;
}
public Goods() {
}
....setter getter方法....
....toString方法......
}
step3:编写dao、service层
- 在com.nan.dao包下编写GoodsDao.java
public interface GoodsDao {
//更新库存
//goods表示本次用户购买的商品信息,id,购买数量
int updateGoods(Goods goods);
//查询商品的信息
Goods selectGoods(Integer id);
}
- 在com.nan.dao包下编写GoodsDaoMapper.xml
<?xml version="1.0" encoding="UTF-8" ?>
<!DOCTYPE mapper
PUBLIC "-//mybatis.org//DTD Mapper 3.0//EN"
"http://mybatis.org/dtd/mybatis-3-mapper.dtd">
<mapper namespace="com.nan.dao.GoodsDao">
<select id="selectGoods" resultType="com.nan.pojo.Goods">
select id,name,amount,price from goods where id=#{id}
</select>
<update id="updateGoods" >
update goods set amount=amount-#{amount} where id=#{id}
</update>
</mapper>
- 在com.nan.dao包下编写SaleDao
public interface SaleDao {
//添加销售记录
int insertSale(Sales sale);
}
- 在com.nan.dao包下编写SaleDaoMapper.xml
<?xml version="1.0" encoding="UTF-8" ?>
<!DOCTYPE mapper
PUBLIC "-//mybatis.org//DTD Mapper 3.0//EN"
"http://mybatis.org/dtd/mybatis-3-mapper.dtd">
<mapper namespace="com.nan.dao.SaleDao">
<insert id="insertSale" parameterType="com.nan.pojo.Sales">
insert into sales(gid,nums)values (#{gid},#{nums})
</insert>
</mapper>
- 在com.nan.service包下建个BuyGoodsService.java
public interface BuyGoodService {
//购买商品的方法
//goodsId:购买商品的编号,nums:购买的数量
void buy(Integer goodsId,Integer nums);
}
- 在com.nan.service.impl包下建个BuyGoodsServiceImpl.java
public class BuyGoodsServiceImpl implements BuyGoodService {
private GoodsDao goodsDao;
private SaleDao sDao;
public void setGoodsDao(GoodsDao goodsDao) {
this.goodsDao = goodsDao;
}
public void setSaleDao(SaleDao sDao) {
this.sDao = sDao;
}
@Override
public void buy(Integer goodsId, Integer nums) {
//记录销售信息,向sale表添加记录
System.out.println("=====buy方法的开始=====");
Sales sale=new Sales();
sale.setGid(goodsId);
sale.setNums(nums);
sDao.insertSale(sale);
//更新库存
Goods goods = goodsDao.selectGoods(goodsId);
if(goods==null){
//商品不存在
throw new NullPointerException("编号为:"+goodsId+",商品不存在");
}else if(goods.getAmount()<nums){
//商品库存不足
throw new NotEnoughExceptoin("编号为:"+goodsId+",商品库存不足");
}
//修改库存
Goods gos=new Goods();
gos.setId(goodsId);
gos.setAmount(nums);
goodsDao.updateGoods(gos);
System.out.println("=====buy方法的完成=====");
}
}
step4:编写自定义异常
- 在com.nan.excep包下建个NotEnoughExceptoin.java
public class NotEnoughExceptoin extends RuntimeException{
public OutMaxNum() {
super();
}
public NotEnoughExceptoin (String message) {
super(message);
}
}
step5:编写资源文件
- db.properties文件
db.url=jdbc:mysql://localhost:3306/springdb?useUnicode=true&characterEncoding=utf8
db.name=root
db.pwd=123456
db.max=20
- mybatis-config.xml
<?xml version="1.0" encoding="UTF-8" ?>
<!DOCTYPE configuration
PUBLIC "-//mybatis.org//DTD Config 3.0//EN"
"http://mybatis.org/dtd/mybatis-3-config.dtd">
<configuration>
<!--settings:控制mybatis全局行为-->
<!-- <settings>-->
<!-- <!–设置mybatis的输出日志–>-->
<!-- <setting name="logImpl" value="STDOUT_LOGGING"/>-->
<!-- </settings>-->
<!--设置别名-->
<typeAliases>
<!--name:实体类所在的包名-->
<package name="com.nan.pojo"/>
</typeAliases>
<!--sql mapper(sql映射文件)的位置-->
<mappers>
<!--方式一:加载单个资源文件-->
<mapper resource="com/nan/dao/GoodsDaoMapper.xml"/>
<mapper resource="com/nan/dao/SaleDaoMapper.xml"/>
<!--方式二:加载包
<package name="com.nan.dao"/>
-->
</mappers>
</configuration>
- applicationContext.xml
<context:property-placeholder location="classpath:db.properties"/>
<bean id="dataSource" class="com.alibaba.druid.pool.DruidDataSource">
<property name="url" value="${db.url}"/>
<property name="username" value="${db.name}"/>
<property name="password" value="${db.pwd}"/>
<property name="maxActive" value="${db.max}"/>
</bean>
<bean id="sqlSessionFactory" class="org.mybatis.spring.SqlSessionFactoryBean">
<property name="dataSource" ref="dataSource"/>
<property name="configLocation" value="classpath:mybatis-config.xml"/>
</bean>
<bean class="org.mybatis.spring.mapper.MapperScannerConfigurer">
<property name="basePackage" value="com.nan.dao"/>
<property name="sqlSessionFactoryBeanName" value="sqlSessionFactory"/>
</bean>
<bean id="buyGoodsService" class="com.nan.service.impl.BuyGoodsServiceImpl">
<property name="goodsDao" ref="goodsDao"/>
<property name="saleDao" ref="saleDao"/>
</bean>
step6:测试数据
- 在test.com.nan包下建个MyTest.java
public class MyTest {
@Test
public void test01(){
String config="applicationContext.xml";
ApplicationContext ac=new ClassPathXmlApplicationContext(config);
BuyGoodService bu = ac.getBean("buyGoodsService", BuyGoodService.class);
bu.buy(1001,100);
}
}
step7:测试结果
- 1、当购买的商品不存在时,依旧会增加购买记录。
- 2、当购买的商品大于库存时,依旧会增加购买记录。
- 3、当购买的商品存在且小于库存时,一切正常。
8.3、练习项目中添加事务
1、在applicationContext.xml中添加事务
<!--使用spring的事务处理-->
<!--1、声明事务管理器-->
<bean id="transactionManager" class="org.springframework.jdbc.datasource.DataSourceTransactionManager">
<!--连接数据库,指定数据源-->
<property name="dataSource" ref="dataSource"/>
</bean>
<!--2、开启事务注解驱动,
告诉spring使用注解管理事务,
创建代理对象。
transaction-manager:事务管理器对象的id
-->
<tx:annotation-driven transaction-manager="transactionManager"/>
2、在要开启事务的方法上添加事务注解
- 在BuyGoodsServiceImpl.java添加事务注解
public class GoodsServiceImpl implements GoodsService {
private SaleDao sdao;
private GoodDao gDao;
public void setSdao(SaleDao sdao) {
this.sdao = sdao;
}
public void setgDao(GoodDao gDao) {
this.gDao = gDao;
}
/**方式一:
*rollbackFor:表示发生指定的异常一定回滚
* 处理逻辑:
* 1、spring框架会首先检查方法抛出的异常
* 是不是在rollbackFor的属性值中,
* 若在rollbackFor列表中,不管什么类型的异常,一定回滚。
* 若不在rollbackFor列表中,spring会判断异常是不是RuantimeException,
* 若是一定回滚。
@Transactional(
propagation = Propagation.REQUIRED,
isolation = Isolation.DEFAULT,
readOnly = false,
rollbackFor = {
NullPointerException.class,
NotEnoughExceptoin.class//自定义的异常类
}
)
*/
/**
* 方式二:
* @Transactional
* 使用的是事务控制的默认值,默认的传播行为是REQUIRED,
* 默认的隔离级别DEFAULT
* 默认抛出运行异常,回滚事务。
* */
@Transactional
@Override
public void buy(Integer id, Integer num) {
System.out.println("==========进入操作之中==========");
//判断是否存在此商品
Goods goods = gDao.selectGoods(id);
if(goods==null){
throw new NullPointerException("编号为:"+id+"的商品,查询不到!!");
}else if(goods.getAmount()<num){
throw new OutMaxNum("编号为:"+id+"的商品,库存不够!!!");
}
//开始执行操作
Goods gs=new Goods();
gs.setId(id);
gs.setAmount(num);
//修改数量
gDao.updateGoods(gs);
//添加记录
Sales sal=new Sales();
sal.setGid(id);
sal.setNums(num);
sdao.insertDate(sal);
System.out.println("==========操作结束==========");
}
}
3、测试结果
- 1、当查询不到商品编号时,不会添加商品记录。
- 2、当购买商品大于库存时,不会添加到商品记录中。
9、适合大型项目的事务
9.1、介绍
大型项目中,有很多的类,方法。需要大量的配置事务,
使用aspectj框架功能,在spring配置文件中声明类、方法需要的事务。
这种方式业务方法和事务配置完全分离。
- 实行步骤
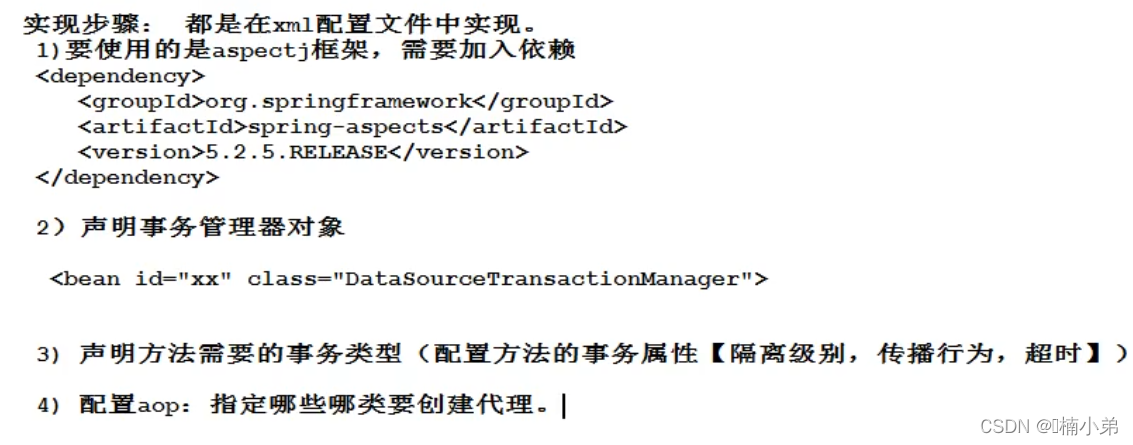
9.2、在applicationContext.xml配置事务
<!--声明式事务处理:和源代码完全分离的-->
<!--1.声明事务管理对象-->
<bean id="transactionManager" class="org.springframework.jdbc.datasource.DataSourceTransactionManager">
<!--指明数据源-->
<property name="dataSource" ref="dataSource"/>
</bean>
<!--2、声明业务方法它的事务属性(隔离级别、传播行为、超时时间)
id:自定义名称,表示<tx:advice>和</tx:advice>之间的配置内容的。
transaction-manager:事务管理器对象的id。
-->
<tx:advice id="myAdvice" transaction-manager="transactionManager">
<!--tx:attributes:配置事务属性-->
<tx:attributes>
<!--tx:method:给具体的方法配置事务属性,method可以有多个,分别给不同的方法设置事务属性
name:方法名称,①完整的方法名称,不带包和类。
②方法可以使用通配符”*“表示任意字符。
propagation:传播行为、枚举值。
isolation:隔离级别
rollback-for:自己指定的异常类名,全限定类名(带上包名)。发生异常一定回滚。
-->
<tx:method name="buy" propagation="REQUIRED" isolation="DEFAULT"
rollback-for="java.lang.NullPointerException,com.nan.excep.NotEnoughExceptoin" />
<!--使用通配符,指定很多方法-->
<tx:method name="add*" propagation="REQUIRES_NEW"/>
<!--指定修改方法-->
<tx:method name="modify*"/>
<!--删除方法-->
<tx:method name="remove"/>
<!--查询方法,query,search,find-->
<tx:method name="*" propagation="SUPPORTS" read-only="true"/>
<!--注意:执行顺序:(完整方法名) > (方法的共同部分+”*“) > (完全使用通配符”*“)-->
</tx:attributes>
</tx:advice>
<!--配置aop-->
<aop:config>
<!--
配置切入点表达式:指定哪些包中类,要使用事务
id:切入点表达式的名称,唯一值。
expression:切入点表达式,指定哪些类要使用事务,aspectj会创建代理对象。
execution(* *..service..*.*(..))
表示:任意类型 任意包下的service包中任意的类,类中任意的方法。
-->
<aop:pointcut id="servicePt" expression="execution(* *..service..*.*(..))"/>
<!--配置增强器:关联advice和pointcut
advice-ref:通知,上面tx:advice哪里的配置
pointcut-ref:切入点表达式的id
-->
<aop:advisor advice-ref="myAdvice" pointcut-ref="servicePt"/>
</aop:config>
9.3、配置截图如下:
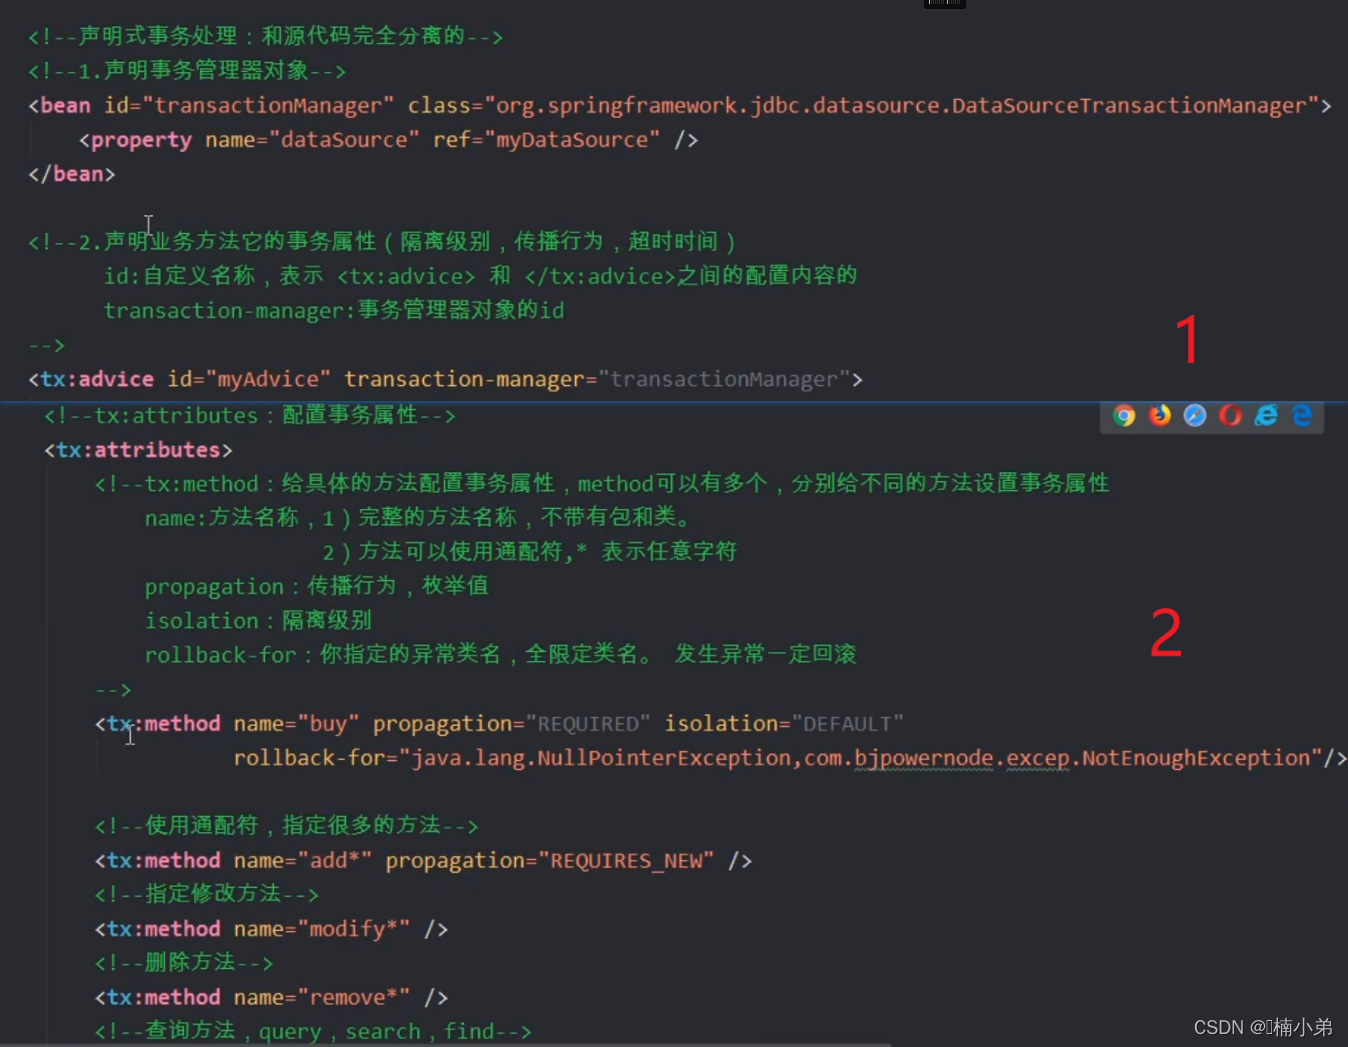
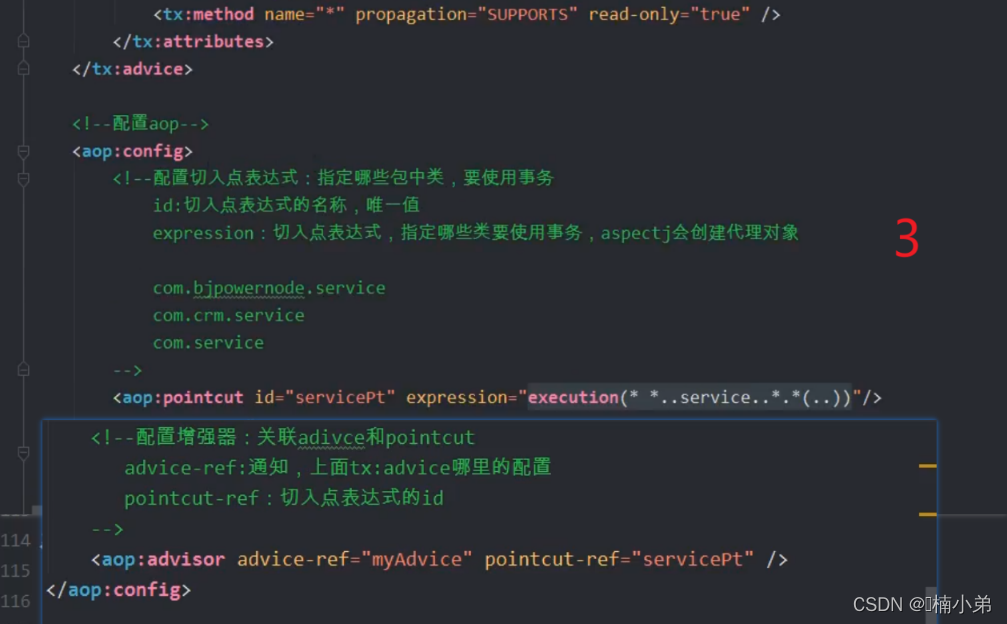
10、spring和mybatis搭建web项目
- 建个web项目工程
10.1、pom.xml文件
<dependencies>
<!--spring核心依赖-->
<dependency>
<groupId>org.springframework</groupId>
<artifactId>spring-context</artifactId>
<version>5.3.15</version>
</dependency>
<!--spring事务依赖-->
<dependency>
<groupId>org.springframework</groupId>
<artifactId>spring-tx</artifactId>
<version>5.3.15</version>
</dependency>
<!--mybatis核心依赖-->
<dependency>
<groupId>org.mybatis</groupId>
<artifactId>mybatis</artifactId>
<version>3.5.9</version>
</dependency>
<!--mybatis和spring的集成依赖-->
<dependency>
<groupId>org.mybatis</groupId>
<artifactId>mybatis-spring</artifactId>
<version>2.0.7</version>
</dependency>
<!--jdbc驱动-->
<dependency>
<groupId>org.springframework</groupId>
<artifactId>spring-jdbc</artifactId>
<version>5.3.15</version>
</dependency>
<!--mysql驱动-->
<dependency>
<groupId>mysql</groupId>
<artifactId>mysql-connector-java</artifactId>
<version>5.1.47</version>
</dependency>
<!--连接池:druid-->
<dependency>
<groupId>com.alibaba</groupId>
<artifactId>druid</artifactId>
<version>1.2.6</version>
</dependency>
<dependency>
<groupId>junit</groupId>
<artifactId>junit</artifactId>
<version>4.13.1</version>
<scope>test</scope>
</dependency>
<!--servlet配置-->
<dependency>
<groupId>javax.servlet</groupId>
<artifactId>servlet-api</artifactId>
<version>2.5</version>
</dependency>
<!--为了使用监听器-->
<dependency>
<groupId>org.springframework</groupId>
<artifactId>spring-web</artifactId>
<version>5.3.13</version>
</dependency>
<!--jsp配置-->
<dependency>
<groupId>javax.servlet.jsp</groupId>
<artifactId>jsp-api</artifactId>
<version>2.2.1-b03</version>
</dependency>
</dependencies>
<build>
<!--目的是把src/main/java目录中的xml文件包含到输出结果中。输出到classes目录中-->
<resources>
<resource>
<!--所在的目录-->
<directory>src/main/java</directory>
<!--包括目录下的 .properties,.xml 文件都会扫描到-->
<includes>
<include>**/*.properties</include>
<include>**/*.xml</include>
</includes>
<filtering>false</filtering>
</resource>
</resources>
<plugins>
<plugin>
<groupId>org.apache.maven.plugins</groupId>
<artifactId>maven-compiler-plugin</artifactId>
<version>3.8.1</version>
<!--指定jdk的版本-->
<configuration>
<source>1.8</source>
<target>1.8</target>
</configuration>
</plugin>
</plugins>
</build>
10.2、编写servlet类
- 在com.nan.controller包中建个RegisterServlet.java
public class RegisterServlet extends HttpServlet {
@Override
protected void doGet(HttpServletRequest req, HttpServletResponse resp) throws ServletException, IOException {
req.setCharacterEncoding("utf-8");
resp.setContentType("text/html;charset=UTF-8");
String strId=req.getParameter("id");
String strName=req.getParameter("name");
String strEmail= req.getParameter("email");
String strAge=req.getParameter("age");
//创建spring的容器对象
WebApplicationContext ctx=null;
//使用框架中的方法,获取容器的对象。
ServletContext sc = getServletContext();
ctx= WebApplicationContextUtils.getRequiredWebApplicationContext(sc);
System.out.println("容器对象的信息========"+ctx);
//获取service
StudentService stuSer = ctx.getBean("studentService", StudentService.class);
Student stu=new Student();
stu.setId(Integer.parseInt(strId));
stu.setName(strName);
stu.setEmail(strEmail);
stu.setAge(Integer.valueOf(strAge));
HttpSession session = req.getSession();
session.setAttribute("stu",stu);
stuSer.addStu(stu);
//给个页面
req.getRequestDispatcher("result.jsp").forward(req,resp);
}
@Override
protected void doPost(HttpServletRequest req, HttpServletResponse resp) throws ServletException, IOException {
doGet(req, resp);
}
10.3、编写dao层
- 在com.nan.dao包下
- 1、建个StudentDao接口类
public interface StudentDao {
//添加数据
int insertDate(Student stu);
//查询所有的数据
List<Student> selectAllStu();
}
- 2、建StudentDaoMapper.xml
<?xml version="1.0" encoding="UTF-8" ?>
<!DOCTYPE mapper
PUBLIC "-//mybatis.org//DTD Mapper 3.0//EN"
"http://mybatis.org/dtd/mybatis-3-mapper.dtd">
<mapper namespace="com.nan.dao.StudentDao">
<insert id="insertDate" parameterType="com.nan.pojo.Student">
insert into student(id,name,email,age) values (#{id},#{name},#{email},#{age})
</insert>
<select id="selectAllStu" resultType="com.nan.pojo.Student">
select * from student order by id asc
</select>
</mapper>
10.4、编写实体类
- 在com.nan.pojo包下建个Student类
public class Student {
private int id;
private String name;
private String email;
private int age;
public Student(int id, String name, String email, int age) {
this.id = id;
this.name = name;
this.email = email;
this.age = age;
}
public Student() {
}
.... setter 和 getter方法
....tostring方法....
}
10.5、编写service层
- 在com.nan.service包中
- 1、建个StudentService接口类
public interface StudentService {
//添加数据
int addStu(Student stu);
//查询所有的数据
List<Student> queryStus();
}
- 2、在其中建个impl包,在其中建StudentServiceImpl类
public class StudentServiceImpl implements StudentService {
//引用类型
private StudentDao dao;
//使用set注入,赋值
public void setDao(StudentDao dao) {
this.dao = dao;
}
@Override
public int addStu(Student stu) {
return dao.insertDate(stu);
}
@Override
public List<Student> queryStus() {
return dao.selectAllStu();
}
}
10.6、编写资源文件
- 1、myData.properties
#driver=com.mysql.jdbc.Driver #because the druid may auto found the driver
jdbc.url=jdbc:mysql://localhost:3306/springdb?useUnicode=true
jdbc.username=root
jdbc.password=123456
jdbc.max=20
- 2、applicationContext.xml
<!--
把数据库的配置信息,写在一个独立的文件,编译修改数据库的配置内容,
spring知道jdbc.properties文件的位置。
-->
<context:property-placeholder location="classpath:myData.properties"/>
<!--声明数据源DataSource,作用是连接数据库的-->
<bean id="myDataSource" class="com.alibaba.druid.pool.DruidDataSource"
init-method="init" destroy-method="close">
<!--set注入给DruidDataSource提供连接数据库信息-->
<!--使用属性配置文件中的数据,语法为 ${key}-->
<property name="url" value="${jdbc.url}"/>
<property name="username" value="${jdbc.username}"/>
<property name="password" value="${jdbc.password}"/>
<property name="maxActive" value="${jdbc.max}"/>
</bean>
<!--声明的是mybatis中提供的SqlSessionFactoryBean类,
这个类内部创建SqlSessionFactory的-->
<bean id="sqlSessionFactory" class="org.mybatis.spring.SqlSessionFactoryBean">
<!--set注入,把数据库连接池付给了dataSource属性-->
<property name="dataSource" ref="myDataSource"/>
<!--mybatis主配置文件的位置
configLocation属性是Resource类型,读取配置文件
它的赋值,使用value,指定文件的路径,使用classpath:表示文件的位置。
-->
<property name="configLocation" value="classpath:mybatis.xml"/>
</bean>
<!--创建dao对象,使用SqlSession的getMapper(StudentDao.class)
MapperScannerConfigurer:在内部调用getMapper()生成每个dao接口的代理对象。
-->
<bean class="org.mybatis.spring.mapper.MapperScannerConfigurer">
<!--指定SqlSessionFactory对象的id-->
<property name="sqlSessionFactoryBeanName" value="sqlSessionFactory"/>
<!--指定包名:包名是dao接口所在的包名。
MapperScannerConfigurer会扫描这个包中的接口,
把每个接口都执行一次getMapper()方法,得到每个接口的dao对象。
创建好的dao对象放入到spring的容器中。
dao对象的默认名称是:接口名首字母小写。
若要扫描多个包,使用”,“分隔。
-->
<property name="basePackage" value="com.nan.dao"/>
</bean>
<!--把service交给spring管理-->
<bean id="studentService" class="com.nan.service.impl.StudentServiceImpl">
<property name="dao" ref="studentDao"/>
</bean>
- 3、mybatis.xml
<?xml version="1.0" encoding="UTF-8" ?>
<!DOCTYPE configuration
PUBLIC "-//mybatis.org//DTD Config 3.0//EN"
"http://mybatis.org/dtd/mybatis-3-config.dtd">
<configuration>
<!--开启mybatis自带的日志-->
<settings>
<setting name="logImpl" value="STDOUT_LOGGING"/>
</settings>
<!--加载sqlMapper的位置-->
<mappers>
<mapper resource="com/nan/dao/StudentDaoMapper.xml"/>
</mappers>
</configuration>
- 4、web.xml
<?xml version="1.0" encoding="UTF-8"?>
<web-app xmlns="http://xmlns.jcp.org/xml/ns/javaee"
xmlns:xsi="http://www.w3.org/2001/XMLSchema-instance"
xsi:schemaLocation="http://xmlns.jcp.org/xml/ns/javaee http://xmlns.jcp.org/xml/ns/javaee/web-app_4_0.xsd"
version="4.0">
<servlet>
<servlet-name>regist</servlet-name>
<servlet-class>com.nan.controller.RegisterServlet</servlet-class>
</servlet>
<servlet-mapping>
<servlet-name>regist</servlet-name>
<url-pattern>/reg</url-pattern>
</servlet-mapping>
<!--注册监听器ContextLoaderListener
监听器被创建对象后,会读取/WEB-INF/spring-config.xml
为什么要读取文件:
因为在监听器中创建ApplicationContext对象,需要加载配置文件。
/WEB-INF/applicationContext.xml就是监听器默认读取的spring配置文件路径。
可以修改默认的文件位置,使用context-param重新指定文件的位置。
配置监听器:
目的是创建容器对象,创建了容器对象,
就能把spring-config.xml配置文件中的所有对象都创建好。
用户发起请求就可以直接使用对象了。
-->
<context-param>
<param-name>contextConfigLocation</param-name>
<!--自定义配置文件的路径-->
<param-value>classpath:applicationContext.xml</param-value>
</context-param>
<listener>
<listener-class>org.springframework.web.context.ContextLoaderListener</listener-class>
</listener>
</web-app>
- 5、在web包下建个index.jsp
<%@ page contentType="text/html;charset=UTF-8" language="java" %>
<html>
<head>
<title>$Title$</title>
</head>
<body>
<p>学生注册</p>
<form action="reg" method="post">
<table>
<tr>
<td>id</td>
<td><input name="id" type="text"></td>
</tr>
<tr>
<td>姓名</td>
<td><input name="name" type="text"></td>
</tr>
<tr>
<td>邮箱</td>
<td><input name="email" type="text"></td>
</tr>
<tr>
<td>年龄</td>
<td><input name="age" type="text"></td>
</tr>
<tr>
<td></td>
<td><input value="提交" type="submit"></td>
</tr>
</table>
</form>
</body>
</html>
- 6、在web包建个result.jsp
<%@ page contentType="text/html;charset=UTF-8" language="java" %>
<html>
<head>
<title>okkk</title>
</head>
<body>
${stu.name}
${stu.id}
${stu.email}
${stu.age}
<h1>result.jsp注册成功</h1>
</body>
</html>
10.7、web项目注意事项:
- 勿要忘记手动添加依赖(需要在Artifacts中选择相应web项目添加lib目录以及在其中添加已添加的依赖)。


 本文详述了Spring的核心特性,包括IOC、依赖注入、别名、Bean的作用域、自动装配、注解开发等。通过实例讲解了Spring的配置、创建对象、事务管理以及与Mybatis的整合。同时,介绍了Spring的动态代理和AOP概念,提供了多种实现方式。最后,探讨了Spring在小型项目和大型项目中的事务处理策略,并展示了如何基于Spring和Mybatis搭建Web项目。


 8626
8626

 被折叠的 条评论
为什么被折叠?


