


一、部署系统环境:UbuntuServer 22.04
1、卸载已安装的docker脚本
#!/bin/bash
echo "停止 Docker 服务"
sudo systemctl stop docker
echo "卸载 Docker 及相关软件包"
sudo apt-get purge docker-ce docker-ce-cli containerd.io docker-buildx-plugin docker-compose-plugin
echo  "删除docker相关文件"
sudo rm -rf /var/lib/docker
sudo rm -rf /var/lib/containerd
sudo rm -rf /etc/docker/daemon.json
sudo rm -rf /etc/systemd/system/docker.service.d
echo  "自动清理残留的依赖"
sudo apt-get autoremove -y --purge
sudo apt-get autoclean
2、安装脚本:
#!/bin/bash

echo "更新软件包索引"
sudo apt-get update

echo "安装必要的依赖包"
sudo apt-get install -y apt-transport-https ca-certificates curl software-properties-common

echo "添加 Docker 的官方 GPG 密钥"
curl -fsSL https://download.docker.com/linux/ubuntu/gpg | sudo apt-key add -

echo "将 Docker 仓库添加到 APT 源"
sudo add-apt-repository "deb [arch=$(dpkg --print-architecture)] https://download.docker.com/linux/ubuntu $(lsb_release -cs) stable"

echo "更新 APT 包索引"
sudo apt-get update

echo "确保从 Docker 官方仓库安装,而不是默认的 Ubuntu 仓库"
apt-cache policy docker-ce

echo "安装 Docker"
sudo apt-get install -y docker-ce docker-ce-cli containerd.io

echo "验证 Docker 是否安装成功"
sudo systemctl status docker

echo "将当前用户添加到 docker 组(可选)"
sudo usermod -aG docker ${USER}

echo "验证 Docker 安装是否正确"
docker --version
echo "配置华为云代理Docker镜像加速地址"
sudo touch /etc/docker/daemon.json
sudo chmod 777 /etc/docker/daemon.json
echo "{"registry-mirrors": [ "https://<你的镜像加速器地址>.mirror.swr.myhuaweicloud.com" ]
}" | tee /etc/docker/daemon.json

echo "关闭安全模块策略并重启docker"
sudo setenforce 0
systemctl daemon-reload
systemctl restart docker

echo "运行一个测试容器"
docker run hello-world
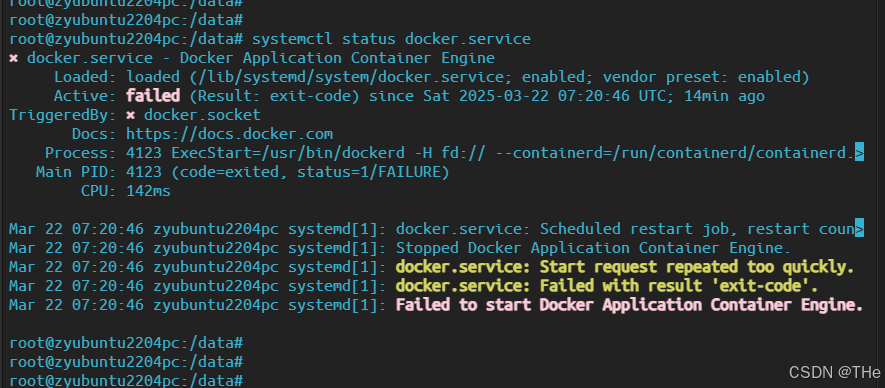
3、安装过程中遇到错误解决方法:
二、部署系统环境:OpenEuler24.03-LTS-SP1
1、添加 Docker 官方仓库:
sudo dnf config-manager --add-repo https://download.docker.com/linux/centos/docker-ce.repo
2、修改仓库配置文件:
将仓库中的 $releasever 替换为 9(对应兼容的 CentOS 9 路径)
sudo sed -i 's/$releasever/9/g' /etc/yum.repos.d/docker-ce.repo
3、清理并重新生成缓存
dnf clean all
dnf makecache #重新生成缓存
[root@eulerzy yum.repos.d]# dnf clean all
25 files removed
[root@eulerzy yum.repos.d]# dnf makecache
Docker CE Stable - x86_64                                                                                              90 kB/s |  70 kB     00:00
openEuler-everything                                                                                                  7.9 MB/s |  16 MB     00:01
openEuler-epol                                                                                                        4.9 MB/s | 5.7 MB     00:01
openEuler-update                                                                                                      6.5 MB/s |  10 MB     00:01
Metadata cache created.
4、安装docker(注意先关闭防火墙再安装)
否则会提示插件下载失败:Error: Error downloading packages: docker-buildx-plugin-0.23.0-1.el9.x86_64: Cannot download, all mirrors were already tried without success
dnf install -y docker-ce --allowerasing
Installed:
  container-selinux-2:2.138-5.oe2203sp4.noarch             containerd.io-1.7.27-3.1.el9.x86_64                docker-buildx-plugin-0.23.0-1.el9.x86_64
  docker-ce-3:28.1.1-1.el9.x86_64                          docker-ce-cli-1:28.1.1-1.el9.x86_64                docker-ce-rootless-extras-28.1.1-1.el9.x86_64
  docker-compose-plugin-2.35.1-1.el9.x86_64                fuse-overlayfs-1.12-1.oe2203sp4.x86_64             fuse3-3.10.5-9.oe2203sp4.x86_64
  fuse3-help-3.10.5-9.oe2203sp4.x86_64                     libslirp-4.7.0-2.oe2203sp4.x86_64                  slirp4netns-1.2.0-1.oe2203sp4.x86_64

Complete!
[root@localhost yum.repos.d]#
5、启动docker
[root@eulerzy yum.repos.d]# systemctl start docker
[root@eulerzy yum.repos.d]# systemctl status docker
● docker.service - Docker Application Container Engine
     Loaded: loaded (/usr/lib/systemd/system/docker.service; disabled; preset: disabled)
     Active: active (running) since Thu 2025-05-08 16:31:48 CST; 10s ago
TriggeredBy: ● docker.socket
       Docs: https://docs.docker.com
   Main PID: 37191 (dockerd)
      Tasks: 10
     Memory: 22.1M ()
     CGroup: /system.slice/docker.service
             └─37191 /usr/bin/dockerd -H fd:// --containerd=/run/containerd/containerd.sock

5月 08 16:31:47 eulerzy.pc dockerd[37191]: time="2025-05-08T16:31:47.685492342+08:00" level=info msg="OTEL tracing is not configured, using no-op tra>
5月 08 16:31:47 eulerzy.pc dockerd[37191]: time="2025-05-08T16:31:47.707149513+08:00" level=info msg="Creating a containerd client" address=/run/cont>
5月 08 16:31:47 eulerzy.pc dockerd[37191]: time="2025-05-08T16:31:47.773711688+08:00" level=info msg="Loading containers: start."
5月 08 16:31:48 eulerzy.pc dockerd[37191]: time="2025-05-08T16:31:48.529526145+08:00" level=info msg="Loading containers: done."
5月 08 16:31:48 eulerzy.pc dockerd[37191]: time="2025-05-08T16:31:48.573886264+08:00" level=info msg="Docker daemon" commit=01f442b containerd-snapsh>
5月 08 16:31:48 eulerzy.pc dockerd[37191]: time="2025-05-08T16:31:48.574221387+08:00" level=info msg="Initializing buildkit"
5月 08 16:31:48 eulerzy.pc dockerd[37191]: time="2025-05-08T16:31:48.687846924+08:00" level=info msg="Completed buildkit initialization"
5月 08 16:31:48 eulerzy.pc dockerd[37191]: time="2025-05-08T16:31:48.704259034+08:00" level=info msg="Daemon has completed initialization"
5月 08 16:31:48 eulerzy.pc dockerd[37191]: time="2025-05-08T16:31:48.704368242+08:00" level=info msg="API listen on /run/docker.sock"
5月 08 16:31:48 eulerzy.pc systemd[1]: Started Docker Application Container Engine.
6、创建仓库镜像加速文件(以华为云镜像加速为例)
- docker目录下创建
daemon.json文件并授权touch /etc/docker/daemon.json chmod 777 /etc/docker/daemon.json - 编辑
daemon.json文件添加华为云镜像加速地址:{ "registry-mirrors": [ "https://xxxxxxx.mirror.swr.myhuaweicloud.com" ] }
7、关闭安全模块策略、重启docker并运行
sudo setenforce 0
systemctl daemon-reload
systemctl restart docker
[root@eulerzy docker]# docker run hello-world

Hello from Docker!
This message shows that your installation appears to be working correctly.

To generate this message, Docker took the following steps:
 1. The Docker client contacted the Docker daemon.
 2. The Docker daemon pulled the "hello-world" image from the Docker Hub.
    (amd64)
 3. The Docker daemon created a new container from that image which runs the
    executable that produces the output you are currently reading.
 4. The Docker daemon streamed that output to the Docker client, which sent it
    to your terminal.

To try something more ambitious, you can run an Ubuntu container with:
 $ docker run -it ubuntu bash

Share images, automate workflows, and more with a free Docker ID:
 https://hub.docker.com/

For more examples and ideas, visit:
 https://docs.docker.com/get-started/

[root@eulerzy docker]#


 976
976

 被折叠的 条评论
为什么被折叠?
被折叠的 条评论
为什么被折叠?
 到【灌水乐园】发言


