


 本文深入讲解了Android开发中常用的四种布局:线性布局(LinearLayout)、相对布局(RelativeLayout)、帧布局(FrameLayout)及百分比布局。详细介绍了各布局的属性与使用场景,帮助开发者灵活掌握布局技巧。
四种基本的布局
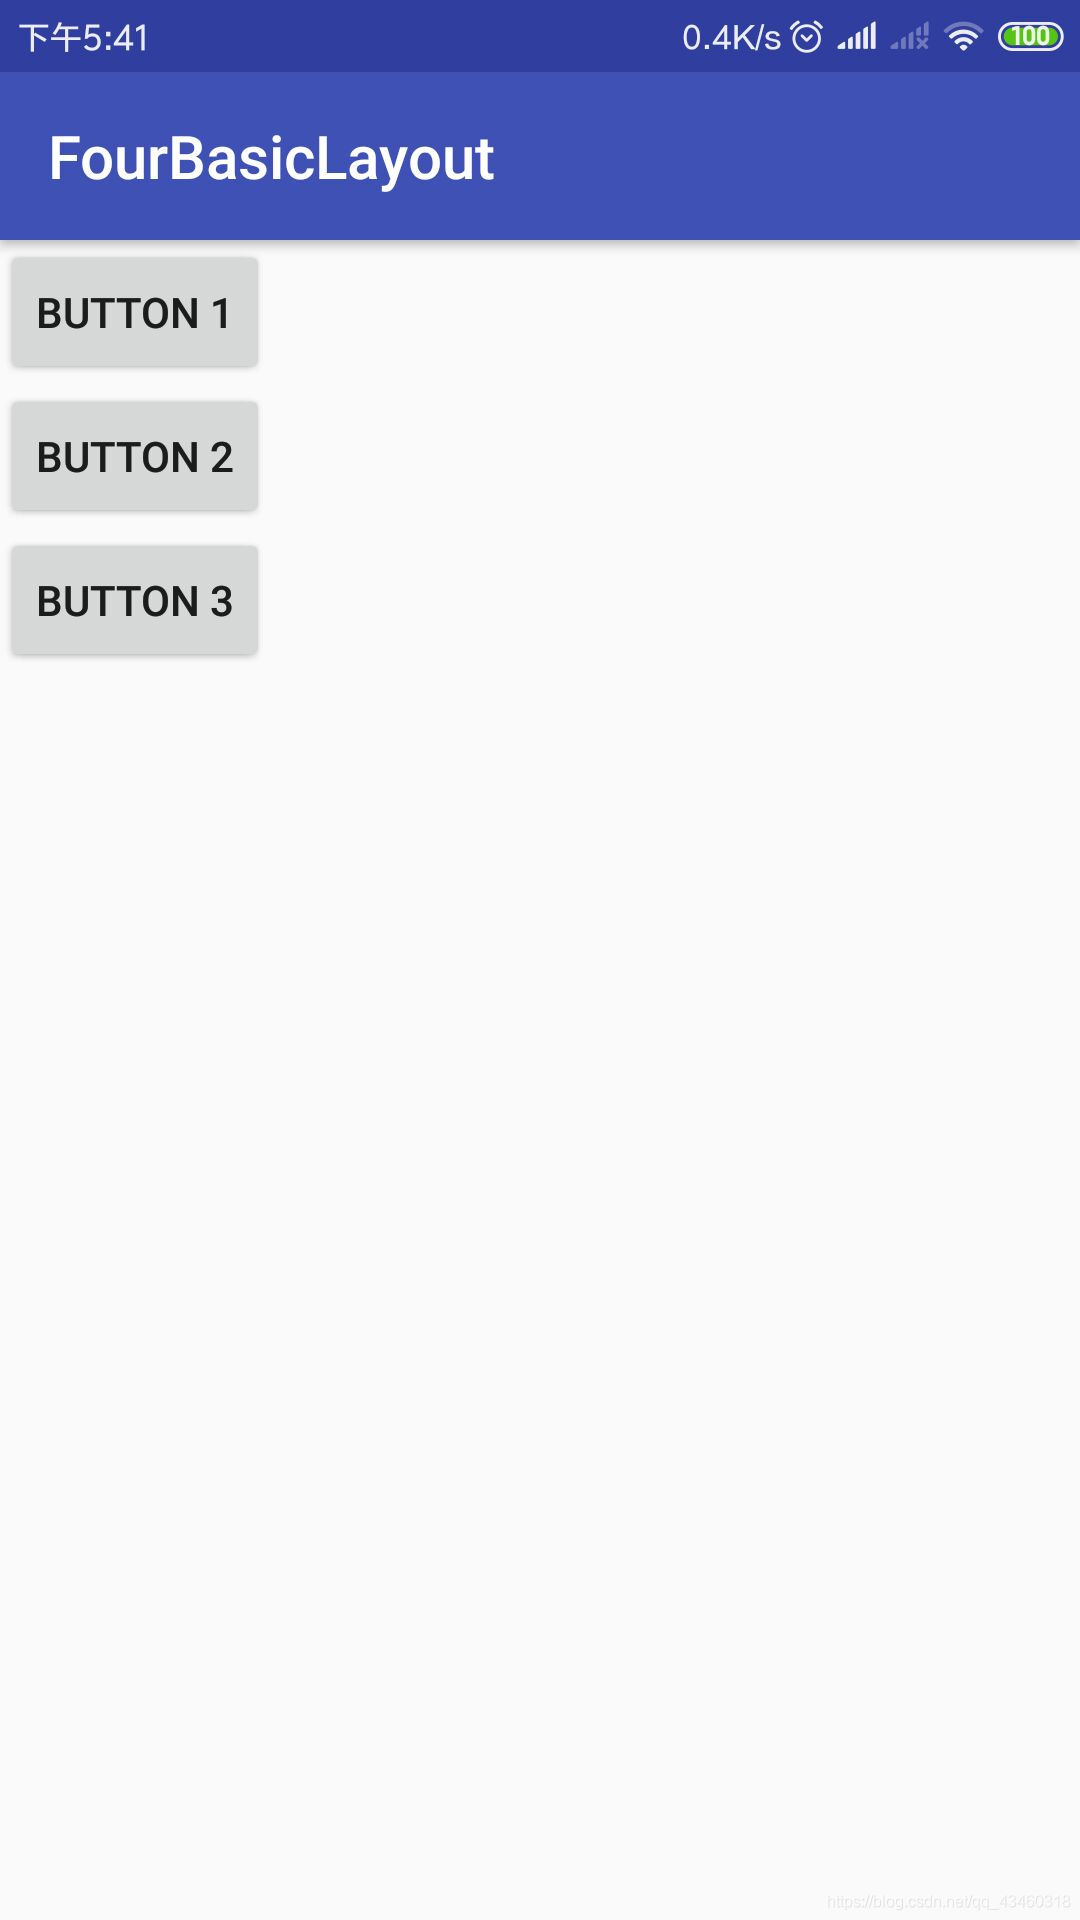
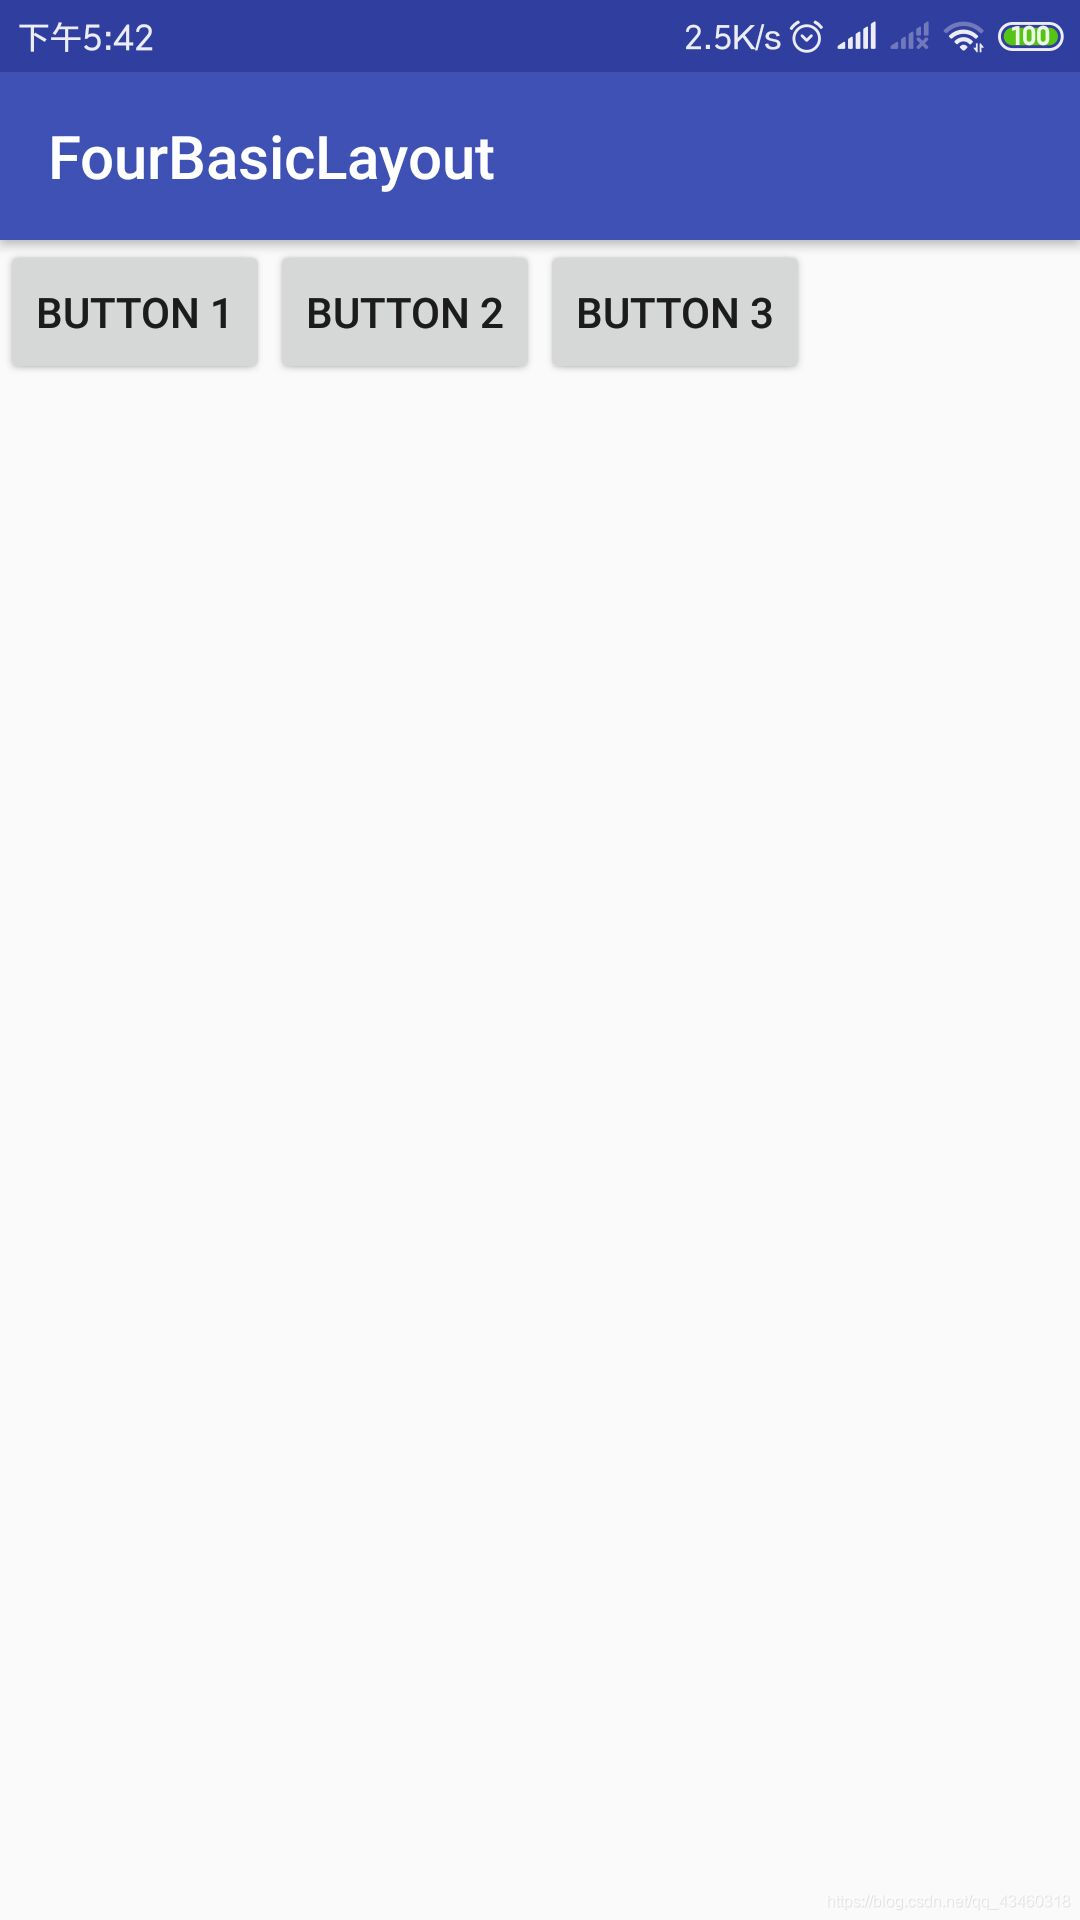
1.线性布局:LinearLayout
通过三个Button来演示:
<?xml version="1.0" encoding="utf-8"?>
<LinearLayout xmlns:android="http://schemas.android.com/apk/res/android"
    android:orientation="horizontal"
    android:layout_width="match_parent"
    android:layout_height="match_parent"
 >

    <Button
        android:id="@+id/button1"
        android:layout_width="wrap_content"
        android:layout_height="wrap_content"
        android:text="button 1"/>
    <Button
        android:id="@+id/button2"
        android:layout_width="wrap_content"
        android:layout_height="wrap_content"
        android:text="button 2"/>
    <Button
        android:id="@+id/button3"
        android:layout_width="wrap_content"
        android:layout_height="wrap_content"
        android:text="button 3"/>
</LinearLayout>
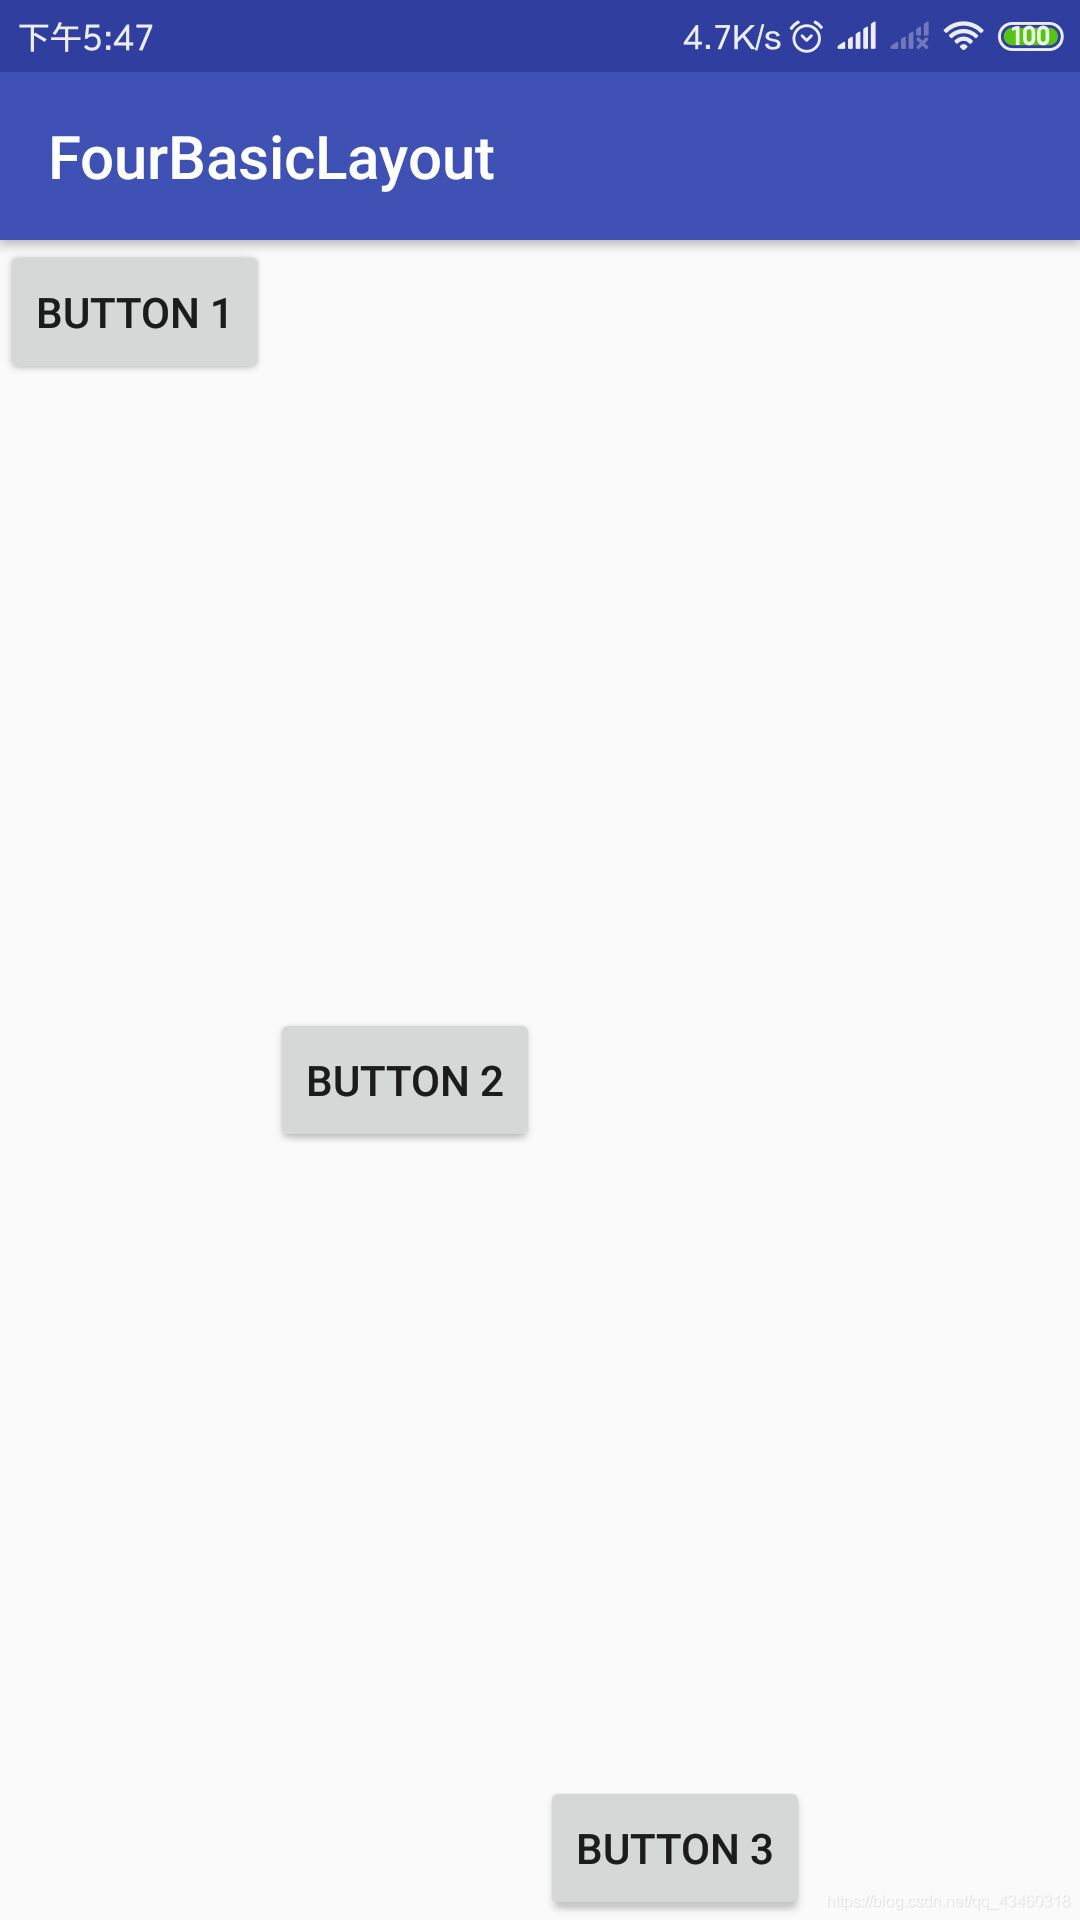
android:orientation用于指定排列的方向,horizontal代表控件将在水平方向排列,vertical代表控件将垂直排列。
vertical 与 horizontal
android:layout_gravity则会指定控件在布局中的对齐方式,在LinearLayout布局中,当排列方向是水平方向时,只有垂直方向上的对齐方式才会生效,而水平方向的对齐方式却无法指定,反之亦然。
<?xml version="1.0" encoding="utf-8"?>
<LinearLayout xmlns:android="http://schemas.android.com/apk/res/android"
    android:orientation="horizontal"
    android:layout_width="match_parent"
    android:layout_height="match_parent"
 >

    <Button
        android:id="@+id/button1"
        android:layout_width="wrap_content"
        android:layout_height="wrap_content"
      * android:layout_gravity="top"
        android:text="button 1"/>
    <Button
        android:id="@+id/button2"
        android:layout_width="wrap_content"
        android:layout_height="wrap_content"
      * android:layout_gravity="center_vertical"
        android:text="button 2"/>
    <Button
        android:id="@+id/button3"
        android:layout_width="wrap_content"
        android:layout_height="wrap_content"
      * android:layout_gravity="bottom"
        android:text="button 3"/>
</LinearLayout>
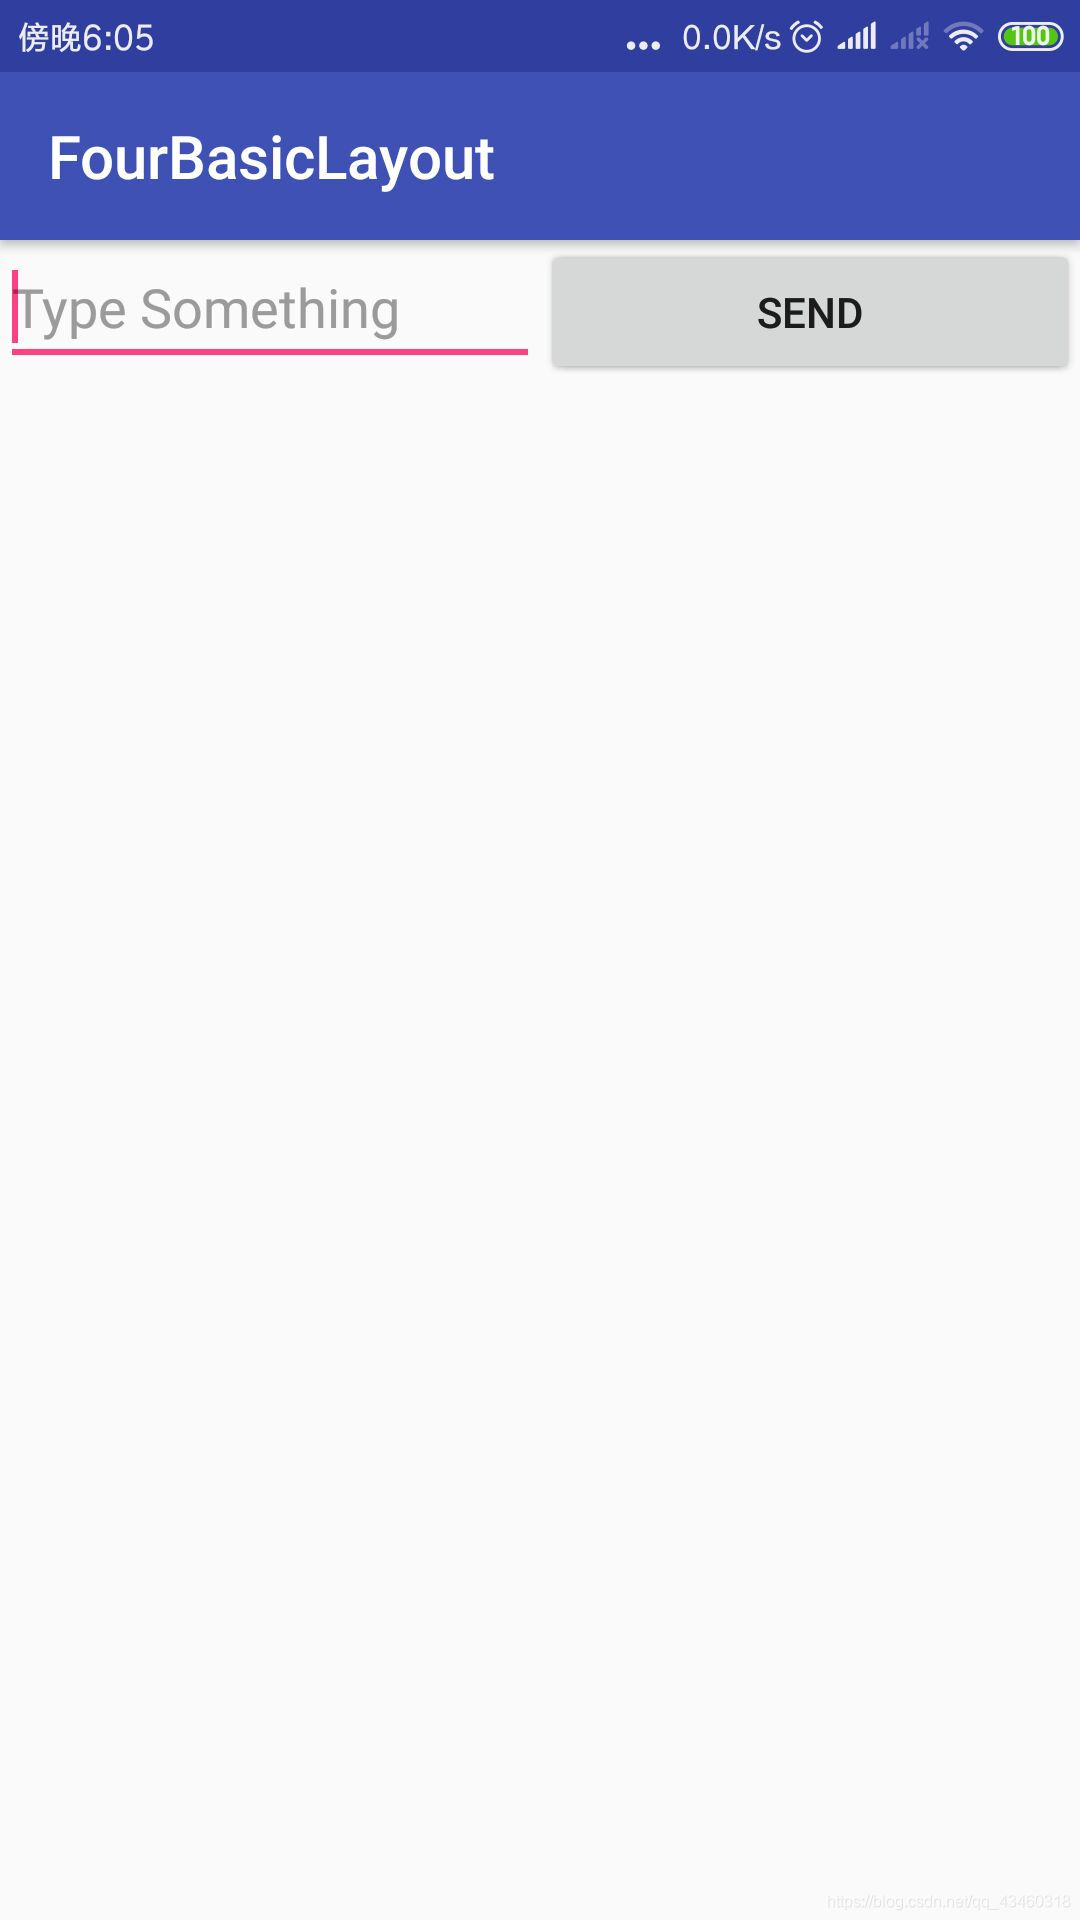
(个人认为非常好的一个属性)android:layout_weight按比例指定控件大小。
<?xml version="1.0" encoding="utf-8"?>
<LinearLayout xmlns:android="http://schemas.android.com/apk/res/android"
    android:orientation="horizontal"
    android:layout_width="match_parent"
    android:layout_height="match_parent"
 >
    <EditText
        android:id="@+id/input_message"
        android:layout_width="0dp"
        android:layout_height="wrap_content"
        android:layout_weight="1"
        android:hint="Type Something"
        />
    <Button
        android:id="@+id/send"
        android:layout_width="0dp"
        android:layout_height="wrap_content"
        android:layout_weight="1"
        android:text="send"/>

</LinearLayout>
android:layout_weight后面的数字“1”用于决定其比例,系统会吧LinearLayout下面所有的layout_weight值相加,作为分母,各个控件自己layout_weight的值则作为分子,然后按比例来决定大小。(但是在实际操作时还是考虑一下排版在否美观,灵活运用)
2.相对布局RelativeLayout
与LinearLayout相比较起来更加灵活。
<?xml version="1.0" encoding="utf-8"?>
<RelativeLayout xmlns:android="http://schemas.android.com/apk/res/android"
android:layout_width="match_parent"
android:layout_height="match_parent"
>
<Button
android:id="@+id/button1"
android:layout_width="wrap_content"
android:layout_height="wrap_content"
android:layout_alignParentLeft="true"
android:layout_alignParentTop="true"
android:text="Button 1"/>
<Button
android:id="@+id/button2"
android:layout_width="wrap_content"
android:layout_height="wrap_content"
android:layout_alignParentRight="true"
android:layout_alignParentTop="true"
android:text="Button 2"/>
<Button
android:id="@+id/button3"
android:layout_width="wrap_content"
android:layout_height="wrap_content"
android:layout_centerInParent="true"
android:text="Button 3"
/>
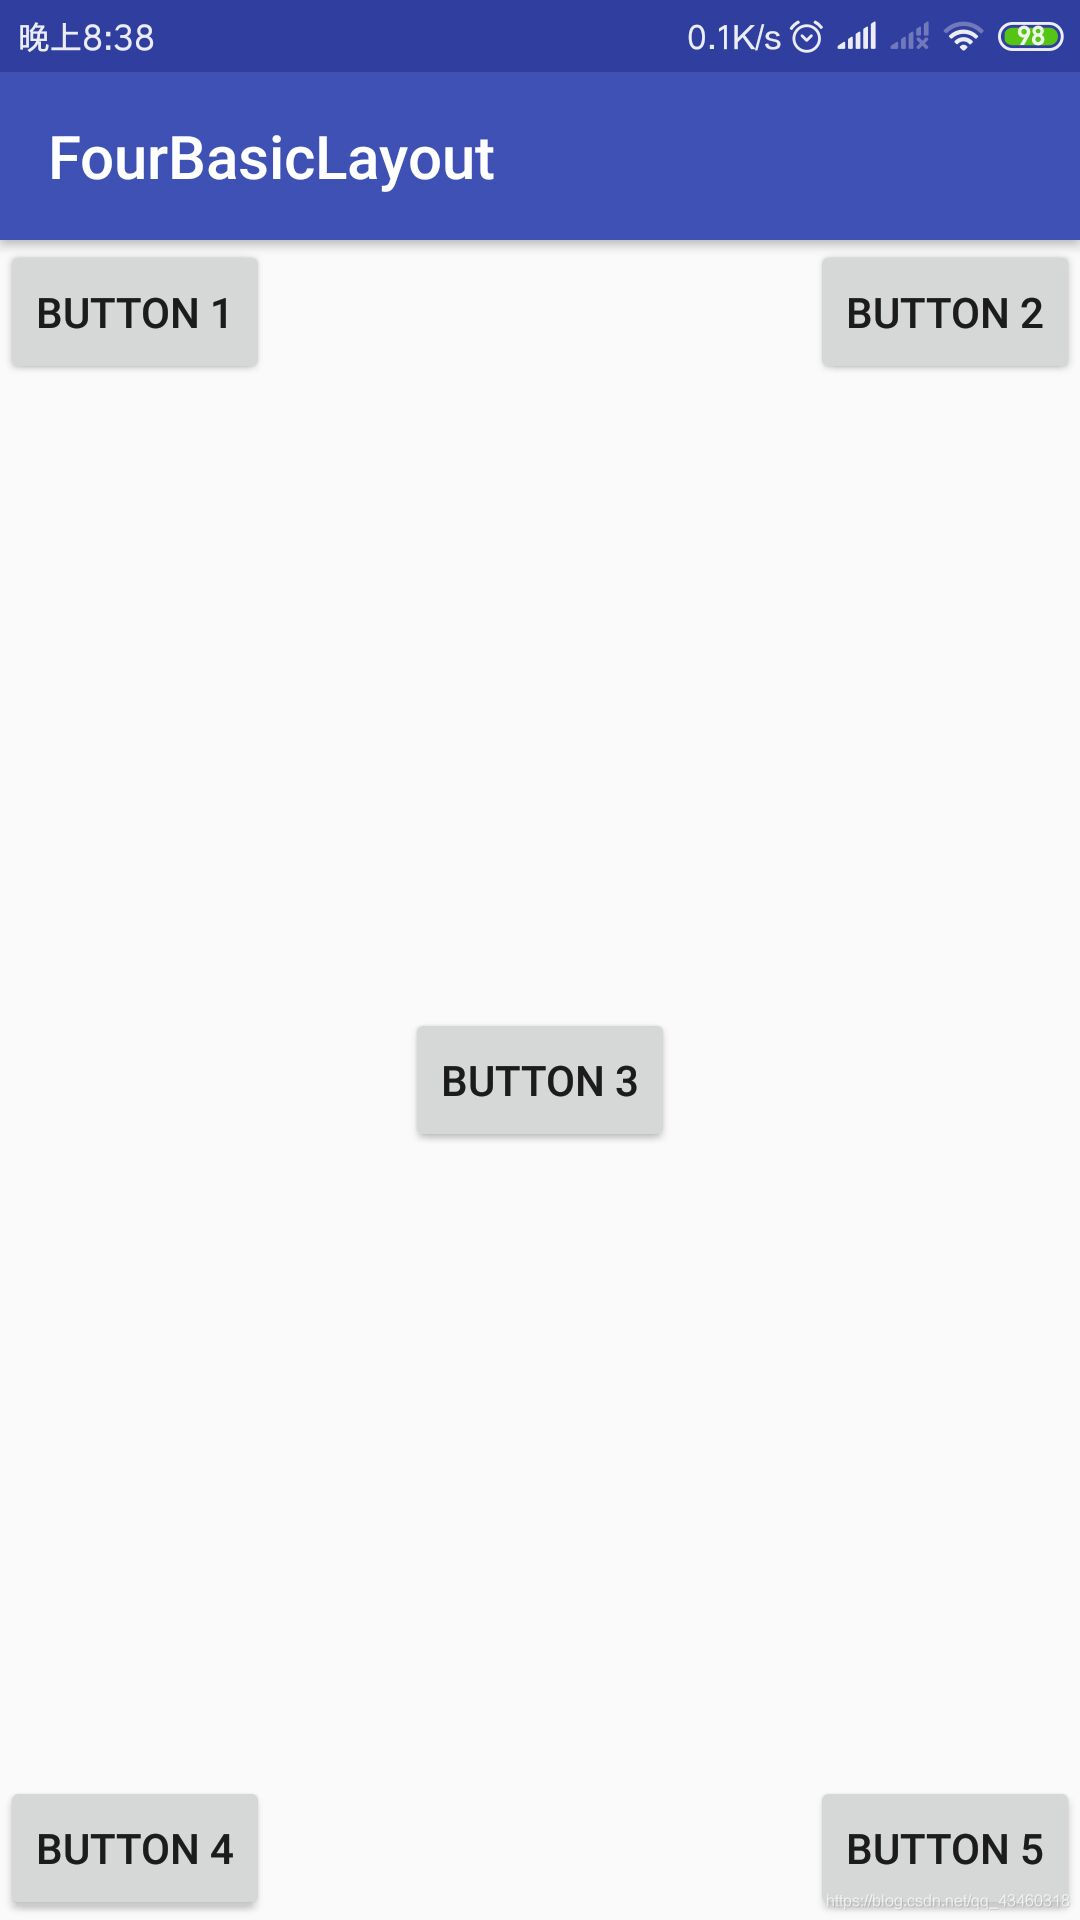
<Button
android:id="@+id/button4"
android:layout_width="wrap_content"
android:layout_height="wrap_content"
android:layout_alignParentLeft="true"
android:layout_alignParentBottom="true"
android:text="Button 4"
/>
<Button
android:id="@+id/button5"
android:layout_width="wrap_content"
android:layout_height="wrap_content"
android:layout_alignParentBottom="true"
android:layout_alignParentRight="true"
android:text="Button 5"
/>
</RelativeLayout>
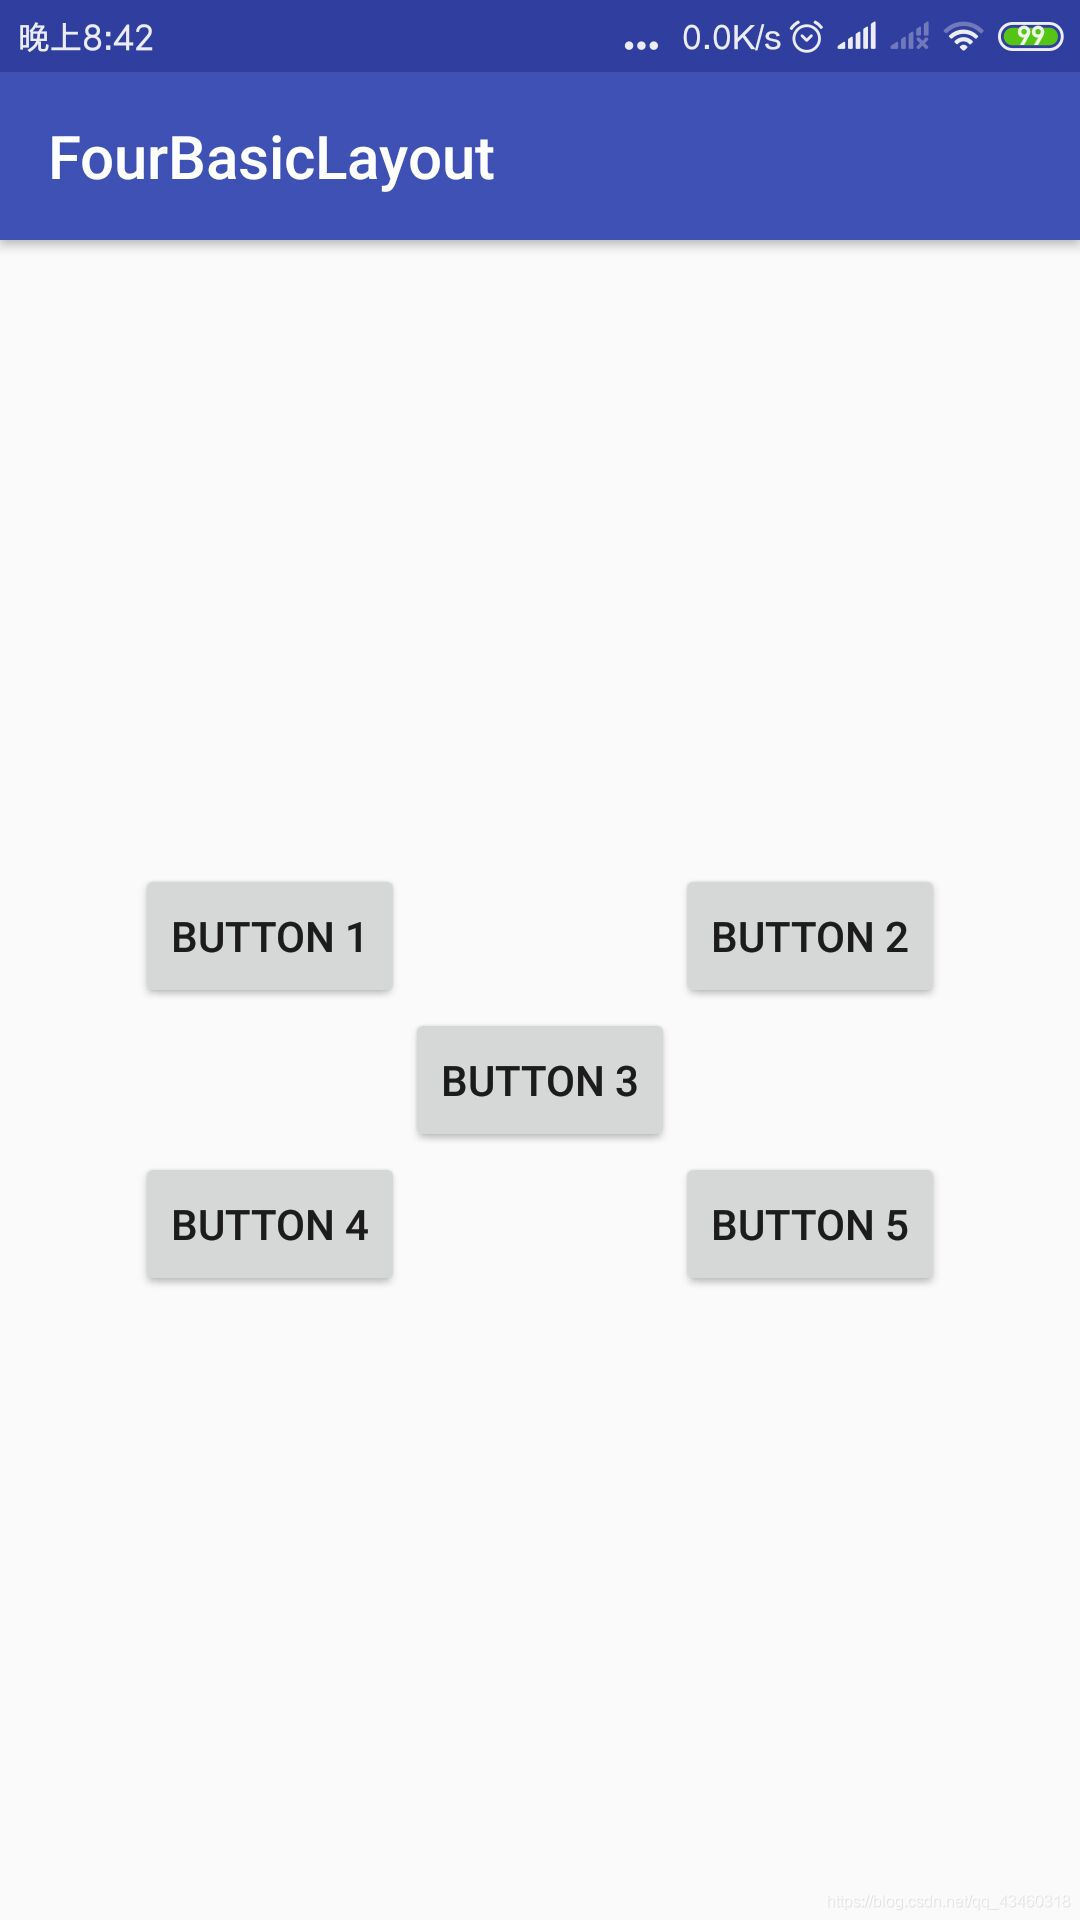
或者凑在一起热闹些:
<?xml version="1.0" encoding="utf-8"?>
<RelativeLayout xmlns:android="http://schemas.android.com/apk/res/android"
    android:layout_width="match_parent"
    android:layout_height="match_parent"
 >
    <Button
        android:id="@+id/button3"
        android:layout_width="wrap_content"
        android:layout_height="wrap_content"
        android:layout_centerInParent="true"
        android:text="Button 3"
        />
    <Button
        android:id="@+id/button1"
        android:layout_width="wrap_content"
        android:layout_height="wrap_content"
        android:layout_above="@id/button3"
        android:layout_toLeftOf="@id/button3"
        android:text="Button 1"/>
    <Button
        android:id="@+id/button2"
        android:layout_width="wrap_content"
        android:layout_height="wrap_content"
        android:layout_toRightOf="@id/button3"
        android:layout_above="@id/button3"
        android:text="Button 2"/>

    <Button
        android:id="@+id/button4"
        android:layout_width="wrap_content"
        android:layout_height="wrap_content"
        android:layout_below="@id/button3"
        android:layout_toLeftOf="@id/button3"
        android:text="Button 4"
        />
    <Button
        android:id="@+id/button5"
        android:layout_width="wrap_content"
        android:layout_height="wrap_content"
        android:layout_below="@id/button3"
        android:layout_toRightOf="@id/button3"
        android:text="Button 5"
        />

</RelativeLayout>
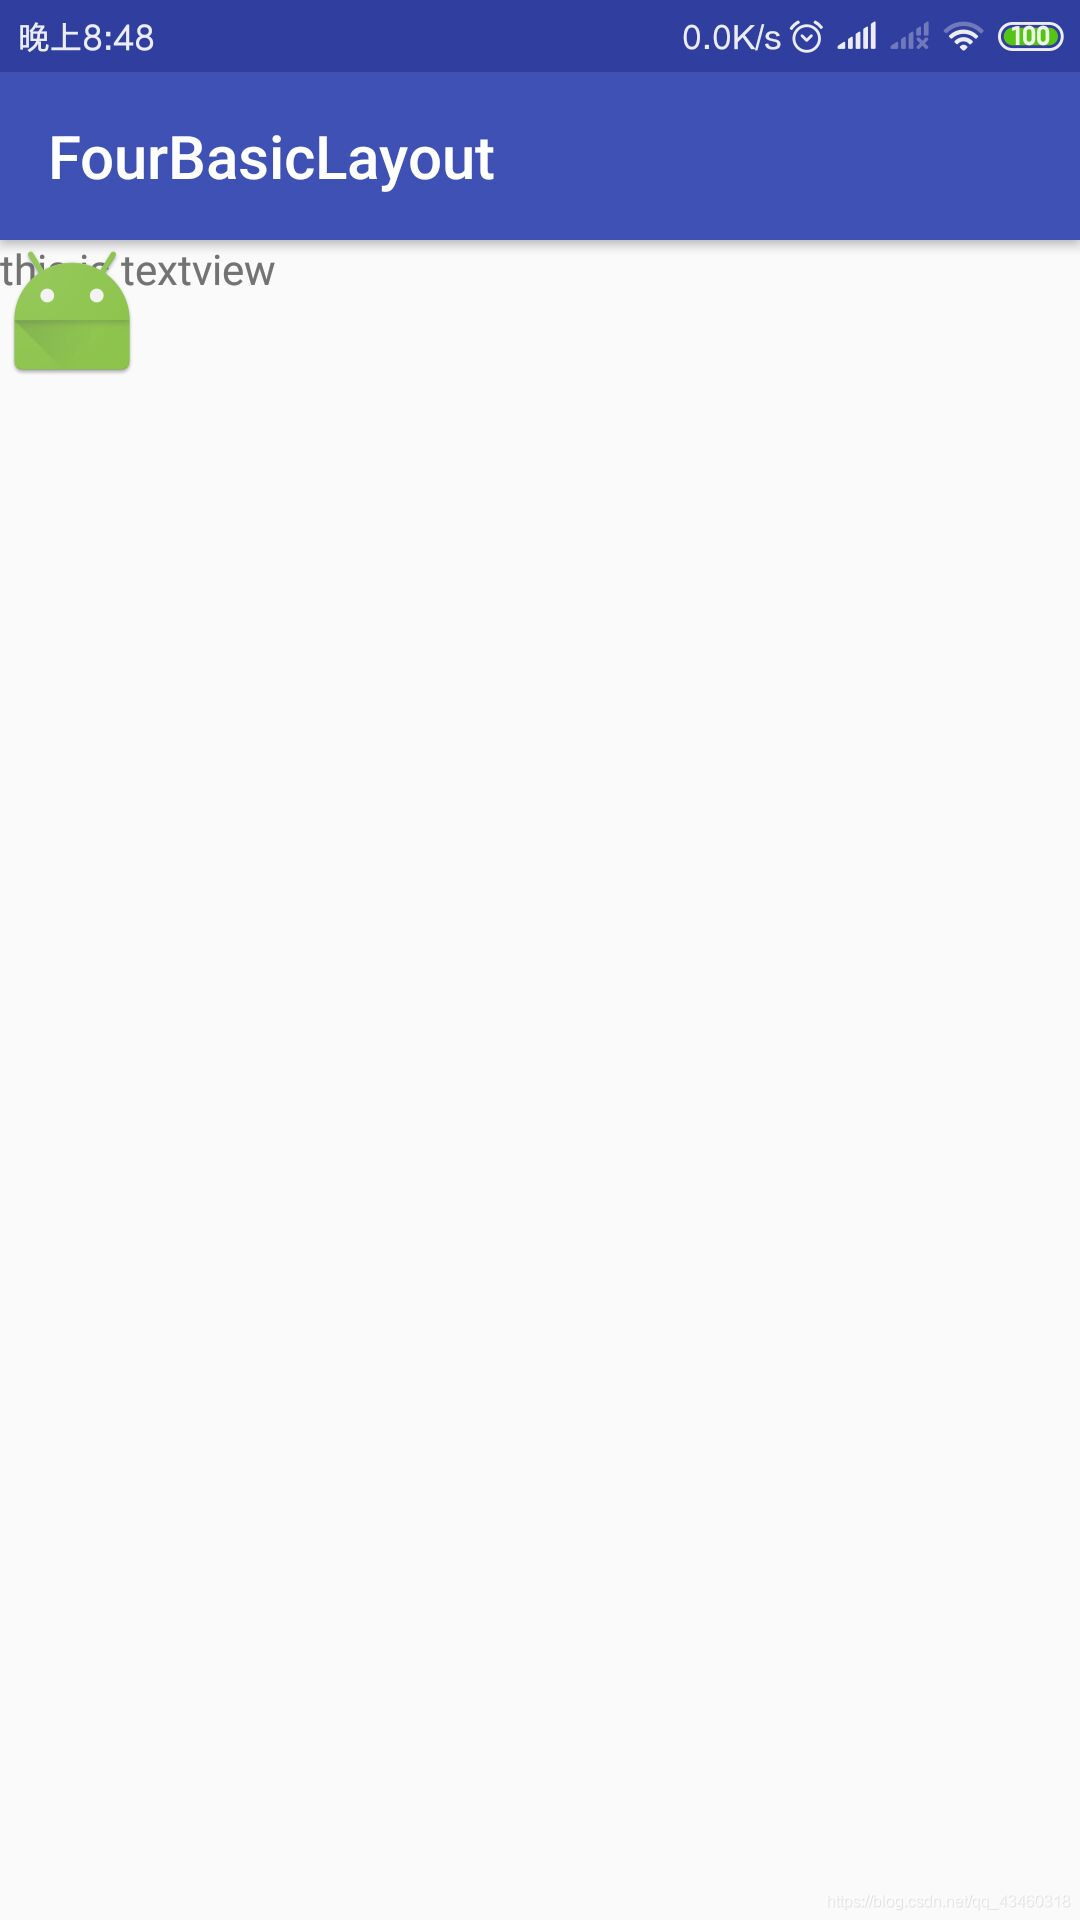
3.帧布局FrameLayout
死板的布局,所有的控件都默认放在布局的左上角。
<?xml version="1.0" encoding="utf-8"?>
<FrameLayout xmlns:android="http://schemas.android.com/apk/res/android"
    android:layout_width="match_parent"
    android:layout_height="match_parent"
 >
  <TextView
      android:id="@+id/text_view"
      android:layout_width="wrap_content"
      android:layout_height="wrap_content"
      android:text="this is textview"
      />
    <ImageView
        android:id="@+id/img_view"
        android:layout_width="wrap_content"
        android:layout_height="wrap_content"
        android:src="@mipmap/ic_launcher"		//自带的图片
        />

</FrameLayout>
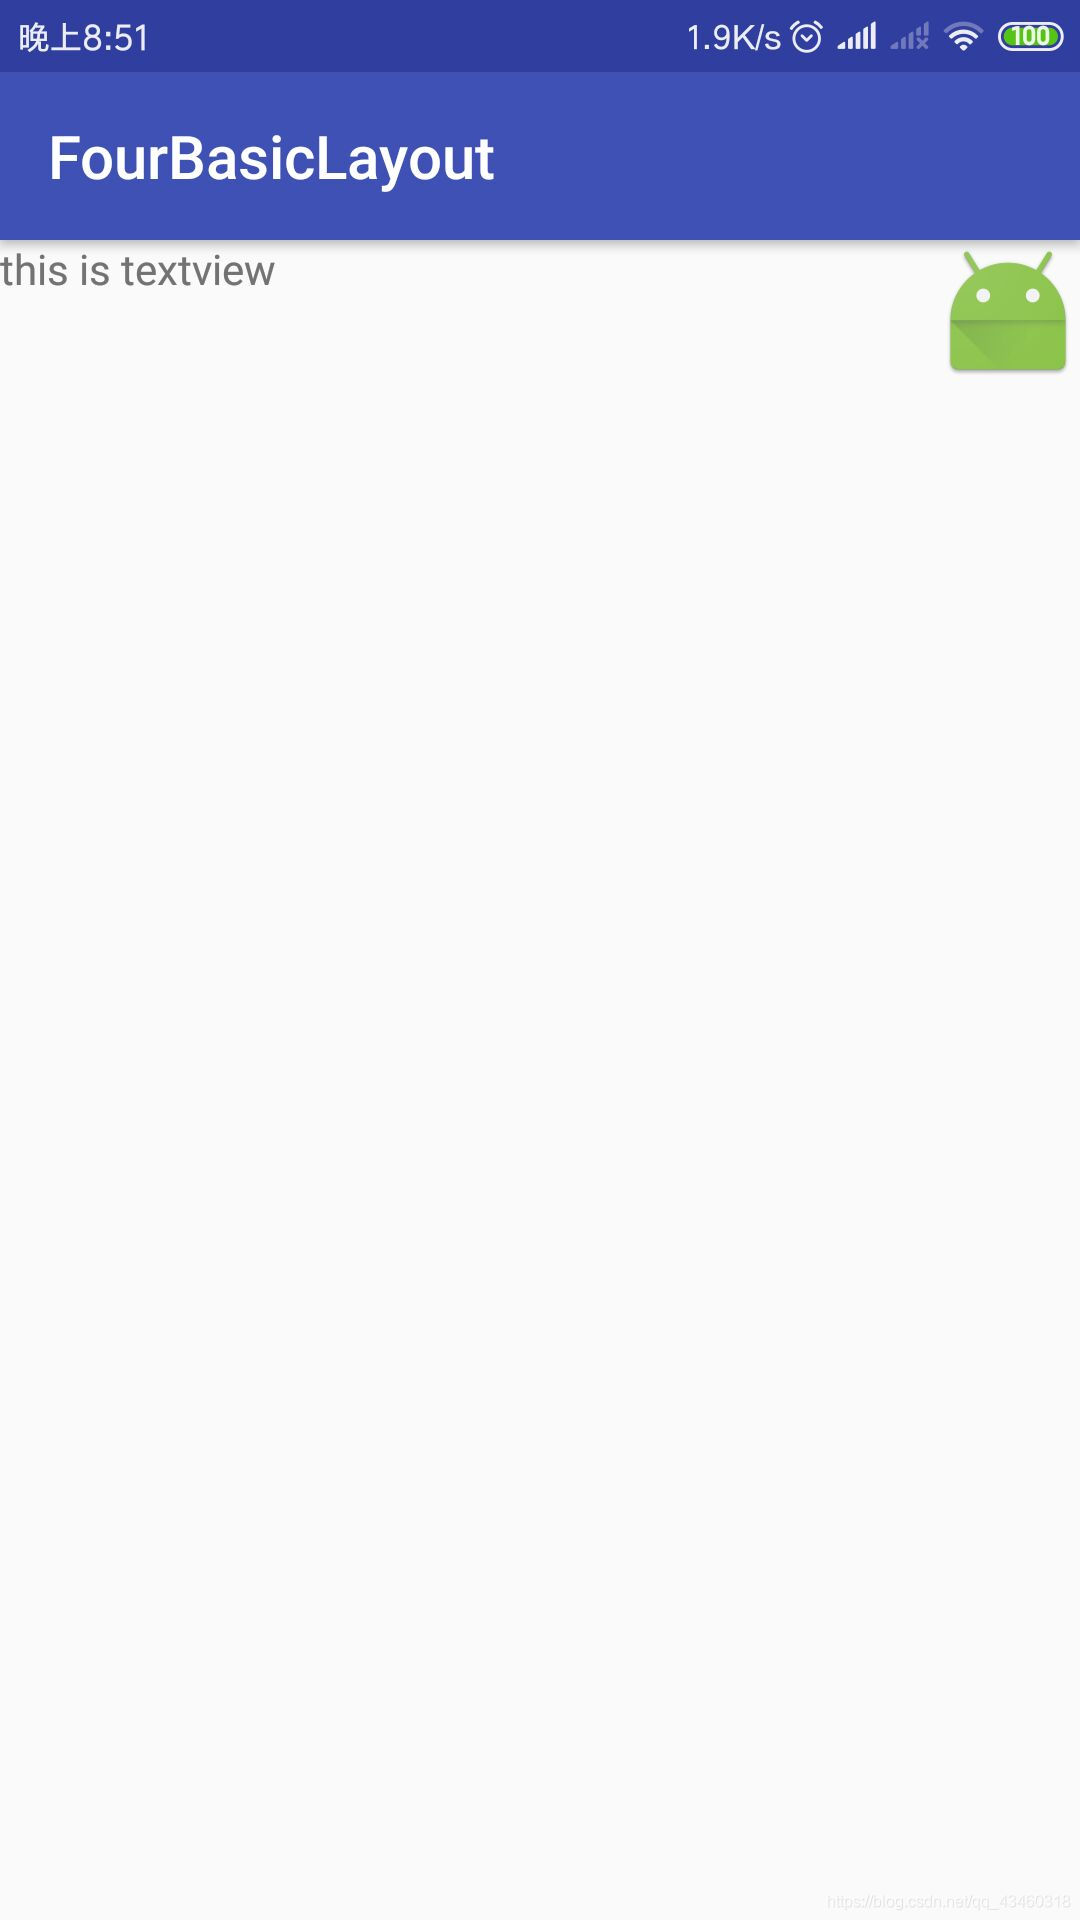
也可以像LinearLayout一样使用layout_gravity来指定控件的对齐方式:
<?xml version="1.0" encoding="utf-8"?>
<FrameLayout xmlns:android="http://schemas.android.com/apk/res/android"
    android:layout_width="match_parent"
    android:layout_height="match_parent"
 >
  <TextView
      android:id="@+id/text_view"
      android:layout_width="wrap_content"
      android:layout_height="wrap_content"
      android:layout_gravity="left"
      android:text="this is textview"
      />
    <ImageView
        android:id="@+id/img_view"
        android:layout_width="wrap_content"
        android:layout_height="wrap_content"
        android:layout_gravity="right"
        android:src="@mipmap/ic_launcher"
        />

</FrameLayout>
4.百分比布局
需要在app/build.gradle的dependencies闭包中增加内容:
dependencies {
    compile fileTree(dir: 'libs', include: ['*.jar'])
    androidTestCompile('com.android.support.test.espresso:espresso-core:2.2.2', {
        exclude group: 'com.android.support', module: 'support-annotations'
    })
    compile 'com.android.support:appcompat-v7:24.2.1'

  * compile 'com.android.support:percent:24.2.1'

    testCompile 'junit:junit:4.12'
}
<?xml version="1.0" encoding="utf-8"?>
<android.support.percent.PercentFrameLayout
    xmlns:android="http://schemas.android.com/apk/res/android"
    xmlns:app="http://schemas.android.com/apk/res-auto"
    android:layout_width="match_parent"
    android:layout_height="match_parent">
  <Button
      android:id="@+id/button1"
      android:text="Button 1"
      android:layout_gravity="left|top"
      app:layout_widthPercent="50%"
      app:layout_heighPercent="50%"
      />
  <Button
      android:id="@+id/button2"
      android:text="Button 2"
      android:layout_gravity="right|top"
      app:layout_widthPercent="50%"
      app:layout_heighPercent="50%"
      />
  <Button
      android:id="@+id/button3"
      android:text="Button 3"
      android:layout_gravity="left|bottom"
      app:layout_widthPercent="50%"
      app:layout_heighPercent="50%"
      />
  <Button
      android:id="@+id/button4"
      android:text="Button 4"
      android:layout_gravity="right|bottom"
      app:layout_widthPercent="50%"
      app:layout_heighPercent="50%"
      />


</android.support.percent.PercentFrameLayout>
如果不是最新的Android2.2会报错,而Android2.2已经修复了这个问题。
。。。。。。
为什么我的Android Studio 2.2 就不行。。。(待解决)
小结:了解了四种基本布局,线性布局LinearLayout,相对布局RelativeLayout,帧布局FrameLayout以及出了问题的百分比布局,以及一些指定控件大小的属性。


 2893
2893

 被折叠的 条评论
为什么被折叠?
被折叠的 条评论
为什么被折叠?
 到【灌水乐园】发言


