


 本文详细介绍了如何在RHEL6系统上从源码包安装Nginx服务器,包括配置SSL加密、服务器状态信息查看等功能,以及如何升级Nginx版本至1.8.0,确保服务稳定性和安全性。
搭建Nginx服务器
问题
在IP地址为192.168.4. 5的主机上安装部署Nginx服务,并可以将Nginx服务器升级到更高版本,要求编译时启用如下功能:
SSL加密功能
查看服务器状态信息功能
设置Nginx账户及组名称均为nginx
然后客户端访问页面验证Nginx Web服务器:
使用火狐浏览器访问
使用curl访问
方案
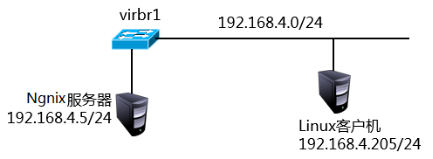
使用2台RHEL6虚拟机,其中一台作为Nginx服务器(192.168.4.5)、另外一台作为测试用的Linux客户机(192.168.4.205),如图所示。
安装Nginx需要先安装nginx-1.7.10版本,在升级至nginx-1.8.0版本时,需要使用如下参数:
with-http_stub_status_module:可以提供服务器状态信息
with-http_ssl_module:提供SSL加密功能
user:指定账户
group:指定组
步骤
实现此案例需要按照如下步骤进行。
步骤一:构建Nginx服务器
1)使用源码包安装nginx软件包
[root@svr5 ~]# yum –y install gcc pcre-devel openssl-devel		//安装常见依赖包
[root@svr5 ~]# useradd –s /sbin/nologin nginx
[root@svr5 ~]# tar  -zxvf   nginx-1.7.10.tar.gz
[root@svr5 ~]# cd  nginx-1.7.10
[root@svr5 nginx-1.7.10]# ./configure   \
> --prefix=/usr/local/nginx   \				//指定安装路径
> --user=nginx   \							//指定用户
> --group=nginx  \							//指定组
> --with-http_stub_status_module  \			//开启状态统计功能
> --with-http_ssl_module						//开启SSL加密功能
  .. ..
nginx path prefix: "/usr/local/nginx"
  nginx binary file: "/usr/local/nginx/sbin/nginx"
  nginx configuration prefix: "/usr/local/nginx/conf"
  nginx configuration file: "/usr/local/nginx/conf/nginx.conf"
  nginx pid file: "/usr/local/nginx/logs/nginx.pid"
  nginx error log file: "/usr/local/nginx/logs/error.log"
  nginx http access log file: "/usr/local/nginx/logs/access.log"
  nginx http client request body temporary files: "client_body_temp"
  nginx http proxy temporary files: "proxy_temp"
  nginx http fastcgi temporary files: "fastcgi_temp"
  nginx http uwsgi temporary files: "uwsgi_temp"
  nginx http scgi temporary files: "scgi_temp"
[root@svr5 nginx-1.7.10]# make && make install	//编译并安装
2)启用nginx服务
[root@svr5 ~]# /usr/local/nginx/sbin/nginx –c /usr/local/nginx/conf/nginx.conf
nginx服务默认通过TCP 80端口监听客户端请求:
[root@svr5 ~]# netstat  -anptu  |  grep nginx
tcp		0		0 0.0.0.0:80		0.0.0.0:*		LISTEN		10441/nginx
3)为Nginx Web服务器建立测试首页文件
Nginx Web服务默认首页文档存储目录为/usr/local/nginx/html/,在此目录下建立一个名为index.html的文件:
[root@svr5 ~]# cat  /usr/local/nginx/html/index.html
<html>
<head>
<title>Welcome to nginx!</title>
</head>
<body bgcolor="white" text="black">
<center><h1>Welcome to nginx!</h1></center>
</body>
</html>
步骤二:升级Nginx服务器
1)编译新版本nginx软件
[root@svr5 ~]# tar  -zxvf   nginx-1.8.0.tar.gz
[root@svr5 ~]# cd nginx-1.8.0
[root@svr5 nginx-1.8.0]# ./configure   \
> --prefix=/usr/local/nginx   \
> --user=nginx   \
> --group=nginx  \
> --with-http_stub_status_module  \
> --with-http_ssl_module
[root@svr5 nginx-1.8.0]# make
2)备份老的nginx主程序,并使用编译好的新版本nginx替换老版本
[root@svr5 nginx-1.8.0]# cd /usr/local/nginx/sbin/
[root@svr5 sbin]# mv nginx  nginxold						//备份旧版本
[root@svr5 sbin]# cd /root/ nginx-1.8.0/objs/
[root@svr5 objs]# cp nginx  /usr/local/nginx/sbin/			//拷贝新版本
[root@svr5 objs]# cd /root/nginx-1.0.5
[root@svr5 nginx-1.8.0]# make upgrade						//升级
/usr/local/nginx/sbin/nginx -t
nginx: the configuration file /usr/local/nginx/conf/nginx.conf syntax is ok
nginx: configuration file /usr/local/nginx/conf/nginx.conf test is successful
kill -USR2 `cat /usr/local/nginx/logs/nginx.pid`
sleep 1
test -f /usr/local/nginx/logs/nginx.pid.oldbin
kill -QUIT `cat /usr/local/nginx/logs/nginx.pid.oldbin`
[root@svr5 ~]# /usr/local/nginx/sbin/nginx –v				//查看版本


 3320
3320

 被折叠的 条评论
为什么被折叠?
被折叠的 条评论
为什么被折叠?
 到【灌水乐园】发言


