


SpringBoot
SpringBoot整合
缓存
Spring缓存抽象
- Spring3.1开始定义了Cache和CacheManager接口统一不同的缓存技术,并且支持JSP-107注解开发
- 缓存概念和注解
CacheManager:缓存管理器,管理缓存组件(相当于连接池)
Cache:缓存接口,定义缓存操作。实现有:RedisCache,EhCache等等(相当于连接)
@Cacheable 标注在方法上,根据方法参数(可以设置)对结果进行缓存
@CacheEvict 清空缓存  标注在删除方法上
@CachePut 更新缓存
@EnableCaching 开启缓存注解
keyGenerator  缓存key的生成策略
serialize 缓存value序列化策略
@MapperScan(value = "com.shyb.mapper")
@SpringBootApplication
@EnableCaching
public class SpringBootMybatisApplication {

    public static void main(String[] args) {
        SpringApplication.run(SpringBootMybatisApplication.class, args);
    }

}
默认情况下,SpringBoot使用@EnableCaching,开启SimpleCacheConfiguration,使用的是ConcurrentMapCacheManager和ConcurrentMapCache,本身是使用ConcurrentMap存储.
@Cacheable方法运行流程:
	1. 方法运行之前,先去查询Cache,按照cacheNames指定名字获取;(CacheManager先获取相应的缓存),第一次获取如果没有Cache会自动创建
	2. 根据key,去Cache中查询内容,key是通过生成策略生成,默认用keyGenerator
		keyGenerator根据参数生成key
	3. 没有缓存调用目标方法,将结果放进缓存
@CachePut方法运行流程:
	1. 先调用目标方法
	2. 将目标结果放入缓存中
	修改结果返回值为Int时,使用注解会覆盖掉,导致查询出现Integer转对象的异常。
使用技巧
- @Caching注解可以组合多个注解
- @CachePut注解先执行方法,再缓存。所以一定会执行方法,而且可以用#result.id等等多key缓存
- @CacheConfig标注在类上,可以统一给service设置cacheNames和keyGenerator
package com.shyb.service.impl;

import com.shyb.bean.User;
import com.shyb.bean.UserExample;
import com.shyb.mapper.UserMapper;
import com.shyb.service.UserService;
import org.springframework.beans.factory.annotation.Autowired;
import org.springframework.cache.annotation.*;
import org.springframework.stereotype.Service;

import java.util.List;

/**
 * @author wzh
 * @date 2019/3/30 - 15:45
 */
@Service
@CacheConfig(cacheNames = "user")
public class UserServiceImpl implements UserService {
    @Autowired
    UserMapper userMapper;

    /**
     * 将方法的运行结果进行缓存;以后相同的数据直接从缓存中获取,不调用方法
     * CacheManager管理多个Cache组件,对缓存的真正CRUD操作在Cache组件中,每一个缓存组件有自己唯一的一个名字
     * 属性:
     *      cacheNames/value:缓存组件名族(如emp,dept)
     *      key:缓存数据使用的key,默认为方法的参数值(使用spel表达式)
     *      keyGenerator:key的生成器,可以指定key的生成器组件id  key/keyGenerator二选一
     *      cacheManager:指定缓存管理器
     *      cacheResolver:等同于cacheManager 二选一
     *      condition:指定符合条件才缓存
     *      unless:否定缓存, 满足条件不缓存
     *      sync:是否使用异步
     * @param id
     * @return
     */
    @Cacheable(cacheNames = "user",condition = "#id>0",unless = "#result == null")
    public User getUserById(Integer id){
        System.out.println("查询了用户"+id);
        return userMapper.selectByPrimaryKey(id);
    }

    @Override
    @CachePut(cacheNames = "user",key = "#result.id")
    public User updateUserById(User user) {
        System.out.println(user.getId()+"修改了");
        userMapper.updateByPrimaryKeySelective(user);
        return userMapper.selectByPrimaryKey(user.getId());
    }

    /**
     * 默认根据id删除
     *  allEntries = true 清空所有缓存       默认false
     *  beforeInvocation = true 方法之前情况缓存,方法出异常也删除  默认false
     * @param id
     */
    @Override
    @CacheEvict(cacheNames = "user",allEntries = true,beforeInvocation = true)
    public void deleteUser(Integer id){
        System.out.println("删除员工"+id);
    }

    @Caching(
            cacheable = {
                    @Cacheable
            },
            put = {
                    @CachePut(key = "#result.id")
            }
    )
    public User getUserByMobileNumber(String mobileNumber){
        UserExample userExample = new UserExample();
        userExample.createCriteria().andMobileNumberEqualTo(mobileNumber);
        List<User> users = userMapper.selectByExample(userExample);
        return users.get(0);
    }
}
redis缓存
导入redis的starter
<dependency>
    <groupId>org.springframework.boot</groupId>
    <artifactId>spring-boot-starter-data-redis</artifactId>
</dependency>
之后SpringBoot中就可以注入RedisTemplate和StringRedisTemplate。
redis存储字符串
实例:
application.yml配置:
spring:
	reids:
		host: xxx
		password: xxx
	@Autowired
    StringRedisTemplate stringRedisTemplate;
	/**
     * stringRedisTemplate.opsForValue();操作String(字符串)
     * stringRedisTemplate.opsForList();操作List(列表)
     * stringRedisTemplate.opsForSet();操作Set(集合)
     * stringRedisTemplate.opsForHash();操作Hash(散列)
     * stringRedisTemplate.opsForZSet();操作ZSet(有序集合)
     */
    @Test
    public void test1(){
        stringRedisTemplate.opsForValue().set("msg","hello");
        System.out.println(stringRedisTemplate.opsForValue().get("msg"));
    }
redid存储对象
- 将对象转为json字符串,再使用stringRedisTemplate存储
- 使用RedisTemplate存储
	@Autowired
    RedisTemplate redisTemplate;
	@Test
    public void test2(){
        User user = new User();
        redisTemplate.opsForValue().set("user",user);
    }
默认需要User实现序列化接口,在redis中存储形式如下:
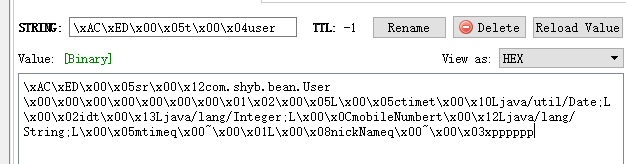
转为json形式需要添加配置类,修改序列化器
@Configuration
public class RedisConfig {
    @Bean
    public RedisTemplate<Object, User> userRedisTemplate(
            RedisConnectionFactory redisConnectionFactory) throws UnknownHostException {
        RedisTemplate<Object, User> template = new RedisTemplate<>();
        template.setConnectionFactory(redisConnectionFactory);
        template.setDefaultSerializer(new Jackson2JsonRedisSerializer<User>(User.class));
        return template;
    }
}
注解使用
原理:
	1. 引用redis的starter,容器会在启动时创建RedisCacheManager
	2. RedisCacheManager创建RedisCache来作为缓存组件;RedisCache通过操作redis缓存数据
	3. 默认保存数据k-v都是Object;利用序列化保存。
		保存为json:
			1. 默认创建的RedisCacheManager操作redis使用的是RedisTemplate<Object,Object>
			2. RedisTemplate<Object,Object>默认使用的是jdk的序列化机制
			3. 自定义CacheManager
spring:
	redis:
	  host: 192.168.40.130
	   database: 0
	   port: 6379
	   password:
	   timeout: 1s
	   jedis:
	     pool:
	       max-active: 20
	       max-idle: 20
	       min-idle: 10
	       max-wait: -1ms
	 cache:
	   redis:
	     use-key-prefix: true
	     key-prefix: dev
	     cache-null-values: false
	     time-to-live: 20s
package com.shyb.config;
import com.fasterxml.jackson.annotation.JsonAutoDetect;
import com.fasterxml.jackson.annotation.PropertyAccessor;
import com.fasterxml.jackson.databind.ObjectMapper;
import org.springframework.boot.context.properties.ConfigurationProperties;
import org.springframework.cache.CacheManager;
import org.springframework.cache.annotation.CachingConfigurerSupport;
import org.springframework.cache.annotation.EnableCaching;
import org.springframework.context.annotation.Bean;
import org.springframework.context.annotation.Configuration;
import org.springframework.data.redis.cache.RedisCacheConfiguration;
import org.springframework.data.redis.cache.RedisCacheManager;
import org.springframework.data.redis.connection.RedisConnectionFactory;
import org.springframework.data.redis.core.RedisTemplate;
import org.springframework.data.redis.core.StringRedisTemplate;
import org.springframework.data.redis.serializer.Jackson2JsonRedisSerializer;
import org.springframework.data.redis.serializer.RedisSerializationContext;
import org.springframework.data.redis.serializer.RedisSerializer;
import org.springframework.data.redis.serializer.StringRedisSerializer;

import java.time.Duration;

/**
 * @Auther: hugeo.wang
 * @Date: 2018/7/11 11:07
 * @Description:
 */

@Configuration
@EnableCaching
@ConfigurationProperties(prefix = "spring.cache.redis")
public class RedisConfig {
    private Duration timeToLive = Duration.ZERO;
    public void setTimeToLive(Duration timeToLive) {
        this.timeToLive = timeToLive;
    }

    @Bean
    public CacheManager cacheManager(RedisConnectionFactory factory) {
        RedisSerializer<String> redisSerializer = new StringRedisSerializer();
        Jackson2JsonRedisSerializer jackson2JsonRedisSerializer = new Jackson2JsonRedisSerializer(Object.class);

        //解决查询缓存转换异常的问题
        ObjectMapper om = new ObjectMapper();
        om.setVisibility(PropertyAccessor.ALL, JsonAutoDetect.Visibility.ANY);
        om.enableDefaultTyping(ObjectMapper.DefaultTyping.NON_FINAL);
        jackson2JsonRedisSerializer.setObjectMapper(om);

        // 配置序列化(解决乱码的问题)
        RedisCacheConfiguration config = RedisCacheConfiguration.defaultCacheConfig()
                .entryTtl(timeToLive)
                .serializeKeysWith(RedisSerializationContext.SerializationPair.fromSerializer(redisSerializer))
                .serializeValuesWith(RedisSerializationContext.SerializationPair.fromSerializer(jackson2JsonRedisSerializer))
                .disableCachingNullValues();

        RedisCacheManager cacheManager = RedisCacheManager.builder(factory)
                .cacheDefaults(config)
                .build();
        return cacheManager;
    }
}
单独设置时间和刷新时间,可以注入StringRedisTemplate,使用
stringRedisTemplate.opsForValue().set(“msg”,“hello”,30, TimeUnit.MINUTES);
Mybatis redis 二级缓存
Mybatis默认开启一级缓存存储在sqlSession中,key为sql语句,方法结束,一级缓存随着sqlSession一起消亡。
二级缓存默认不开启。作用域为同一个mapper的namespace下,SpringBoot开启二级缓存步骤如下:
- 配置文件开启
- 实体类实现序列化并声明序列号
- 实现 Spring ApplicationContextAware 接口,用于手动注入 Bean
- 创建RedisCache,实现 MyBatis Cache 接口,重写其方法
- 在Mapper 接口中增加注解
mybatis:
  configuration:
    cache-enabled: true
@Component
@Slf4j
public class ApplicationContextHolder implements ApplicationContextAware, DisposableBean {
    private static ApplicationContext applicationContext;

    /**
     * 获取存储在静态变量中的 ApplicationContext
     *
     * @return
     */
    public static ApplicationContext getApplicationContext() {
        assertContextInjected();
        return applicationContext;
    }

    /**
     * 从静态变量 applicationContext 中获取 Bean,自动转型成所赋值对象的类型
     *
     * @param name
     * @param <T>
     * @return
     */
    public static <T> T getBean(String name) {
        assertContextInjected();
        return (T) applicationContext.getBean(name);
    }

    /**
     * 从静态变量 applicationContext 中获取 Bean,自动转型成所赋值对象的类型
     *
     * @param clazz
     * @param <T>
     * @return
     */
    public static <T> T getBean(Class<T> clazz) {
        assertContextInjected();
        return applicationContext.getBean(clazz);
    }

    /**
     * 实现 DisposableBean 接口,在 Context 关闭时清理静态变量
     *
     * @throws Exception
     */
    public void destroy() throws Exception {
        log.debug("清除 SpringContext 中的 ApplicationContext: {}", applicationContext);
        applicationContext = null;
    }

    /**
     * 实现 ApplicationContextAware 接口,注入 Context 到静态变量中
     *
     * @param applicationContext
     * @throws BeansException
     */
    @Override
    public void setApplicationContext(ApplicationContext applicationContext) throws BeansException {
        ApplicationContextHolder.applicationContext = applicationContext;
    }

    /**
     * 断言 Context 已经注入
     */
    private static void assertContextInjected() {
        Validate.validState(applicationContext != null, "applicationContext 属性未注入,请在 spring-context.xml 配置中定义 ApplicationContextHolder");
    }
}
@Slf4j
public class RedisCache implements Cache {
    private final ReadWriteLock readWriteLock = new ReentrantReadWriteLock();
    private final String id;
    private RedisTemplate redisTemplate;
    private static final long EXPIRE_TIME_IN_MINUTES = 30;

    public RedisCache(String id) {
        if (id == null) {
            throw new IllegalArgumentException("Cache instances require an ID");
        }
        this.id = id;
    }

    @Override
    public String getId() {
        return id;
    }

    /**
     * Put query result to redis
     *
     * @param key
     * @param value
     */
    @Override
    public void putObject(Object key, Object value) {
        try {
            RedisTemplate redisTemplate = getRedisTemplate();
            ValueOperations opsForValue = redisTemplate.opsForValue();
            opsForValue.set(key, value, EXPIRE_TIME_IN_MINUTES, TimeUnit.MINUTES);
            log.debug("Put query result to redis");
        } catch (Throwable t) {
            log.error("Redis put failed", t);
        }
    }

    /**
     * Get cached query result from redis
     *
     * @param key
     * @return
     */
    @Override
    public Object getObject(Object key) {
        try {
            RedisTemplate redisTemplate = getRedisTemplate();
            ValueOperations opsForValue = redisTemplate.opsForValue();
            log.debug("Get cached query result from redis");
            return opsForValue.get(key);
        } catch (Throwable t) {
            log.error("Redis get failed, fail over to db", t);
            return null;
        }
    }

    /**
     * Remove cached query result from redis
     *
     * @param key
     * @return
     */
    @Override
    @SuppressWarnings("unchecked")
    public Object removeObject(Object key) {
        try {
            RedisTemplate redisTemplate = getRedisTemplate();
            redisTemplate.delete(key);
            log.debug("Remove cached query result from redis");
        } catch (Throwable t) {
            log.error("Redis remove failed", t);
        }
        return null;
    }

    /**
     * Clears this cache instance
     */
    @Override
    public void clear() {
        RedisTemplate redisTemplate = getRedisTemplate();
        redisTemplate.execute((RedisCallback) connection -> {
            connection.flushDb();
            return null;
        });
        log.debug("Clear all the cached query result from redis");
    }

    /**
     * This method is not used
     *
     * @return
     */
    @Override
    public int getSize() {
        return 0;
    }

    @Override
    public ReadWriteLock getReadWriteLock() {
        return readWriteLock;
    }

    private RedisTemplate getRedisTemplate() {
        if (redisTemplate == null) {
            redisTemplate = ApplicationContextHolder.getBean("redisTemplate");
        }
        return redisTemplate;
    }
}
@CacheNamespace(implementation = RedisCache.class)
public interface GoodsMapper extends MyMapper<Goods> {
}
消息
Rabbitmq整合
- 添加依赖
		<dependency>
            <groupId>org.springframework.boot</groupId>
            <artifactId>spring-boot-starter-amqp</artifactId>
        </dependency>
- yml连接配置
spring:
  rabbitmq:
    host: 192.168.40.130
    username: guest
    password: guest
    #port: 5672  默认就是5672
    #virtual-host: "/"  默认"/"
SpringBoot自动配置了RabbitMQ,可以直接注入RabbitTemplate和AmqpAdmin使用
package com.shyb;

import org.junit.Test;
import org.junit.runner.RunWith;
import org.springframework.amqp.rabbit.core.RabbitTemplate;
import org.springframework.beans.factory.annotation.Autowired;
import org.springframework.boot.test.context.SpringBootTest;
import org.springframework.test.context.junit4.SpringRunner;

import java.util.HashMap;
import java.util.Map;

@RunWith(SpringRunner.class)
@SpringBootTest
public class SpringbootAmqpApplicationTests {
    @Autowired
    RabbitTemplate rabbitTemplate;

    /**
     * 1.点对点
     */
    @Test
    public void contextLoads() {
        //message(byte[] bytes,MessageProperties properties);自己定义消息体内容和消息头
        //rabbitTemplate.send(exchange,routeKey,message);

        //object默认当成消息体,只需要传入要发送的对象,自动序列化发送给rabbitmq
        //rabbitTemplate.convertAndSend(exchange,routeKey,object);
        Map<String,String> map = new HashMap<>();
        map.put("msg","hello World");
        rabbitTemplate.convertAndSend("exchange.direct","atguigu",map);
    }
    //接收数据
    @Test
    public void receive(){
        Object aiguigu = rabbitTemplate.receiveAndConvert("atguigu");
        System.out.println(aiguigu.getClass());
        System.out.println(aiguigu);
    }
    /**
     * 广播
     */
    @Test
    public void sendMsg(){
        rabbitTemplate.convertAndSend("exchange.fanout","","hello");
    }
}
json序列化
package com.shyb.config;

import org.springframework.amqp.support.converter.Jackson2JsonMessageConverter;
import org.springframework.amqp.support.converter.MessageConverter;
import org.springframework.context.annotation.Bean;
import org.springframework.context.annotation.Configuration;

/**
 * @author wzh
 * @date 2019/4/3 - 17:54
 */
@Configuration
public class AMQPConfig {
    @Bean
    public MessageConverter messageConverter(){
        return new Jackson2JsonMessageConverter();
    }
}
监听机制
- 开启rabbitmq
@EnableRabbit - service接收
package com.shyb.service;

import org.springframework.amqp.rabbit.annotation.RabbitListener;
import org.springframework.stereotype.Service;

/**
 * @author wzh
 * @date 2019/4/3 - 18:23
 */
@Service
public class UserService {
    @RabbitListener(queues = "atguigu")
    public void receive(String str){
        System.out.println("收到消息" + str);
    }
}
Java中生成exchange、binding、queue
	@Autowired
    AmqpAdmin amqpAdmin;
    @Test
    public void createExchange(){
        Exchange exchange = new DirectExchange("exchange.direct");
        //Exchange exchange = new FanoutExchange("exchange.fanout");
        //Exchange exchange = new TopicExchange("exchange.topic");
        amqpAdmin.declareQueue(new Queue("atguigu"));
        amqpAdmin.declareBinding(new Binding("atguigu", Binding.DestinationType.QUEUE,"exchange.direct","atguigu",null));
        amqpAdmin.declareExchange(exchange);
    }
检索
整合ElasticSearch
- 导入jar包
		<dependency>
            <groupId>org.springframework.boot</groupId>
            <artifactId>spring-boot-starter-data-elasticsearch</artifactId>
        </dependency>
- Springboot支持Jest(默认不生效,需要导入JestClient包)和SpringData ElasticSearch
SpringData ElasticSearch:
	1. Client 节点信息clusterNodes;clusterName
	2. ElasticsearchTemplate 操作es
	3. 可以编写一个ElasticsearchRepository的子接口操作es
配置yml
spring:
  data:
    elasticsearch:
      cluster-nodes: 192.168.40.130:9300
      cluster-name: docker-cluster
package com.shyb.bean;

import org.springframework.data.elasticsearch.annotations.Document;

/**
 * @author wzh
 * @date 2019/4/4 - 10:24
 */
@Document(indexName = "school",type = "student")
public class Student {
    private Integer id;
    private String name;
    private String mobile;

    @Override
    public String toString() {
        return "Student{" +
                "id=" + id +
                ", name='" + name + '\'' +
                ", mobile='" + mobile + '\'' +
                '}';
    }

    public Integer getId() {
        return id;
    }

    public void setId(Integer id) {
        this.id = id;
    }

    public String getName() {
        return name;
    }

    public void setName(String name) {
        this.name = name;
    }

    public String getMobile() {
        return mobile;
    }

    public void setMobile(String mobile) {
        this.mobile = mobile;
    }
}
package com.shyb.repository;

import com.shyb.bean.Student;
import org.springframework.data.elasticsearch.repository.ElasticsearchRepository;

import java.util.List;

/**
 * @author wzh
 * @date 2019/4/4 - 10:25
 */
public interface StudentRepository extends ElasticsearchRepository<Student,Integer> {
    //命名方式参考官网
    public List<Student> findByNameLike(String name);
}
package com.shyb;

import com.shyb.bean.Student;
import com.shyb.repository.StudentRepository;
import org.junit.Test;
import org.junit.runner.RunWith;
import org.springframework.beans.factory.annotation.Autowired;
import org.springframework.boot.test.context.SpringBootTest;
import org.springframework.test.context.junit4.SpringRunner;

@RunWith(SpringRunner.class)
@SpringBootTest
public class SpringbootElasticsearchApplicationTests {

    @Autowired
    StudentRepository studentRepository;
    @Test
    public void contextLoads() {
        Student student = new Student();
        student.setId(1);
        student.setName("zhangsan");
        student.setMobile("13800138000");
        studentRepository.index(student);
    }
    @Test
    public void test() {
        for (Student student : studentRepository.findByNameLike("zhang")) {
            System.out.println(student);
        }
    }

}
任务
异步任务
在异步的方法或类上添加@Async注解,在主方法类上标注@EnableAsync即可
定时任务
在定时任务上标注@Scheduled(cron =表达式) 在主方法类上标注@EnableScheduling
邮件任务
添加依赖
		<dependency>
            <groupId>org.springframework.boot</groupId>
            <artifactId>spring-boot-starter-mail</artifactId>
        </dependency>
配置邮箱发送yml
spring:
  mail:
    username: 515030185@qq.com
    password: sdgdsfdsfsdg #邮箱授权码
    host: smtp.qq.com
    properties:
      mail.smtp.ssl.enable: true
使用:
package com.shyb;

import org.junit.Test;
import org.junit.runner.RunWith;
import org.springframework.beans.factory.annotation.Autowired;
import org.springframework.boot.test.context.SpringBootTest;
import org.springframework.mail.SimpleMailMessage;
import org.springframework.mail.javamail.JavaMailSender;
import org.springframework.mail.javamail.MimeMessageHelper;
import org.springframework.test.context.junit4.SpringRunner;

import javax.mail.internet.MimeMessage;
import java.io.File;

@RunWith(SpringRunner.class)
@SpringBootTest
public class SpringbootTaskApplicationTests {

    @Autowired
    JavaMailSender javaMailSender;
    @Test
    public void contextLoads() {
        SimpleMailMessage message = new SimpleMailMessage();
        message.setSubject("标题");
        message.setText("消息内容");
        message.setTo("123456789@qq.com");
        javaMailSender.send(message);
    }
    //复杂邮件
    @Test
    public void test() throws Exception{
        MimeMessage mimeMessage = javaMailSender.createMimeMessage();
        MimeMessageHelper helper = new MimeMessageHelper(mimeMessage, true);
        helper.setSubject("标题");
        helper.setText("<h1>消息内容</h1>",true);
        helper.setTo("123456@qq.com");
        helper.setFrom("654321@qq.com");
        helper.addAttachment("1.jpg",new File("/C:1.jpg"));
        javaMailSender.send(mimeMessage);
    }
}
安全
spring security
- 引入依赖
		<dependency>
            <groupId>org.springframework.boot</groupId>
            <artifactId>spring-boot-starter-security</artifactId>
        </dependency>
- 添加配置类
package com.shyb.config;

import org.springframework.security.config.annotation.authentication.builders.AuthenticationManagerBuilder;
import org.springframework.security.config.annotation.web.builders.HttpSecurity;
import org.springframework.security.config.annotation.web.configuration.EnableWebSecurity;
import org.springframework.security.config.annotation.web.configuration.WebSecurityConfigurerAdapter;
import org.springframework.security.crypto.bcrypt.BCryptPasswordEncoder;

import java.util.Map;

/**
 * @EnableWebSecurity 开启SpringSecurity  改注解带了@Configuration 会被扫描到
 */
@EnableWebSecurity
public class SecurityConfig extends WebSecurityConfigurerAdapter {

    @Override
    protected void configure(HttpSecurity http) throws Exception {
        //定制授权规则
        http.authorizeRequests().antMatchers("/").permitAll()
                .antMatchers("/level1/**").hasRole("VIP1")
                .antMatchers("/level2/**").hasRole("VIP2")
                .antMatchers("/level3/**").hasRole("VIP3");
        //开启自动配置的登录功能  没有登陆会到登录页面,登录成功后跳转到输入的网页处
        //1. 默认到/login来到登录页
        //2. 登录失败重定向到/login?error页面
        // 自定义login页面  loginPage
                // 默认/login Get请求是到登录页面  Post是登录  默认账户密码为username和password,
                //可以usernameParameter("mobile").passwordParameter("pwd");指定参数
        http.formLogin().loginPage("/login").usernameParameter("mobile").passwordParameter("pwd");
        // 开启自己注销功能
        // 1. 访问/logout标识用户自动注销
        // 2. 规定是post请求,所以需要form表单指定method
        // 3. 注销后会跳转到/login?logout页面
        // logoutSuccessUrl主要成功后的页面
        http.logout().logoutSuccessUrl("/");
        // 开启记住我功能
        // 登录成功后,将Cookie发给浏览器保存,以后访问会带上这个Cookie,通过检查就可以免登陆
        // 点击注销会删除Cookie  默认保存时间是14天
        // 自定义记住我时,使用rememberMeParameter("remember")来接受参数
        http.rememberMe().rememberMeParameter("remember");
    }

    /**
     * 定义认证规则
     * @param auth
     * @throws Exception
     */
    @Override
    protected void configure(AuthenticationManagerBuilder auth) throws Exception {
        // spring security5后需要增加密码加密规则和解密规则
        auth.inMemoryAuthentication().passwordEncoder(new BCryptPasswordEncoder()).withUser("zhangsan").password(new BCryptPasswordEncoder().encode("123456")).roles("VIP1","VIP2")
                .and().withUser("lisi").password(new BCryptPasswordEncoder().encode("123456")).roles("VIP2","VIP3");
    }
}
可以引入thymleaf和spring-security依赖,在页面使用权限显示内容
		<dependency>
            <groupId>org.thymeleaf.extras</groupId>
            <artifactId>thymeleaf-extras-springsecurity5</artifactId>
        </dependency>
weclome页面
<!DOCTYPE html>
<html xmlns:th="http://www.thymeleaf.org"
      xmlns:sec="http://www.thymeleaf.org/thymeleaf-extras-springsecurity4">
<head>
    <meta charset="UTF-8">
    <title>Title</title>
</head>
<body>
<h1 align="center">欢迎光临武功秘籍管理系统</h1>
<div sec:authorize="!isAuthenticated()">
    <h1 align="center">游客您好,如果想查看武功秘籍,<a th:href="@{/login}">请登录</a></h1>
</div>
<div sec:authorize="isAuthenticated()">
    <h1 align="center">欢迎您<span sec:authentication="name"></span>,你的角色有<span
            sec:authentication="principal.authorities"></span></h1>
    <form th:action="@{/logout}" method="post">
        <input type="submit" value="注销">
    </form>
</div>
<div sec:authorize="hasRole('VIP1')">
    <h3>普通武功秘籍</h3>
    <ul>
        <li><a th:href="@{/level1/1}">罗汉拳</a></li>
        <li><a th:href="@{/level1/2}">武当长拳</a></li>
        <li><a th:href="@{/level1/3}">全真剑法</a></li>
    </ul>
</div>
<div sec:authorize="hasRole('VIP2')">
    <h3>高级武功秘籍</h3>
    <ul>
        <li><a th:href="@{/level2/1}">太极拳</a></li>
        <li><a th:href="@{/level2/2}">七伤拳</a></li>
        <li><a th:href="@{/level2/3}">梯云纵</a></li>
    </ul>
</div>
<div sec:authorize="hasRole('VIP3')">
    <h3>绝世武功秘籍</h3>
    <ul>
        <li><a th:href="@{/level3/1}">葵花宝典</a></li>
        <li><a th:href="@{/level3/2}">龟派气功</a></li>
        <li><a th:href="@{/level3/3}">独孤九剑</a></li>
    </ul>
</div>
</body>
</html>
login页面
<!DOCTYPE html>
<html lang="en" xmlns:th="http://www.thymeleaf.org">
<head>
    <meta charset="UTF-8">
    <title>Title</title>
</head>
<body>
  <form th:action="@{/login}" method="post">
      <input name="mobile" placeholder="账号">
      <input type="password" name="pwd" placeholder="密码">
      <input type="checkbox" name="remember">记住我
      <input type="submit" value="登录">
  </form>
</body>
</html>
分布式
整合dubbo
发布服务
- 添加依赖
		<!--dubbo 依赖 -->
        <dependency>
            <groupId>com.alibaba.boot</groupId>
            <artifactId>dubbo-spring-boot-starter</artifactId>
            <version>0.2.0</version>
        </dependency>
        <!-- zookeeper client依赖 -->
        <dependency>
            <groupId>com.101tec</groupId>
            <artifactId>zkclient</artifactId>
            <version>0.10</version>
        </dependency>
- 将服务提供者注册在提供中心
- 配置文件
dubbo:
  application:
    name: provider-ticker
  server: true
  registry:
    address: zookeeper://192.168.40.130:2181
  scan:
    base-packages: com.shyb.service  #不写默认所有服务
demo:
  service:
    version: 1.0.0
2. 使用@Service发布服务
package com.shyb.service.impl;

import com.alibaba.dubbo.config.annotation.Service;
import com.shyb.service.TickerService;
import org.springframework.stereotype.Component;

/**
 * @author wzh
 * @date 2019/4/5 - 11:07
 */
@Service(version = "${demo.service.version}")//默认按照接口名发布,指定版本号后使用时也需指定
@Component
public class TickerServiceImpl implements TickerService {
    @Override
    public String getTicker() {
        return "流浪地球";
    }
}
3. 主程序添加@EnableDubbo并启动
消费服务
- 添加依赖
		<!--dubbo 依赖 -->
        <dependency>
            <groupId>com.alibaba.boot</groupId>
            <artifactId>dubbo-spring-boot-starter</artifactId>
            <version>0.2.0</version>
        </dependency>
        <!-- zookeeper client依赖 -->
        <dependency>
            <groupId>com.101tec</groupId>
            <artifactId>zkclient</artifactId>
            <version>0.10</version>
        </dependency>
- 配置properties
server.port=8081
demo.service.version=1.0.0
dubbo.registry.address=zookeeper://192.168.40.130:2181
dubbo.application.name=consumer-user
- RPC注入调用
package com.shyb.service.impl;

import com.alibaba.dubbo.config.annotation.Reference;
import com.shyb.service.TickerService;
import com.shyb.service.UserService;
import org.springframework.stereotype.Service;

/**
 * @author wzh
 * @date 2019/4/5 - 11:09
 */
@Service
public class UserServiceImpl implements UserService {
    @Reference(version = "${demo.service.version}")
    TickerService tickerService;
    @Override
    public void hello() {
        System.out.println(tickerService.getTicker());
    }
}
整合Spring Cloud
Spring Cloud 五大常用组件
- 服务发现(注册中心)----Netflix Eureka
- 客服端负载均衡----Netflix Ribbon
- 断路器----Netflix Hystrix
- 服务网关----Netflix Zuul
- 分布式配置----Spring Cloud Config
创建注册中心(Eureka Server)
- 配置yml
server:
  port: 8761
eureka:
  instance:
    hostname: eureka-server #eureka实例主机名
  client:
    register-with-eureka: false # 不把自己注册到服务中心
    fetch-registry: false #不从eureka上获取服务的注册信息
    service-url:
      defaultZone: http://localhost:8761/eureka/
- 开启注册中心
package com.shyb;

import org.springframework.boot.SpringApplication;
import org.springframework.boot.autoconfigure.SpringBootApplication;
import org.springframework.cloud.netflix.eureka.server.EnableEurekaServer;

/**
 * 注册中心
 */
@EnableEurekaServer
@SpringBootApplication
public class EurekaServerApplication {

    public static void main(String[] args) {
        SpringApplication.run(EurekaServerApplication.class, args);
    }

}
创建服务提供者和消费者(Eureka Discovery)
服务提供者
yml配置
server:
  port: 8081
spring:
  application:
    name: eureka-ticket
eureka:
  instance:
    prefer-ip-address: true #注册服务使用服务的ip地址
  client:
    service-url:
      defaultZone: http://localhost:8761/eureka/
之后提供者的Controller就是显示在服务中心
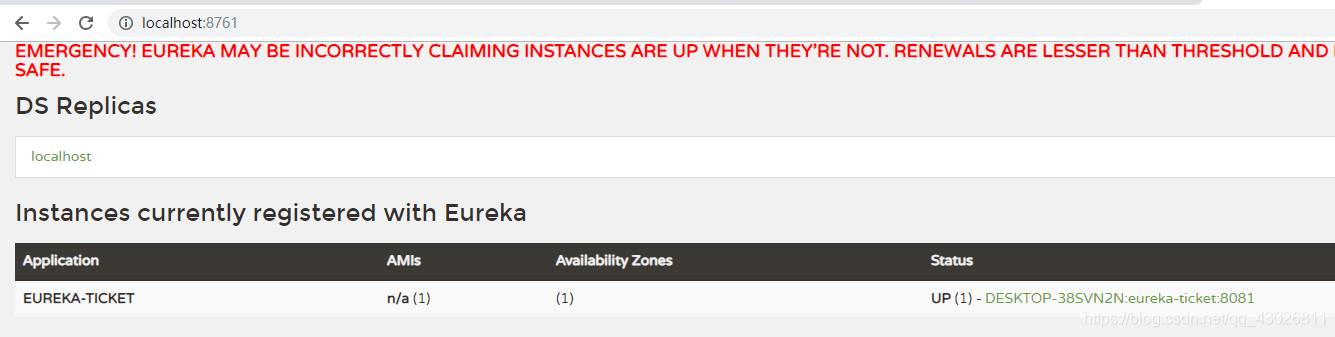
可以打包多个,指定不同端口,同一服务,eureka会使用负载均衡来回调用
服务消费者
- 配置yml
spring:
  application:
    name: consumer-user

eureka:
  instance:
    prefer-ip-address: true #注册服务使用服务的ip地址
  client:
    service-url:
      defaultZone: http://localhost:8761/eureka/
- 开启发现功能
package com.shyb;

import org.springframework.boot.SpringApplication;
import org.springframework.boot.autoconfigure.SpringBootApplication;
import org.springframework.cloud.client.discovery.EnableDiscoveryClient;
import org.springframework.cloud.client.loadbalancer.LoadBalanced;
import org.springframework.context.annotation.Bean;
import org.springframework.web.client.RestTemplate;

@EnableDiscoveryClient//开启发现服务功能
@SpringBootApplication
public class ConsumerUserApplication {

    public static void main(String[] args) {
        SpringApplication.run(ConsumerUserApplication.class, args);
    }

    @LoadBalanced//使用负载均衡机制
    @Bean
    public RestTemplate restTemplate(){
        return new RestTemplate();
    }
}
- 远程调用
package com.shyb.controller;

import org.springframework.beans.factory.annotation.Autowired;
import org.springframework.web.bind.annotation.GetMapping;
import org.springframework.web.bind.annotation.RestController;
import org.springframework.web.client.RestTemplate;

/**
 * @author wzh
 * @date 2019/4/11 - 9:59
 */
@RestController
public class UserController {
    @Autowired
    RestTemplate restTemplate;

    @GetMapping("/buy")
    public String buyTicket(){
        //  http://  + 服务名 + 请求
        String str = restTemplate.getForObject("http://EUREKA-TICKET/ticket", String.class);
        return "购买了"+str;
    }
}
开发热部署
引入spring-boot-devtools
<dependency>
    <groupId>org.springframework.boot</groupId>
    <artifactId>spring-boot-devtools</artifactId>
    <optional>true</optional>
</dependency>
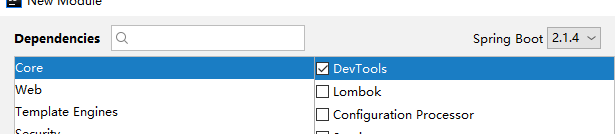
可以创建时直接选中
页面可以ctrl+F9刷新
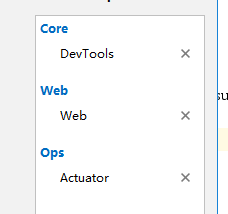
监控管理
选择模块
参考文章


 585
585

 被折叠的 条评论
为什么被折叠?
被折叠的 条评论
为什么被折叠?
 到【灌水乐园】发言


