


 这篇博客主要介绍了Linux系统中的配置文件及其作用,包括网卡配置、启动级别管理和软件包管理。讲解了如何配置DNS、挂载点、开机启动脚本以及使用chkconfig管理服务。还涉及到了运行级别在CentOS 6和7的区别,以及如何设置。此外,内容涵盖了解析 `/etc/resolv.conf`、`/etc/fstab`、`/etc/inittab` 和 `/etc/rc.local` 等重要文件。最后,讨论了Linux软件安装方式,如RPM包管理和使用Yum工具,以及如何解决依赖问题和管理仓库。
目录
网卡的配置文件
/etc/resolv.conf
# DNS 配置文件 重点
优先于 resolv.conf 如果网中配置了DNS 然后重启网卡 则会覆盖 resolv.conf 中的配置
如果网卡中不配置DNS 重启后 则不会覆盖 resolv.conf
网卡配置 修改网卡 必须重启
DNS1=114.114.114.114
DNS2=223.5.5.5
resolv.conf 中书写方式 直接生效
nameserver 223.5.5.5
工作中建议使用 resolv.conf
/etc/fstab
# 设置开机启动挂载的文件 设备和挂载点的一个对应表 file system table 重点
/etc/rc.local
开机自动启动,自动执行文件
chmod +x /etc/rc.d/rc.local 需要给源文件执行权限
chkconfig
通过chkconfig命令可以给每个服务的各个运行级别设置自启动/关闭
chkconfig --list|grep xxx:筛选查看xxx服务
示例
-
查看所有服务
-
[root@wcl ~]# chkconfig --list
注:该输出结果只显示 SysV 服务,并不包含
原生 systemd 服务。SysV 配置数据
可能被原生 systemd 配置覆盖。

      要列出 systemd 服务,请执行 'systemctl list-unit-files'。
      查看在具体 target 启用的服务请执行
      'systemctl list-dependencies [target]'。

jexec           0:关    1:开    2:开    3:开    4:开    5:开    6:关
mysqld          0:关    1:关    2:开    3:开    4:开    5:开    6:关
netconsole      0:关    1:关    2:关    3:关    4:关    5:关    6:关
network         0:关    1:关    2:开    3:开    4:开    5:开    6:关
-
-
查看单个mysqld服务,有两种方式;
方式1:
chkconfig --list | grep 服务名 方式2:
chkconfig 服务名--list-
//方式1: chkconfig --list | grep mysqld [root@wcl ~]# chkconfig --list | grep mysqld mysqld 0:关 1:关 2:开 3:开 4:开 5:开 6:关 -
// 方式2:chkconfig mysqld --list
[root@wcl ~]# chkconfig mysqld --list
mysqld          0:关    1:关    2:开    3:开    4:开    5:开    6:关
-
-
关闭mysqld服务运行级别5的服务
chkconfig --level 服务运行级别 服务名 on/off:开启关闭某服务运行级别的服务-
[root@wcl ~]# chkconfig --level 5 mysqld off       //关闭
[root@wcl ~]# chkconfig mysqld --list     //查看验证是否成功关闭
mysqld          0:关    1:关    2:开    3:开    4:开    5:关    6:关
注意:
注:该输出结果只显示 SysV 服务,并不包含
原生 systemd 服务。SysV 配置数据
可能被原生 systemd 配置覆盖。要列出 systemd 服务,请执行 'systemctl list-unit-files'。 查看在具体 target 启用的服务请执行 'systemctl list-dependencies [target]'。 -
上面指令中查询的结果出现这段内容,只因为我是在Centos7上面操作的原因。Centos7和之前的老版本差别较大。
细节注意:chkconfig重新设置服务后自启动或关闭,需要重启机器reboot才能生效。
-
查看sshd的服务运行状态:
service sshd status -
显示当前系统中所有服务的各个运行级别的运行状态:
chkconfig --list -
将sshd服务在运行级别5下设置为不自动启动:
chkconfig --level 5 sshd off -
在所有运行级别下,关闭防火墙:
chkconfig iptables off -
在所有运行级别下,开启防火墙:
chkconfig iptables on
chkconfig --del mysqld:删除服务mysqld
chkconfig --add mysqld:添加服务mysqld
chkconfig mysqld off:所有运行级别下关闭服务mysqld
chkconfig mysqld on:所有运行级别下开启服务mysqld
/etc/inittab
# run level 运行级别的配置文件 (6中) centos6.x centos7.x
运行级别
0 关机 poweroff.target
1 单用户模式(密码忘记,重新更改密码) rescue.target
2 多用户模式 没有NFS multi-user.target
3 完全多用户模式 (当前使用的模式) multi-user.target
4 未使用 待开发 multi-user.target
5 桌面模式 (需要安装DESKTOP) graphical.target
6 重启 reboot.target
c6如果设置启动级别
vim /etc/inittab
id:3:initdefault:
或者 init 6 重启系统了
c7 设置启动级别
查看运行级别
systemctl get-default
multi-user.target
设置
systemctl set-default runlevel5.target tab补全安装 yum -y install bash-completion.noarch
或者 init 6 重启系统了
/etc/issue
# 登录系统前的提示
/etc/issue.net
# 登录系统前的提示
> /etc/issue 清空文件
> /etc/issue.net 清空文件
/etc/motd
# 系统登录后的提示
/etc/redhat-release
重点 查看当前系统的版本
[root@oldboy ~]# cat /etc/redhat-release
CentOS Linux release 7.5.1804 (Core)
/etc/profile
# 环境变量的配置文件 重点
1)系统环境变量大写
2)环境变量大部分位置都可使用
3)name=oldboy 等号右边一堆内容 使用一个名字来代替 称为变量
[root@oldboy ~]# test="I am oldboy teacher I am 60"
[root@oldboy ~]# echo $test
I am oldboy teacher I am 60
PS1
/etc/bashrc
别名
ll ===== ls -l
给命令起了一个小名
浩达 -----> 好大
周玉强 -----> 强哥 old强 钢炮
11. ~/.bashrc 别名
12. ~/.bash_profile 环境变量
/etc/bashrc 全局生效 针对系统所有用户 国法 22 20 规定的年龄结婚
/etc/bash_profile 全局生效 针对系统所有用户 国法
~/.bashrc 局部生效 针对当前使用用户 家规 家里 男孩子 尽快抱孙子
~/.bash_profile 局部生效 针对当前使用用户 家规 家里 女孩子 不要过早谈恋爱
/usr/local
默认编译安装的软件放在此目录下
LANG
centos6:[root@centos6 ~]# cat /etc/sysconfig/i18n
LANG="en_US.UTF-8"
centos7:[root@executive ~]# cat /etc/locale.conf
LANG="en_US.UTF-8"
Linux系统管理-软件包管理
与windows安装各种应用程序相似,在linux下也可以安装各种需要的应用程序,通常称为软件包。
1. Rpm安装软件包
1. 什么是Rpm
RPM 是Red-Hat Package Manager(RPM软件包管理器)的缩写,这一文件格式名称虽然打上了RedHat的标志,但是
其原始设计理念是开放式的是由红帽公司开发用于软件包的安装、升级、卸载、查询等操作。在主流的linux系统上,多数
软件的安装、升级、移除以及维护工作都是使用RPM软件包管理程序来完成的。
2. Rpm包介绍
zip-3.0-11.el7.x86_64.rpm #el7
zip-3.0-1.el6.x86_64.rpm #el6
yum-utils-1.1.31-50.el7.noarch.rpm #noarch,noarch是no architecture的缩写,说明这个 包可以在各个不同的cpu上使用。
QQ_v8.9.exe #Windows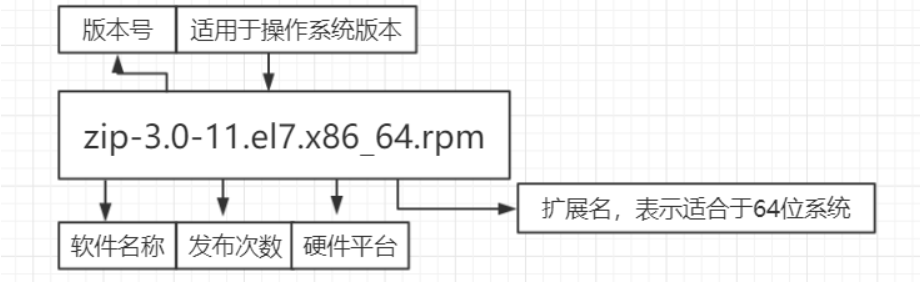
| 分类 | 安装 | 版本 |
|---|---|---|
| rpm包 | 预先编译打包,安装简单 | 软件版本偏低 |
| 源码包 | 手动编译打包,安装繁琐 | 软件版本随意 |
| 二进制包 | 解压即可使用, 安装简单 | 不能修改源代码 |
1. Rpm安装软件包
1. 什么是Rpm
RPM 是Red-Hat Package Manager(RPM软件包管理器)的缩写,这一文件格式名称虽然打上了RedHat的标志,但是
其原始设计理念是开放式的是由红帽公司开发用于软件包的安装、升级、卸载、查询等操作。在主流的linux系统上,多数
软件的安装、升级、移除以及维护工作都是使用RPM软件包管理程序来完成的。
2. Rpm包介绍
zip-3.0-11.el7.x86_64.rpm #el7
zip-3.0-1.el6.x86_64.rpm #el6
yum-utils-1.1.31-50.el7.noarch.rpm #noarch,noarch是no architecture的缩写,说明这个 包可以在各个不同的cpu上使用。
QQ_v8.9.exe #Windows
img
3. Linux系统安装软件方式
分类 安装 版本
rpm包 预先编译打包,安装简单 软件版本偏低
源码包 手动编译打包,安装繁琐 软件版本随意
二进制包 解压即可使用, 安装简单 不能修改源代码
4. Rpm包获取
1.本地的ISO镜像光盘(软件包可能存在版本偏低情况) /mnt --挂载-->/dev/cdrom
2.自行联网下载rpm包进行安装
3.仓库联网获取rpm包 #yum的时候
5. Rpm实战
1.安装
-i #安装软件包
-v #显示安装的过程
-h #显示安装的进度条
--test #模拟演练
--force #强制安装
[root@qls ~]# rpm -ivh /mnt/Packages/tree-1.6.0-10.el7.x86_64.rpm
Preparing... ################################# [100%]
Updating / installing...
1:tree-1.6.0-10.el7 ################################# [100%]
2.安装过程中出现了依赖的情况
[root@qls ~]# rpm -ivh /mnt/Packages/samba-4.8.3-4.el7.x86_64.rpm
error: Failed dependencies:
libxattr-tdb-samba4.so()(64bit) is needed by samba-0:4.8.3-4.el7.x86_64
libxattr-tdb-samba4.so(SAMBA_4.8.3)(64bit) is needed by samba-0:4.8.3-4.el7.x86_64
samba-common-tools = 4.8.3-4.el7 is needed by samba-0:4.8.3-4.el7.x86_64
samba-libs = 4.8.3-4.el7 is needed by samba-0:4.8.3-4.el7.x86_64
1.尝试安装依赖包samba-common-tools
[root@qls ~]# rpm -ivh /mnt/Packages/samba-common-tools-4.8.3-4.el7.x86_64.rpm
error: Failed dependencies:
samba-libs = 4.8.3-4.el7 is needed by samba-common-tools-0:4.8.3-4.el7.x86_64
2.尝试安装依赖包samba-libs
[root@qls ~]# rpm -ivh /mnt/Packages/pytalloc-2.1.13-1.el7.x86_64.rpm
Preparing... ################################# [100%]
Updating / installing...
1:pytalloc-2.1.13-1.el7 ################################# [100%]
3.安装samba-libs
[root@qls ~]# rpm -ivh /mnt/Packages/samba-libs-4.8.3-4.el7.x86_64.rpm
Preparing... ################################# [100%]
Updating / installing...
1:samba-libs-0:4.8.3-4.el7 ################################# [100%]
4.安装samba-common-tools
[root@qls ~]# rpm -ivh /mnt/Packages/samba-common-tools-4.8.3-4.el7.x86_64.rpm
Preparing... ################################# [100%]
Updating / installing...
1:samba-common-tools-0:4.8.3-4.el7 ################################# [100%]
5.安装samba
[root@qls ~]# rpm -ivh /mnt/Packages/samba-4.8.3-4.el7.x86_64.rpm
Preparing... ################################# [100%]
Updating / installing...
1:samba-0:4.8.3-4.el7 ################################# [100%]
------------------------------------rpm软件包依赖太强了......通常使用yum来解决
3.如何使用rpm安装互联网上面的软件包(没有依赖)
[root@qls ~]# rpm -ivh https://mirrors.aliyun.com/zabbix/zabbix/4.0/rhel/7/x86_64/zabbix-agent-4.0.0-2.el7.x86_64.rpm
4.卸载
[root@qls ~]# rpm -e tree
[root@qls ~]# rpm -qa zabbix-agent
zabbix-agent-4.0.0-2.el7.x86_64
[root@qls ~]# rpm -e zabbix-agent-4.0.0-2.el7.x86_64
[root@qls ~]# rpm -qa zabbix-agent
5.升级
wget https://mirrors.aliyun.com/zabbix/zabbix/3.0/rhel/7/x86_64/zabbix-agent-3.0.9-1.el7.x86_64.rpm
wget https://mirrors.aliyun.com/zabbix/zabbix/4.2/rhel/7/x86_64/zabbix-agent-4.2.0-1.el7.x86_64.rpm
1.先安装低版本
[root@qls ~]# rpm -ivh zabbix-agent-3.0.9-1.el7.x86_64.rpm
2.尝试安装高版本(会出现错误)
[root@qls ~]# rpm -ivh zabbix-agent-4.2.0-1.el7.x86_64.rpm
3.使用升级的方式,完美解决替换
[root@qls ~]# rpm -Uvh zabbix-agent-4.2.0-1.el7.x86_64.rpm
warning: /var/tmp/rpm-tmp.saqeVO: Header V4 RSA/SHA512 Signature, key ID a14fe591: NOKEY
Preparing... ################################# [100%]
Updating / installing...
1:zabbix-agent-4.2.0-1.el7 ################################# [ 50%]
Cleaning up / removing...
2:zabbix-agent-3.0.9-1.el7 ################################# [100%]
6.查看软件安装的路径,或者其他
#选项 描述
rpm -q #查看指定软件包是否安装
[root@qls ~]# rpm -q vsftpd **
package vsftpd is not installed
rpm -qa #查看系统中已安装的所有RPM软件包列表
[root@qls ~]# rpm -qa|grep "samba" #列出所有的rpm包,然后筛选名称是samba的相关包 ****
samba-common-tools-4.8.3-4.el7.x86_64
samba-common-libs-4.8.3-4.el7.x86_64
samba-common-4.8.3-4.el7.noarch
samba-libs-4.8.3-4.el7.x86_64
samba-client-libs-4.8.3-4.el7.x86_64
samba-4.8.3-4.el7.x86_64
[root@qls ~]# rpm -qa samba #明确知道软件包的名称,在进行查找
samba-4.8.3-4.el7.x86_64
rpm -ql #查询指定软件包所安装的目录、文件列表,存放的位置 *****
rpm -qc #查询指定软件包的所有配置文件 *****
rpm -qf #查询文件或目录属于哪个RPM软件 ***(只能查询已存在的命令或已存在的文件路径)
[root@qls ~]# rpm -qf /bin/cd
bash-4.2.46-31.el7.x86_64
[root@qls ~]# rpm -qf /bin/cp
coreutils-8.22-23.el7.x86_64
[root@qls ~]# yum provides mkpasswd #更好的解决方案
rpm -qi #查看指定软件的详细信息 *
[root@qls ~]# rpm -qi samba
6. Rpm包总结
#安装:rpm -ivh <RPM包名全称>
#卸载:rpm -e <RPM包名>
#升级:rpm -Uvh <RPM包名>
#查询:rpm [参数] <RPM包名>
常用参数:rpm -qa #查询系统中安装的所有RPM软件包
rpm -q <RPM包名> #查询指定软件包是否已安装
rpm -qi <RPM包名> #查询系统中已安装包的描述信息
rpm -ql <RPM包名> #查询系统中已安装包里所包含的文件
rpm -qc <RPM包名> #查询指定软件包的所有配置文件
rpm -qf <RPM包名> #查询系统中指定文件所属的软件包
rpm -qa | grep php #检索系统中已经安装有关php的软件包
5.验证:rpm -V [参数]
2. Yum安装软件包
1. Yum介绍
Yum(全称为 Yellow dog Updater, Modified)是一个在Fedora和RedHat以及CentOS中的Shell前端软件包管理器。基于RPM包管理,能够从指定的服务器自动下载RPM包并且安装,可以自动处理依赖性关系,并且一次安装所有依赖的软件包,无须繁琐地一次次下载、安装。
2. Yum源(Yum仓库)
要使用yum前,需要准备一个yum源(我们也称为yum仓库), 这个可以是一个互联网上的仓库,也可以是本地自己搭建的仓库.
仓库里面有什么呢?里面全部都是.rpm的软件包.
一台linux,可以添加N多个yum源, 能搜索的软件包数量就是N个yum源之和.
3. 系统中常用的Yum源
1.base基础源
2.epel扩展源
3.与服务相关的源(官网)
4. Yum实战
1.如何通过仓库进行查找软件包,比如模糊匹配
[root@qls ~]# yum list #查看所有的rpm包,建议配合less
[root@qls ~]# yum list | grep ftp #模糊匹配的方式
[root@qls ~]# yum info vsftpd #查看vsftpd软件的详情(可有可无)
2.yum通过公网仓库搜索进行安装
[root@qls ~]# yum install vsftpd #交互,麻烦
[root@qls ~]# yum install vsftpd -y #非交互
3.yum直接安装公网的rpm包, 会自动查找当前系统上已有的仓库解决依赖关系
[root@qls ~]# yum install https://mirrors.aliyun.com/centos/7.6.1810/os/x86_64/Packages/samba-4.8.3-4.el7.x86_64.rpm
4.Yum直接安装本地的rpm包,会自动查找当前系统上已有的仓库解决依赖关系
[root@qls ~]# yum localinstall samba-4.8.3-4.el7.x86_64.rpm
5.如果误删除某个软件的配置文件,可以使用reinstall进行重装
[root@qls ~]# yum reinstall vsftpd
6.更新所有的软件包,包括内核(刚装好系统时进行一次升级)
[root@qls ~]# yum update acl -y
[root@qls ~]# yum update -y
7.如何去删除一个软件包
[root@qls ~]# yum remove samba -y
8.查看正在使用的仓库基本信息
[root@qls ~]# yum repolist
[root@qls ~]# yum repolist all 查看所有的仓库
#启用和禁用仓库
[root@qls ~]# yum install https://dev.mysql.com/get/mysql80-community-release-el7-3.noarch.rpm
[root@qls ~]# yum repolist all|grep mysql
[root@qls ~]# yum-config-manager --disable mysql80-community #关闭仓库
[root@qls ~]# yum-config-manager --enable mysql57-community #启用仓库
本质: 都是在修改repo文件中的enable的值 0 不启用 1 启用
9.查找一个命令或文件所属的软件包是什么?
[root@qls ~]# rpm -qf $(which cd)
bash-4.2.46-31.el7.x86_64
PS: rpm需要知道命令的绝对路径, 如果不存在该命令是无法查找到该命令所属的软件包
[root@qls ~]# yum provides cd
[root@qls ~]# yum provides ifconfig
PS1: yum不需要知道命令的绝对路径,只需要知道完整的命令即可.
PS2: yum会通过所有已启用的仓库进行查找那些软件包中涵盖了需要查询的命令
以后: 查询命令来自于哪个软件,使用yum的方式进行查询
1.如果查询不到,检查命令是否写错,如果写错,修改即可.
2.如果修改命令还是查询不到,请检查是否仓库真的没有软件包涵盖此命令, 建议添加更多yum源(仓库)
10.组包的安装与卸载
[root@qls ~]# yum groups install Development Tools
[root@qls ~]# yum groups remove -y Base
11.如何使用Yum缓存已经安装过了的软件包
#缓存rpm包方式一、修改yum全局配置文件
[root@qls ~]# vim /etc/yum.conf
[main]
cachedir=/var/cache/yum/$basearch/$releasever
keepcache=1 #启动缓存
#缓存rpm包方式二,只下载不安装
[root@qls ~]# yum install httpd -y --downloadonly --downloaddir=/tmp
#1.先清空
[root@qls ~]# yum clean packages
#当你的yum出现问题,进行了一次替换后,你需要执行 yum clean all
#2.开启缓存,然后再下载软件包
12.Yum的历史记录
#1.查看历史执行yum命令
[root@qls ~]# yum history
#2.查询历史执行yum命令ID详细信息
[root@qls ~]# yum history info ID
#3.撤销历史执行过的yum命令
[root@qls ~]# yum history undo ID
5. Yum总结
yum是管理rpm包的工具,能够自动解决依赖,同时能实现联网下载,极其方便.
常用选项说明:
#安装 yum install httpd httpd-tools
#卸载 yum remove httpd httpd-tools
#重装 yum reinstall httpd #不小心删除了配置文件的时
#更新 yum check-update #检查能更新的软件包
yum update -y #更新所有软件包,包括内核
yum update httpd -y #更新某个软件包
#查看 yum list #列出可用仓库中所有的软件包
yum provides command/file #联网查询命令所属的软件包
#仓库 yum repolist all #查看所有仓库,包括已启用或禁用的
#缓存 vim /etc/yum.conf #keepcache=1 即可开启缓存
3. Yum搭建本地仓库
1. Yum搭建本地仓库-单台
1.挂载cd光盘,因为里面很多的软件包
[root@qls ~]# mount /dev/cdrom /mnt
2.创建一个本地的仓库
[root@qls ~]# cd /etc/yum.repos.d/
[root@qls yum.repos.d]# gzip *
[root@qls yum.repos.d]# cat local.repo
[LocalBase] #真实的仓库名称
name=This is Local Base #当前仓库的描述
baseurl=file:///mnt #仓库所在的路径,可以是 http:// https:// ftp:// file://
enabled=1 #启用当前的仓库,默认是启用的
gpgcheck=0 #校验安装的rpm是否是合法的,0表示不校验
3.使用当前本地的仓库
[root@qls yum.repos.d]# yum makecache#服务器的包信息下载到本地电脑缓存起来
[root@qls yum.repos.d]# yum repolist
Loaded plugins: fastestmirror, langpacks
Loading mirror speeds from cached hostfile
repo id repo name status
LocalBase This is Local Base 4,021
repolist: 4,021
2. 共享给局域网中的所有主机
环境准备:
10.0.0.99 #作为yum仓库
10.0.0.98 #作为使用yum仓库的客户端
1.搭建一个Yum仓库
1.1.初始环境
[root@qls ~]# systemctl disable firewalld #关闭开机自动启动firewalld防火墙
[root@qls ~]# systemctl stop firewalld #现在立即关闭firewalld防火墙
[root@qls ~]# setenforce 0 #关闭selinux防火墙
[root@qls ~]# sed -i 's#^SELINUX=.*#SELINUX=disabled#g' /etc/selinux/config #关闭开机自启动
1.2.安装Ftp服务,并启动
[root@qls ~]# yum install vsftpd -y #安装ftp服务
[root@qls ~]# systemctl start vsftpd #启动ftp服务
[root@qls ~]# systemctl status vsftpd #查看ftp服务状态是否是active Running
3.给Ftp共享的目录准备基础软件包
[root@qls ~]# mkdir /var/ftp/centos7 #创建基础base仓库
[root@qls ~]# mount /dev/cdrom /mnt/ #挂载磁盘
[root@qls ~]# find /mnt/Packages/ -type f -name "*.rpm" |xargs -I {} cp -rp {} /var/ftp/centos7/
1.5.将ftp对应的目录生成为Yum的仓库
[root@qls ~]# yum install createrepo -y
[root@qls ~]# createrepo /var/ftp/centos7/
1.6.客户端指向并使用内部的Yum仓库
[root@client yum.repos.d]# gzip *
[root@client yum.repos.d]# cat ftp_99.repo
[FtpRepos]
name = This is Ftp Share Repos
baseurl = ftp://10.0.0.99/centos7/
enabled = 1
gpgcheck = 0
[root@client yum.repos.d]# yum makecache
[root@client yum.repos.d]# yum repolist
Loaded plugins: fastestmirror, langpacks
Loading mirror speeds from cached hostfile
repo id repo name status
LocalBase This is Local Base 4,021
repolist: 4,021
4. 源码包管理
1.下载Nginx的源码包
[root@qls ~]# wget http://nginx.org/download/nginx-1.16.0.tar.gz
2.解压源码包
[root@qls ~]# tar xf nginx-1.16.0.tar.gz
3.对软件进行各种自定义操作
[root@qls ~]# cd nginx-1.16.0/
[root@qls nginx-1.16.0]# ./configure --prefix=/soft/nginx-1.16.0 --with-http_ssl_module
--prefix编译的时候用来指定程序存放路径
4.生成makfile后,根据makefile的文件进行编译 使用make命令
[root@qls nginx-1.16.0]# make
5.将编译好的二进制文件和配置文件,拷贝到./configure指定的目录
[root@qls nginx-1.16.0]# make install
6.将程序设定一个软连接,便于后续的升级
[root@qls soft]# ln -s /soft/nginx-1.16.0/ /soft/nginx
7.执行二进制文件,然后在浏览器中输入当前服务器的IP地址,测试是否有welcome to nginx
[root@qls ~]# /soft/nginx/sbin/nginx
注意:现在百分之90,能用上的软件,都提供了rpm包. --->使用户可以使用yum直接安装使用.
8.编译过程中的报错解决
[root@qls nginx-1.16.0]# ./configure --prefix=/soft/nginx-1.16.0 --with-http_ssl_module
checking for OS
Linux 3.10.0-957.el7.x86_64 x86_64
checking for C compiler ... not found
./configure: error: C compiler cc is not found
#解决:
[root@qls yum.repos.d]# yum install gcc
./configure: error: the HTTP rewrite module requires the PCRE library.
You can either disable the module by using --without-http_rewrite_module
option, or install the PCRE library into the system, or build the PCRE library
statically from the source with nginx by using --with-pcre=<path> option.
#解决:
[root@qls nginx-1.16.0]# yum install pcre-devel pcre -y
./configure: error: SSL modules require the OpenSSL library.
You can either do not enable the modules, or install the OpenSSL library
into the system, or build the OpenSSL library statically from the source
with nginx by using --with-openssl=<path> option.
#解决:
[root@qls nginx-1.16.0]# yum install openssl-devel -y
#整合:
[root@qls yum.repos.d]# yum install gcc pcre-devel pcre openssl-devel -y
/etc/default/grub
网卡名称字符含义
1、前2个字符的含义
en  以太网    Ethernet
wl  无线局域网  WLAN
ww   无线广域网  WWAN
2、第3个字符根据设备类型选择
o<index>           on-board device index number
s<slot>            hotplug slot index number
x<MAC>             MAC address
p<bus>s<slot>      PCI geographical location
p<bus>s<slot>      USB port number chain
修改网卡名称样式为ethx
如果不习惯使用新的命名规则,可以恢复使用传统的方式命名,编辑 grub 文件,增加两个变量,再使用 grub2-mkconfig 重新生成 grub 配置文件即可。
1、编辑 grub 配置文件
vim /etc/sysconfig/grub   # 其实是/etc/default/grub的软连接
# 为GRUB_CMDLINE_LINUX变量增加2个参数,具体内容如下(加粗):
GRUB_CMDLINE_LINUX="crashkernel=auto rd.lvm.lv=cl/root rd.lvm.lv=cl/swap net.ifnames=0 biosdevname=0 rhgb quiet"
2、重新生成 grub 配置文件
grub2-mkconfig -o /boot/grub2/grub.cfg然后重新启动 Linux 操作系统,通过 ip addr 可以看到网卡名称已经变为 eth0 。
3、修改网卡配置文件
原来网卡配置文件名称为 ifcfg-ens33,这里需要修改为 ethx 的格式,并适当调整网卡配置文件。
mv /etc/sysconfig/network-scripts/ifcfg-ens33 /etc/sysconfig/network-scripts/ifcfg-eth0
# 修改ifcfg-eth0文件如下内容(其它内容不变)
NAME=eth0
DEVICE=eth0
[root@localhost ~]# systemctl restart network.service    # 重启网络服务
注意:ifcfg-ens33 文件最好删除掉,否则重启 network 服务时候会报错。
运维的核心职责
1.保证网站数据不丢
2.保证网站稳定运行(网站7*24小时运行)
3.保证用户访问体验(访问网站速度快)
shutdown -h now 关机
shutdown -r now 重启


 1077
1077

 被折叠的 条评论
为什么被折叠?
被折叠的 条评论
为什么被折叠?
 到【灌水乐园】发言


