


 博客主要总结了前端页面的一些功能实现,包括引入样式文件、添加返回顶部按钮、让头部固定内容滚动、设置元素层级顺序以及实现登陆窗口栏图标显示等内容。
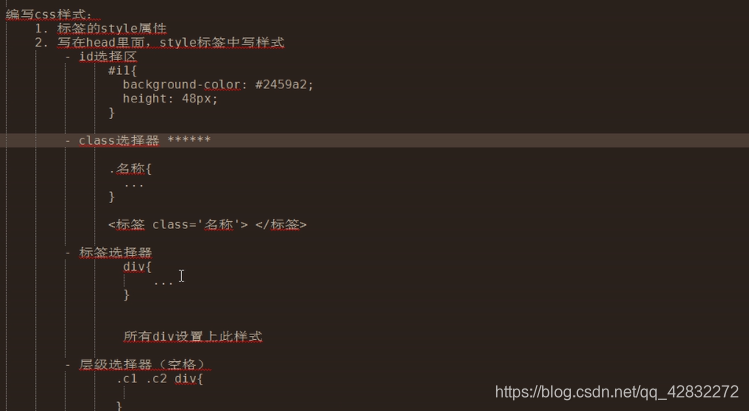
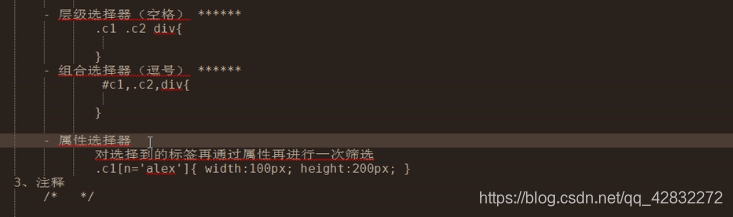
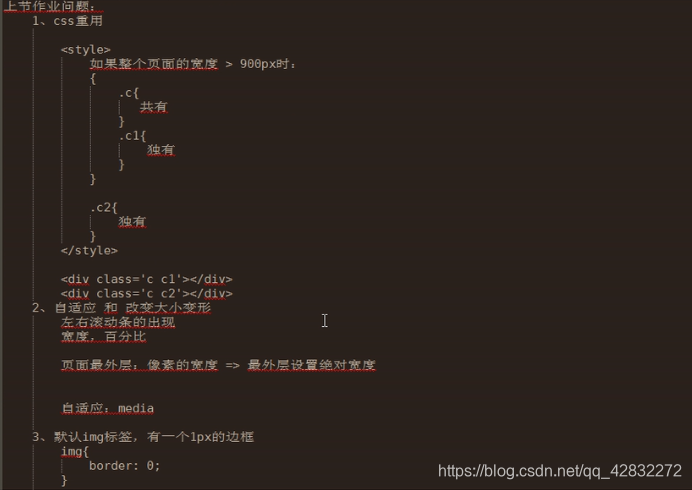
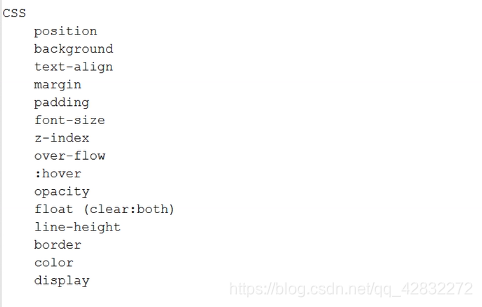
引入样式文件:


<!DOCTYPE html>
<html lang="en" xmlns="http://www.w4.org/1999/xhtml">
<head>
    <meta charset="utf-8" />
    <title></title>
</head>
<body>
   <div style="border:1px solid red;">
       sdfsdf
   </div>
    <!-- border边框
     1px: 1个像素宽度
     solid:线形,实线
     red:线的颜色
     -->
   <div style="height:48px;<!-- 高度-->
    width:200px;  <!-- 宽度-->
    border:1px solid red;<!--边框 -->
    font-size:18px;<!--字体大小 -->
    text-align:center;<!--水平居中 -->
    line-height:48px;<!--垂直居中 -->
    font-weight:bold;">
   <!--加粗 -->dsafdsf</div>
</body>
</html>

<!DOCTYPE html>
<html lang="en" xmlns="http://www.w4.org/1999/xhtml">
<head>
    <meta charset="utf-8" />
    <title></title>
    <style>
    .pg-header {
        height:38px;
        background-color:#dddddd;
        line-height:38px;
    }
    </style>
</head>
<body style="margin:0 auto;"> <!--占满两边-->>
   <div class="pg-header">
       <div style="float:left;">收藏本站</div>
       <div style="float:right;">
           <a>登陆</a>
           <a>注册</a>
       </div>
   </div>
   <div style="width:300px;border:1px solid red">
       <div style="width:96px;height:30px;border:1px solid green;float:left;"></div>
       <div style="width:96px;height:30px;border:1px solid green;float:left;"></div>
       <div style="width:96px;height:30px;border:1px solid green;float:left;"></div>
       <div style="width:96px;height:30px;border:1px solid green;float:left;"></div>
       <div style="width:96px;height:30px;border:1px solid green;float:left;"></div>
       <div style="width:96px;height:30px;border:1px solid green;float:left;"></div>
       <div style="width:96px;height:30px;border:1px solid green;float:left;"></div>
       <div style="clear:both;"></div> <!--保证父类的边框不会消失-->>


   </div>
</body>
</html>

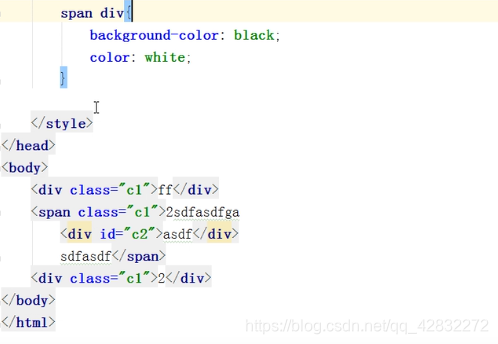
右下角固定一个返回顶部的按钮:
<!DOCTYPE html>
<html lang="en" xmlns="http://www.w3.org/1999/xhtml">
<head>
    <meta charset="utf-8" />
    <title></title>
</head>
<body>
    <div onclick="GoTop();"style="width:50px;height:50px;background-color:black;color:white;position:fixed;bottom:20px;right:20px;">返回顶部</div>
    <div style="height:5000px;background-color: #dddddd;">dsad</div>
    <script>
        function GoTop() {
            document.body.scrollTop = 0;
        }
    </script>
</body>
</html>
滚动滑轮,头部保持不动,内容随滑轮滚动而滑动:
<!DOCTYPE html>

<html lang="en" xmlns="http://www.w3.org/1999/xhtml">
<head>
    <meta charset="utf-8" />
    <title>Title</title>
    <style>
        .pg-header {
            height:48px;
            background-color:black;
            color:#dddddd;
            position:fixed;
            top:0;
            right:0;
            left:0;
        }
        .pg-body {
            background-color:#dddddd;
            height:5000px;
            margin-top:50px;
        }
    </style>
</head>
<body>
    <div class="pg-header">头部</div>
    <div class="pg-body">内容</div>
</body>
</html>
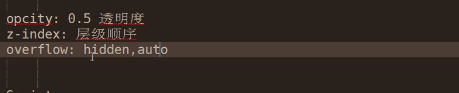
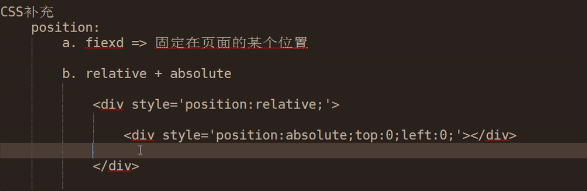
z-index:层级顺序,值越大,界面越在上方。
<!DOCTYPE html>

<html lang="en" xmlns="http://www.w3.org/1999/xhtml">
<head>
    <meta charset="utf-8" />
    <title>title</title>
</head>
<body>
    <div style="display:none;z-index:10;position:fixed;top:50%;left:50%;margin-left:-250px;margin-top:-200px;background-color:white;height:400px;width:500px;">

        <input type="text" />
        <input type="text" />
        <input type="text" />
    </div>

    <div style="display:none;z-index:9;position:fixed;background-color:black;
    top:0;
    bottom:0;
    right:0;
    left:0;
    opacity:0.5;"></div>
    <!--opacity:透明度,范围为0--1-->
    <div style="height:5000px;background-color:green;">
        sfdsf
    </div>
</body>
</html>
 <div style="height:200px;width:300px;overflow:hidden">
        <img src="1.jpg">
    </div>
    <!--overflow:hidden  图像超过范围则隐藏
    overflow:auto   图像超过范围出现滚动条-->
<!DOCTYPE html>

<html lang="en" xmlns="http://www.w5.org/1999/xhtml">
<head>
    <meta charset="utf-8" />
    <title>title</title>
    <style>
        .pg-header  {
            position:fixed;
            right:0;
            left:0;
            top:0;
            height:48px;
            background-color:#2459a2;
            line-height:48px;
        }
        .pg-body  {
            margin-top:50px;
        }
        .w {
            width:980px;
            margin:0 auto;
        }
        .pg-header.menu {
            display: inline-block;
            padding: 0 10px 0 10px;
            color: white;
        }
        /*当鼠标移动到当前标签上时,以下css属性才生效
        鼠标移动到当前标签时,改变标签的颜色:hover*/
        .pg-header.menu:hover {
           background-color:blue;
        }
    </style>
</head>
<body>
    <div class="pg-header">
        <div class="w">
            <a class="logo">LOGO</a>
            <a class="menu">全部</a>
            <a class="menu">段子</a>
            <a class="menu">42区</a>
            <a class="menu">1024</a>
        </div>
    </div>
    <div class="pg-body">
        <div class="w">dfsfa</div>
    </div>

</body>
</html>

实现登陆窗口栏有图标显示:

<html lang="en" xmlns="http://www.w5.org/1999/xhtml">
<head>
    <meta charset="utf-8" />
    <title>title</title>
    <style>

    </style>
</head>
<body>

    <div style="height:35px;width:400px;position:relative">
        <input typeof="text" style="height:35px;width:370px;padding-right:30px;">
        <span style="position:absolute;right:0;top:10px;background-image:url(i_name.jpg);height:20px;width:20px;display:inline-block;"></span>
    </div>
</body>
</html>
总结


 538
538

 被折叠的 条评论
为什么被折叠?
被折叠的 条评论
为什么被折叠?
 到【灌水乐园】发言


