


文章目录
本文重点讲解新设备开局初始化相关配置
Console管理台使用、登录认证、破解恢复密码
一、Console管理台使用和登录认证
使用SecureCRT连接设备(端口号参考设备管理器)
1.1 思科设备配置
1.1.1 基本配置流程
Router> enable                                                 # 进入特权模式
Router# show users                                             # 查看当前登录用户
Router# configure terminal                                     # 进入全局配置模式
Router(config)# line console 0                                 # 进入Console接口配置
Router(config-line)# password xxxxx                            # 设置Console密码
Router(config-line)# login                                     # 启用密码认证
Router(config-line)# write                                     # 保存配置
Router(config-line)# exit                                      # 退出配置模式
1.1.2 验证配置
- 退出后重新连接需输入密码验证
- 特权模式密码与Console密码需分开配置
1.2 华为设备配置
1.2.1 本地密码认证
<huawei> system-view                                               # 进入系统视图
[huawei] display users                                             # 查看登录用户信息
[huawei] user-interface console 0                                  # 进入Console接口
[huawei-ui-console0] authentication-mode password                  # 启用密码认证
[huawei-ui-console0] set authentication password cipher XXXX       # 设置密文密码
[huawei] quit                                                      # 退出配置模式
<huawei> save                                                      # 保存配置
1.2.2 AAA认证配置
[AR1] user-interface console 0                                     # 进入console接口
[AR1-ui-console0] authentication-mode aaa                          # 切换为AAA认证
[AR1] aaa
[AR1-aaa] local-user zhangsan privilege level 3 password cipher zhangsan      # 创建用户zhangsan并设置密码,设置用户级别为3
#[AR1-aaa] local-user zhangsan password cipher zhangsan123         # 更改用户密码的方法
#[AR1-aaa] undo local-user zhangsan                                # 删除用户的方法
真实项目中,console配置还有最后一步,是在vlanif上配地址,作为远程的管理地址
二、远程管理协议Telnet和SSH配置
2.1 思科Telnet基本配置
R1(config)# enable password xxxx                                   # 设置特权密码
R1(config)# line vty 0 4                                           # 进入line模式对0-4线路进行配置
R1(config-line)# password xxxx                                     # 设置远程登录密码
R1(config-line)# transport input all                               # 允许所有远程协议
R1(config-line)# login                                             # 激活登录密码模式
2.2 华为Telnet基本配置
#[AR1] telnet server enable                                        # 开启Telnet服务,有些设备可能是关闭状态
[AR1] user-interface vty 0 4                                       # 进入line模式对0-4线路进行配置
[AR1-ui-vty0-4] protocol inbound ?                                 # 可以允许用哪些协议登录到设备。包括telnet/ssh/all三种
[AR1-ui-vty0-4] authentication-mode password
[AR1-ui-vty0-4] set authentication password cipher XXXX            # 设置本地密码
[AR1-ui-vty0-4] user privilege level 3                             # 设置用户权限
telnet配置之aaa相关配置
[AR1] user-interface vty 0 4                                     # 进入远程登录接口
[AR1-ui-console0] authentication-mode  aaa                       # 进入配置模式后,认证方式从password改为aaa
[AR1] aaa                                                        # 进入aaa模式
[AR1-aaa] local-user zhangsan password cipher zhangsan           # 创建新用户zhangsan并设置密码
[AR1-aaa] local-user zhangsan privilege level 3                  # 设置用户级别为3
[AR1-aaa] local-user zhangsan server-type telnet                 # 指定此用户用于访问telnet服务
ssh配置之aaa相关配置
[AR1] user-interface maximum-vty 15                               # 设置vty最多支持个数,最多15
[AR1] user-interface vty 0 14                                     # 设置vty 0到14
[AR1-ui-vty0-14] authentication-mode aaa                          # 设置为aaa模式,刚才已经创建了用户zhangsan,此处仍然有效
[AR1-ui-vty0-14] protocol inbound ssh                             # 设置允许的协议:telnet:只允许telnet协议;ssh:只允许ssh协议;all:都允许。
[AR1-aaa] local-user zhangsan service-type ssh terminal           # 进入aaa模式,设置用户远程时使用的协议ssh terminal
[AR1] rsa local-key-pair create                                   # 更改为只允许ssh后还需要在此视图输入此条命令,在输入y,回车,创建本地秘钥
[AR1] stelnet server enable                                       # 开启ssh,之后就可以使用ssh登录了
设置完使用ssh,选择协议使用ssh2,不要使用ssh1,然后就可以用其他机器远程管理了
三、FTP文件传输
3.1 思科TFTP操作
从路由器备份文件至电脑
电脑端运行软件TFTPD64,更改存放地址,默认地址无权限
R1# copy flash:xxxx.bin tftp: # 备份文件到TFTP服务器
回车后输入TFTP服务器地址
回车后输入是否更改文件名,传输成功
从电脑传输文件至路由器
R1# copy tftp: flash: # 传输文件至路由器端
回车后输入TFTP服务器地址
回车后输入需传输的文件名称,传输成功
R1(config)# boot system xxxx.bin # 进入全局配置模式后,设置用新镜像启动设备
R1(config)# tftp-server flash: # 可以把思科设备的flash:作为tftp服务器目录
3.2 华为FTP的实施
[AR1] telnet server enable                          # 在路由器上开启telnet服务(在真机上需要此命令)
[AR1] ftp server enable                             # 在路由器上开启ftp服务
[AR1] aaa                                           # 进入aaa视图
[AR1-aaa] local-user xxxx password cipher yyyy      # 增加用户xxxx,密码yyyy
[AR1-aaa] local-user xxxx server-type ssh ftp       # 设置用户服务类型为ssh和ftp
[AR1-aaa] local-user xxxx privilege level 15        # 设置用户权限为15
[AR1-aaa] local-user xxxx ftp-directory flash:      # 设置用户可操作目录为flash,即所有目录
[AR1-aaa] quit                                      # 退出aaa视图
[AR1] dis current-configuration configuration  aaa  # 查看aaa配置
<AR1> save  xxxx.zip                                # 保存当前配置到xxxx.zip文件
[AR2] ftp 200.1.1.2     						    # 用另一台路由器或设备远程连接AR1,并输入用户名密码
[AR2-ftp] get xxxx.zip 							    # 用ftp传输文件
[AR2] tftp 10.1.1.1 get xxxx.cc 				    # 如果思科或其他设备作为tftp服务器,华为设备可以作为客户端下载文件。
[AR2] tftp 192.168.127.1 put 20210201.cfg           # 如果思科或其他设备作为tftp服务器,华为设备也可以上传备份配置文件。
四、其他开具配置
4.1 用户界面管理
[AR1-ui-vty0-4]idle-timeout 10                    # 设置10分钟后自动退出登录
[AR1-ui-vty0-4]screen-length 512                  # 设置屏幕显示行数(最大512行)
[AR1-ui-vty0-4]history-command max-size 256       # 设置历史记录缓冲区容量(最大256条)
[AR1]display history-command                      # 查看历史命令记录
[AR1]undo info-center enable                      # 关闭日志实时弹幕(生产环境不推荐关闭)
4.2 端口镜像配置
[AR1]observe-port interface GigabitEthernet 0/0/1
[AR1]interface g0/0/0
[AR1-g0/0/0]mirror to observe-port both
[AR1]dis cur interface g0/0/0                    # 验证端口镜像配置
4.3 系统时钟管理
<AR1>clock timezone BJ add 08:00                         # 设置时区(北京时区+8)
<AR1>clock datetime 20:00:00 2023-12-07                  # 设置具体日期时间
<AR1>display clock                                       # 显示系统时钟
[AR1]ntp-service unicast-server 1.1.1.1                  # 配置NTP服务器(示例IP)
[AR1]header login information "Authorized Access Only"         # 登录前提示信息
[AR1]header shell information "System Maintenance Mode"        # 登录后提示信息
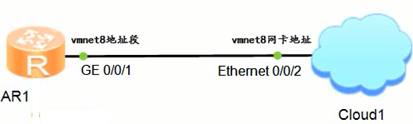
五、ENSP云桥接配置
5.1 网络适配器绑定
-
绑定网卡类型选择:
vmnet8虚拟网卡(推荐实验环境)- 物理网卡(生产环境不推荐)
-
传输协议选择:
- 必须选择
UDP协议
- 必须选择
-
端口映射设置:
- 入口方向选择
1 - 出口方向选择
2 - 勾选
双向通道选项 - 点击
增加完成配置
- 入口方向选择
-
建议关闭防火墙
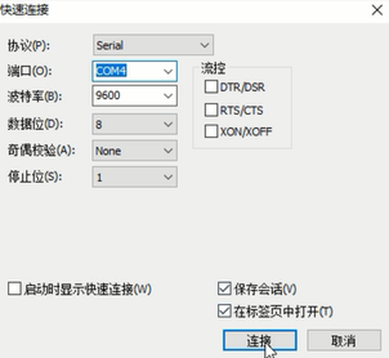
六、SecureCRT连接配置
6.1 基础连接方法
- 点击
快速连接按钮 - 协议选择:
Telnet - 主机地址:
127.0.0.1 - 端口号:从ENSP设备属性面板获取
6.2 字符乱码解决方案
选项 -> 全局选项 -> 常规 -> 默认会话 -> 编辑默认设置 -> 连接 -> Telnet
勾选"强制每次一个字符模式",应用设置后重新连接
默认认证信息:
- 用户名:
admin - 密码:
admin@huawei.com(注意大小写)
七、华为设备的系统维护操作
7.1 配置保存与恢复
<AR1>display current-configuration             		      # 查看内存中的当前配置
<AR1>save											      # 保存配置到存储设备
<AR1>display saved-configuration				          # 查看已保存配置
<AR1>compare configuration 							      # 比较运行与保存配置差异
<AR1>save 20231208.cfg 									  # 指定配置文件名保存
<AR1>display startup 									  # 查看启动配置文件信息
<AR1>startup saved-configuration flash:/20231208.cfg      # 指定下次启动配置
<AR1>reset saved-configuration 						      # 清除已保存配置(需reboot生效)
<AR1>format flash:                                         # 格式化磁盘(如果有需要)
7.2 系统升级操作
<AR1>tftp 10.1.1.3 put 20210201.cfg                       # 上传配置文件到TFTP服务器
<AR1>tftp 10.1.1.3 get system.cc                          # 下载系统文件
<AR1>startup system-software system.cc				      # 指定系统软件版本
<AR1>startup patch flash:/hotfix.pat 				      # 安装系统补丁
八、密码恢复方案
8.1 思科设备恢复
启动时按Ctrl+break(真机)/Ctrl+C(模拟器)进入ROMMON模式
rommon 1> confreg 0x2142    #修改寄存器值
rommon 2> reset
Router(config)# config-register 0x2102           #重启进入路由器,进入全局配置模式在输入此命令即可
Router# copy startup-config running-config       #退出全局配置模式,载入以前的配置
Router(config)# enable secret NewPassword123!       #更改密码
Router# write
8.2 华为设备恢复
- 启动时按
Ctrl+B中断启动流程 - 输入默认密码(尝试以下组合):
admin@huawei.comAdmin@huawei.comhuawei空密码
- 选择
7.Clear password for console user清除console密码 - 选择
1. Boot with default mode保存刚才的操作
九、关键注意事项
- 配置保存前务必进行
compare configuration - 格式化存储设备将清除所有配置:
format flash: - NTP服务器地址需替换为实际企业地址
- 关闭日志输出(
undo info-center enable)仅限实验环境 - 防火墙设置可能影响云桥接功能,建议实验环境临时关闭


 1121
1121

 被折叠的 条评论
为什么被折叠?
被折叠的 条评论
为什么被折叠?
 到【灌水乐园】发言


