


 本文详细解析了Vue实例的生命周期,包括初始化、挂载、更新和销毁等阶段,通过代码示例展示了各生命周期钩子的调用顺序及应用场景。
每个 Vue 实例在被创建时都要经过一系列的初始化过程——例如,需要设置数据监听、编译模板、将实例挂载到 DOM 并在数据变化时更新 DOM 等。同时在这个过程中也会运行一些叫做生命周期钩子的函数,这给了我们在不同阶段添加自己的代码的机会。
Vue 生命周期方法的调用顺序
话不多说,先来一波代码,我们可以通过执行以下代码来学习其调用顺序。
<!DOCTYPE html>
<html lang="en">
<head>
    <meta charset="UTF-8">
    <meta name="viewport" content="width=device-width, initial-scale=1.0">
    <meta http-equiv="X-UA-Compatible" content="ie=edge">
    <title>vue生命周期学习</title>
    <script src="https://cdn.bootcss.com/vue/2.4.2/vue.js"></script>
    <script type="text/javascript">
        window.onload = function(){
            new Vue({
                // el:'#box',
                data:{
                    msg:'hello world'
                },
                beforeCreate:function(){
                    console.log( this.$el , '-------beforeCreate')
                },
                created:function(){
                    console.log( this.$el ,'-------created')
                },
                beforeMount:function(){
                    console.log( this.$el , '-------beforeMount')
                },
                mounted:function(){
                    console.log( this.$el , '-------mounted')
                },
                beforeUpdate:function(){
                    console.log( this.$el , '-------beforeUpdate')
                },
                updated:function(){
                    console.log( this.$el , '-------updated')
                    // setTimeout(() => {
                    //     this.$destroy();
                    // }, 2000);
                },
                beforeDestroy:function(){
                    console.log( this.$el , '-------beforeDestroy')
                },
                destroyed:function(){
                    console.log( this.$el , '-------destroyed')
                }
            });
        };
    </script>
</head>
<body>
<div id="box">
    <input type="text" v-model="msg"><br/>
    <h2>{{msg}}</h2>
</div>
</body>
</html>
注意:此时vue实例并未设置el属性。
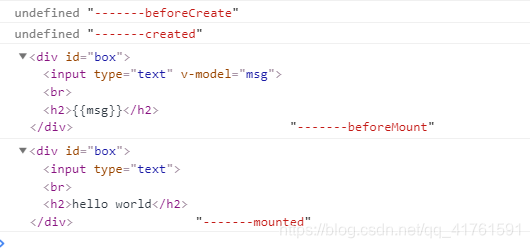
执行结果如下:

我们可以看到 beforeCreate()、created() 两个个生命周期方法被依次执行,而其他的生命周期方法并没有被触发执行。
如果接下来我们加上 el 属性
new Vue({
    el: '#app', // 设置 el 属性
    // ...
});
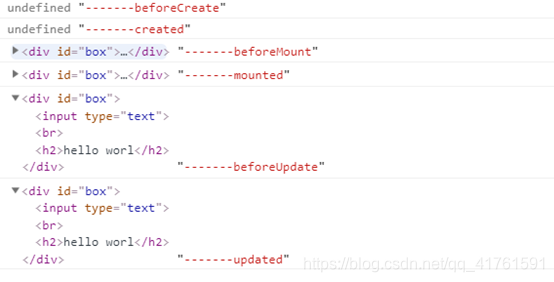
我们发现,再一次页面加载时触发了 beforeCreate, created, beforeMount, mounted 这几个钩子。
这里我们可以知道,在 new 一个 Vue 实例的时候,如果没有设置 el 属性或者调用 Vue 实例的 $mount() 方法,其实是只会执行 beforeCreate() 和 created() 方法。
原因在于,生命周期中的 mountd() 方法其实是把 Vue 实例中的 template属性里的 html 挂载到 el 属性对应的 dom 节点上,如果没有定义 el 属性或者没有调用 Vue 实例的 $mount() 方法,那么就无法执行挂载的动作,因为根本不知道要挂载到哪儿去。
同时,可以看到 vm.$ el 在各个生命周期中的值是不同的,在 beforeCreate() 和 created() 中是 undefined,在 beforeMount() 中变成了html 里div里面的内容但我们的msg并还没有渲染,等到执行 mounted() 方法时msg渲染到了页面里。而在 mounted() 方法之后,我们再调用生命周期的方法拿到的 vm.$el 都是跟 mounted() 方法中一样的。
因此,我们是无法在 beforeCreate() 和 created() 这两个生命周期中对 dom 做操作的,因为根本就拿不到 Vue 实例对应的那个 dom 节点,所以一般我们是会在 mounted() 中做一些与 dom 有关的操作。
我们再试着去更改 input 输入框中的内容,可以看到输入框上方的数据同步发生改变,这就是数据绑定的效果,在更新数据时触发 beforeUpdate 和 updated 钩子,且在 beforeUpdate 触发时,数据已更新完毕。
接下来我们试着在updated钩子里面添加以下代码。
setTimeout(() => {
    this.$destroy(); // 该方法会销毁 Vue 实例
}, 2000);
在重新进行上个更改输入框的步骤后,我们发现destroy 仅在调用app.$destroy();时触发,对 vue 实例进行le销毁。销毁完成后,我们再重新改变 msg 的值,vue 不再对此动作进行响应了。但是原先生成的dom元素还存在,可以这么理解,执行了destroy操作,后续就不再受vue控制了。
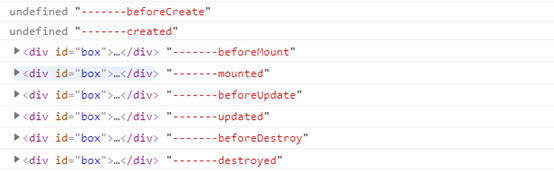
到此为止,我们的vue实例已经完成了从新建到销毁的整个流程。总结或许有许多不足,欢迎指出。
生命周期小结
生命周期钩子的一些使用方法:
beforecreate : 可以在这加个loading事件,在加载实例时触发
created : 初始化完成时的事件写在这里,如在这结束loading事件,异步请求也适宜在这里调用
mounted : 挂载元素,获取到DOM节点
updated : 如果对数据统一处理,在这里写上相应函数
beforeDestroy : 可以做一个确认停止事件的确认框
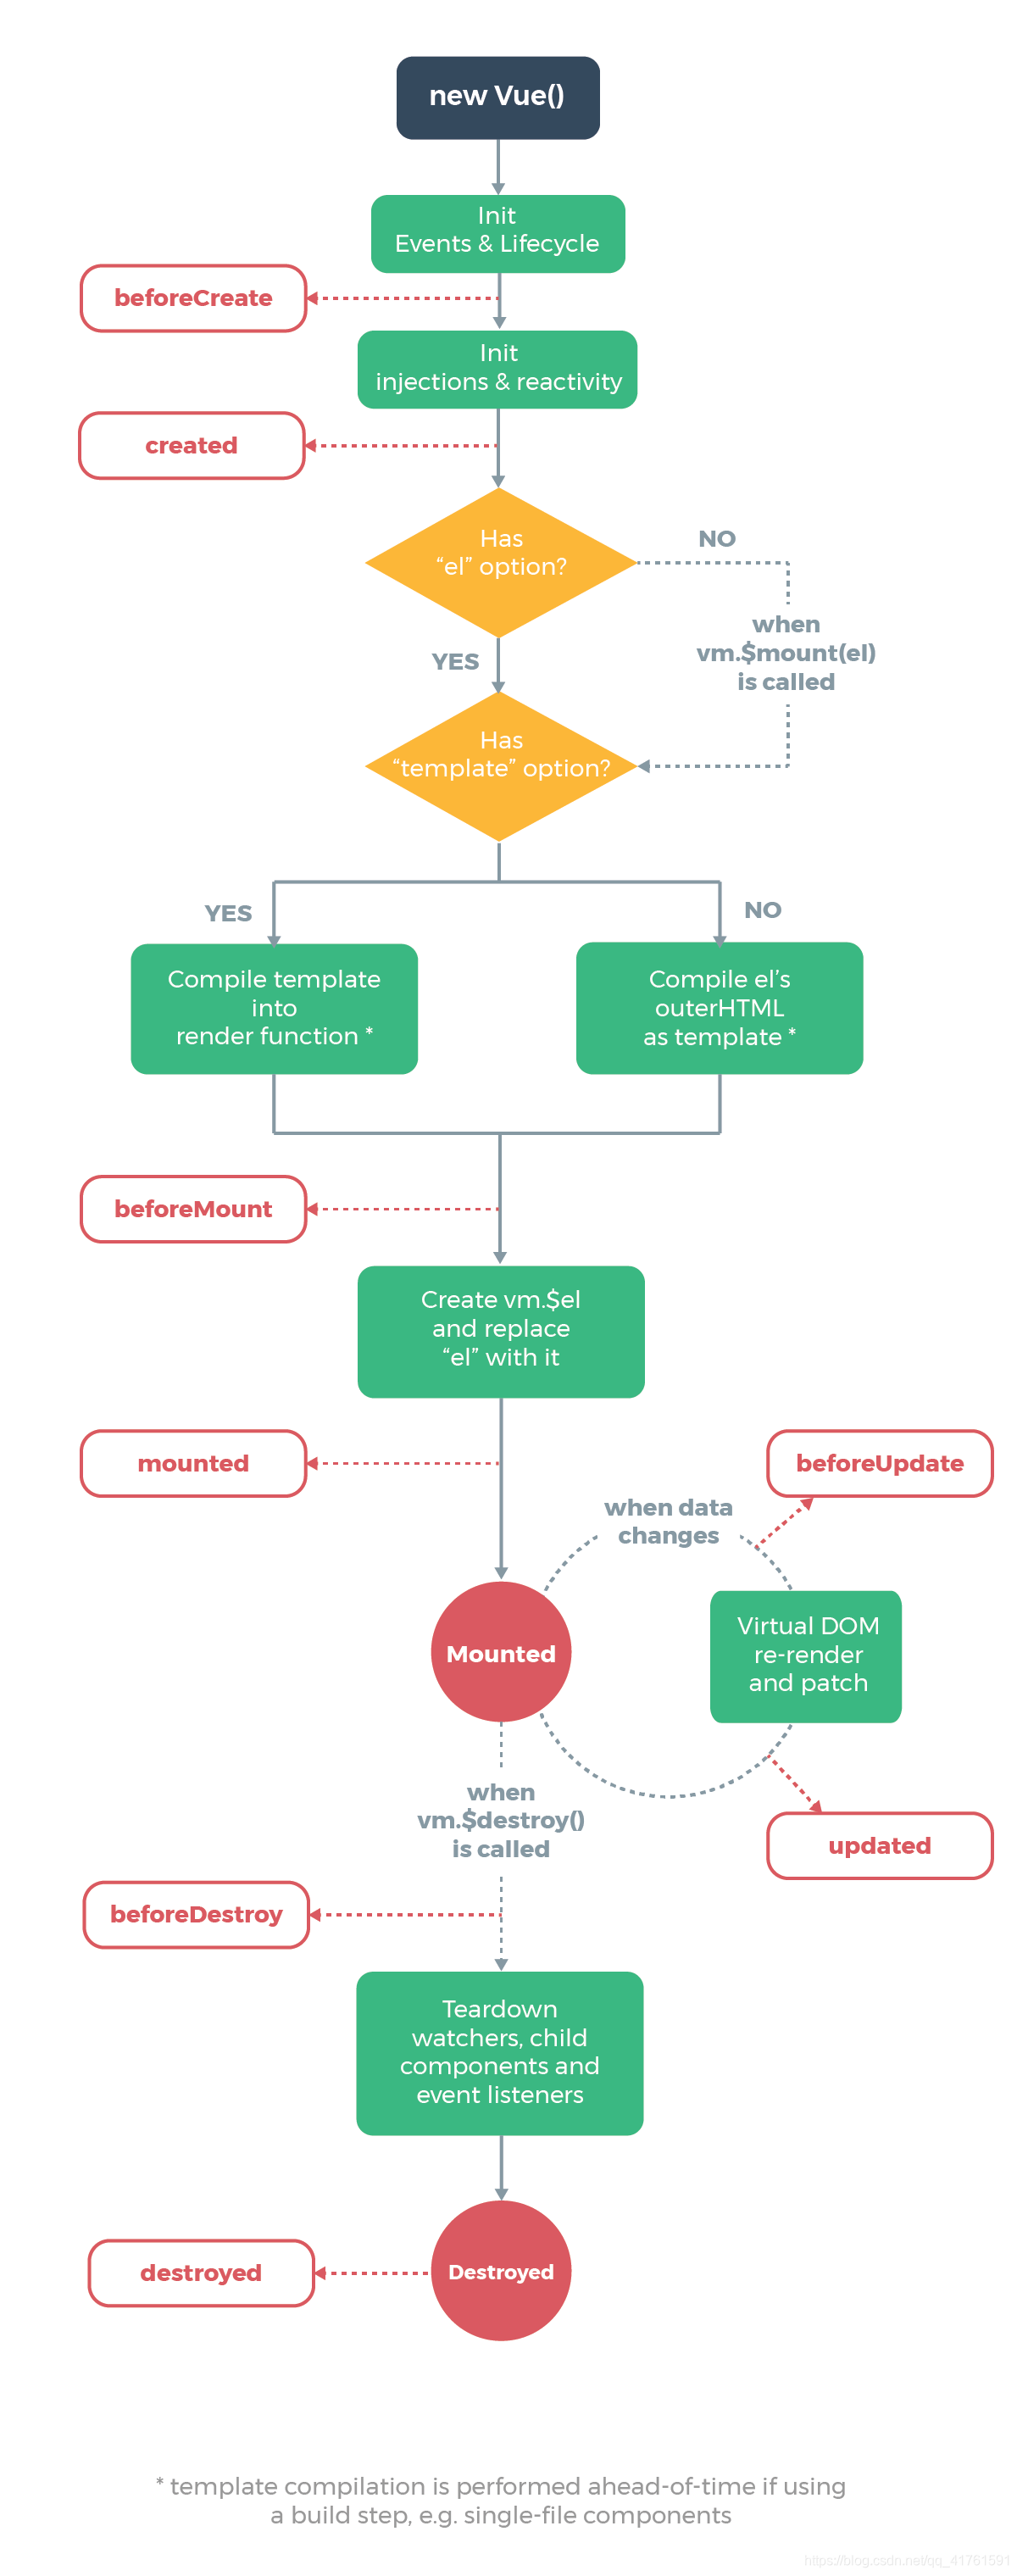
Vue生命周期图


 309
309

 被折叠的 条评论
为什么被折叠?
被折叠的 条评论
为什么被折叠?
 到【灌水乐园】发言


