


 本文详细介绍了消息队列MQ的基本概念,重点解析了RabbitMQ的原理与应用场景。通过Windows环境下的安装步骤,展示了RabbitMQ的安装与管理。接着,通过SpringBoot项目实践,演示了RabbitMQ的单生产者-单消费者、单生产者-多消费者、多生产者-多消费者、topic模式和广播模式的实现,帮助读者深入理解RabbitMQ的使用技巧。
今天闲来无事,复习了一早上,把 RabbitMQ 简单总结下,看着感觉能理解到精髓,请给个赞,多谢!!!
Now,步入正题!
1、什么是 MQ ?
首先,你肯定会去百度什么是 RabbitMQ,了解下这个东西到底是啥个鬼?到底有啥子用?对吧?
其实啊,大家都知道,MQ 都是用来做消息队列的,从字面意思上来看,本质是一个队列,FIFO 先入先出,只不过队列中存放的是 message(消息)而已。它的主要用途:不同进程Process/线程Thread之间通信。
而我们今天想学习的 RabbitMQ 只是一种 MQ 中的一种消息队列。
为什么会产生消息队列?有几个原因:
不同进程(process)之间传递消息时,两个进程之间耦合程度过高,改动一个进程,引发必须修改另一个进程,为了隔离这两个进程,在两进程间抽离出一层(一个模块),所有两进程之间传递的消息,都必须通过消息队列来传递,单独修改某一个进程,不会影响另一个;
不同进程(process)之间传递消息时,为了实现标准化,将消息的格式规范化了,并且,某一个进程接受的消息太多,一下子无法处理完,并且也有先后顺序,必须对收到的消息进行排队,因此诞生了事实上的消息队列;
当前 MQ 框架非常之多,比较流行的有RabbitMq、ActiveMq、ZeroMq、kafka,以及阿里开源的RocketMQ。
2、什么是 RabbitMQ ?
AMQP,即Advanced Message Queuing Protocol,高级消息队列协议,是应用层协议的一个开放标准,为面向消息的中间件设计。消息中间件主要用于组件之间的解耦,消息的发送者无需知道消息使用者的存在,反之亦然。 AMQP的主要特征是面向消息、队列、路由(包括点对点和发布/订阅)、可靠性、安全。 RabbitMQ是一个开源的AMQP实现,服务器端用Erlang语言编写,支持多种客户端,如:Python、Ruby、.NET、Java、JMS、C、PHP、ActionScript、XMPP、STOMP等,支持AJAX。用于在分布式系统中存储转发消息,在易用性、扩展性、高可用性等方面表现不俗。
RabbitMQ是一个消息代理 - 一个消息系统的媒介。它可以为你的应用提供一个通用的消息发送和接收平台,并且保证消息在传输过程中的安全。
开发语言为:Erlang –– 面向并发的编程语言。
3、网址
官网:
安装地址:
http://www.rabbitmq.com/download.html
Elang下载:
http://www.erlang.org/download/otp_win64_17.3.exe
接下来就要开始战斗了,准备好了吗?
4、安装RabbitMQ
打开 http://www.rabbitmq.com/download.html

5、下载完开始搭建 RabbitMQ 环境(当前所述皆为 Windows 环境下,LInux 环境下尚未研究)
a)下载 Elang:http://www.erlang.org/download/otp_win64_17.3.exe
下载完之后就跟平时安装软件一样,Next...Next 就可以了。

安装完成后,我们要安装 RabbitMQ 了。
b)双击打开 rabbitmq-server-3.7.15.exe
![]()

和安装软件一毛一样,下一步即可,安装完成。
然后打开开始菜单,就会看到下图:

c)双击启动管理工具 RabbitMQ Command Prompt (sbin dir)
输入命令:rabbitmq-plugins enable rabbitmq_management

这样我们就启动了管理工具。
如果启动/停止 RqbbitMQ,则输入下面的命令方可:
停止:net stop RabbitMQ
启动:net start RabbitMQ
见证奇迹的时刻到了,我们来看下成果。
d)打开浏览器,在地址栏输入 :http://127.0.0.1:15672

登陆界面出来了,用户名和密码都为 guest,然后登陆,就可以看到下方界面,说明我们的 RabbitMQ 安装成功了。

如果要管理功能的话,可以自行管理。


6、接下来,就要用项目验证了。
代码资源下载地址:https://download.youkuaiyun.com/download/qq_39415129/11557188
此项目是基于 SpringBoot 的,所以需要对 SpringBoot 要有一定的了解。
首先要引入 RabbitMQ 的依赖:
<dependency>
   <groupId>com.rabbitmq</groupId>
   <artifactId>amqp-client</artifactId>
   <version>3.4.1</version>
</dependency>
然后在 src/main/resources里新增 application.properties文件
spring.application.name=spirng-boot-rabbitmq
spring.rabbitmq.host=127.0.0.1
spring.rabbitmq.port=5672
spring.rabbitmq.username=guest
spring.rabbitmq.password=guest
我是将 SpringBoot 的主类改为了 Appllication,大家可以自行决定,当然也可不改。
主类代码很简单,最基本的 SpringBoot 启动类:
package com.rabbitmq;

import org.springframework.boot.SpringApplication;
import org.springframework.boot.autoconfigure.SpringBootApplication;

@SpringBootApplication
public class Application {

	public static void main(String[] args) {
		SpringApplication.run(Application.class, args);
	}

}
7、各种情景实现 消息队列。
a)单生产者 --- 单消费者
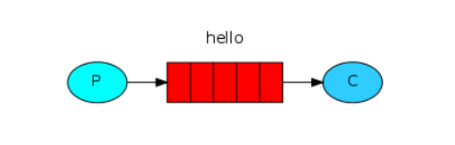
P:消息的生产者
C:消息的消费者
红色:队列
生产者将消息发送到队列,消费者从队列中获取消息。
生产者:
package com.rabbitmq.hello;

import java.util.Date;

import org.springframework.amqp.core.AmqpTemplate;
import org.springframework.beans.factory.annotation.Autowired;
import org.springframework.stereotype.Component;

@Component
public class HelloSender {

   @Autowired
    private AmqpTemplate rabbitTemplate;

    public void send() {
        String date = new SimpleDateFormat("yyyy-MM-dd HH:mm:ss").format(new Date());//24小时制
        String context = "hello " + date;
        System.out.println("Sender : " + context);
        //简单对列的情况下routingKey即为Q名
        this.rabbitTemplate.convertAndSend("queue_hello", context);
    }

}
消费者:
package com.rabbitmq.hello;

import org.springframework.amqp.rabbit.annotation.RabbitHandler;
import org.springframework.amqp.rabbit.annotation.RabbitListener;
import org.springframework.stereotype.Component;

@Component
@RabbitListener(queues = "queue_hello")
public class HelloReceiver {

    @RabbitHandler
    public void process(String hello) {
        System.out.println("Receiver  : " + hello);
    }
}
Controller:
package com.rabbitmq.test;

import org.springframework.beans.factory.annotation.Autowired;
import org.springframework.web.bind.annotation.PostMapping;
import org.springframework.web.bind.annotation.RequestMapping;
import org.springframework.web.bind.annotation.RestController;

import com.rabbitmq.hello.HelloSender;

@RestController
@RequestMapping("/rabbit")
public class RabbitMqHelloTest {

    @Autowired
    private HelloSender helloSender;

    @PostMapping("/hello")
    public void hello() {
        helloSender.send();
    }

}
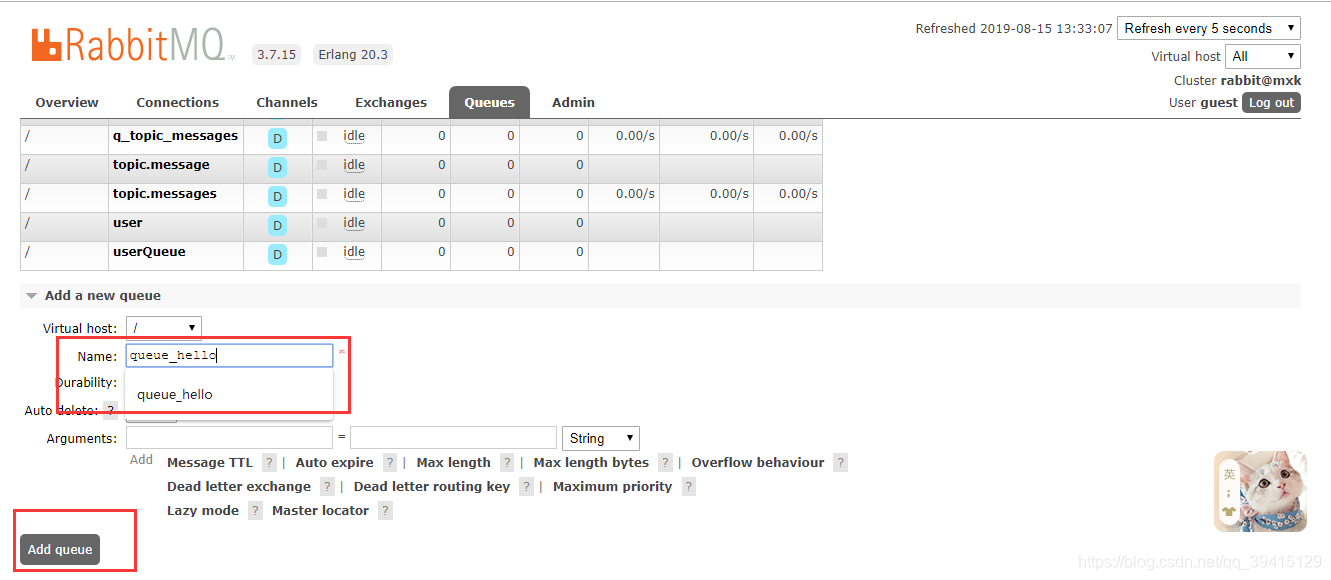
启动项目之前,我们来新建一个队列(queue),名字就叫queue_hello
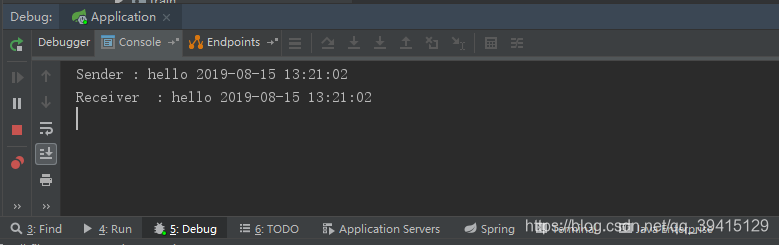
启动项目,PostMan 发送 post 请求:http://127.0.0.1:8080/rabbit/hello
控制台输出:
b)单生产者 --- 多消费者
生产者:
package com.rabbitmq.hello;

import org.springframework.amqp.core.AmqpTemplate;
import org.springframework.beans.factory.annotation.Autowired;
import org.springframework.stereotype.Component;

import java.text.SimpleDateFormat;
import java.util.Date;

@Component
public class HelloSender {
    @Autowired
    private AmqpTemplate rabbitTemplate;

    public void send() {
        String date = new SimpleDateFormat("yyyy-MM-dd HH:mm:ss").format(new Date());//24小时制
        String context = "hello " + date;
        System.out.println("Sender : " + context);
        //简单对列的情况下routingKey即为Q名
        this.rabbitTemplate.convertAndSend("queue_hello", context);
    }

    public void send(int i) {
        String date = new SimpleDateFormat("yyyy-MM-dd HH:mm:ss").format(new Date());//24小时制
        String context = "hello " + i + " " + date;
        System.out.println("Sender : " + context);
        //简单对列的情况下routingKey即为Q名
        this.rabbitTemplate.convertAndSend("helloQueue", context);
    }

}
消费者1:
package com.rabbitmq.hello;

import org.springframework.amqp.rabbit.annotation.RabbitHandler;
import org.springframework.amqp.rabbit.annotation.RabbitListener;
import org.springframework.stereotype.Component;

@Component
@RabbitListener(queues = "helloQueue")
public class HelloReceiver1 {

    @RabbitHandler
    public void process(String hello) {
        System.out.println("Receiver1  : " + hello);
    }

}
消费者2:
package com.rabbitmq.hello;

import org.springframework.amqp.rabbit.annotation.RabbitHandler;
import org.springframework.amqp.rabbit.annotation.RabbitListener;
import org.springframework.stereotype.Component;

@Component
@RabbitListener(queues = "helloQueue")
public class HelloReceiver2 {

    @RabbitHandler
    public void process(String hello) {
        System.out.println("Receiver2  : " + hello);
    }

}
Controller:
package com.rabbitmq.test;

import org.springframework.beans.factory.annotation.Autowired;
import org.springframework.web.bind.annotation.PostMapping;
import org.springframework.web.bind.annotation.RequestMapping;
import org.springframework.web.bind.annotation.RestController;

import com.rabbitmq.callback.CallBackSender;
import com.rabbitmq.fanout1.FanoutSender;
import com.rabbitmq.hello.HelloSender;
import com.rabbitmq.hello.HelloSender1;
import com.rabbitmq.hello.HelloSender2;
import com.rabbitmq.topic1.TopicSender;
import com.rabbitmq.user.UserSender;

@RestController
@RequestMapping("/rabbit")
public class RabbitMqHelloTest {

    @Autowired
    private HelloSender helloSender;
    @Autowired
    private HelloSender1 helloSender1;

    @PostMapping("/hello")
    public void hello() {
        helloSender.send();
    }

    @PostMapping("/oneToMany")
    public void oneToMany() throws Exception {
	for (int i = 0; i < 10; i++) {
		helloSender.send(i);
		Thread.sleep(300);
	}
    }

}
启动项目,PostMan 发送 post 请求:http://127.0.0.1:8080/rabbit/oneToMany
控制台输出:
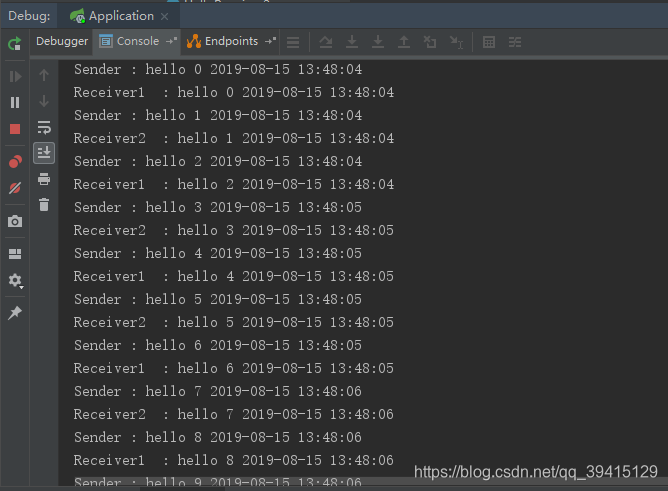
这下我们可以看出来,生产者生产出来的10条消息,分别被 消费者1 和 消费者2 接收消费了。
c)多生产者 --- 多消费者
生产者1:
import org.springframework.amqp.core.AmqpTemplate;
import org.springframework.beans.factory.annotation.Autowired;
import org.springframework.stereotype.Component;

@Component
public class HelloSender1 {

    @Autowired
    private AmqpTemplate rabbitTemplate;

    public void send(String msg) {
        String sendMsg = msg + new Date();
        System.out.println("Sender1 : " + sendMsg);
        this.rabbitTemplate.convertAndSend("helloQueue", sendMsg);
    }

}
生产者2:
package com.rabbitmq.hello;

import java.util.Date;

import org.springframework.amqp.core.AmqpTemplate;
import org.springframework.beans.factory.annotation.Autowired;
import org.springframework.stereotype.Component;

@Component
public class HelloSender2 {

    @Autowired
    private AmqpTemplate rabbitTemplate;

    public void send(String msg) {
        String sendMsg = msg + new Date();
        System.out.println("Sender2 : " + sendMsg);
        this.rabbitTemplate.convertAndSend("helloQueue", sendMsg);
    }

}
消费者1:
package com.rabbitmq.hello;

import org.springframework.amqp.rabbit.annotation.RabbitHandler;
import org.springframework.amqp.rabbit.annotation.RabbitListener;
import org.springframework.stereotype.Component;

@Component
@RabbitListener(queues = "helloQueue")
public class HelloReceiver1 {

    @RabbitHandler
    public void process(String hello) {
        System.out.println("Receiver1  : " + hello);
    }

}
消费者2:
package com.rabbitmq.hello;

import org.springframework.amqp.rabbit.annotation.RabbitHandler;
import org.springframework.amqp.rabbit.annotation.RabbitListener;
import org.springframework.stereotype.Component;

@Component
@RabbitListener(queues = "helloQueue")
public class HelloReceiver2 {

    @RabbitHandler
    public void process(String hello) {
        System.out.println("Receiver2  : " + hello);
    }

}
Controller:
package com.rabbitmq.test;

import org.springframework.beans.factory.annotation.Autowired;
import org.springframework.web.bind.annotation.PostMapping;
import org.springframework.web.bind.annotation.RequestMapping;
import org.springframework.web.bind.annotation.RestController;

import com.rabbitmq.callback.CallBackSender;
import com.rabbitmq.fanout1.FanoutSender;
import com.rabbitmq.hello.HelloSender;
import com.rabbitmq.hello.HelloSender1;
import com.rabbitmq.hello.HelloSender2;
import com.rabbitmq.topic1.TopicSender;
import com.rabbitmq.user.UserSender;

@RestController
@RequestMapping("/rabbit")
public class RabbitMqHelloTest {

    @Autowired
    private HelloSender helloSender;
    @Autowired
    private HelloSender1 helloSender1;

    @PostMapping("/hello")
    public void hello() {
        helloSender.send();
    }

    @PostMapping("/oneToMany")
    public void oneToMany() throws Exception {
	for (int i = 0; i < 10; i++) {
		helloSender.send(i);
		Thread.sleep(300);
	}
    }

    /**
     * 多生产者-多消费者
     */
    @PostMapping("/manyToMany")
    public void manyToMany() {
        for (int i = 0;i < 10;i++){
            helloSender1.send("helloNewMsg:" + i);
            helloSender2.send("helloNewMsg:" + i);
        }

    }

}
启动项目,PostMan 发送 post 请求:http://127.0.0.1:8080/rabbit/manyToMany
控制台输出:
Sender1 : helloNewMsg:0Thu Aug 15 13:54:22 CST 2019
Sender2 : helloNewMsg:0Thu Aug 15 13:54:22 CST 2019
Sender1 : helloNewMsg:1Thu Aug 15 13:54:22 CST 2019
Sender2 : helloNewMsg:1Thu Aug 15 13:54:22 CST 2019
Sender1 : helloNewMsg:2Thu Aug 15 13:54:22 CST 2019
Sender2 : helloNewMsg:2Thu Aug 15 13:54:22 CST 2019
Sender1 : helloNewMsg:3Thu Aug 15 13:54:22 CST 2019
Sender2 : helloNewMsg:3Thu Aug 15 13:54:22 CST 2019
Sender1 : helloNewMsg:4Thu Aug 15 13:54:22 CST 2019
Sender2 : helloNewMsg:4Thu Aug 15 13:54:22 CST 2019
Sender1 : helloNewMsg:5Thu Aug 15 13:54:22 CST 2019
Sender2 : helloNewMsg:5Thu Aug 15 13:54:22 CST 2019
Sender1 : helloNewMsg:6Thu Aug 15 13:54:22 CST 2019
Sender2 : helloNewMsg:6Thu Aug 15 13:54:22 CST 2019
Sender1 : helloNewMsg:7Thu Aug 15 13:54:22 CST 2019
Sender2 : helloNewMsg:7Thu Aug 15 13:54:22 CST 2019
Sender1 : helloNewMsg:8Thu Aug 15 13:54:22 CST 2019
Sender2 : helloNewMsg:8Thu Aug 15 13:54:22 CST 2019
Sender1 : helloNewMsg:9Thu Aug 15 13:54:22 CST 2019
Sender2 : helloNewMsg:9Thu Aug 15 13:54:22 CST 2019
Receiver1  : helloNewMsg:0Thu Aug 15 13:54:22 CST 2019
Receiver2  : helloNewMsg:0Thu Aug 15 13:54:22 CST 2019
Receiver2  : helloNewMsg:1Thu Aug 15 13:54:22 CST 2019
Receiver2  : helloNewMsg:2Thu Aug 15 13:54:22 CST 2019
Receiver2  : helloNewMsg:3Thu Aug 15 13:54:22 CST 2019
Receiver2  : helloNewMsg:4Thu Aug 15 13:54:22 CST 2019
Receiver1  : helloNewMsg:1Thu Aug 15 13:54:22 CST 2019
Receiver2  : helloNewMsg:5Thu Aug 15 13:54:22 CST 2019
Receiver1  : helloNewMsg:2Thu Aug 15 13:54:22 CST 2019
Receiver1  : helloNewMsg:3Thu Aug 15 13:54:22 CST 2019
Receiver2  : helloNewMsg:6Thu Aug 15 13:54:22 CST 2019
Receiver2  : helloNewMsg:7Thu Aug 15 13:54:22 CST 2019
Receiver2  : helloNewMsg:8Thu Aug 15 13:54:22 CST 2019
Receiver1  : helloNewMsg:4Thu Aug 15 13:54:22 CST 2019
Receiver1  : helloNewMsg:5Thu Aug 15 13:54:22 CST 2019
Receiver2  : helloNewMsg:9Thu Aug 15 13:54:22 CST 2019
Receiver1  : helloNewMsg:6Thu Aug 15 13:54:22 CST 2019
Receiver1  : helloNewMsg:7Thu Aug 15 13:54:22 CST 2019
Receiver1  : helloNewMsg:8Thu Aug 15 13:54:22 CST 2019
Receiver1  : helloNewMsg:9Thu Aug 15 13:54:22 CST 2019
从这可以看出,生产者1 和 生产者2 生产的20条消息被 消费者1 和 消费者2 均匀消费。和多对多一样。
d)topic 模式
生产者:
package com.rabbitmq.topic1;

import java.util.Date;

import org.springframework.amqp.core.AmqpTemplate;
import org.springframework.beans.factory.annotation.Autowired;
import org.springframework.stereotype.Component;

@Component
public class TopicSender {

    @Autowired
    private AmqpTemplate rabbitTemplate;

    public void send() {
        String msg1 = "I am topic.mesg msg======";
        System.out.println("sender1 : " + msg1);
        this.rabbitTemplate.convertAndSend("exchange", "topic.mesg", msg1);

        String msg2 = "I am topic.mesgs msg########";
        System.out.println("sender2 : " + msg2);
        this.rabbitTemplate.convertAndSend("exchange", "topic.mesgs", msg2);
    }

}
消费者1:
package com.rabbitmq.topic1;

import org.springframework.amqp.rabbit.annotation.RabbitHandler;
import org.springframework.amqp.rabbit.annotation.RabbitListener;
import org.springframework.stereotype.Component;

@Component
@RabbitListener(queues = "topic.mesg")
public class topicMessageReceiver {

    @RabbitHandler
    public void process(String msg) {
        System.out.println("topicMessageReceiver  : " +msg);
    }

}
消费者2:
package com.rabbitmq.topic1;

import org.springframework.amqp.rabbit.annotation.RabbitHandler;
import org.springframework.amqp.rabbit.annotation.RabbitListener;
import org.springframework.stereotype.Component;

@Component
@RabbitListener(queues = "topic.mesgs")
public class topicMessagesReceiver {

    @RabbitHandler
    public void process(String msg) {
        System.out.println("topicMessagesReceiver  : " +msg);
    }

}
Controller:
package com.rabbitmq.test;

import org.springframework.beans.factory.annotation.Autowired;
import org.springframework.web.bind.annotation.PostMapping;
import org.springframework.web.bind.annotation.RequestMapping;
import org.springframework.web.bind.annotation.RestController;

import com.rabbitmq.callback.CallBackSender;
import com.rabbitmq.fanout1.FanoutSender;
import com.rabbitmq.hello.HelloSender;
import com.rabbitmq.hello.HelloSender1;
import com.rabbitmq.hello.HelloSender2;
import com.rabbitmq.topic1.TopicSender;

@RestController
@RequestMapping("/rabbit")
public class RabbitMqHelloTest {

	@Autowired
	private HelloSender helloSender;
	@Autowired
	private HelloSender1 helloSender1;
	@Autowired
	private HelloSender2 helloSender2;

	@Autowired
	private TopicSender topicSender;

    @PostMapping("/hello")
    public void hello() {
        helloSender.send();
    }

	@PostMapping("/oneToMany")
	public void oneToMany() throws Exception {
		for (int i = 0; i < 10; i++) {
			helloSender.send(i);
			Thread.sleep(300);
		}
	}

	/**
     * 多生产者-多消费者
     */
    @PostMapping("/manyToMany")
    public void manyToMany() {
        for(int i = 0;i < 10;i++){
            helloSender1.send("helloNewMsg:" + i);
            helloSender2.send("helloNewMsg:" + i);
        }

    }

    /**
     * 实体类传输测试
     */
    @PostMapping("/userTest")
    public void userTest() {
           userSender.send();
    }

    /**
     * topic exchange类型rabbitmq测试
     */
    @PostMapping("/topicTest")
    public void topicTest() {
           topicSender.send();
    }

}
启动项目,PostMan 发送 post 请求:http://127.0.0.1:8080/rabbit/topicTest
控制台输出:
sender1 : I am topic.mesg msg======
sender2 : I am topic.mesgs msg########
topicMessagesReceiver  : I am topic.mesg msg======
topicMessagesReceiver  : I am topic.mesgs msg########
由以上结果可知:sender1发送的消息,routing_key是“topic.mesg”,所以exchange里面的绑定的binding_key是“topic.mesg”,topic.#都符合路由规则;所以sender1发送的消息,两个队列都能接收到;
sender2发送的消息,routing_key是“topic.mesgs”,所以exchange里面的绑定的binding_key只有topic.#都符合路由规则;所以sender2发送的消息只有队列topic.mesgs能收到。
只要符合 topic 规则的生产者消息都会被一个消费者消费。
e)广播模式/订阅模式(fanout Exchange)
Fanout 就是我们熟悉的广播模式或者订阅模式,给Fanout转发器发送消息,绑定了这个转发器的所有队列都收到这个消息。
fanout.A、fanout.B、fanout.C 这三个队列都和 Application 中创建的 fanoutExchange 转发器绑定。
生产者:
package com.rabbitmq.fanout;

import org.springframework.amqp.core.AmqpTemplate;
import org.springframework.beans.factory.annotation.Autowired;
import org.springframework.stereotype.Component;

@Component
public class MsgSenderFanout {

    @Autowired
    private AmqpTemplate rabbitTemplate;

    public void send() {
        String context = "hi, fanout msg ";
        System.out.println("Sender : " + context);
        this.rabbitTemplate.convertAndSend("mybootfanoutExchange","", context);
    }
}
消费者A:
package com.rabbitmq.fanout;

import org.springframework.amqp.rabbit.annotation.RabbitHandler;
import org.springframework.amqp.rabbit.annotation.RabbitListener;
import org.springframework.stereotype.Component;

@Component
@RabbitListener(queues = "q_fanout_A")
public class ReceiverA {

    @RabbitHandler
    public void process(String hello) {
        System.out.println("AReceiver  : " + hello");
    }
}
消费者B:
package com.rabbitmq.fanout;

import org.springframework.amqp.rabbit.annotation.RabbitHandler;
import org.springframework.amqp.rabbit.annotation.RabbitListener;
import org.springframework.stereotype.Component;

@Component
@RabbitListener(queues = "q_fanout_B")
public class ReceiverB {

    @RabbitHandler
    public void process(String hello) {
        System.out.println("BReceiver  : " + hello);
    }
}
消费者C:
package com.rabbitmq.fanout;

import org.springframework.amqp.rabbit.annotation.RabbitHandler;
import org.springframework.amqp.rabbit.annotation.RabbitListener;
import org.springframework.stereotype.Component;

@Component
@RabbitListener(queues = "q_fanout_C")
public class ReceiverC {

    @RabbitHandler
    public void process(String hello) {
        System.out.println("CReceiver  : " + hello);
    }
}
RabbitMQ Exchange 绑定:
package com.rabbitmq.fanout;

import org.springframework.amqp.core.Binding;
import org.springframework.amqp.core.BindingBuilder;
import org.springframework.amqp.core.FanoutExchange;
import org.springframework.amqp.core.Queue;
import org.springframework.context.annotation.Bean;
import org.springframework.context.annotation.Configuration;

@Configuration
public class FanoutRabbitConfig {

    @Bean
    public Queue aMessage() {
        return new Queue("q_fanout_A");
    }

    @Bean
    public Queue bMessage() {
        return new Queue("q_fanout_B");
    }

    @Bean
    public Queue cMessage() {
        return new Queue("q_fanout_C");
    }

    @Bean
    FanoutExchange fanoutExchange() {
        return new FanoutExchange("mybootfanoutExchange");
    }

    @Bean
    Binding bindingExchangeA(Queue aMessage, FanoutExchange fanoutExchange) {
        return BindingBuilder.bind(aMessage).to(fanoutExchange);
    }

    @Bean
    Binding bindingExchangeB(Queue bMessage, FanoutExchange fanoutExchange) {
        return BindingBuilder.bind(bMessage).to(fanoutExchange);
    }

    @Bean
    Binding bindingExchangeC(Queue cMessage, FanoutExchange fanoutExchange) {
        return BindingBuilder.bind(cMessage).to(fanoutExchange);
    }
}
Controller:
package com.rabbitmq.fanout;

import org.springframework.beans.factory.annotation.Autowired;
import org.springframework.test.context.junit4.SpringRunner;
import org.springframework.web.bind.annotation.PostMapping;
import org.springframework.web.bind.annotation.RequestMapping;
import org.springframework.web.bind.annotation.RestController;

@RestController
@RequestMapping("/rabbitTest")
public class RabbitFanoutTest {

    @Autowired
    private MsgSenderFanout msgSender;

    @PostMapping("send")
    public void send1() throws Exception {
        msgSender.send();
    }
}
启动项目,PostMan 发送 post 请求:http://127.0.0.1:8080/rabbitTest/send
Sender : hi, fanout msg
AReceiver  : hi, fanout msg
BReceiver  : hi, fanout msg
CReceiver  : hi, fanout msg
由以上结果可知:就算 fanoutSender 发送消息的时候,指定了routing_key为"abcd.ee",但是所有接收者都接受到了消息
这就是所谓的 广播模式,也叫订阅模式,绑定了这个转发器的所有消费者都能消费到消息。
f)还有一种模式叫 :带callback的消息发送
今天暂时先讲到这。有空再追加,感谢各位的赞和关注。
我是进阶的球儿,大家一起2019年的爬坑历程。感觉分享很给力的话给个赞,谢谢!!!有问题也可以下方留言沟通。


 943
943

 被折叠的 条评论
为什么被折叠?
被折叠的 条评论
为什么被折叠?
 到【灌水乐园】发言


