


 博客介绍将IDEA项目运行到远程Linux Docker的方法。前提是开启Docker远程访问,修改服务文件、重新加载配置并重启服务。需安装Docker插件,若为最新版IDEA则已内置。还说明了编写Dockerfile文件、添加maven依赖、mvn打包等步骤。
前提条件:Docker开启远程访问
修改Docker服务文件:
vi /lib/systemd/system/docker.service
将文件内的ExecStart注释,添加如下代码:
ExecStart=/usr/bin/dockerd -H tcp://0.0.0.0:2375 -H unix://var/run/docker.sock
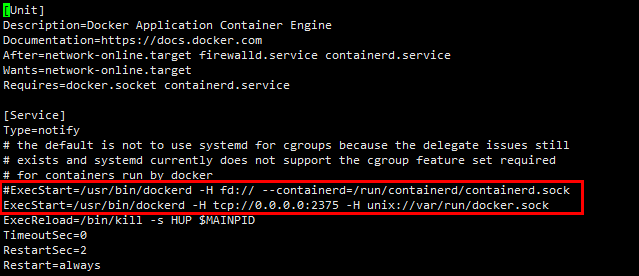
重新加载配置文件、重启Docker服务
systemctl daemon-reload
systemctl restart docker
查看端口号(若指令无法使用,执行yum install net-tools)
netstat -nplt |grep 2375

安装插件(最新版IDEA已经内置Docker插件)
-
Docker插件,首先需要在你的IDEA中安装Docker插件,定位到File-Setting-Plugins后搜索Docker Integration安装
-
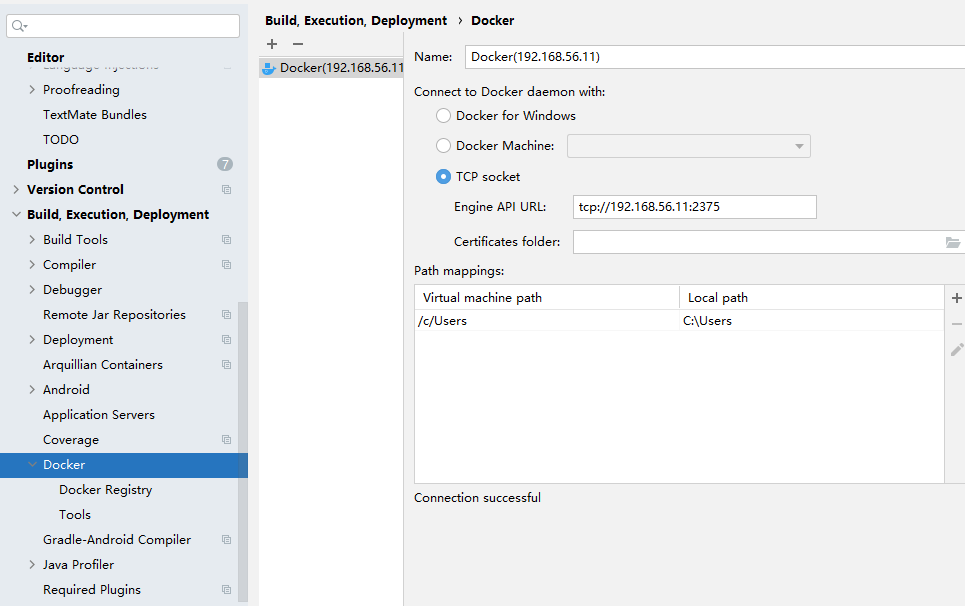
配置Docker服务器,在IDEA中定位到File-Setting-build,Execution,Deployment-Docker
运行 idea 项目到 远程 linux docker 上
1、编写 Dockerfile 文件
FROM jdk1.8:v1.0_271
EXPOSE 9000
WORKDIR /usr/local/data/myProject
VOLUME /usr/local/data
ADD shop.jar /usr/local/data/myProject
ENTRYPOINT ["java","-jar","/usr/local/data/myProject/shop.jar"]
ENV LANG en_US.UTF-8
ENV LANGUAGE en_US:UTF-8
ENV LC_ALL en_US.UTF-8
其中,jdk1.8:v1.0_271为自定义镜像。
2、添加 maven 依赖
 1 <build>
 2     <finalName>${project.artifactId}</finalName>
 3     <plugins>
 4         <plugin>
 5             <groupId>org.springframework.boot</groupId>
 6             <artifactId>spring-boot-maven-plugin</artifactId>
 7         </plugin>
 8
 9         <!--使用docker-maven-plugin插件-->
10         <plugin>
11             <groupId>com.spotify</groupId>
12             <artifactId>docker-maven-plugin</artifactId>
13             <version>1.0.0</version>
14
15             <!--将插件绑定在某个phase执行-->
16             <executions>
17                 <execution>
18                     <id>build-image</id>
19                     <!--将插件绑定在package这个phase上。也就是说,用户只需执行mvn package ,就会自动执行mvn docker:build-->
20                     <phase>package</phase>
21                     <goals>
22                         <goal>build</goal>
23                     </goals>
24                 </execution>
25             </executions>
26
27             <configuration>
28                 <!--指定生成的镜像名-->
29                 <imageName>zhangjianbin1991/${project.artifactId}</imageName>
30                 <!--指定标签-->
31                 <imageTags>
32                     <imageTag>latest</imageTag>
33                 </imageTags>
34                 <!-- 指定 Dockerfile 路径-->
35                 <dockerDirectory>${project.basedir}/src/main/docker</dockerDirectory>
36
37                  <!--指定远程 docker api地址-->
38                 <dockerHost>http://192.168.75.132:2375</dockerHost>
39
40                 <!-- 这里是复制 jar 包到 docker 容器指定目录配置 -->
41                 <resources>
42                     <resource>
43                         <targetPath>/</targetPath>
44                         <!--jar 包所在的路径  此处配置的 即对应 target 目录-->
45                         <directory>${project.build.directory}</directory>
46                         <!-- 需要包含的 jar包 ,这里对应的是 Dockerfile中添加的文件名 -->
47                         <include>${project.build.finalName}.jar</include>
48                     </resource>
49                 </resources>
50             </configuration>
51         </plugin>
52     </plugins>
53 </build>
此处,小编使用版本号+时间戳作为镜像tag
    <build>
        <!--${build.time} 错误提示不影响-->
        <!--<finalName>shop-v1.0.0_${build.time}</finalName>-->
        <finalName>${project.artifactId}</finalName>
        <plugins>
            <plugin>
                <groupId>org.springframework.boot</groupId>
                <artifactId>spring-boot-maven-plugin</artifactId>
                <configuration>
                    <includeSystemScope>true</includeSystemScope>
                    <fork>true</fork>
                </configuration>
            </plugin>
            <!-- 跳过单元测试 -->
            <plugin>
                <groupId>org.apache.maven.plugins</groupId>
                <artifactId>maven-surefire-plugin</artifactId>
                <configuration>
                    <skipTests>true</skipTests>
                </configuration>
            </plugin>

            <!--打包时间-->
            <plugin>
                <groupId>org.codehaus.mojo</groupId>
                <artifactId>build-helper-maven-plugin</artifactId>
                <version>1.10</version>
                <executions>
                    <execution>
                        <id>timestamp-property</id>
                        <goals>
                            <goal>timestamp-property</goal>
                        </goals>
                        <configuration>
                            <name>build.time</name>
                            <pattern>yyyyMMddHHmmss</pattern>
                            <locale>zh_CN</locale>
                            <timeZone>Asia/Shanghai</timeZone>
                        </configuration>
                    </execution>
                </executions>
            </plugin>

            <!--使用docker-maven-plugin插件-->
            <plugin>
                <groupId>com.spotify</groupId>
                <artifactId>docker-maven-plugin</artifactId>
                <version>1.0.0</version>

                <!--将插件绑定在某个phase执行-->
                <executions>
                    <execution>
                        <id>build-image</id>
                        <!--将插件绑定在package这个phase上。也就是说,用户只需执行mvn package ,就会自动执行mvn docker:build-->
                        <phase>package</phase>
                        <goals>
                            <goal>build</goal>
                        </goals>
                    </execution>
                </executions>

                <configuration>
                    <!--指定生成的镜像名-->
                    <imageName>shop/${project.artifactId}</imageName>
                    <!--指定标签-->
                    <imageTags>
                        <imageTag>v1.0.0_${build.time}</imageTag>
                    </imageTags>
                    <!-- 指定 Dockerfile 路径-->
                    <dockerDirectory>${project.basedir}/src/main/docker</dockerDirectory>

                    <!--指定远程 docker api地址-->
                    <dockerHost>http://192.168.56.11:2375</dockerHost>

                    <!-- 这里是复制 jar 包到 docker 容器指定目录配置 -->
                    <resources>
                        <resource>
                            <targetPath>/</targetPath>
                            <!--jar 包所在的路径  此处配置的 即对应 target 目录-->
                            <directory>${project.build.directory}</directory>
                            <!-- 需要包含的 jar包 ,这里对应的是 Dockerfile中添加的文件名 -->
                            <include>${project.build.finalName}.jar</include>
                        </resource>
                    </resources>
                </configuration>
            </plugin>
        </plugins>

        <!--打包时开启,排除yml-->
        <!--<resources>
            <resource>
                <directory>src/main/resources</directory>
                <excludes>
                    <exclude>**/application.properties</exclude>
                    <exclude>**/application.yml</exclude>
                </excludes>
            </resource>
        </resources>-->

    </build>
3、mvn 打包
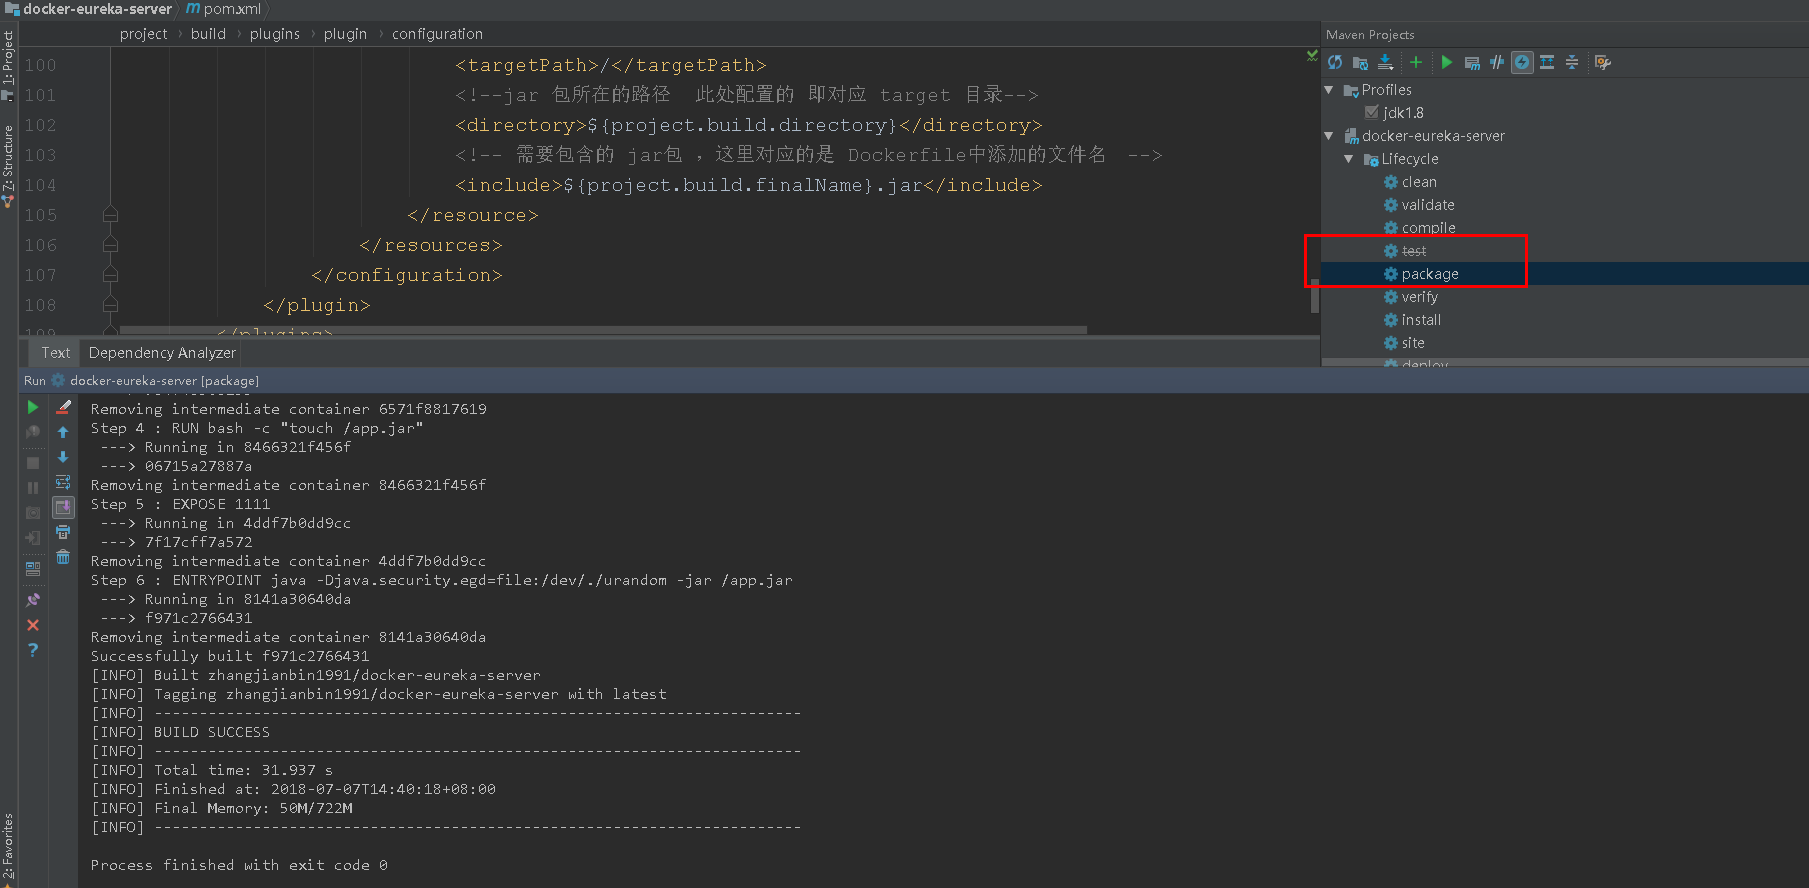
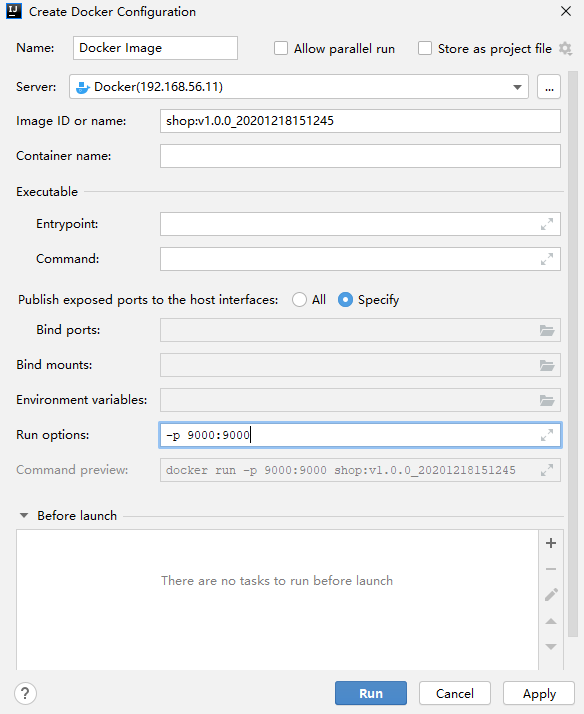
打包容器,启动容器前,完成端口映射


 1131
1131

 被折叠的 条评论
为什么被折叠?
被折叠的 条评论
为什么被折叠?
 到【灌水乐园】发言


