


 Pytorch2.0的核心是torch.compile,它能优化模型,提升运行速度,适用于训练和部署。TorchDynamo解析Python字节码,TorchInductor是神经网络编译器,两者旨在优化性能。虽然提升不比TensorRT显著,但使用简便且拓展性强。文章还提到了多个与Pytorch相关的编译和优化工具,并提供了性能测试示例。
一句话概括下,Pytorch2.0的功能介绍核心就是:torch.compile
opt_module = torch.compile(module)
一行代码就能优化你的模型,优化后的模型和往常使用方式一样
速度会提升,比较重要的一点是:可以用于训练或者部署,训练可以传梯度
这次是带有AOT autograd的
官方测试了三个模型仓库的模型,在A100的加速比如下:
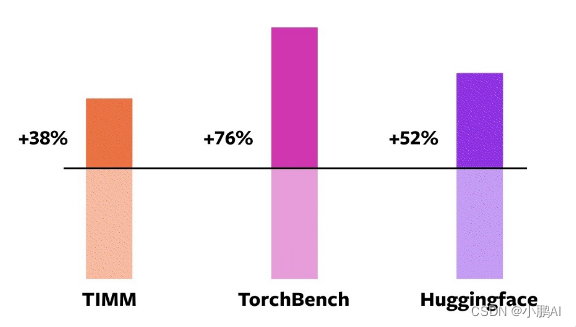
看提速,提升没有超一倍,相比TensorRT(TensorRT优化的话,一般都是2-6倍左右,当然要算FP16)
torch.compile优化级别还是差些的,性能肯定不是极致,更不如纯手工优化后的
不过胜在好用以及拓展性强,可以应付大部分的训练和部署场景,使用起来很方便
吐槽的一点,现在和Pytorch沾边的库越来越多了,加速模型的,部署模型的,编译器类型的, 大概有这些:
- torchscript(torch.jit)
- lazy tensor
- torch.fx
- torch::deploy
- AItemplate
- nvfuser
- TorchDynamo
- TorchInductor
- AOTAutograd
- PrimTorch
- torch_tensorrt
- functorch
- torch2trt
而这次2.0强调的是TorchDynamo和TorchInductor
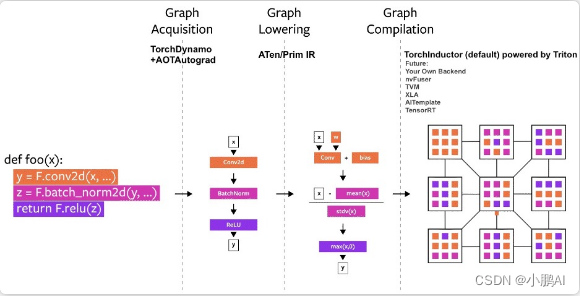
TorchDynamo: 是解析Python字节码,可以trace你的model
TorchInductor:是神经网络编译器,将pytorch模型lower为IR然后生成高性能的CUDA或者CPU代码
TorchDynamo相比fx和jit的trace,可以更方便地跟踪data-dependent分支,而且不像torch.script一样需要修改代码
感觉TorchDynamo就是加强普适版的fx和torchscript
而TorchInductor就是编译器,有对应的IR(define-by-run IR)
然后可以利用triton去codegen生成高性能的算子
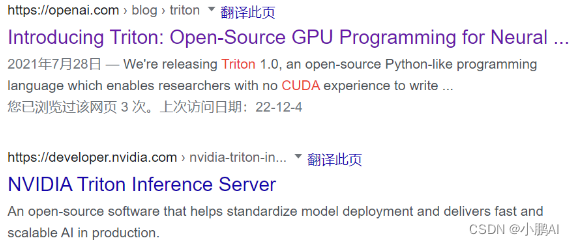
triton这个名字有点歧义哈,这里指的不是triton-server-inference
而是一个类似于TVMscript的可以通过python语法去写高性能GPU程序的
深度学习编译器大繁荣的时代来了,啥都要编译来干了
不管是之前的torchscript还是torch.fx
以及新出的TorchDynamo和TorchInductor,总之就是编译优化编译优化
编译器这块晦涩难懂,想要了解底层学习的,难度还是挺大(没时间学了)
希望Pytorch这个新的编译器,之后使用起来bug少一些,问题看起来直观一些…
这个Pytorch2.0版本其实就是1.14,只不过官方认为torch.compile这个功能意义重大,所以干脆2.0了
现在放出的是beta版,稳定版的话在明年3月
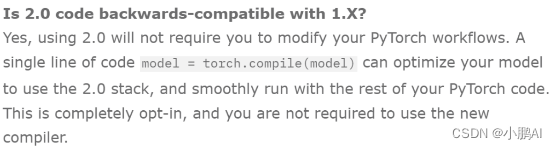
所以说对之前版本完全兼容
首先按照官网的要求来安装
pip3 install numpy --pre torch[dynamo] torchvision torchaudio --force-reinstall --extra-index-url https://download.pytorch.org/whl/nightly/cu117
然后跑几个模型试试,按照以下的方式进行测试
调用compiled_model = torch.compile(model)来对模型进行优化,对比优化前和优化后的速度以及余弦相似度
import torch
import time
import torch._dynamo
import torchvision.models as models

torch._dynamo.config.verbose=True
torch._dynamo.config.suppress_errors = True
torch.set_float32_matmul_precision('high')

model = models.resnet50().cuda()

print("prepare model and input")
dummy_input = torch.randn(1,3,1024,1024).cuda()

NITER = 300
print("warm...")
for _ in range(10):
    res = model(dummy_input)
    torch.cuda.synchronize()

print("begin eval ...")
torch.cuda.synchronize()
s = time.time()
for _ in range(NITER):
    res = model(dummy_input)
    torch.cuda.synchronize()

print('benchmark time (CUDA normal) (ms/iter)', (time.time() - s) / NITER * 1000)

compiled_model = torch.compile(model)
print("warm...")
for _ in range(10):
    res_compiled = compiled_model(dummy_input)
    torch.cuda.synchronize()

print("begin eval ...")
torch.cuda.synchronize()
s = time.time()
for _ in range(NITER):
    res_compiled = compiled_model(dummy_input)
    torch.cuda.synchronize()

print('benchmark time (torch.compiled) (ms/iter)', (time.time() - s) / NITER * 1000)
print("check res cosine_similarity")
assert (
    torch.nn.functional.cosine_similarity(
        res.flatten(), res_compiled.flatten(), dim=0
    )
    > 0.9999
)
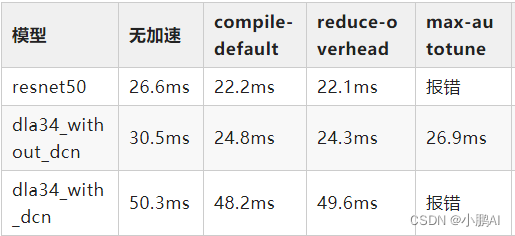
测试结果如下,输入都是torch.randn(1,3,1024,1024).cuda()
其中reduce-overhead和max-autotune为torch.compile函数中的优化参数
除了r50,我也试了下dla结构的模型,其中with_dcn是带了自定义cuda实现的pytorch-dcn算子
compile的优化细节还没有细看,可以简单看下官方的描述:
# API NOT FINAL
# default: optimizes for large models, low compile-time
#          and no extra memory usage
torch.compile(model)

# reduce-overhead: optimizes to reduce the framework overhead
#                and uses some extra memory. Helps speed up small models
torch.compile(model, mode="reduce-overhead")

# max-autotune: optimizes to produce the fastest model,
#               but takes a very long time to compile
torch.compile(model, mode="max-autotune")
reduce-overhead的意思是适合小模型
而max-autotune则是相当于trt或者tvm那样对整个模型进行编译优化了
选用这个的时候,compile的明显时间变长
我测试的几个模型没有明显提升甚至会编译失败,原因应该比较复杂,需要深入去看
放一个torch.compile的函数介绍:
def compile(model: Optional[Callable] = None, *,
            fullgraph: builtins.bool = False,
            dynamic: builtins.bool = False,
            backend: Union[str, Callable] = "inductor",
            mode: Union[str, None] = None,
            passes: Optional[Dict[str, Union[str, builtins.int, builtins.bool]]] = None,
            **kwargs) -> Callable:
    """
    Optimizes given model/function using Dynamo and specified backend

    Args:
       model (Callable): Module/function to optimize
       fullgraph (bool): Whether it is ok to break model into several subgraphs
       dynamic (bool): Use dynamic shape tracing
       backend (str or Callable): backend to be used
       mode (str): Can be either "default", "reduce-overhead" or "max-autotune"
       passes (dict): A dictionary of passes to the backend. Passes currently recognized by inductor backend:
                       - static-memory
                       - matmul-tune
                       - matmul-padding
                       - triton-autotune
                       - triton-bmm
                       - triton-mm
                       - triton-convolution
                       - rematerialize-threshold
                       - rematerialize-acc-threshold

    Example::

        @torch.compile(passes={"matmul-padding": True}, fullgraph=True)
        def foo(x):
            return torch.sin(x) + torch.cos(x)

    """
后续
Pytorch2.0的版本,可能Dynamo会成为主要的模型的parser替代torch.fx.trace和torch.jit.trace成为我们常用的工具
之后Pytorch转trt、转tvm、转乱七八槽一切也会慢慢往这个上头靠。。。
参考文献
- https://pytorch.org/get-started/pytorch-2.0
- https://mp.weixin.qq.com/s/yK_RDG6qB2rAOuMGqC5sWQ


 690
690

 被折叠的 条评论
为什么被折叠?
被折叠的 条评论
为什么被折叠?
 到【灌水乐园】发言


