


 本文详细介绍了Qt中树视图(TreeView)的多种操作技巧,包括禁用编辑、选择模式设置、行间颜色交替、焦点策略调整、节点展开与折叠、右键菜单功能实现,以及通过QSS为不同层级节点设置个性化样式。
常用函数
treeView->setEditTriggers(QTreeView::NoEditTriggers);	        //节点不能编辑
treeView->setSelectionBehavior(QTreeView::SelectRows);		//一次选中整行
treeView->setSelectionMode(QTreeView::SingleSelection);         //单选,配合上面的整行就是一次选单行
treeView->setAlternatingRowColors(true);                        //每间隔一行颜色不一样
treeView->setFocusPolicy(Qt::NoFocus);                          //去掉鼠标移到节点上时的虚线框
treeView->expandToDepth(int depth);                             //展开给定深度的所有节点
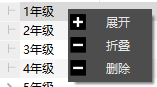
右键菜单
效果如下:
首先在头文件中设置一个右键菜单的槽函数:
private slots:
	void slotTreeMenu(const QPoint& pos);
接着在cpp中实现它:
void QtGuiApplication1::slotTreeMenu(const QPoint &pos)
{
    QModelIndex curIndex = ui.treeView->indexAt(pos);     	 //当前点击的元素的index
    QModelIndex index = curIndex.sibling(curIndex.row(), 0);	 //该行的第1列元素的index
    if (index.isValid())
    {
        QStandardItem* item = treeModel->itemFromIndex(index);
        if (item->hasChildren())	//判断是否为父结点(父结点才有孩子)
        {
            menu.addAction(QIcon(":/Resources/expand.png"), QStringLiteral("展开"), this, SLOT(slotTreeMenuExpand(bool)));
            menu.addAction(QIcon(":/Resources/collapse.png"), QStringLiteral("折叠"), this, SLOT(slotTreeMenuCollapse(bool)));
            menu.addSeparator();        //添加一个分隔线
            menu.addAction(QIcon(":/Resources/delete.png"), QStringLiteral("删除"), this, SLOT(slotTreeMenuDelete(bool)));
        }
        QString text = item->text();				//获取节点的文本
        QVariant data = item->data(Qt::UserRole + 1);		//获取节点的data
    }
    menu.exec(QCursor::pos());      //显示菜单
}
右键菜单中三个选项:展开、折叠和删除的分别实现:
void QtGuiApplication1::slotTreeMenuExpand(bool checked)
{
    QModelIndex curIndex = ui.treeView->currentIndex();
    QModelIndex index = curIndex.sibling(curIndex.row(), 0); //同一行第一列元素的index
    if (index.isValid())
    {
        ui.treeView->expand(index);
    }
}

void QtGuiApplication1::slotTreeMenuCollapse(bool checked)
{
    QModelIndex curIndex = ui.treeView->currentIndex();
    QModelIndex index = curIndex.sibling(curIndex.row(), 0); //同一行第一列元素的index
    if (index.isValid())
    {
        ui.treeView->collapse(index);
    }
}

void QtGuiApplication1::slotTreeMenuDelete(bool checked)
{
    QModelIndex curIndex = ui.treeView->currentIndex();
    QModelIndex index = curIndex.sibling(curIndex.row(), 0); //同一行第一列元素的index
    if (index.isValid())
    {
        QStandardItem* item = treeModel->itemFromIndex(index);
        mModel->removeRow(item->row());
    }
}
最后还得在构造函数中创建信号与槽的连接,代码如下:
treeView->setContextMenuPolicy(Qt::CustomContextMenu);
connect(treeView, &QTreeView::customContextMenuRequested, this, &QtGuiApplication1::slotTreeMenu);
为每层节点设置样式
效果如下:
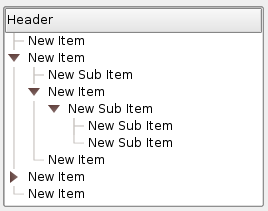
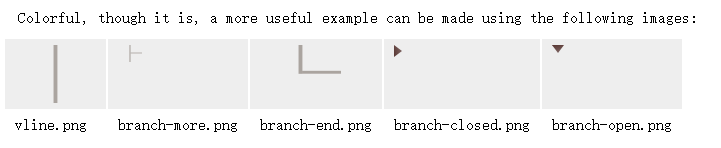
参考Qt Assistant中的文档,实现上图所示的效果可以用qss,代码如下:
QTreeView::branch:has-siblings:!adjoins-item {
      border-image: url(vline.png) 0;
}

QTreeView::branch:has-siblings:adjoins-item {
      border-image: url(branch-more.png) 0;
}

QTreeView::branch:!has-children:!has-siblings:adjoins-item {
      border-image: url(branch-end.png) 0;
}

QTreeView::branch:has-children:!has-siblings:closed, QTreeView::branch:closed:has-children:has-siblings {
          border-image: none;
          image: url(branch-closed.png);
}

QTreeView::branch:open:has-children:!has-siblings,
QTreeView::branch:open:has-children:has-siblings  {
          border-image: none;
          image: url(branch-open.png);
}


 788
788

 被折叠的 条评论
为什么被折叠?
被折叠的 条评论
为什么被折叠?
 到【灌水乐园】发言


