


 本文介绍了Spring AOP的基本概念,包括连接点、切点、通知等,并通过一个实例展示了如何在SpringBoot中实现AOP,用于在成绩录入前进行验证并打印成绩。文章还提到了项目的结构和配置,以及在实际运行中可能出现的问题和解决方案。
在说AOP之前,首先你要知道什么是约定编程。首先你需要记住的是约定的流程是什么,然后就可以完成对应的任务,但是你不需要知道底层具体是怎么实现的(底层设计者将你约定的内容织入对应的流程中)。
Spring AOP也是一种约定流程的编程,在SpringBoot中采用注解方式。
AOP是一种切面编程方式,其理念就是将通用逻辑从业务逻辑中分离出来。并且可以将一些通用的逻辑抽取出来,然后给予默认实现,这样你只需要完成部分的功能就可以了,这样做可以使得开发者的代码更加简短,同时可维护性也得到提高。
下面讲解AOP术语:
- 连接点(join point):具体被拦截的对象,往往指特定的方法。
- 切点(point cut):有时候我们的切面不单单应用于单个方法,也与可能是多个类的不同方法。可以通过正则式和指示器的规则去定义,从而适配连接点。切点就是提供这样一个功能的概念。
- 通知(advice):不同版本可能有不同的翻译。按照约定的流程方法,可以分为前置通知(before advice)、后置通知(after advice)、环绕通知(around advice)、事后返回通知(afterReturning advice)和异常通知(afterThrowig advice),它们会根据约定织入流程中,需要弄明白它们在流程中的顺序和运行的条件。
- 目标对象(target):即被代理对象,一般指实现类。
- 引入(introduction):引入新的类和其方法,增强现有Bean的功能。
- 织入(weaving):通过动态代理技术,为原有对象生成代理对象,然后将与切点定义匹配的连接点拦截,并按约定将各类通知织入约定流程的过程。
- 切面(aspect):定义切点、各类通知和引入的内容,Spring AOP将通过它的信息来增强Bean的功能或将对应的方法织入流程。
举例:
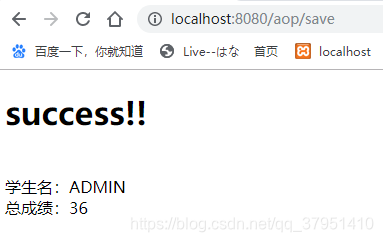
为了快速检查学生成绩录入的正确性,希望设计一个Before Advice,其能够将学生的(语文、数学、英语)成绩以JSON的格式在后台打印输出,然后再提交成绩计算出总分成绩。(要求学生姓名一律大写)
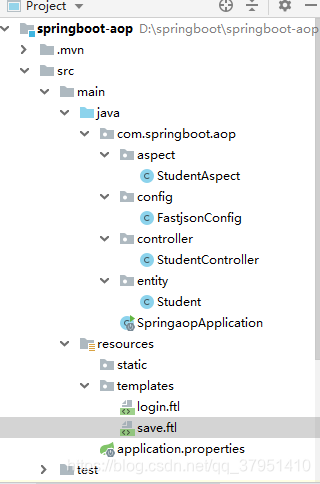
新建一个SpringBoot项目,其项目结构如下:
pom.xml
        <!--为了实现AOP,在pom.xml引入aop依赖模块-->
        <dependency>
            <groupId>org.springframework.boot</groupId>
            <artifactId>spring-boot-starter-aop</artifactId>
        </dependency>

        <!--添加freemarker模板引擎依赖,用来页面展示-->
        <dependency>
            <groupId>org.springframework.boot</groupId>
            <artifactId>spring-boot-starter-freemarker</artifactId>
        </dependency>

        <!--添加lombok的依赖-->
        <dependency>
            <groupId>org.projectlombok</groupId>
            <artifactId>lombok</artifactId>
            <optional>true</optional>
        </dependency>

        <!--引入fastjson依赖-->
        <dependency>
            <groupId>com.alibaba</groupId>
            <artifactId>fastjson</artifactId>
            <version>1.2.58</version>
        </dependency>
application.properties
## Freemarker 配置
##模版存放路径(默认为 classpath:/templates/)
spring.freemarker.template-loader-path=classpath:/templates/
##是否生成缓存,生成环境建议开启(默认为true)
spring.freemarker.cache=false
##编码
spring.freemarker.charset=UTF-8
##content-type类型(默认为test/html)
spring.freemarker.content-type=text/html
##模板后缀(默认为.ftl)
spring.freemarker.suffix=.ftl
Student.java
package com.springboot.aop.entity;

import lombok.Data;
import lombok.NoArgsConstructor;

/**
 * Created on 2019/8/16 by Tinchi
 **/

@Data   //lombok注解,简化getter和setter
@NoArgsConstructor //lombok注解,表示无参数的构造方法
public class Student {
    public String name;
    public int chinese;
    public int math;
    public int english;
}
StudentAspect.java
package com.springboot.aop.aspect;

import com.alibaba.fastjson.JSON;
import org.aspectj.lang.JoinPoint;
import org.aspectj.lang.annotation.Aspect;
import org.aspectj.lang.annotation.Before;
import org.aspectj.lang.annotation.Pointcut;
import org.springframework.stereotype.Component;
import org.springframework.web.context.request.RequestAttributes;
import org.springframework.web.context.request.RequestContextHolder;

import javax.servlet.http.HttpServletRequest;
import java.util.Enumeration;
import java.util.HashMap;
import java.util.Map;

/**
 * Created on 2019/8/16 by Tinchi
 **/

@Component  //组件类
@Aspect //注解一个切面类
public class StudentAspect {

    @Pointcut("execution(* com.springboot.aop..*.do*(..))") //pointcut表达式
    public void executeService(){}

    @Before("executeService()") //注解一个before Advice
    public void doBeforeAdvice(JoinPoint joinPoint){
        //获取RequestAttributes
        RequestAttributes requestAttributes= RequestContextHolder.getRequestAttributes();
        //从获取的获取RequestAttributes中获取HttpServletRequest
        HttpServletRequest request= (HttpServletRequest) requestAttributes.resolveReference(RequestAttributes.REFERENCE_REQUEST);
        Enumeration<String> enumeration=request.getParameterNames();
        Map<String,String> paramMap=new HashMap<String,String>();
        while (enumeration.hasMoreElements()){
            String param=enumeration.nextElement();
            paramMap.put(param,request.getParameter(param));
        }
        String str= JSON.toJSONString(paramMap);
        System.out.println("请求的参数信息JSON格式为:"+str);
    }
}
FastjsonConfig.java
package com.springboot.aop.config;

import com.alibaba.fastjson.serializer.SerializerFeature;
import com.alibaba.fastjson.support.config.FastJsonConfig;
import com.alibaba.fastjson.support.spring.FastJsonHttpMessageConverter;
import org.springframework.boot.autoconfigure.http.HttpMessageConverters;
import org.springframework.context.annotation.Bean;
import org.springframework.context.annotation.Configuration;
import org.springframework.http.MediaType;

import java.util.ArrayList;
import java.util.List;

/**
 * Created on 2019/8/16 by Tinchi
 **/
@Configuration
public class FastjsonConfig {

    /**
     * 使用@Bean注解注入第三方的解析框架(fastJson)
     */
    @Bean
    public HttpMessageConverters fastjsonHttpMessageConverters(){
        //1、首先他要定义一个converter转换消息对象
        FastJsonHttpMessageConverter fastConverter=new FastJsonHttpMessageConverter();
        //2、添加fastjson的配置信息,比如:是否要格式化返回的json数据
        FastJsonConfig fastJsonConfig=new FastJsonConfig();
        fastJsonConfig.setSerializerFeatures(SerializerFeature.PrettyFormat);
        //2-1:解决中文乱码问题
        List<MediaType> fastMediaTypes=new ArrayList<>();
        fastMediaTypes.add(MediaType.APPLICATION_PROBLEM_JSON_UTF8);
        fastConverter.setSupportedMediaTypes(fastMediaTypes);
        //3、在converter中添加配置信息
        fastConverter.setFastJsonConfig(fastJsonConfig);

        return new HttpMessageConverters(fastConverter);
    }

}
StudentController.java
package com.springboot.aop.controller;

import com.springboot.aop.entity.Student;
import org.springframework.stereotype.Controller;
import org.springframework.web.bind.annotation.ModelAttribute;
import org.springframework.web.bind.annotation.RequestMapping;
import org.springframework.web.servlet.ModelAndView;

/**
 * Created on 2019/8/16 by Tinchi
 **/
@Controller
@RequestMapping(value = "/aop")
public class StudentController {

    @RequestMapping(value = "/login")
    public ModelAndView hello(){
        ModelAndView mv=new ModelAndView();
        mv.setViewName("login");
        return mv;
    }

    @RequestMapping(value = "/save")
    public ModelAndView doSave(@ModelAttribute Student stu){
        ModelAndView mv=new ModelAndView();
        mv.setViewName("save");
        stu.name=stu.getName().toUpperCase();   //将名字转为大写
        int total=stu.getChinese()+stu.getMath()+stu.getEnglish();
        mv.addObject("stu",stu);
        mv.addObject("total",total);
        return mv;
    }
}
启动类SpringaopApplication.java
package com.springboot.aop;

import org.springframework.boot.SpringApplication;
import org.springframework.boot.autoconfigure.SpringBootApplication;

@SpringBootApplication
public class SpringaopApplication {

    public static void main(String[] args) {
        SpringApplication.run(SpringaopApplication.class, args);
    }

}
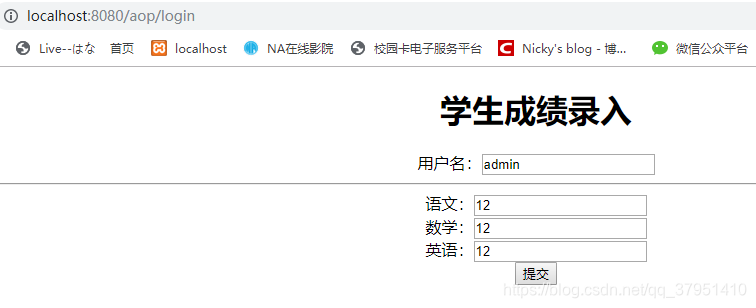
login.ftl
<!DOCTYPE html>
<html lang="en">
<head>
    <meta charset="UTF-8">
    <title>成绩录入</title>
</head>
<body style="text-align: center">
    <h1>学生成绩录入</h1>
    <form action="/aop/save" method="post">
        用户名:<input type="text" name="name"><hr>
        语文:<input type="text" name="chinese"><br>
        数学:<input type="text" name="math"><br>
        英语:<input type="text" name="english"><br>
        <input type="submit" value="提交">
    </form>
</body>
</html>
save.ftl
<!DOCTYPE html>
<html lang="en">
<head>
    <meta charset="UTF-8">
    <title>成绩结果</title>
</head>
<body>
    <h1>success!!</h1>
    <br>
    学生名:${stu.name}<br>
    总成绩:${total}
</body>
</html>
启动项目后在浏览器输入http://localhost:8080/aop/login即可看到效果。如出现javax.servlet.ServletException: Circular view path [index]: would dispatch back to the current handler URL [/index] again. Check your ViewResolver setup!,看看pom.xml文件中是否正确引入spring-boot-starter-freemarker依赖。
同时控制台会输出信息:

说明我们的切面编程(约定编程)成功了。


 1217
1217

 被折叠的 条评论
为什么被折叠?
被折叠的 条评论
为什么被折叠?
 到【灌水乐园】发言


