


 本文介绍了一种利用Spring的BeanPostProcessor解决同一接口多个实现类的优雅注入问题,通过自定义注解和代理工厂实现灵活的选择接口实现。
“对于Spring框架,现实公司使用的非常广泛,但是由于业务的复杂程度不同,了解到很多小伙伴们利用Spring开发仅仅是利用了Spring的IOC,即使是AOP也很少用,但是目前的Spring是一个大家族,形成了一个很大的生态,覆盖了我们平时开发的方方面面,抛开特殊的苛刻要求之外,Spring的生态其实已经很全面了,所以在此开个系列来研究下Spring提供给我们的一些平时不太却又很实用的内容。”
说明:
对于Spring开发时,我们有时会遇到同一个接口有多个实现类,为了避免错误,我们通常在具体调用的地方通过ApplicationContext根据业务的需要来选择不同的接口实现类,虽然可以在抽象出一个工厂方法,但是还是感觉不够优雅,如果通过@Autowired直接引入接口,则需要在某个实现类上标注@Primary,否则会报错。那么书归正传如何优雅的解决上述的问题呢,此处就介绍一种利用Spring的BeanPostProcessor来处理。话不多说先上接口
示例:
1、声明接口
public interface HelloService {
public void sayHello();
}
2、对应的接口实现类1:
@Service
public class HelloServiceImpl1 implements HelloService{
@Override
public void sayHello() {
System.out.println(“你好我是HelloServiceImpl1”);
}
}
3、对应接口实现类2:
@Service
public class HelloServiceImpl2 implements HelloService{
@Override
public void sayHello() {
System.out.println(“你好我是HelloServiceImpl2”);
}
}
4、自定义注解:
@Target({ElementType.FIELD})
@Retention(RetentionPolicy.RUNTIME)
@Documented
@Component
public @interface RountingInjected {
String value() default “helloServiceImpl1”;
}
5、自定义BeanPostProcessor实现类:
@Component
public class HelloServiceInjectProcessor implements BeanPostProcessor {
@Autowired
private ApplicationContext applicationContext;

@Override
public Object postProcessBeforeInitialization(Object bean, String beanName) throws BeansException {
    return bean;
}

@Override
public Object postProcessAfterInitialization(Object bean, String beanName) throws BeansException {
    Class<?> targetCls = bean.getClass();
    Field[] targetFld = targetCls.getDeclaredFields();
    for (Field field : targetFld) {
        //找到制定目标的注解类
        if (field.isAnnotationPresent(RountingInjected.class)) {
            if (!field.getType().isInterface()) {
                throw new BeanCreationException("RoutingInjected field must be declared as an interface:" + field.getName()
                        + " @Class " + targetCls.getName());
            }
            try {
                this.handleRoutingInjected(field, bean, field.getType());
            } catch (IllegalAccessException e) {
                e.printStackTrace();
            }
        }
    }
    return bean;
}

/**
 * @param field
 * @param bean
 * @param type
 * @throws IllegalAccessException
 */
private void handleRoutingInjected(Field field, Object bean, Class type) throws IllegalAccessException {
    Map<String, Object> candidates = this.applicationContext.getBeansOfType(type);
    field.setAccessible(true);
    if (candidates.size() == 1) {
        field.set(bean, candidates.values().iterator().next());
    } else if (candidates.size() == 2) {
        String injectVal = field.getAnnotation(RountingInjected.class).value();
        Object proxy = RoutingBeanProxyFactory.createProxy(injectVal, type, candidates);
        field.set(bean, proxy);
    } else {
        throw new IllegalArgumentException("Find more than 2 beans for type: " + type);
    }
}
6、对应的代理实现类:
public class RoutingBeanProxyFactory {
private final static String DEFAULT_BEAN_NAME = "helloServiceImpl1";

public static Object createProxy(String name, Class type, Map<String, Object> candidates) {
    ProxyFactory proxyFactory = new ProxyFactory();
    proxyFactory.setInterfaces(type);
    proxyFactory.addAdvice(new VersionRoutingMethodInterceptor(name, candidates));
    return proxyFactory.getProxy();
}

static class VersionRoutingMethodInterceptor implements MethodInterceptor {
    private Object targetObject;

    public VersionRoutingMethodInterceptor(String name, Map<String, Object> beans) {
        this.targetObject = beans.get(name);
        if (this.targetObject == null) {
            this.targetObject = beans.get(DEFAULT_BEAN_NAME);
        }
    }

    @Override
    public Object invoke(MethodInvocation invocation) throws Throwable {
        return invocation.getMethod().invoke(this.targetObject, invocation.getArguments());
    }
}
}
7、结果测试类
@Component
public class HelloServiceTest {
@RountingInjected(value = "helloServiceImpl2")
private HelloService helloService;

public void testSayHello() {
    helloService.sayHello();
}

public static void main(String[] args) {
    AnnotationConfigApplicationContext applicationContext = new AnnotationConfigApplicationContext("colin.spring.basic.advanced.bbp");
    HelloServiceTest helloServiceTest = applicationContext.getBean(HelloServiceTest.class);
    helloServiceTest.testSayHello();
}
上述是整个解决方案的示例流程,其核心思想就是根据自定义注解拦截要注入的接口实现类,运用java反射和代理的知识点来进行有效的实现类注入。
再次补充下BeanPostProcessor的一些知识点,
BeanPostProcessor接口作用:
如果我们想在Spring容器中完成bean实例化、配置以及其他初始化方法前后要添加一些自己逻辑处理。我们需要定义一个或多个BeanPostProcessor接口实现类,然后注册到Spring IoC容器中。
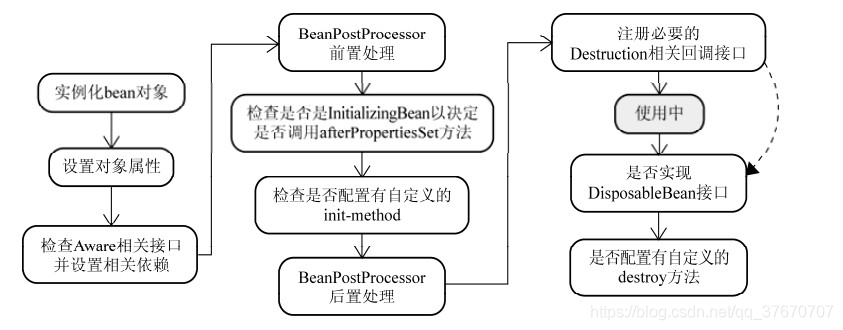
Spring中Bean的实例化过程图示:
注意:
1、接口中的两个方法都要将传入的bean返回,而不能返回null,如果返回的是null那么我们通过getBean方法将得不到目标。
2、BeanFactory和ApplicationContext对待bean后置处理器稍有不同。ApplicationContext会自动检测在配置文件中实现了BeanPostProcessor接口的所有bean,并把它们注册为后置处理器,然后在容器创建bean的适当时候调用它,因此部署一个后置处理器同部署其他的bean并没有什么区别。而使用BeanFactory实现的时候,bean 后置处理器必须通过代码显式地去注册,在IoC容器继承体系中的ConfigurableBeanFactory接口中定义了注册方法
/**
- Add a new BeanPostProcessor that will get applied to beans created
- by this factory. To be invoked during factory configuration.
-
Note: Post-processors submitted here will be applied in the order of
- registration; any ordering semantics expressed through implementing the
- {@link org.springframework.core.Ordered} interface will be ignored. Note
- that autodetected post-processors (e.g. as beans in an ApplicationContext)
- will always be applied after programmatically registered ones.
- @param beanPostProcessor the post-processor to register
*/
void addBeanPostProcessor(BeanPostProcessor beanPostProcessor);
另外,不要将BeanPostProcessor标记为延迟初始化。因为如果这样做,Spring容器将不会注册它们,自定义逻辑也就无法得到应用。假如你在元素的定义中使用了’default-lazy-init’属性,请确信你的各个BeanPostProcessor标记为’lazy-init=“false”’。
InstantiationAwareBeanPostProcessor
InstantiationAwareBeanPostProcessor是BeanPostProcessor的子接口,可以在Bean生命周期的另外两个时期提供扩展的回调接口,即实例化Bean之前(调用postProcessBeforeInstantiation方法)和实例化Bean之后(调用postProcessAfterInstantiation方法),该接口定义如下:
package org.springframework.beans.factory.config;
import java.beans.PropertyDescriptor;
import org.springframework.beans.BeansException;
import org.springframework.beans.PropertyValues;
public interface InstantiationAwareBeanPostProcessor extends BeanPostProcessor {
Object postProcessBeforeInstantiation(Class<?> beanClass, String beanName) throws BeansException;

boolean postProcessAfterInstantiation(Object bean, String beanName) throws BeansException;

PropertyValues postProcessPropertyValues(
        PropertyValues pvs, PropertyDescriptor[] pds, Object bean, String beanName)
        throws BeansException;
}
其使用方法与上面介绍的BeanPostProcessor接口类似,只时回调时机不同。
如果是使用ApplicationContext来生成并管理Bean的话则稍有不同,使用ApplicationContext来生成及管理Bean实例的话,在执行BeanFactoryAware的setBeanFactory()阶段后,若Bean类上有实现org.springframework.context.ApplicationContextAware接口,则执行其setApplicationContext()方法,接着才执行BeanPostProcessors的ProcessBeforeInitialization()及之后的流程。
原文:https://blog.youkuaiyun.com/geekjoker/article/details/79868945


 1229
1229

 被折叠的 条评论
为什么被折叠?
被折叠的 条评论
为什么被折叠?
 到【灌水乐园】发言


