


一、官方简介
Apache ActiveMQ™是最流行的开源,多协议,基于Java的消息服务器。它支持行业标准协议,因此用户可以通过广泛的语言和平台获得客户选择的好处。可以使用C,C ++,Python,.Net等连接。使用无处不在的AMQP协议集成您的多平台应用程序。使用STOMP通过websockets 在Web应用程序之间交换消息
官网:http://activemq.apache.org/
二、Queue与Topic 消息传递模式区别
1)点对点(point-to-point,简称PTP)Queue消息传递模型:
通过该消息传递模型,一个应用程序(即消息生产者)可以向另外一个应用程序(即消息消费者)发送消息。在此传递模型中,消息目的地类型是队列(即Destination接口实现类实例由Session接口实现类实例通过调用其createQueue方法并传入队列名称而创建)。消息首先被传送至消息服务器端特定的队列中,然后从此对列中将消息传送至对此队列进行监听的某个消费者。同一个队列可以关联多个消息生产者和消息消费者,但一条消息仅能传递给一个消息消费者。如果多个消息消费者正在监听队列上的消息,,JMS消息服务器将根据“先来者优先”的原则确定由哪个消息消费者接收下一条消息。如果没有消息消费者在监听队列,消息将保留在队列中,直至消息消费者连接到队列为止。这种消息传递模型是传统意义上的懒模型或轮询模型。在此模型中,消息不是自动推动给消息消费者的,而是要由消息消费者从队列中请求获得。
2)发布/订阅(publish/subscribe,简称pub/sub)Topic消息传递模型:
通过该消息传递模型,应用程序能够将一条消息发送给多个消息消费者。在此传送模型中,消息目的地类型是主题(即Destination接口实现类实例由Session接口实现类实例通过调用其createTopic方法并传入主题名称而创建)。消息首先由消息生产者发布至消息服务器中特定的主题中,然后由消息服务器将消息传送至所有已订阅此主题的消费者。主题目标也支持长期订阅。长期订阅表示消费者已注册了主题目标,但在消息到达目标时该消费者可以处于非活动状态。当消费者再次处于活动状态时,将会接收该消息。如果消费者均没有注册某个主题目标,该主题只保留注册了长期订阅的非活动消费者的消息。与PTP消息传递模型不同,pub/sub消息传递模型允许多个主题订阅者接收同一条消息。JMS一直保留消息,直至所有主题订阅者都接收到消息为止。pub/sub消息传递模型基本上是一个推模型。在该模型中,消息会自动广播,消息消费者无须通过主动请求或轮询主题的方法来获得新的消息。
3)具体区别对比如下:
| 类型 | Topic | Queue |
|---|---|---|
| 概要 | Publish Subscribe messaging 发布订阅消息 | Point-to-Point 点对点 |
| 有无状态 | topic数据默认不落地,是无状态的 | Queue数据默认会在mq服务器上以文件形式保存,比如Active MQ一般保存在$AMQ_HOME\data\kr-store\data下面。也可以配置成DB存储。 |
| 完整性保障 | 并不保证publisher发布的每条数据,Subscriber都能接受到。 | Queue保证每条数据都能被receiver接收。 |
| 消息是否会丢失 | 一般来说publisher发布消息到某一个topic时,只有正在监听该topic地址的sub能够接收到消息;如果没有sub在监听,该topic就丢失了。 | Sender发送消息到目标Queue,receiver可以异步接收这个Queue上的消息。Queue上的消息如果暂时没有receiver来取,也不会丢失。 |
| 消息发布接收策略 | 一对多的消息发布接收策略,监听同一个topic地址的多个sub都能收到publisher发送的消息。Sub接收完通知mq服务器 | 一对一的消息发布接收策略,一个sender发送的消息,只能有一个receiver接收。receiver接收完后,通知mq服务器已接收,mq服务器对queue里的消息采取删除或其他操作。 |
三、SpringBoot与ActiveMQ整合
3.1 安装ActiveMQ
下载地址: http://activemq.apache.org/download.html
3.2 目录结构
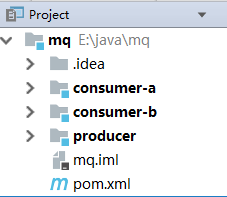
producer : 消息生产者
consumer-a : 消息消费者
consumer-b : 消息消费者
pom文件:
<dependency>
    <groupId>org.springframework.boot</groupId>
    <artifactId>spring-boot-starter-activemq</artifactId>
</dependency>
如果使用pool的话, 就需要在pom中加入以下依赖:
<dependency>
     <groupId>org.apache.activemq</groupId>
     <artifactId>activemq-pool</artifactId>
     <version>5.14.5</version>
</dependency>
3.3 producer
1)目录结构

2)yml文件:
server:
  port: 8080
  context-path: /pro
spring:
  activemq:
    user: admin
    password: admin
    broker-url: tcp://192.168.153.129:61616
    pool:
      enabled: true
      max-connections: 10

queueName: publish.queue
topicName: publish.topic
这里我开启了连接池, 默认是不开的.
这里要注意端口8080
context-path 表示上下文的前缀,请求url的时候一定添加上
3)配置文件 ActiveMQConfig
@Configuration
public class ActiveMQConfig {
    @Value("${queueName}")
    private String queueName;

    @Value("${topicName}")
    private String topicName;

    @Value("${spring.activemq.user}")
    private String usrName;

    @Value("${spring.activemq.password}")
    private  String password;

    @Value("${spring.activemq.broker-url}")
    private  String brokerUrl;

    @Bean
    public Queue queue(){
        return new ActiveMQQueue(queueName);
    }

    @Bean
    public Topic topic(){
        return new ActiveMQTopic(topicName);
    }

    @Bean
    public ActiveMQConnectionFactory connectionFactory() {
        return new ActiveMQConnectionFactory(usrName, password, brokerUrl);
    }

    @Bean
    public JmsListenerContainerFactory<?> jmsListenerContainerQueue(ActiveMQConnectionFactory connectionFactory){
        DefaultJmsListenerContainerFactory bean = new DefaultJmsListenerContainerFactory();
        bean.setConnectionFactory(connectionFactory);
        return bean;
    }

    @Bean
    public JmsListenerContainerFactory<?> jmsListenerContainerTopic(ActiveMQConnectionFactory connectionFactory){
        DefaultJmsListenerContainerFactory bean = new DefaultJmsListenerContainerFactory();
        //设置为发布订阅方式, 默认情况下使用的生产消费者方式
        bean.setPubSubDomain(true);
        bean.setConnectionFactory(connectionFactory);
        return bean;
    }
}
这里本来不需要配置这么多的, 但是在consumer中也会用到, 所以就暂时弄一份一样的, 拷贝一下完事.
4) PublishController
@RestController
@RequestMapping("/publish")
public class PublishController {

    @Autowired
    private JmsMessagingTemplate jms;

    @Autowired
    private Queue queue;

    @Autowired
    private Topic topic;

    @RequestMapping("/queue")
    public String queue(){

        for (int i = 0; i < 10 ; i++){
            jms.convertAndSend(queue, "queue"+i);
        }

        return "queue 发送成功";
    }

    @JmsListener(destination = "out.queue")
    public void consumerMsg(String msg){
        System.out.println(msg);
    }

    @RequestMapping("/topic")
    public String topic(){

        for (int i = 0; i < 10 ; i++){
            jms.convertAndSend(topic, "topic"+i);
        }

        return "topic 发送成功";
    }
}
3.4 consumer
1)目录结构
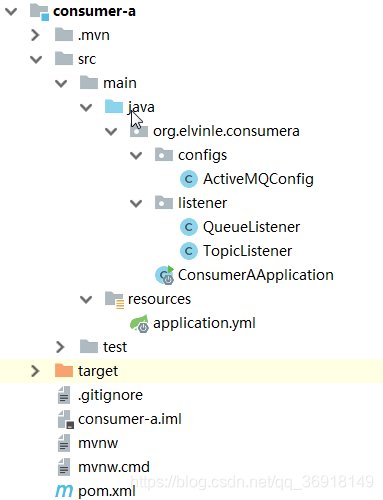
a,b是一样的, 只是显示的信息不同.
2)配置文件
yml配置文件是一样的, 只是修改了端口和context-path.
ActiveMQConfig文件内容是一样的.
3)listener
@Component
public class QueueListener {

    @JmsListener(destination = "publish.queue", containerFactory = "jmsListenerContainerQueue")
    @SendTo("out.queue")
    public String receive(String text){
        System.out.println("QueueListener: consumer-a 收到一条信息: " + text);
        return "consumer-a received : " + text;
    }
}
SendTo 会将此方法返回的数据, 写入到 queue : out.queue 中去.
@Component
public class TopicListener {

    @JmsListener(destination = "publish.topic", containerFactory = "jmsListenerContainerTopic")
    public void receive(String text){
        System.out.println("TopicListener: consumer-a 收到一条信息: " + text);
    }
}
这里通过传入不同的factory, 来实现发送不同类型的信息
3.5 测试验证结果
1)queue测试
浏览器中访问: http://localhost:8080/pro/publish/queue
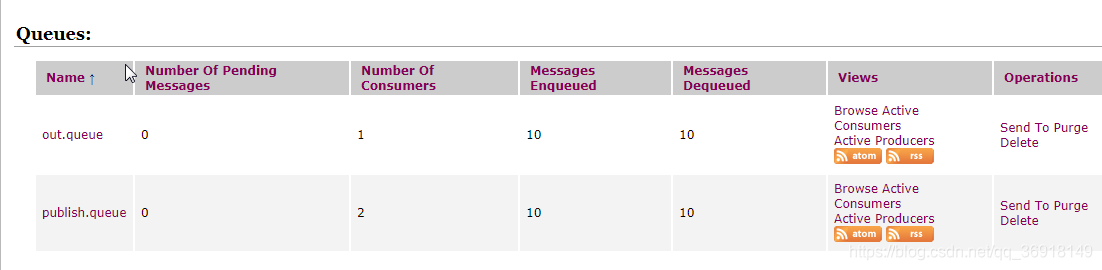
然后看一下, 控制台, 那些用户接收到了信息.
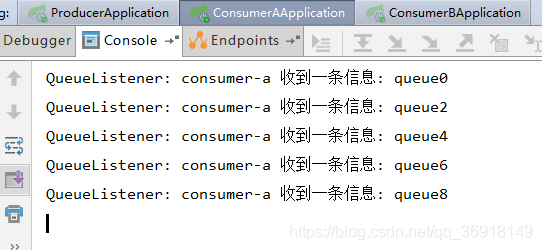

从上两幅图看的出来, a, b并不能同时接收数据. 这是queue的方式, 点对点.

2)topic测试
浏览器访问页面: http://localhost:8080/pro/publish/topic


a用户完全接收到信息了. 再看看b用户

四、感谢
1)https://blog.youkuaiyun.com/lspj201007186/article/details/70176427
2)https://www.cnblogs.com/elvinle/p/8457596.html


 3万+
3万+

 被折叠的 条评论
为什么被折叠?
被折叠的 条评论
为什么被折叠?
 到【灌水乐园】发言


