


 本文详细介绍了SpringBoot对Web的处理,包括静态资源映射规则,如/webjars/和/staticPathPattern/的处理,以及SpringMVC的自动配置原理。内容涵盖自动配置的组件,如ContentNegotiatingViewResolver、HttpMessageConverter等,并探讨了如何扩展和接管SpringMVC。此外,还解析了SpringBoot启动配置的流程,包括事件监听机制和自定义starter的创建步骤。文章深入浅出地展示了SpringBoot与SpringMVC的协同工作方式。
Spring Boot学习(五)Web
1、SpringBoot对静态资源的映射规则;
@ConfigurationProperties(prefix = "spring.resources", ignoreUnknownFields = false)
public class ResourceProperties {
//可以设置和静态资源有关的参数, 缓存时间
@Override
		public void addResourceHandlers(ResourceHandlerRegistry registry) {
			if (!this.resourceProperties.isAddMappings()) {
				logger.debug("Default resource handling disabled");
				return;
			}
			Duration cachePeriod = this.resourceProperties.getCache().getPeriod();
			CacheControl cacheControl = this.resourceProperties.getCache().getCachecontrol().toHttpCacheControl();
			if (!registry.hasMappingForPattern("/webjars/**")) {
				customizeResourceHandlerRegistration(registry.addResourceHandler("/webjars/**")
						.addResourceLocations("classpath:/META-INF/resources/webjars/")
						.setCachePeriod(getSeconds(cachePeriod)).setCacheControl(cacheControl));
			}
			String staticPathPattern = this.mvcProperties.getStaticPathPattern();
			if (!registry.hasMappingForPattern(staticPathPattern)) {
				customizeResourceHandlerRegistration(registry.addResourceHandler(staticPathPattern)
						.addResourceLocations(getResourceLocations(this.resourceProperties.getStaticLocations()))
						.setCachePeriod(getSeconds(cachePeriod)).setCacheControl(cacheControl));
			}
		}
1)、所有/webjars/,都去classpath:/META-INF/resources/webjars/里面找资源
webjars:利用jar包方式导入资源
http://www.webjars.org/
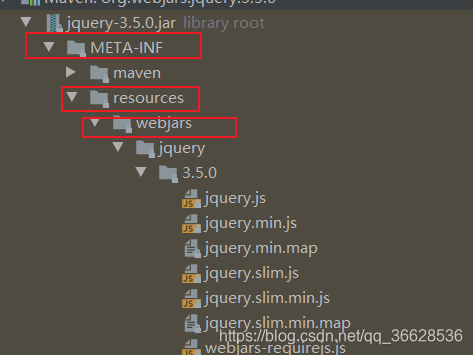
http://localhost:8080/webjars/jquery/3.5.0/jquery.js
导入依赖
<dependency>在访问的时候只需要写webjars里面资源的名称就行
			<groupId>org.webjars</groupId>
			<artifactId>jquery</artifactId>
			<version>3.5.0</version>
		</dependency>
2)、 staticPathPattern = "/" 访问当前项目的任何资源,(静态资源的文件夹)**
 "classpath:/META-INF/resources/",
 "classpath:/resources/",
 "classpath:/static/",
 "classpath:/public/"
  "/":当前项目的根路径
3)、欢迎页:静态资源文件夹下的所有index.html页面;被”/“映射;**
localhost:8080/ 找index页面
4)、所有的/favicon.ico 都在静态资源文件下找;**
2、Spring MVC自动配置原理
1、 Spring MVC Auto-configuration
Spring Boot 自动配置好了SpringMVC
以下是SpringBoot对SpringMVC的默认:
The auto-configuration adds the following features on top of Spring’s defaults:
-
Inclusion of
ContentNegotiatingViewResolverandBeanNameViewResolverbeans.- 自动配置了视图解析器,根据方法的返回值得到view对象,view决定如何渲染(转发? 重定向?)
- ContentNegotiatingViewResolver` :组合所有的视图解析器的;
- 如何定制:我们可以自己给容器中添加一个视图解析器;它就可以自动整合进来;
-
Support for serving static resources, including support for WebJars (covered later in this document)).
-
自动注册了 of
Converter,GenericConverter, andFormatterbeans.- Converter: 转换器;html 都是文本,要将文本转换成对象对应的属性
- Formatter 格式化器; 2020-04-28 -----》date
-
Support for
HttpMessageConverters(covered later in this document).-
HttpMesageConverter: SpringMVC用来转换Http请求和响应的;User----json
-
HttpMessageConverters`是从容器中确定;获取所有的HttpMessageConverter;
自己给容器中添加HttpMessageConverter,只需要将自己定义的Converter放到容器中
-
-
Automatic registration of
MessageCodesResolver(covered later in this document).定义错误代码生成规则的; -
Static
index.htmlsupport. 首页 -
Custom
Faviconsupport (covered later in this document).图标 -
Automatic use of a
ConfigurableWebBindingInitializerbean (covered later in this document).- 我们页可以配置来替换默认的;
 初始化WebDataBinder;
 请求数据 ===== javaBean(前端的json串 绑定到后端的bean)
If you want to keep those Spring Boot MVC customizations and make more MVC customizations (interceptors, formatters, view controllers, and other features), you can add your own @Configuration class of type WebMvcConfigurer but without @EnableWebMvc.
If you want to provide custom instances of RequestMappingHandlerMapping, RequestMappingHandlerAdapter, or ExceptionHandlerExceptionResolver, and still keep the Spring Boot MVC customizations, you can declare a bean of type WebMvcRegistrations and use it to provide custom instances of those components.
If you want to take complete control of Spring MVC, you can add your own @Configuration annotated with @EnableWebMvc, or alternatively add your own @Configuration-annotated DelegatingWebMvcConfiguration as described in the Javadoc of @EnableWebMvc.
2、扩展SpringMVC
<mvc:view-controller path="/hello" view-name="success"/>
<mvc:interceptors>
	<mvc:interceptor>
    	<mvc:mapping path="/hello/">
        <bean></bean>
        </mvc:mapping>
    </mvc:interceptor>
</mvc:interceptors>
编写一个配置类(@Configuration),是WebMvcConfigurer类型;不能标注@EnableWebMvc;
既保留了SpringBoot的自动配置,也存在我们自己的配置;
@Configuration
public class MvcConfig implements WebMvcConfigurer {

    @Override
    public void addViewControllers(ViewControllerRegistry registry) {
        //浏览器发送/atzt请求,来到success页面;
        registry.addViewController("/atzt").setViewName("success");
    }
}
原理:
1)先看org.springframework.boot.autoconfigure.web.servlet.WebMvcAutoConfiguration,它是Springboot的自动配置的实现类;它存在如下的内部类,我们在看这个内部类的父类;
@Configuration(proxyBeanMethods = false)
	public static class EnableWebMvcConfiguration extends DelegatingWebMvcConfiguration implements ResourceLoaderAware {
2)DelegatingWebMvcConfiguration,看到它的setConfiurers使用了@Autowired注解,从而拿到了容器中所有的实现了WebMvcConfigurer的接口,这样我们就明白了,我们自定义的配置也实现了该接口,那么SpringBoot在自动配置的时候,也能拿到我们自己写的配置类,就可以实现我们自己的功能;
@Configuration(proxyBeanMethods = false)
public class DelegatingWebMvcConfiguration extends WebMvcConfigurationSupport {

	private final WebMvcConfigurerComposite configurers = new WebMvcConfigurerComposite();


	@Autowired(required = false)
	public void setConfigurers(List<WebMvcConfigurer> configurers) {
		if (!CollectionUtils.isEmpty(configurers)) {
			this.configurers.addWebMvcConfigurers(configurers);
            //它的实现,将所有的WebMvcConfigurer相关配置都来一起调用
		}
	}
3、全面接管SpringMVC;
SpringBoot对SpringMVC的自动配置不需要了,所有的都是我们自己配;所有的SpringMVC自动配置都失效;
我们需要在配置类中添加@EnableWebMvc;
@Configuration
@EnableWebMvc
public class MvcConfig implements WebMvcConfigurer {

    @Override
    public void addViewControllers(ViewControllerRegistry registry) {
        //浏览器发送/atzt请求,来到success页面;
        registry.addViewController("/atzt").setViewName("index.html");
    }
}
原理:
为什么@EnableWebMvc自动配置就失效了;
1)EnableWebMvc的核心
@Retention(RetentionPolicy.RUNTIME)
@Target(ElementType.TYPE)
@Documented
@Import(DelegatingWebMvcConfiguration.class)
public @interface EnableWebMvc {
}
2)、
@Configuration(proxyBeanMethods = false)
public class DelegatingWebMvcConfiguration extends WebMvcConfigurationSupport {
3)、
@Configuration(proxyBeanMethods = false)
@ConditionalOnWebApplication(type = Type.SERVLET)
@ConditionalOnClass({ Servlet.class, DispatcherServlet.class, WebMvcConfigurer.class })
@ConditionalOnMissingBean(WebMvcConfigurationSupport.class)
@AutoConfigureOrder(Ordered.HIGHEST_PRECEDENCE + 10)
@AutoConfigureAfter({ DispatcherServletAutoConfiguration.class, TaskExecutionAutoConfiguration.class,
		ValidationAutoConfiguration.class })
public class WebMvcAutoConfiguration {
@ConditionalOnMissingBean(WebMvcConfigurationSupport.class),只有容器中缺少这个bean它才会创建,而我们加入了@EnableWebMvc之后,容器中就有了一个WebMvcConfigurationSupport.class,所有它不会创建自动配置类了。
3、如何修改SpringBoot的默认配置
模式:
1)SpringBoot在自动配置很多组件的时候,先看容器中有没有用户自己配置的(@Bean、@Component)如果由就用用户配置的,如果没有就是用自动配置;如果有些组件可以有多个(ViewResolver)将用户配置的和自己默认的组合起来;
2) 在SpringBoot中会有非常多的xxxWebConfigurer帮助我们进行扩展配置,但是它们都会有自己的条件,我们可以根据它上面的条件来进行自我修改;
4、Spring Boot启动配置原理
几个重要的事件回调机制
配置在META-INF/spring.factories
ApplicationContenxtInitializer
SpringApplicationRunListener
只需要放到IOC容器中
ApplicationRunner
CommandLineRunner
启动流程:
1、创建SpringApplicaton对象
//调用构造器方法
this(null, primarySources);
//构造器源码如下
public SpringApplication(ResourceLoader resourceLoader, Class<?>... primarySources) {
this.resourceLoader = resourceLoader;
Assert.notNull(primarySources, "PrimarySources must not be null");
//保存主配置类信息
this.primarySources = new LinkedHashSet<>(Arrays.asList(primarySources));
//判断当前是不是web应用,reactive、servlet、None类型
this.webApplicationType = WebApplicationType.deduceFromClasspath();
//从类路径下找到META-INF/spring-factories配置的所有ApplicationContextInitializer;然后保存起来
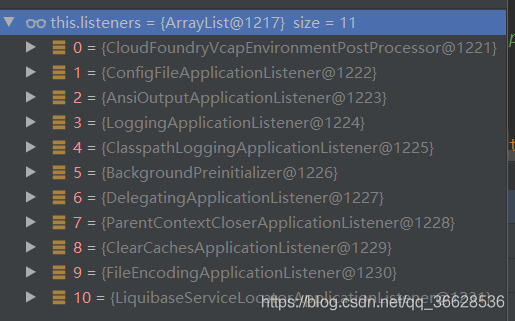
setInitializers((Collection) getSpringFactoriesInstances(ApplicationContextInitializer.class));
//从类路径下找到META-INF/spring-factories配置的所有ApplicationListener.class;然后保存起来
setListeners((Collection) getSpringFactoriesInstances(ApplicationListener.class));
//从多个配置类中找到有main方法的主配置类
this.mainApplicationClass = deduceMainApplicationClass();
}
2、运行run方法
public ConfigurableApplicationContext run(String... args) {
		StopWatch stopWatch = new StopWatch();
		stopWatch.start();
		ConfigurableApplicationContext context = null;
		Collection<SpringBootExceptionReporter> exceptionReporters = new ArrayList<>();
		configureHeadlessProperty();
    //获取SpringApplicationRunListeners;从类路径下META-INF/spring.factories获取得;
		SpringApplicationRunListeners listeners = getRunListeners(args);
    //回调所有的获取SpringApplicationRunListener.starting();
		listeners.starting();
		try {
            //封装命令行参数
			ApplicationArguments applicationArguments = new DefaultApplicationArguments(args);
            //准备环境
			ConfigurableEnvironment environment = prepareEnvironment(listeners, applicationArguments);
            //创建环境完成后,回调SpringApplicationRunListener.environmentPrepared(environment);表示环境准备完成
			configureIgnoreBeanInfo(environment);
            //打印图标
			Banner printedBanner = printBanner(environment);
            //创建ApplicationContext;决定容器的类型是 web还是reavtive 还是普通,实例化;
			context = createApplicationContext();
            //创建异常报告对象
			exceptionReporters = getSpringFactoriesInstances(SpringBootExceptionReporter.class,
					new Class[] { ConfigurableApplicationContext.class }, context);
            //准备上下文环境
            //将environment保存到ioc中;而且applyInitializers();
            //applyInitializers();回调之前保存的所有ApplicationContextInitializer.initialize(context);
            //回调所有的SpringApplicationRunListener.contextPrepared();
			prepareContext(context, environment, listeners, applicationArguments, printedBanner);
            //当prepareContext()执行最后一步,其回调所有的SpringApplicationRunListener的loadContext()

            //刷新容器,ioc容器初始化的过程;如果是web容器,还会创建内置的tomcat
            //扫描、创建、加载所有组件的地方;(配置类、组件、自动配置)
			refreshContext(context);
            //从ioc容器中获取所有的ApplicationRunner和CommandLineRunner进行回调
            //空函数
			afterRefresh(context, applicationArguments);
			stopWatch.stop();
			if (this.logStartupInfo) {
				new StartupInfoLogger(this.mainApplicationClass).logStarted(getApplicationLog(), stopWatch);
			}
            //回调所有SpringApplicationRunListener的started()方法
			listeners.started(context);
            //ApplicationRunner先回调,CommandLineRunner在回调
			callRunners(context, applicationArguments);
		}
		catch (Throwable ex) {
			handleRunFailure(context, ex, exceptionReporters, listeners);
			throw new IllegalStateException(ex);
		}

		try {
            //回调SpringApplicationRunListener的running()
            //调用org.springframework.boot.context.event.EventPublishingRunListener的running;
            //context.publishEvent(new ApplicationReadyEvent(this.application, this.args, context));发送applicationReadyEvent事件通知
			listeners.running(context);
		}
		catch (Throwable ex) {
			handleRunFailure(context, ex, exceptionReporters, null);
			throw new IllegalStateException(ex);
		}
    //整个springboot应用启动完成以后返回启动的ioc容器;
		return context;
	}
3、事件监听机制
配置在META-INF/spring.factories
ApplicationContenxtInitializer
SpringApplicationRunListener
只需要放到IOC容器中
ApplicationRunner
CommandLineRunner
5、自定义starter
starter:
1、这个场景需要使用到的依赖是什么?
2、编写自动配置类
@Configuration//指定这个类是一个配置类
@ConditionalOnXXX //在指定条件成立的情况下自动配置类生效
@AutoConfigureAfter //指定自动配置在那个类之后配置
@AutoConfigureOrder //自动配置类的顺序

@Bean  //给容器中添加组件
@ConfigurationProperties //结合相关的xxxProperties类绑定相关的配置
@EnableConfigurationProperties	//让xxxProperies生效加入到容器中

自动配置类要能加载

将需要启动就加载的自动配置类放到 META-INF/spring.factories
# Auto Configure
org.springframework.boot.autoconfigure.EnableAutoConfiguration=\
org.springframework.boot.autoconfigure.admin.SpringApplicationAdminJmxAutoConfiguration,\
org.springframework.boot.autoconfigure.aop.AopAutoConfiguration,\
3、模式:
启动器只用来依赖导入;
专门下一个自动配置模块;
启动器依赖自动配置;别人只需要引入启动器(starter)
-mybaties-spring-boot-starter; 自定义启动器名-spring-boot-starter
就加载的自动配置类放到 META-INF/spring.factories
Auto Configure
org.springframework.boot.autoconfigure.EnableAutoConfiguration=
org.springframework.boot.autoconfigure.admin.SpringApplicationAdminJmxAutoConfiguration,
org.springframework.boot.autoconfigure.aop.AopAutoConfiguration,\
3、模式:
启动器只用来依赖导入;
专门下一个自动配置模块;
启动器依赖自动配置;别人只需要引入启动器(starter)
-mybaties-spring-boot-starter; 自定义启动器名-spring-boot-starter


 554
554

 被折叠的 条评论
为什么被折叠?
被折叠的 条评论
为什么被折叠?
 到【灌水乐园】发言


