


 本文详细探讨了Java中的线程池,包括自定义线程池、ThreadPoolExecutor的构造方法和使用、线程池的状态与参数配置、拒绝策略、线程池关闭方法,以及异步模式下的工作线程设计。同时讲解了Fork/Join框架和AQS(AbstractQueuedSynchronizer)的基础原理,包括ReentrantLock的实现、读写锁和条件变量。此外,还介绍了Semaphore和CountDownLatch在并发控制中的应用,以及CyclicBarrier的特点和使用场景。
8.1 线程池
池化技术相比大家已经屡见不鲜了,线程池、数据库连接池、Http 连接池等等都是对这个思想的应用。池化技术的思想主要是为了减少每次获取资源的消耗,提高对资源的利用率。
线程池提供了一种限制和管理资源(包括执行一个任务)。 每个线程池还维护一些基本统计信息,例如已完成任务的数量。
这里借用《Java 并发编程的艺术》提到的来说一下使用线程池的好处:
- 降低资源消耗。通过重复利用已创建的线程降低线程创建和销毁造成的消耗。
- 提高响应速度。当任务到达时,任务可以不需要的等到线程创建就能立即执行。
- 提高线程的可管理性。线程是稀缺资源,如果无限制的创建,不仅会消耗系统资源,还会降低系统的稳定性,使用线程池可以进行统一的分配,调优和监控。
8.1.1 自定义线程池(手写线程池)
友情提示:线程池中的线程都是非守护线程
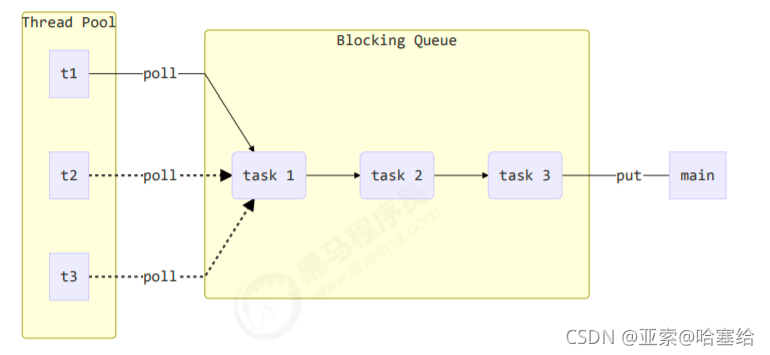
实例代码设计步骤:
步骤1:自定义拒绝策略接口
@FunctionalInterface // 拒绝策略
interface RejectPolicy<T> {
 void reject(BlockingQueue<T> queue, T task);
}
步骤2:自定义任务队列
class BlockingQueue<T> {
 // 1. 任务队列
 private Deque<T> queue = new ArrayDeque<>();
 // 2. 锁
 private ReentrantLock lock = new ReentrantLock();
 // 3. 生产者条件变量
 private Condition fullWaitSet = lock.newCondition();
 // 4. 消费者条件变量
 private Condition emptyWaitSet = lock.newCondition();
 // 5. 容量
 private int capcity;
 public BlockingQueue(int capcity) {
 this.capcity = capcity;
 }
 // 带超时阻塞获取
 public T poll(long timeout, TimeUnit unit) {
 lock.lock();
 try {
 // 将 timeout 统一转换为 纳秒
 long nanos = unit.toNanos(timeout);
 while (queue.isEmpty()) {
 try {
 // 返回值是剩余时间
 if (nanos <= 0) {
 return null;
 }
 nanos = emptyWaitSet.awaitNanos(nanos);
 } catch (InterruptedException e) {
 e.printStackTrace();
 }
 }
 T t = queue.removeFirst();
 fullWaitSet.signal();
 return t;
 } finally {
 lock.unlock();
 }
}
 // 阻塞获取
 public T take() {
 lock.lock();
 try {
 while (queue.isEmpty()) {
 try {
 emptyWaitSet.await();
 } catch (InterruptedException e) {
 e.printStackTrace();
 }
 }
 T t = queue.removeFirst();
 fullWaitSet.signal();
 return t;
 } finally {
 lock.unlock();
 }
 }
 // 阻塞添加
 public void put(T task) {
 lock.lock();
 try {
 while (queue.size() == capcity) {
 try {
 log.debug("等待加入任务队列 {} ...", task);
 fullWaitSet.await();
 } catch (InterruptedException e) {
 e.printStackTrace();
 }
 }
 log.debug("加入任务队列 {}", task);
 queue.addLast(task);
 emptyWaitSet.signal();
 } finally {
 lock.unlock();
 }
 }
 // 带超时时间阻塞添加
 public boolean offer(T task, long timeout, TimeUnit timeUnit) {
 lock.lock();
 try {
 long nanos = timeUnit.toNanos(timeout);
 while (queue.size() == capcity) {
 try {
 if(nanos <= 0) {
 return false;
 }
 log.debug("等待加入任务队列 {} ...", task);
 nanos = fullWaitSet.awaitNanos(nanos);
} catch (InterruptedException e) {
 e.printStackTrace();
 }
 }
 log.debug("加入任务队列 {}", task);
 queue.addLast(task);
 emptyWaitSet.signal();
 return true;
 } finally {
 lock.unlock();
 }
 }
 public int size() {
 lock.lock();
 try {
 return queue.size();
 } finally {
 lock.unlock();
 }
 }
 public void tryPut(RejectPolicy<T> rejectPolicy, T task) {
 lock.lock();
 try {
 // 判断队列是否满
 if(queue.size() == capcity) {
 rejectPolicy.reject(this, task);
 } else { // 有空闲
 log.debug("加入任务队列 {}", task);
 queue.addLast(task);
 emptyWaitSet.signal();
 }
 } finally {
 lock.unlock();
 }
 }
}
步骤3:自定义线程池
class ThreadPool {
 // 任务队列
 private BlockingQueue<Runnable> taskQueue;
 // 线程集合
 private HashSet<Worker> workers = new HashSet<>();
 // 核心线程数
 private int coreSize;
 // 获取任务时的超时时间
private long timeout;
 private TimeUnit timeUnit;
 private RejectPolicy<Runnable> rejectPolicy;
 // 执行任务
 public void execute(Runnable task) {
 // 当任务数没有超过 coreSize 时,直接交给 worker 对象执行
 // 如果任务数超过 coreSize 时,加入任务队列暂存
 synchronized (workers) {
 if(workers.size() < coreSize) {
 Worker worker = new Worker(task);
 log.debug("新增 worker{}, {}", worker, task);
 workers.add(worker);
 worker.start();
 } else {
// taskQueue.put(task);
 // 1) 死等
 // 2) 带超时等待
 // 3) 让调用者放弃任务执行
 // 4) 让调用者抛出异常
 // 5) 让调用者自己执行任务
 taskQueue.tryPut(rejectPolicy, task);
 }
 }
 }
 public ThreadPool(int coreSize, long timeout, TimeUnit timeUnit, int queueCapcity,
RejectPolicy<Runnable> rejectPolicy) {
 this.coreSize = coreSize;
 this.timeout = timeout;
 this.timeUnit = timeUnit;
 this.taskQueue = new BlockingQueue<>(queueCapcity);
 this.rejectPolicy = rejectPolicy;
 }
 class Worker extends Thread{
 private Runnable task;
 public Worker(Runnable task) {
 this.task = task;
 }
 @Override
 public void run() {
 // 执行任务
 // 1) 当 task 不为空,执行任务
 // 2) 当 task 执行完毕,再接着从任务队列获取任务并执行
// while(task != null || (task = taskQueue.take()) != null) {
 while(task != null || (task = taskQueue.poll(timeout, timeUnit)) != null) {
 try {
 log.debug("正在执行...{}", task);
task.run();
 } catch (Exception e) {
 e.printStackTrace();
 } finally {
 task = null;
 }
 }
 synchronized (workers) {
 log.debug("worker 被移除{}", this);
 workers.remove(this);
 }
 }
 }
}
步骤4:测试
public static void main(String[] args) {
 ThreadPool threadPool = new ThreadPool(1,
 1000, TimeUnit.MILLISECONDS, 1, (queue, task)->{
 // 1. 死等
// queue.put(task);
 // 2) 带超时等待
// queue.offer(task, 1500, TimeUnit.MILLISECONDS);
 // 3) 让调用者放弃任务执行
// log.debug("放弃{}", task);
 // 4) 让调用者抛出异常
// throw new RuntimeException("任务执行失败 " + task);
 // 5) 让调用者自己执行任务
 task.run();
 });
 for (int i = 0; i < 4; i++) {
 int j = i;
 threadPool.execute(() -> {
 try {
 Thread.sleep(1000L);
 } catch (InterruptedException e) {
 e.printStackTrace();
 }
 log.debug("{}", j);
 });
 }
 }
代码完整版
package cn.itcast.n8;

import lombok.extern.slf4j.Slf4j;
import org.springframework.core.log.LogDelegateFactory;

import java.util.ArrayDeque;
import java.util.Deque;
import java.util.HashSet;
import java.util.concurrent.TimeUnit;
import java.util.concurrent.locks.Condition;
import java.util.concurrent.locks.ReentrantLock;

@Slf4j(topic = "c.TestPool")
public class TestPool {
    public static void main(String[] args) {
        ThreadPool threadPool = new ThreadPool(1,
                1000, TimeUnit.MILLISECONDS, 1, (queue, task)->{
            // 1. 死等
//            queue.put(task);
            // 2) 带超时等待
//            queue.offer(task, 1500, TimeUnit.MILLISECONDS);
            // 3) 让调用者放弃任务执行
//            log.debug("放弃{}", task);
            // 4) 让调用者抛出异常
//            throw new RuntimeException("任务执行失败 " + task);
            // 5) 让调用者自己执行任务
            task.run();
        });
        for (int i = 0; i < 4; i++) {
            int j = i;
            threadPool.execute(() -> {
                try {
                    Thread.sleep(1000L);
                } catch (InterruptedException e) {
                    e.printStackTrace();
                }
                log.debug("{}", j);
            });
        }
    }
}

@FunctionalInterface // 拒绝策略
interface RejectPolicy<T> {
    void reject(BlockingQueue<T> queue, T task);
}

@Slf4j(topic = "c.ThreadPool")
class ThreadPool {
    // 任务队列
    private BlockingQueue<Runnable> taskQueue;

    // 线程集合
    private HashSet<Worker> workers = new HashSet<>();

    // 核心线程数
    private int coreSize;

    // 获取任务时的超时时间
    private long timeout;

    private TimeUnit timeUnit;

    private RejectPolicy<Runnable> rejectPolicy;

    // 执行任务
    public void execute(Runnable task) {
        // 当任务数没有超过 coreSize 时,直接交给 worker 对象执行
        // 如果任务数超过 coreSize 时,加入任务队列暂存
        synchronized (workers) {
            if(workers.size() < coreSize) {
                Worker worker = new Worker(task);
                log.debug("新增 worker{}, {}", worker, task);
                workers.add(worker);
                worker.start();
            } else {
//                taskQueue.put(task);
                // 1) 死等
                // 2) 带超时等待
                // 3) 让调用者放弃任务执行
                // 4) 让调用者抛出异常
                // 5) 让调用者自己执行任务
                taskQueue.tryPut(rejectPolicy, task);
            }
        }
    }

    public ThreadPool(int coreSize, long timeout, TimeUnit timeUnit, int queueCapcity, RejectPolicy<Runnable> rejectPolicy) {
        this.coreSize = coreSize;
        this.timeout = timeout;
        this.timeUnit = timeUnit;
        this.taskQueue = new BlockingQueue<>(queueCapcity);
        this.rejectPolicy = rejectPolicy;
    }

    class Worker extends Thread{
        private Runnable task;

        public Worker(Runnable task) {
            this.task = task;
        }

        @Override
        public void run() {
            // 执行任务
            // 1) 当 task 不为空,执行任务
            // 2) 当 task 执行完毕,再接着从任务队列获取任务并执行
//            while(task != null || (task = taskQueue.take()) != null) {
            while(task != null || (task = taskQueue.poll(timeout, timeUnit)) != null) {
                try {
                    log.debug("正在执行...{}", task);
                    task.run();
                } catch (Exception e) {
                    e.printStackTrace();
                } finally {
                    task = null;
                }
            }
            synchronized (workers) {
                log.debug("worker 被移除{}", this);
                workers.remove(this);
            }
        }
    }
}
@Slf4j(topic = "c.BlockingQueue")
class BlockingQueue<T> {
    // 1. 任务队列
    private Deque<T> queue = new ArrayDeque<>();

    // 2. 锁
    private ReentrantLock lock = new ReentrantLock();

    // 3. 生产者条件变量
    private Condition fullWaitSet = lock.newCondition();

    // 4. 消费者条件变量
    private Condition emptyWaitSet = lock.newCondition();

    // 5. 容量
    private int capcity;

    public BlockingQueue(int capcity) {
        this.capcity = capcity;
    }

    // 带超时阻塞获取
    public T poll(long timeout, TimeUnit unit) {
        lock.lock();
        try {
            // 将 timeout 统一转换为 纳秒
            long nanos = unit.toNanos(timeout);
            while (queue.isEmpty()) {
                try {
                    // 返回值是剩余时间
                    if (nanos <= 0) {
                        return null;
                    }
                    nanos = emptyWaitSet.awaitNanos(nanos);
                } catch (InterruptedException e) {
                    e.printStackTrace();
                }
            }
            T t = queue.removeFirst();
            fullWaitSet.signal();
            return t;
        } finally {
            lock.unlock();
        }
    }

    // 阻塞获取
    public T take() {
        lock.lock();
        try {
            while (queue.isEmpty()) {
                try {
                    emptyWaitSet.await();
                } catch (InterruptedException e) {
                    e.printStackTrace();
                }
            }
            T t = queue.removeFirst();
            fullWaitSet.signal();
            return t;
        } finally {
            lock.unlock();
        }
    }

    // 阻塞添加
    public void put(T task) {
        lock.lock();
        try {
            while (queue.size() == capcity) {
                try {
                    log.debug("等待加入任务队列 {} ...", task);
                    fullWaitSet.await();
                } catch (InterruptedException e) {
                    e.printStackTrace();
                }
            }
            log.debug("加入任务队列 {}", task);
            queue.addLast(task);
            emptyWaitSet.signal();
        } finally {
            lock.unlock();
        }
    }

    // 带超时时间阻塞添加
    public boolean offer(T task, long timeout, TimeUnit timeUnit) {
        lock.lock();
        try {
            long nanos = timeUnit.toNanos(timeout);
            while (queue.size() == capcity) {
                try {
                    if(nanos <= 0) {
                        return false;
                    }
                    log.debug("等待加入任务队列 {} ...", task);
                    nanos = fullWaitSet.awaitNanos(nanos);
                } catch (InterruptedException e) {
                    e.printStackTrace();
                }
            }
            log.debug("加入任务队列 {}", task);
            queue.addLast(task);
            emptyWaitSet.signal();
            return true;
        } finally {
            lock.unlock();
        }
    }

    public int size() {
        lock.lock();
        try {
            return queue.size();
        } finally {
            lock.unlock();
        }
    }

    public void tryPut(RejectPolicy<T> rejectPolicy, T task) {
        lock.lock();
        try {
            // 判断队列是否满
            if(queue.size() == capcity) {
                rejectPolicy.reject(this, task);
            } else {  // 有空闲
                log.debug("加入任务队列 {}", task);
                queue.addLast(task);
                emptyWaitSet.signal();
            }
        } finally {
            lock.unlock();
        }
    }
}
8.1.2 ThreadPoolExecutor
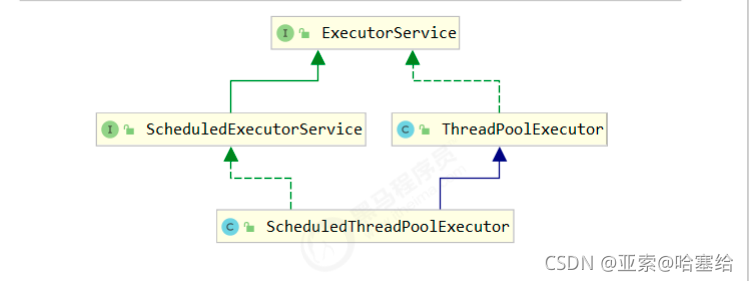
Executor 框架结构(主要由三大部分组成)
任务(Runnable /Callable)
执行任务需要实现的 Runnable 接口 或 Callable接口。Runnable 接口或 Callable 接口 实现类都可以被 ThreadPoolExecutor 或 ScheduledThreadPoolExecutor 执行。
任务的执行(Executor)
如上图所示,包括任务执行机制的核心接口 Executor ,以及继承自 Executor 接口的 ExecutorService 接口。ThreadPoolExecutor 和 ScheduledThreadPoolExecutor 这两个关键类实现了 ExecutorService 接口。
这里提了很多底层的类关系,但是,实际上我们需要更多关注的是 ThreadPoolExecutor 这个类,这个类在我们实际使用线程池的过程中,使用频率还是非常高的。
异步计算的结果(Future)
Future 接口以及 Future 接口的实现类 FutureTask 类都可以代表异步计算的结果。
当我们把 Runnable接口 或 Callable 接口 的实现类提交给 ThreadPoolExecutor 或 ScheduledThreadPoolExecutor 执行。(调用 submit() 方法时会返回一个 FutureTask 对象)
4.Executor 框架的使用示意图
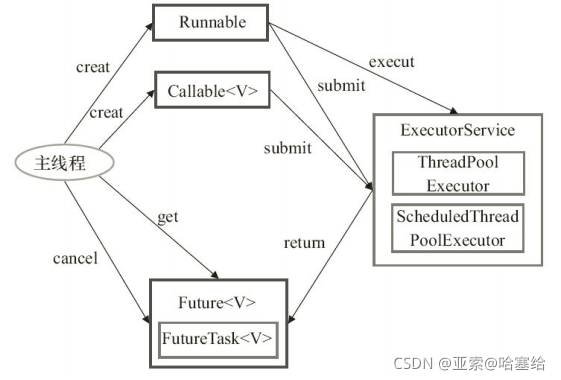
- 主线程首先要创建实现 Runnable 或者 Callable 接口的任务对象。
- 把创建完成的实现 Runnable/Callable接口的 对象直接交给 ExecutorService 执行:
ExecutorService.execute(Runnable command))或者也可以把Runnable对象或Callable对象提交给ExecutorService执行(ExecutorService.submit(Runnable task)或ExecutorService.submit(Callable <T> task))。 - 如果执行 ExecutorService.submit(…),ExecutorService 将返回一个实现Future接口的对象(我们刚刚也提到过了执行
execute()方法和submit()方法的区别,submit()会返回一个FutureTask对象)。 - 最后,主线程可以执行 FutureTask.get()方法来等待任务执行完成。主线程也可以执行 FutureTask.cancel(boolean mayInterruptIfRunning)来取消此任务的执行
学习ThreadPoolExecutor
1) 线程池状态
ThreadPoolExecutor 使用 int 的高 3 位来表示线程池状态,低 29 位表示线程数量
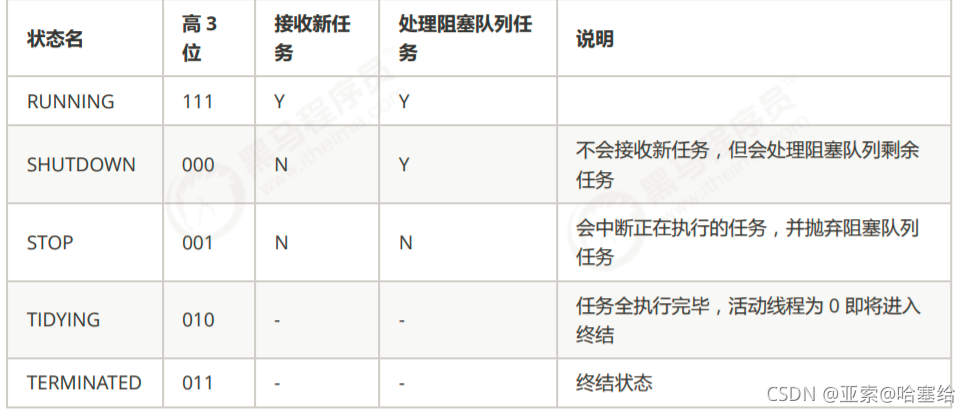
从数字上比较(第一位是符号位),TERMINATED > TIDYING > STOP > SHUTDOWN > RUNNING 这些信息存储在一个原子变量 ctl 中,目的是将线程池状态与线程个数合二为一,这样就可以用一次 cas 原子操作 进行赋值
友情提示:RUNNING 为什么最小,因为最高位1表示的是负数,除此之外,线程池状态和线程数为什么只用一个数字,而不用两个,就是为了保证原子性
// c 为旧值, ctlOf 返回结果为新值
ctl.compareAndSet(c, ctlOf(targetState, workerCountOf(c))));
// rs 为高 3 位代表线程池状态, wc 为低 29 位代表线程个数,ctl 是合并它们
private static int ctlOf(int rs, int wc) { return rs | wc; }
2) 构造方法
下面看一下参数最多的 一个线程方法
public ThreadPoolExecutor(int corePoolSize,
 int maximumPoolSize,
 long keepAliveTime,
 TimeUnit unit,
 BlockingQueue<Runnable> workQueue,
 ThreadFactory threadFactory,
RejectedExecutionHandler handler){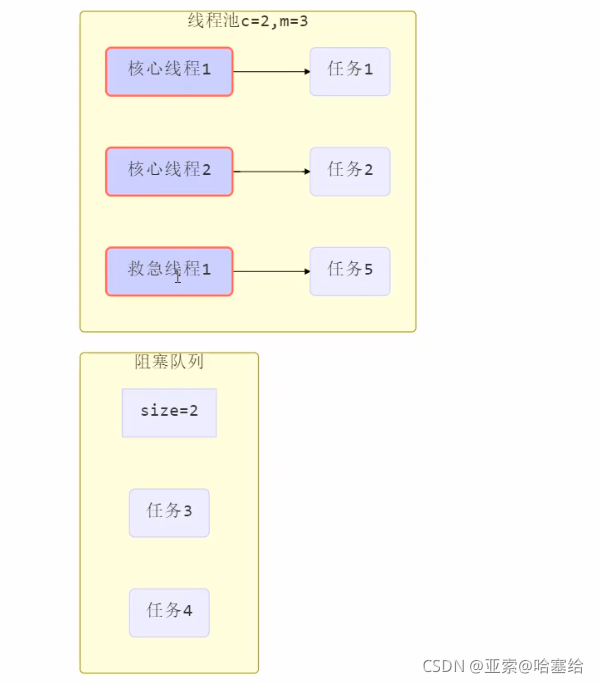
}- corePoolSize 核心线程数目 (最多保留的线程数)
- maximumPoolSize 最大线程数目(核心线程数加上救急线程数)
- keepAliveTime 救急线程的生存时间(核心线程没有生存时间这个东西,核心线程会一直运行)
- unit 时间单位 - 针对救急线程
- workQueue 阻塞队列
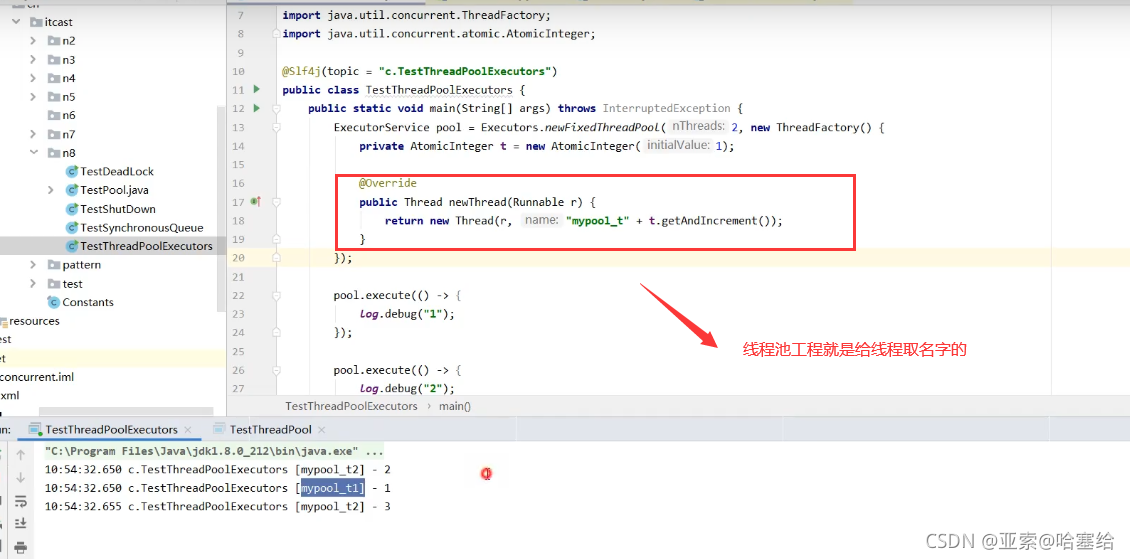
- threadFactory 线程工厂 - 可以为线程创建时起个好名字
- handler 拒绝策略
- 线程池中刚开始没有线程,当一个任务提交给线程池后,线程池会创建一个新线程来执行任务。
- 当线程数达到 corePoolSize 并没有线程空闲,这时再加入任务,新加的任务会被加入workQueue 队列排 队,直到有空闲的线程。
- 如果队列选择了有界队列,那么任务超过了队列大小时,会创建 maximumPoolSize - corePoolSize 数目的线 程来救急。
- 如果线程到达 maximumPoolSize 仍然有新任务这时会执行拒绝策略。拒绝策略 jdk 提供了 下面的前4 种实现,其它著名框架也提供了实现
- ThreadPoolExecutor.AbortPolicy让调用者抛出 RejectedExecutionException 异常,这是默认策略
- ThreadPoolExecutor.CallerRunsPolicy 让调用者运行任务
- ThreadPoolExecutor.DiscardPolicy 放弃本次任务
- ThreadPoolExecutor.DiscardOldestPolicy 放弃队列中最早的任务,本任务取而代之
- Dubbo 的实现,在抛出 RejectedExecutionException 异常之前会记录日志,并 dump 线程栈信息,方 便定位问题
- Netty 的实现,是创建一个新线程来执行任务
- ActiveMQ 的实现,带超时等待(60s)尝试放入队列,类似我们之前自定义的拒绝策略
- PinPoint 的实现,它使用了一个拒绝策略链,会逐一尝试策略链中每种拒绝策略
- 当高峰过去后,超过corePoolSize 的救急线程如果一段时间没有任务做,需要结束节省资源,这个时间由 keepAliveTime 和 unit 来控制。
下面的是4中拒绝策略

根据这个构造方法,JDK Executors 类中提供了众多工厂方法来创建各种用途的线程池
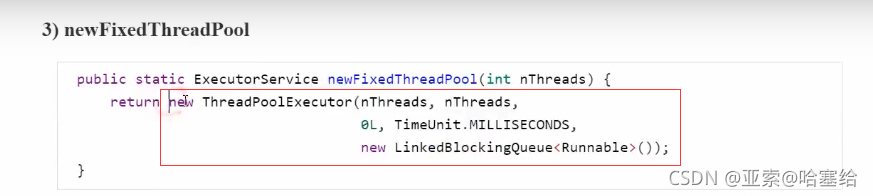
3) newFixedThreadPool
这个是Executors类提供的工厂方法来创建线程池!Executors 是Executor 框架的工具类! Test19.java
   public static ExecutorService newFixedThreadPool(int nThreads) {
        return new ThreadPoolExecutor(nThreads, nThreads,
                                      0L, TimeUnit.MILLISECONDS,
                                      new LinkedBlockingQueue<Runnable>());
    }
通过源码可以看到 new ThreadPoolExecutor(xxx)方法其实是是调用了之前说的完整参数的构造方法,使用了默认的线程工厂和拒绝策略!
  public ThreadPoolExecutor(int corePoolSize,
                              int maximumPoolSize,
                              long keepAliveTime,
                              TimeUnit unit,
                              BlockingQueue<Runnable> workQueue) {
        this(corePoolSize, maximumPoolSize, keepAliveTime, unit, workQueue,
             Executors.defaultThreadFactory(), defaultHandler);
    }
特点
- 核心线程数 == 最大线程数(没有救急线程被创建),因此也无需超时时间
- 阻塞队列是无界的,可以放任意数量的任务
- 适用于任务量已知,相对耗时的任务
代码
4) newCachedThreadPool
public static ExecutorService newCachedThreadPool() {
 return new ThreadPoolExecutor(0, Integer.MAX_VALUE,
 60L, TimeUnit.SECONDS,
 new SynchronousQueue<Runnable>());
}
特点
- 核心线程数是 0, 最大线程数是 Integer.MAX_VALUE,救急线程的空闲生存时间是 60s,意味着
- 全部都是救急线程(60s 后可以回收)
- 救急线程可以无限创建
- 队列采用了 SynchronousQueue 实现特点是,它没有容量,没有线程来取是放不进去的(一手交钱、一手交 货)
代码:
SynchronousQueue<Integer> integers = new SynchronousQueue<>();
new Thread(() -> {
 try {
 log.debug("putting {} ", 1);
 integers.put(1);
 log.debug("{} putted...", 1);
 log.debug("putting...{} ", 2);
 integers.put(2);
 log.debug("{} putted...", 2);
 } catch (InterruptedException e) {
 e.printStackTrace();
 }
},"t1").start();
sleep(1);
new Thread(() -> {
 try {
 log.debug("taking {}", 1);
 integers.take();
 } catch (InterruptedException e) {
 e.printStackTrace();
 }
},"t2").start();
sleep(1);
new Thread(() -> {
 try {
 log.debug("taking {}", 2);
 integers.take();
 } catch (InterruptedException e) {
 e.printStackTrace();
 }
},"t3").start();
输出
11:48:15.500 c.TestSynchronousQueue [t1] - putting 1
11:48:16.500 c.TestSynchronousQueue [t2] - taking 1
11:48:16.500 c.TestSynchronousQueue [t1] - 1 putted...
11:48:16.500 c.TestSynchronousQueue [t1] - putting...2
11:48:17.502 c.TestSynchronousQueue [t3] - taking 2
11:48:17.503 c.TestSynchronousQueue [t1] - 2 putted...
评价
整个线程池表现为线程数会根据任务量不断增长,没有上限,当任务执行完毕,空闲 1分钟后释放线 程。
适合任务数比较密集,但每个任务执行时间较短的情况
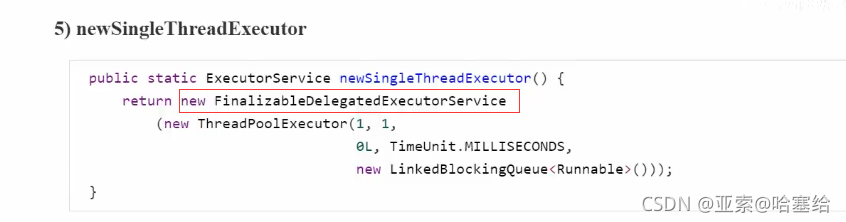
5) newSingleThreadExecutor
public static ExecutorService newSingleThreadExecutor() {
 return new FinalizableDelegatedExecutorService
 (new ThreadPoolExecutor(1, 1,0L, TimeUnit.MILLISECONDS,new LinkedBlockingQueue<Runnable>()));
}
使用场景:
- 希望多个任务串行排队执行。线程数固定为 1,任务数多于 1 时,会放入无界队列排队。任务执行完毕,这唯一的线程也不会被释放。
- 区别:
- 和自己创建单线程执行任务的区别:自己创建一个单线程串行执行任务,如果任务执行失败而终止那么没有任何补救措施,而线程池还会新建一个线程,保证池的正常工作
- 和Executors.newFixedThreadPool(1) 初始时为1时的区别:Executors.newFixedThreadPool(1) 初始时为1,以后还可以修改,对外暴露的是 ThreadPoolExecutor 对象,可以强转后调用 setCorePoolSize 等方法进行修改
- Executors.newSingleThreadExecutor() 线程个数始终为1,线程数不能修改,newSingleThreadExecutor的返回值是FinalizableDelegatedExecutorServic, FinalizableDelegatedExecutorService 应用的是装饰器模式,只对外暴露了 ExecutorService 接口,因 此不能调用 ThreadPoolExecutor 中特有的方法
对比下面的返回的对象
6) 提交任务
// 执行任务
void execute(Runnable command);
// 提交任务 task,用返回值 Future 获得任务执行结果,Future的原理就是利用我们之前讲到的保护性暂停模式来接受返回结果的,主线程可以执行 FutureTask.get()方法来等待任务执行完成
<T> Future<T> submit(Callable<T> task);
// 提交 tasks 中所有任务
<T> List<Future<T>> invokeAll(Collection<? extends Callable<T>> tasks)
 throws InterruptedException;
// 提交 tasks 中所有任务,带超时时间
<T> List<Future<T>> invokeAll(Collection<? extends Callable<T>> tasks,
 long timeout, TimeUnit unit)
 throws InterruptedException;
// 提交 tasks 中所有任务,哪个任务先成功执行完毕,返回此任务执行结果,其它任务取消
<T> T invokeAny(Collection<? extends Callable<T>> tasks)
 throws InterruptedException, ExecutionException;
// 提交 tasks 中所有任务,哪个任务先成功执行完毕,返回此任务执行结果,其它任务取消,带超时时间
<T> T invokeAny(Collection<? extends Callable<T>> tasks,
 long timeout, TimeUnit unit)
 throws InterruptedException, ExecutionException, TimeoutException;
代码
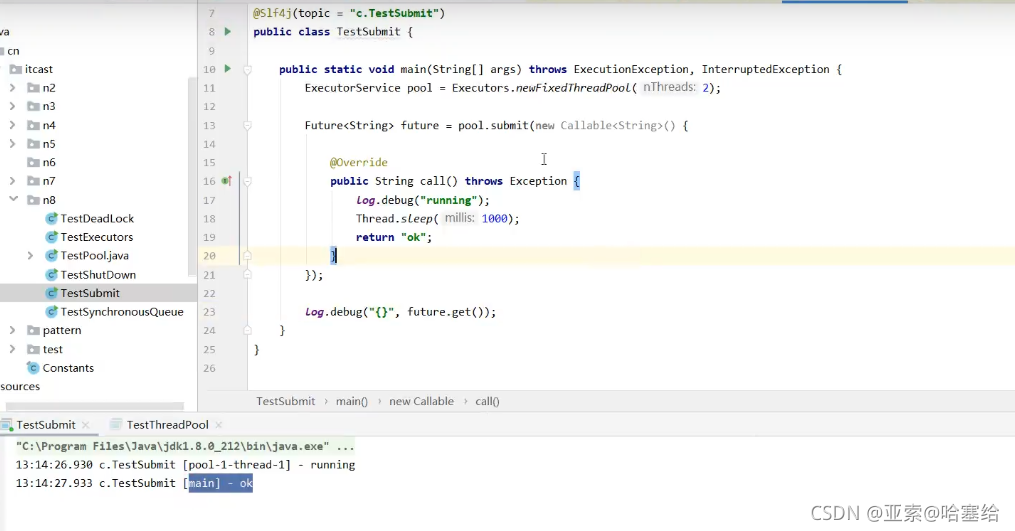
submit的使用
友情提示: 提交任务 task,用返回值 Future 获得任务执行结果,Future的原理就是利用我们之前讲到的保护性暂停模式来接受返回结果的,主线程可以执行 FutureTask.get()方法来等待任务执行完成
invokeAll的使用
友情提示:提交 tasks 中所有任务
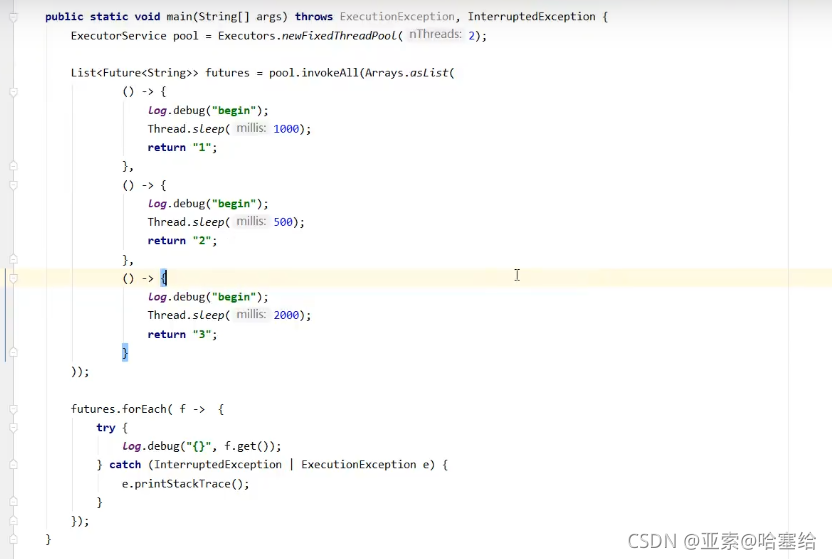
运行结果

invokeAny的使用
友情提示:提交 tasks 中所有任务,哪个任务先成功执行完毕,返回此任务执行结果,其它任务取消,下面的案列由于已经知道返回值得类型,所以写成String,如果不知道是什么类型,返回值的类型是Object
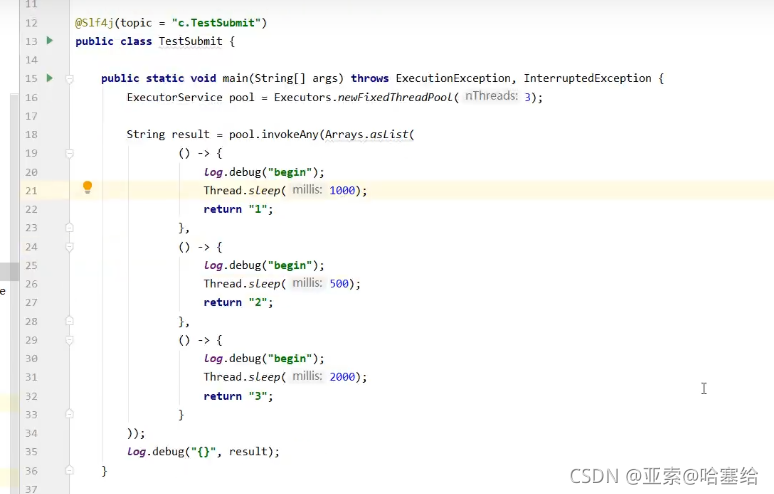
运行结果
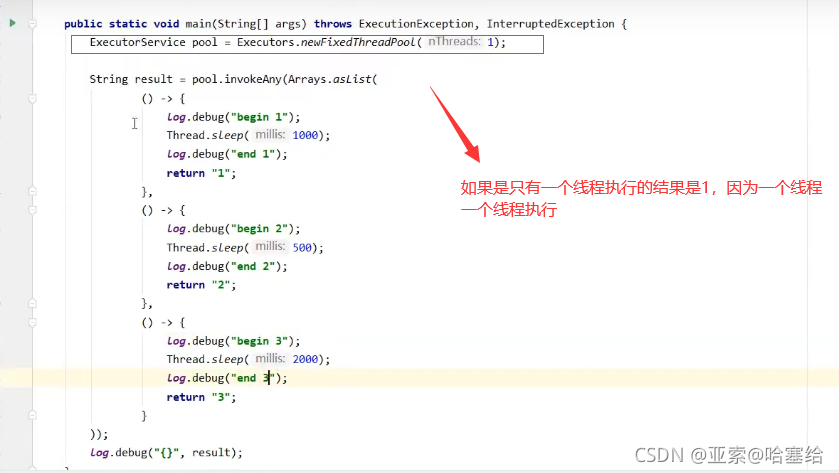
![]()
针对上面的问题,如果将线程数由原来的2变成1返回的结果就是1
7) 关闭线程池
shutdown介绍
/*
线程池状态变为 SHUTDOWN
- 不会接收新任务
- 但已提交任务会执行完,包括等待队列里面的
- 此方法不会阻塞调用线程的执行
*/
void shutdown();
public void shutdown() {
final ReentrantLock mainLock = this.mainLock;
mainLock.lock();
try {
checkShutdownAccess();
// 修改线程池状态
advanceRunState(SHUTDOWN);
// 仅会打断空闲线程
interruptIdleWorkers();
onShutdown(); // 扩展点 ScheduledThreadPoolExecutor
} finally {
mainLock.unlock();
}
// 尝试终结(没有运行的线程可以立刻终结)
tryTerminate();
}代码
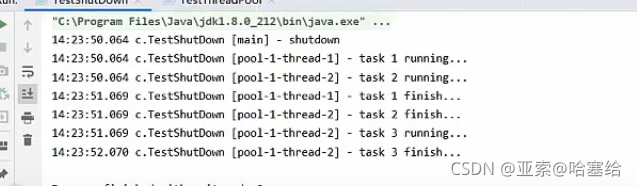
shutdown的使用
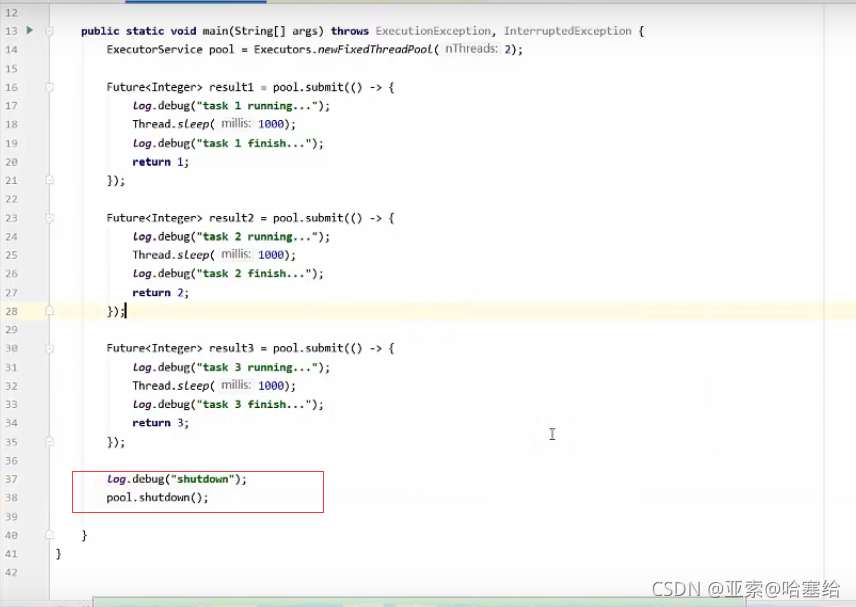
运行结果
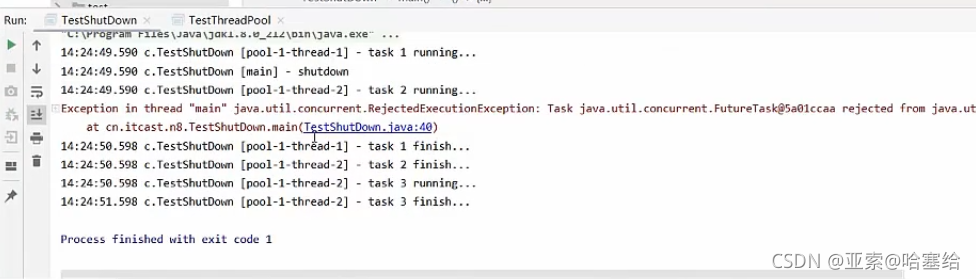
如果shutdown后面执行线程,则后面的就会报错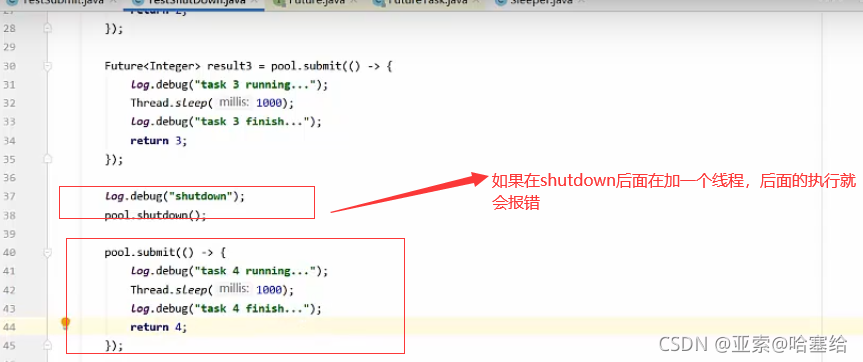
运行结果
让其主线程等待前面的线程使用awaitTermination,这个方法,不能很好的绝对线程什么时候执行结束,可以使用futureTask的get方法。
 最低0.47元/天 解锁文章


 341
341

 被折叠的 条评论
为什么被折叠?
被折叠的 条评论
为什么被折叠?
 到【灌水乐园】发言


