


 本文介绍如何在SpringBoot中使用@EnableAsync开启异步任务,通过@Async注解实现方法异步执行,并自定义线程池参数。同时,讲解如何使用@EnableScheduling和@Scheduled注解创建定时任务,包括cron表达式的详细用法。
异步任务
使用步骤
- 启动类里面使用
@EnableAsync注解开启异步任务
@SpringBootApplication
@EnableAsync // 开启异步功能
public class SpringBootTaskApplication {

    public static void main(String[] args) {
        ConfigurableApplicationContext ico = SpringApplication.run(SpringBootTaskApplication.class, args);

    }

}
- 编写异步任务
在SpringBoot中,异步任务可以使用@Async注解,可以在方法上标注该注解,说明该方法是异步方法,也可以标注在类上,表示该类的所有方法都是异步方法。注意:异步任务在其它类中调用才会起作用, 调用同一个类中的异步方法是不会起作用的
@Service
public class AsyncServiceImpl implements AsyncService {
    @Override
    @Async
    public void sayHello() {
        System.out.println("这是异步任务1");
        System.out.println("当前线程名" + Thread.currentThread().getName());
    }

    @Override
    @Async
    public void sayHello1() {
        // 调用本类的异步方法
        this.sayHello();
        System.out.println("这是异步任务2");
        System.out.println("当前线程名" + Thread.currentThread().getName());
    }
}
- 编写controller测试
@RestController
public class TestController {

    @Autowired
    private AsyncService asyncService;

    @RequestMapping("/testasync1")
    public String testAsync1() {
        System.out.println("访问testasync1");
        System.out.println("这是controller");
        System.out.println("当前线程名" + Thread.currentThread().getName());
        asyncService.sayHello();
        return "success";
    }

    @RequestMapping("/testasync2")
    public String testAsync2() {
        System.out.println("访问testasync2");
        System.out.println("这是controller");
        System.out.println("当前线程名" + Thread.currentThread().getName());
        asyncService.sayHello1();
        return "success";
    }
}
分别访问/testasync1和/testasyc2,可以得到以下结果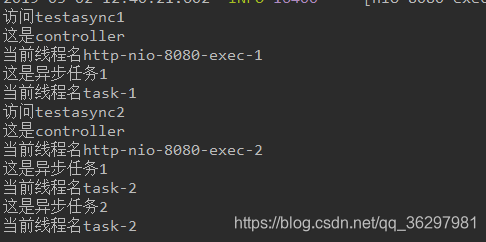
可以看出,执行asyncService的方法时在新的线程执行, 而在sayhello1中执行sayhello方法时,两个方法在同一个线程,说明了调用所在类的异步方法时不会起作用的
自定义线程池
SpringBoot使用的是自己定义的线程池来执行异步方法,我们也可以使用自定义的线程池,使用自定义线程池我们可以来实现Spring的AsyncConfigurer接口
@Configuration
public class AysncConfig implements AsyncConfigurer {
    @Override
    public Executor getAsyncExecutor() {

        ThreadPoolTaskExecutor executor = new ThreadPoolTaskExecutor();
        executor.setCorePoolSize(10);
        executor.setMaxPoolSize(30);
        executor.setQueueCapacity(3000);
        executor.initialize();
        return executor;
    }
}
定时任务
开始SpringBoot的定时任务需要两个注解 @EnableScheduling、 @Scheduled, @EnableScheduling作用在启动类上,开启基于注解的定时任务, @Scheduled作用在启动类上,表示该方法为定时方法
- 开启定时任务
@EnableAsync  //开启异步注解功能
@EnableScheduling //开启基于注解的定时任务
@SpringBootApplication
public class Springboot04TaskApplication {

	public static void main(String[] args) {
		SpringApplication.run(Springboot04TaskApplication.class, args);
	}
}
- 编写定时任务
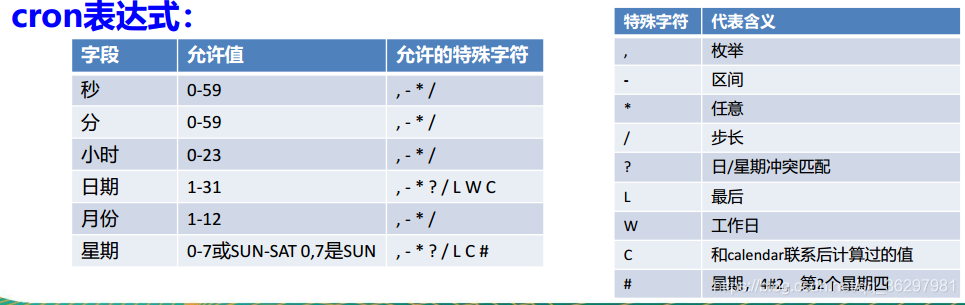
Spring允许使用cron表达式来规定执行时机
cron表达式
@Service
public class ScheduledService {

    /**
     * second(秒), minute(分), hour(时), day of month(日), month(月), day of week(周几).
     * 0 * * * * MON-FRI
     *  【0 0/5 14,18 * * ?】 每天14点整,和18点整,每隔5分钟执行一次
     *  【0 15 10 ? * 1-6】 每个月的周一至周六10:15分执行一次
     *  【0 0 2 ? * 6L】每个月的最后一个周六凌晨2点执行一次
     *  【0 0 2 LW * ?】每个月的最后一个工作日凌晨2点执行一次
     *  【0 0 2-4 ? * 1#1】每个月的第一个周一凌晨2点到4点期间,每个整点都执行一次;
     */
    // @Scheduled(cron = "0 * * * * MON-SAT")
    //@Scheduled(cron = "0,1,2,3,4 * * * * MON-SAT")
    // @Scheduled(cron = "0-4 * * * * MON-SAT")
    @Scheduled(cron = "0/4 * * * * MON-SAT")  //每4秒执行一次
    public void hello(){
        System.out.println("hello ... ");
    }
}


 632
632

 被折叠的 条评论
为什么被折叠?
被折叠的 条评论
为什么被折叠?
 到【灌水乐园】发言


