


 本文详细介绍Redux的基本概念、工作流程及如何在React项目中集成Redux,包括Action、Reducer、Store的创建,以及通过connect方法连接React组件与Redux。同时,演示了一个完整的面包屑标题切换实例,展示了如何使用Redux进行状态管理和组件间的数据共享。
Github地址
一 Redux基础介绍
-
单向数据流:从父组件留向子组件,兄弟组件无法共享数据
-
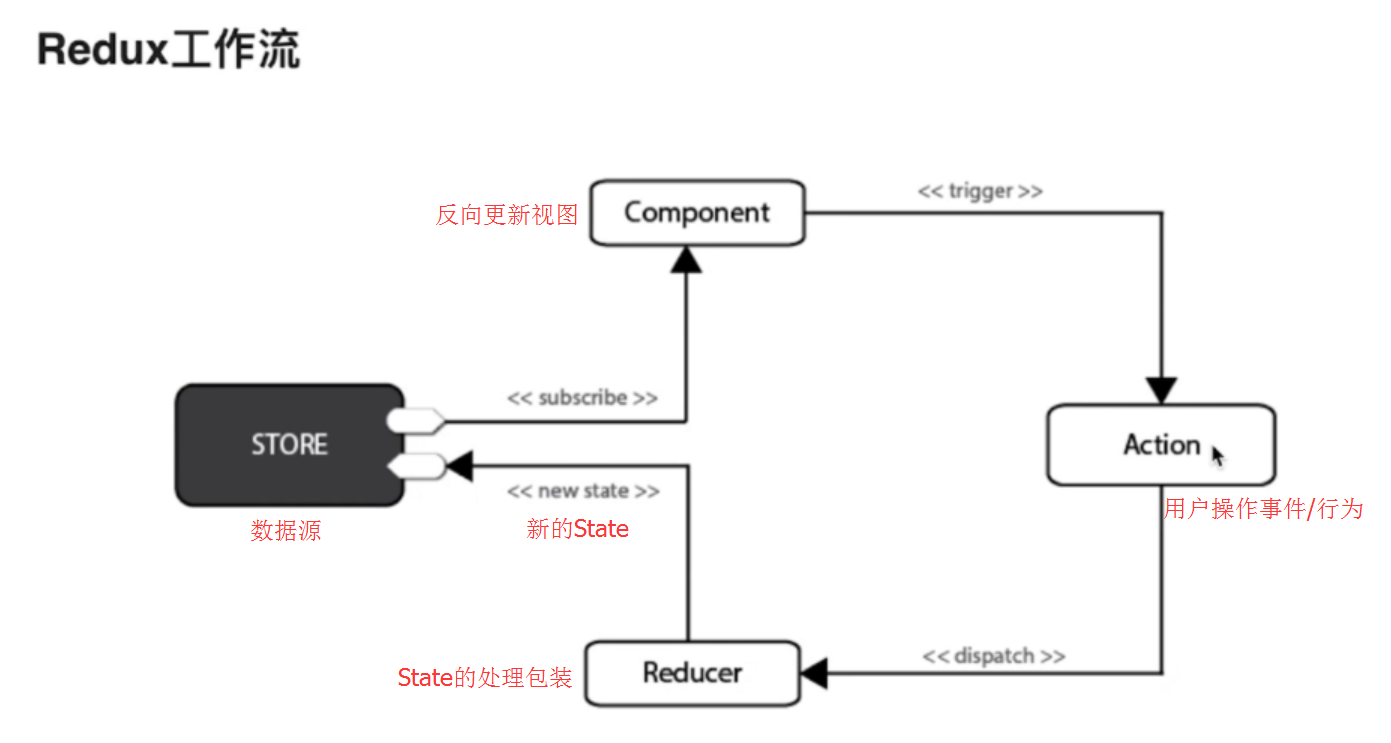
Redux核心概念
- State:React中的状态,是只读对象,不可直接修改
- Reducer:基本函数,用于对State的业务处理
- Action:普通对象,用于描述事件行为,改变State
-
Redux工作流
-
Redux安装
yarn add redux --save yarn add react-redux --save -
Redux集成
- 创建Action模块
- 创建Reducer模块
- 创建Store模块
- 通过connect方法将React组件和Redux连接起来
- 添加作为项目的根组件,用于数据的存储
- Redux调试工具安装
-
在火狐中安装Redux Devtools扩展:【安装地址】
-
项目中安装redux-devtools-extension调试插件
yarn add redux-devtools-extension --save -
Redux适用场景
-
项目需求角度考虑:
- 用户的使用方式复杂
- 不同身份的用户有不同的使用方式(比如普通用户和管理员)
- 多个用户之间可以协作
- 与服务器大量交互,或者使用了WebSocket
- View要从多个来源获取数据
-
组件角度考虑:
- 某个组件的状态,需要共享
- 某个状态需要在任何地方都可以拿到
- 一个组件需要改变全局状态
- 一个组件需要改变另一个组件的状态
-
不适用的场景:
- 用户的使用方式非常简单
- 用户之间没有协作
- 不需要与服务器大量交互,也没有使用 WebSocket
- 视图层(View)只从单一来源获取数据
二、Redux集成
- src->redux目录下:创建action->index.js操作事件模块
/*
* Action类型:用户事件操作
*/

export const type = {
    SWITCH_MENU:'SWITCH_MENU'
}

//菜单点击切换,修改面包屑名称
export function switchMenu(menuName) {
    return {
        type:type.SWITCH_MENU,
        menuName
    }
}
- src->redux目录下:创建reducer->index.js数据处理模块
/*
* Reducer: 数据处理
*/

import {type} from './../action'
const initialState={
    menuName:'首页'
}

const ebikeData = (state=initialState, action)=>{
    switch (action.type) {
        case type.SWITCH_MENU:
            return {
                ...state, // 旧值
                menuName:action.menuName // 新值
            }

        default:
            return{
                ...state
            }
    }
}

export default ebikeData
- src->redux目录下:创建store->configureStore.js数据源模块
/*
 *  引入createStore 保存数据源
 */

import { createStore } from "redux";
// 引入所有的reducer
import reducer from "./../reducer";
//调试工具插件方法 -- redux降级到3.7可使用
// import { composeWithDevTools } from 'redux-devtools-extension'
// export default ()=>createStore(reducer,composeWithDevTools)

export default ()=>createStore(reducer)
-
src->index.js项目入口文件中:添加项目根组件,存储store数据源
import { Provider } from "react-redux"; // 添加<Provider />项目根组件
import configureStore from "./redux/store/configureStore";

const store = configureStore();
ReactDOM.render(
  <Provider store={store}>
    <Router />
  </Provider>,
  document.getElementById("root")
);
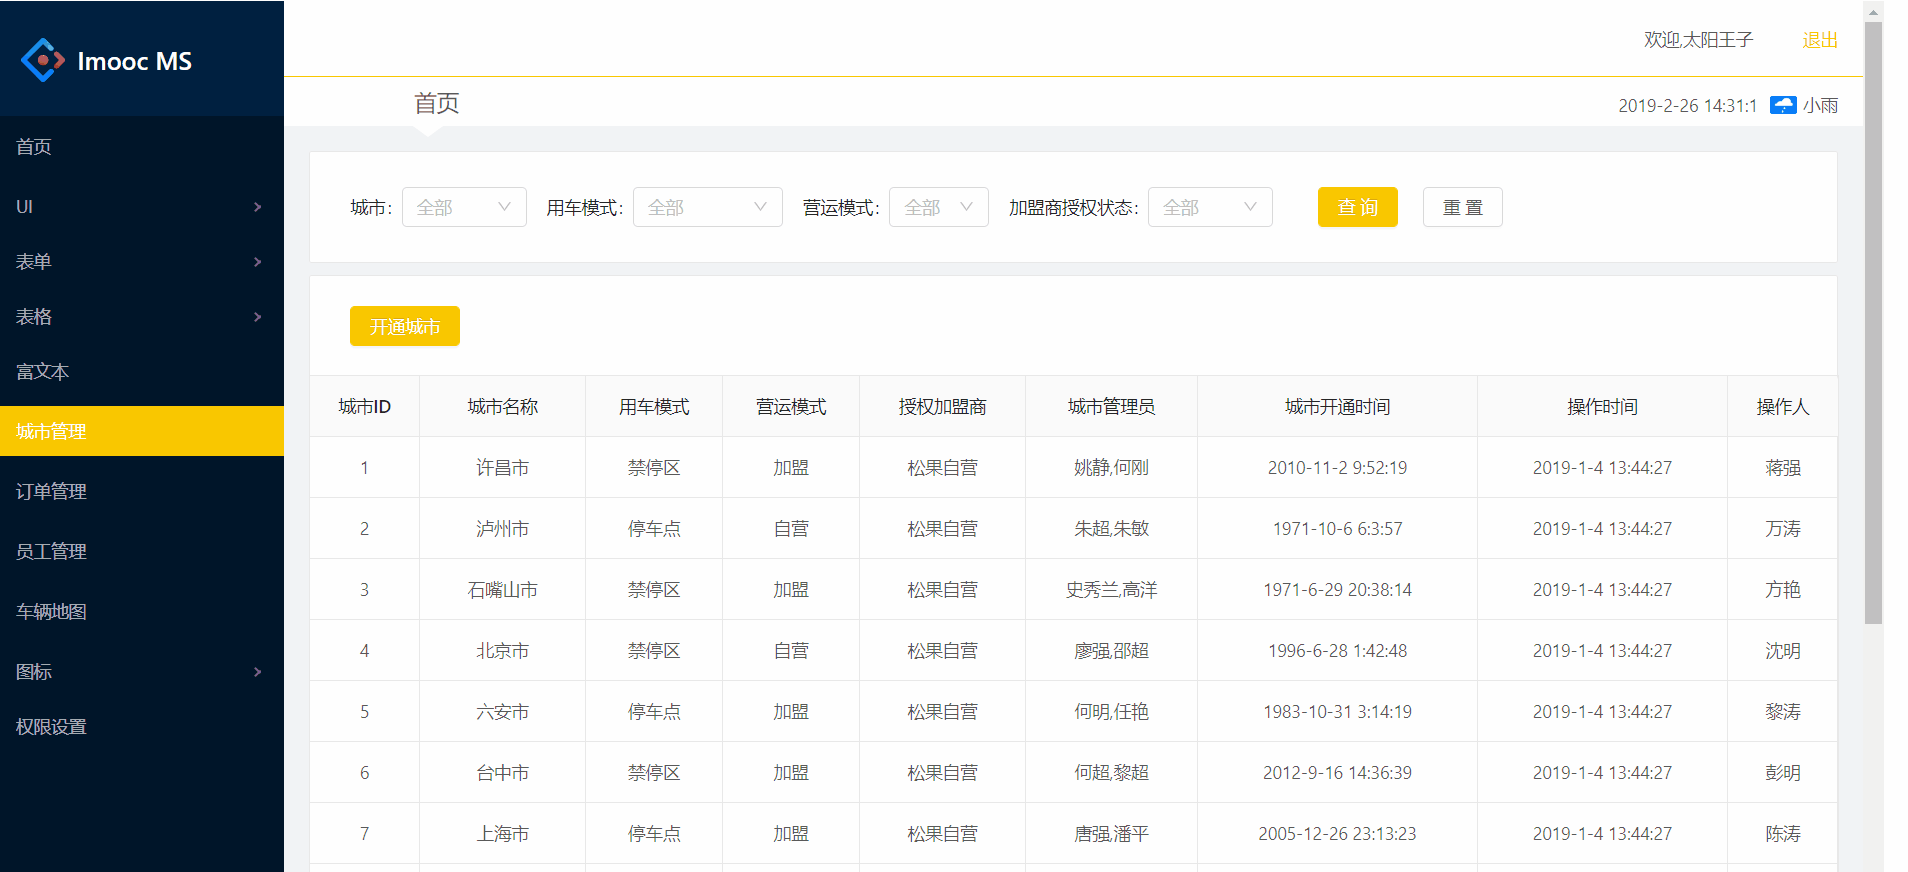
三、面包屑标题切换
-
pages->components->NevLeft(index.js)中:菜单(Menu)点击切换改变store中的面包屑名称(MenuName)
-
-
通过connect方法将react组件与Redux连接
export default connect()(NavLeft)
-
-
获取this.props.dispatch方法派发事件:通过action事件自动调用reducer存入到store中
import {connect} from 'react-redux'  //连接器
import { switchMenu } from './../../redux/action' //事件行为

class NavLeft extends React.Component {
    state = {
        currentKey: ''
    }
    handleClick = ({item, key}) => {
        if (key === this.state.currentKey) {
            return false;
        }
        // 事件派发,自动调用reducer,通过reducer保存到store对象中
        const { dispatch } = this.props;
        dispatch(switchMenu(item.props.title))
        // console.log(item)
        this.setState({
            currentKey: key
        })
    }
    homeHandleClick = () => {
        const { dispatch } = this.props;
        dispatch(switchMenu('首页'));
        this.setState({
            currentKey: ""
        });
    };

    //其它代码
    <Menu
          onClick={this.handleClick}
          selectedKeys={[this.state.currentKey]}
          theme="dark"
     >
          {this.state.MenuTreeNode}
    </Menu>
}
-
pages->components->Header(index.js)中:获取并填入store中的面包屑名称(MenuName)
-
通过connect方法将react组件与Redux连接
-
利用mapStateToProps函数建立state与store的映射关系:将state.menuName 绑定到 props 的menuName
-
面包屑标题处:获取this.props.menuName填入
import {connect} from 'react-redux'  //连接器
...
<Col span="4" className="breadcrumb-title">
                            {/* 首页 */}
                            {this.props.menuName}
</Col>
...
//将state.menuName 绑定到 props 的menuName
const mapStateToProps = state => {
    return {
        menuName: state.menuName
    }
}
export default connect(mapStateToProps)(Header)
四 完整实例
// src/components/Header/index.js
  // src/components/Header/index.js
  import React from 'react';
  /*
  Header组件 分两部分建立两行Row
  第一行是用户的个人信息(这里以后要通过变量传输进来)
  * */
  import {Row, Col} from "antd";
  import './index.less'
  import Util from '../../utils/utils'//导入公共机制
  import axios from "../../axios";//引入axios组件
  import {connect} from 'react-redux'  //连接器
  class Header extends React.Component {
      //声明 state变量 在setState之前要声明变量
      state = {};

      componentWillMount() {
          this.setState({
              userName: '太阳王子',
          });
          /*
          创建定时器,每隔一秒获取时间
          * 获取时间的方法
          */
          setInterval(() => {
              // new Date();
              let sysTime = Util.formateDate(new Date().getTime());
              this.setState({
                  sysTime
              })
          }, 1000);
          this.getWeatherAPIData();//在这里调用下天气
      }

      /*定义得到API天气的方法*/
      getWeatherAPIData() {
          //通过jsonp的方式  调用百度Api接口
          //1.安装jsonp插件             yarn add jsonp --save
          //2.对jsonp插件进行的封装   新建文件夹axios-----index.js
          //3.通过axios插件来发送jsonp()方法
          //通过字符串的方式发送url
          //地区动态储存,定义变量   city            // url:'http://api.map.baidu.com/telematics/v3/weather?location='+this.city+'&output=json&ak=3p49MVra6urFRGOT9s8UBWr2'
          //对中文进行编码,转为页面字符
          // 编码后通过   .then  进行接收

          let city = '咸阳';

          axios.jsonp({
              // url:'http://api.map.baidu.com/telematics/v3/weather?location='+this.city+'&output=json&ak=3p49MVra6urFRGOT9s8UBWr2'
              url: 'http://api.map.baidu.com/telematics/v3/weather?location=' + encodeURIComponent(city) + '&output=json&ak=3p49MVra6urFRGOT9s8UBWr2'
          }).then((res) => {//通过这里拿到返回值,可以先看下返回值是什么

              if (res.status == 'success') {//状态成功取得数据进行使用
                  let data = res.results[0].weather_data[0];
                  this.setState({//将状态设置进去
                      date:data.date,
                      dayPictureUrl: data.dayPictureUrl,
                      weather: data.weather
                  })
              }
          })
      }

      render() {
          // 取出menuType 用作二级导航(父组件Common.js传来)
          const menuType = this.props.menuType;
          return (
              <div className="header">
                  <Row className="header-top">
                      {
                        menuType?
                          <Col span="6" className="logo">
                            <img src="/assets/logo-ant.svg" alt=""/>
                            <span>IMooc 通用管理系统</span>
                          </Col>:''
                      }
                      <Col span={menuType?18:24}>
                          <span>欢迎,{this.state.userName}</span>
                          <a href="#">退出</a>
                      </Col>
                  </Row>
                  {
                      menuType?'':<Row className="breadcrumb">
                          <Col span="4" className="breadcrumb-title">
                              {/* 首页 */}
                              {this.props.menuName}
                          </Col>
                          <Col span="20" className="weather">
                              <span className="date">{this.state.sysTime}</span>
                              <span className="weather-img">
                              <img src={this.state.dayPictureUrl} alt=""/>
                          </span>
                              <span className="weather-detail">
                              {this.state.weather}
                                  {/*{this.state.date}*/}
                          </span>
                          </Col>
                      </Row>
                  }
              </div>
          );
      }
  }
  //将state.menuName 绑定到 props 的menuName
  const mapStateToProps = state => {
      return {
          menuName: state.menuName
      }
  };
  export default connect(mapStateToProps)(Header)
// src/components/NavLeft/index.js
// src/components/NavLeft/index.js
import React from "react";
import MenuConfig from "./../../config/menuConfig"; //导入menuConfig这个文件
import { Menu, Icon } from "antd"; //导入子组件菜单
import { NavLink } from "react-router-dom";
import "./index.less";
import { connect } from "react-redux"; // 连接器
import { switchMenu } from "./../../redux/action"; //事件行为

const SubMenu = Menu.SubMenu;
class NavLeft extends React.Component {
  state = {
    currentKey: ""
  };
  handleClick = ({ item, key }) => {
    // console.log(item)
    if (key === this.state.currentKey) {
      return false;
    }
    // 事件派发,自动调用reducer,通过reducer保存到store对象中
    const { dispatch } = this.props;
    dispatch(switchMenu(item.props.title));
    this.setState({
      currentKey: key
    });
  };

  /*
   * 获取到对象后,可以通过setState将对象存进去 ,这是React的一个特色
   * */
  componentWillMount() {
    //通过MenuConfig读取文件
    //通过递归(遍历)实现菜单(是一个List)的渲染
    const menuTreeNode = this.renderMenu(MenuConfig);
    let currentKey = window.location.hash.replace(/#|\?.*$/g, "");
    //通过setState存入state
    this.setState({
      currentKey,
      menuTreeNode
    });
  }

  homeHandleClick = () => {
    const { dispatch } = this.props;
    dispatch(switchMenu('首页'));
    this.setState({
      currentKey: ""
    });
  };

  //菜单渲染
  renderMenu = data => {
    return data.map(item => {
      //如果item有子元素,遍历自己,再次调用,直到子节点加载完毕
      if (item.children) {
        return (
          <SubMenu title={item.title} key={item.key}>
            {this.renderMenu(item.children)}
          </SubMenu>
        );
      }
      return (
        <Menu.Item title={item.title} key={item.key}>
          <NavLink to={item.key}>{item.title}</NavLink>
        </Menu.Item>
      );
    });
  };

  render() {
    // var style = {
    //     backgroundColor:'red'
    // }
    return (
      <div>
        <NavLink to="/home" onClick={this.homeHandleClick}>
          <div className="logo">
            <img src="/assets/logo-ant.svg" alt=""/>
            <h1>Imooc MS</h1>
          </div>
        </NavLink>
        <Menu
          onClick={this.handleClick}
          selectedKeys={[this.state.currentKey]}
          theme="dark"
        >
          {this.state.menuTreeNode}
        </Menu>
      </div>
    );
  }
}
export default connect()(NavLeft);


 2万+
2万+

 被折叠的 条评论
为什么被折叠?
被折叠的 条评论
为什么被折叠?
 到【灌水乐园】发言


