


 本文深入探讨了BIO(Blocking I/O)的传统通信机制及其在处理多客户端连接时的弊端,包括两次阻塞的问题。此外,文章还介绍了NIO(Non-blocking I/O)的概念,重点讲解了其关键组件buffer、selector和channel的工作原理,以及如何利用NIO进行高效的文件读写操作。
BIO
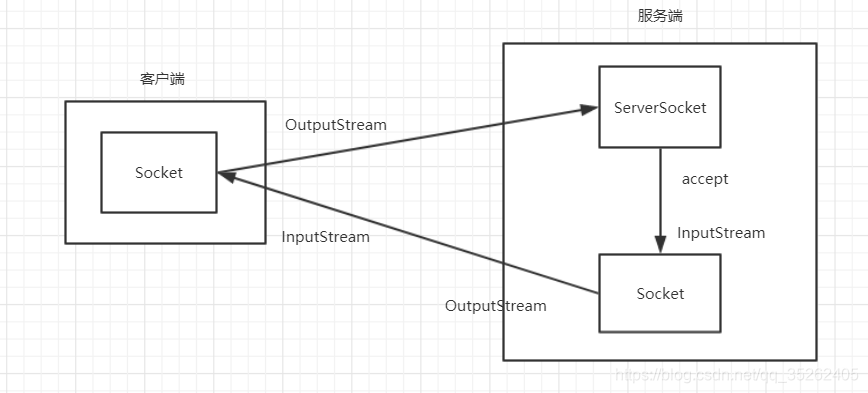
传统的BIO主要是通过socket、输入流和输出流实现的,有客户端和服务端之分,其中共有3个Socket参与其中
BIO的弊端
因为传统BIO在通信过程中会遇到两次阻塞,所以在实际运用中会遇到许多问题
第一次阻塞
Socket socket = serverSocket.accept(); //阻塞
第二次阻塞
while ((count=inputStream.read(bytes))!=-1){
所以想要实现一个服务端和多个客户端通信必须开启多线程才能实现
传统BIO示例(一问一答)
客户端
public class BioClient {
    public static void main(String[] args) {
        Socket socket=null;
        OutputStream outputStream=null;
        try {
            socket =new Socket("127.0.0.1",9999);
            new Thread(new BioClientHandler(socket)).start();  //循环读
            outputStream=socket.getOutputStream();
            Scanner scanner=new Scanner(System.in);
            System.out.print("请输入要发送的消息:");
            while (true){
                String s = scanner.nextLine();
                if(s.trim().equals("by")){
                    break;
                }
                outputStream.write(s.getBytes());
                outputStream.flush();
            }
        } catch (IOException e) {
            e.printStackTrace();
        }finally {
            if(outputStream!=null){
                try {
                    outputStream.close();
                } catch (IOException e) {
                    e.printStackTrace();
                }
            }
            if(socket!=null){
                try {
                    socket.close();
                } catch (IOException e) {
                    e.printStackTrace();
                }
            }
        }
    }
}
public class BioClientHandler implements  Runnable {
    private Socket socket;

    public BioClientHandler(Socket socket) {
        this.socket = socket;
    }
    @Override
    public void run() {
        InputStream inputStream=null;
        try {
            inputStream = socket.getInputStream();
            int count=0;
            byte[] bytes=new byte[1024];
            while ((count=inputStream.read(bytes))!=-1){
                System.out.println("\n收到服务器消息:  "+new String(bytes,0,count,"utf-8"));
                System.out.print("请输入要发送的消息:");
            }
        } catch (IOException e) {
            e.printStackTrace();
        }
    }
}
服务端
public class BioServer {

    public static void main(String[] args) {
        ServerSocket serverSocket = null;
        try {
            serverSocket=new ServerSocket(9999);
            TimeServerHandlerExecutorPool timeServerHandlerExecutorPool=new TimeServerHandlerExecutorPool(50,1000);
            while (true){
                Socket socket = serverSocket.accept();  //阻塞
                System.out.println("客户端"+socket.getRemoteSocketAddress().toString()+"来连接了");
//                new Thread(new BioServerHandler(socket)).start();
                timeServerHandlerExecutorPool.execute(new BioServerHandler(socket));
            }
        } catch (IOException e) {
            e.printStackTrace();
        }finally {
            if(serverSocket!=null){
                try {
                    serverSocket.close();
                } catch (IOException e) {
                    e.printStackTrace();
                }
            }
        }
    }
}
public class BioServerHandler implements Runnable {
    //负责客户端通信
    private Socket socket;

    public BioServerHandler(Socket socket){
        this.socket=socket;
    }

    @Override
    public void run() {
        InputStream inputStream=null;
        OutputStream outputStream=null;
        try {
            inputStream = socket.getInputStream();
            outputStream=socket.getOutputStream();
            int count=0;
            String content=null;
            byte[] bytes=new byte[1024];
            while ((count=inputStream.read(bytes))!=-1){
                String line=new String(bytes,0,count,"utf-8");
                System.out.println(line);
                content=line.trim().equalsIgnoreCase("SJ")?new SimpleDateFormat("yyyy-MM-dd hh:mm:ss").format(new Date()): "你发的啥?";
                outputStream.write(content.getBytes());
                outputStream.flush();
            }
        } catch (IOException e) {
            e.printStackTrace();
        }finally {
            if(inputStream!=null){
                try {
                    inputStream.close();
                } catch (IOException e) {
                    e.printStackTrace();
                }
            }
            if(outputStream!=null){
                try {
                    outputStream.close();
                } catch (IOException e) {
                    e.printStackTrace();
                }
            }
            if(socket!=null){
                try {
                    socket.close();
                } catch (IOException e) {
                    e.printStackTrace();
                }
            }
        }
    }
}
public class TimeServerHandlerExecutorPool implements Executor{

     private ExecutorService executorService;

    public TimeServerHandlerExecutorPool(int maxPoolSize, int queueSize) {

        /**
         * @param corePoolSize 核心线程数量
         * @param maximumPoolSize 线程创建最大数量
         * @param keepAliveTime 当创建到了线程池最大数量时  多长时间线程没有处理任务,则线程销毁
         * @param unit keepAliveTime时间单位
         * @param workQueue 此线程池使用什么队列
         */
        this.executorService = new ThreadPoolExecutor(Runtime.getRuntime().availableProcessors(),
                maxPoolSize,120L, TimeUnit.SECONDS,new ArrayBlockingQueue<Runnable>(queueSize));
    }


    public TimeServerHandlerExecutorPool(int corePoolSize,int maxPoolSize, int queueSize) {

        /**
         * @param corePoolSize 核心线程数量
         * @param maximumPoolSize 线程创建最大数量
         * @param keepAliveTime 当创建到了线程池最大数量时  多长时间线程没有处理任务,则线程销毁
         * @param unit keepAliveTime时间单位
         * @param workQueue 此线程池使用什么队列
         */
        this.executorService = new ThreadPoolExecutor(corePoolSize,
                maxPoolSize,120L, TimeUnit.SECONDS,new LinkedBlockingDeque<>(queueSize));
    }

    @Override
    public void execute(Runnable command) {
        executorService.execute(command);
    }


    public static void main(String[] args) {
        TimeServerHandlerExecutorPool timeServerHandlerExecutorPool=new TimeServerHandlerExecutorPool(0,20);
        while (true){
            timeServerHandlerExecutorPool.execute(new Runnable() {
                @Override
                public void run() {
                    System.out.println("aaaaaa");
                }
            });
        }
    }
}
模拟实现redis客户端
其实redis客户端也是通过IO将一些指令发送给redis服务端进行增删改查操作的。
至于发送的指令的格式这是根据redis的resp协议,同样Jedis也是通过resp协议编写的,比如Jedis中的set方法就是客户端发送如下的指令
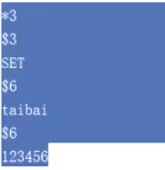
其中*3代表有3个指令
第一个$3代表后面SET指令的长度
第一个$6代表后面的key的长度
第二个$6代表后面的值的长度
代码如下,这里只是实现了一个简单的客户端,只有几个简单的指令
API层
public class LubanJedis {

    LubanSocket lubanSocket=new LubanSocket("192.168.204.188",6379);

    public String set(String key, String value){
        lubanSocket.send(commandUtil(Resp.command.SET,key.getBytes(),value.getBytes()));
        return lubanSocket.read();
    }


    public String get(String key){
        lubanSocket.send(commandUtil(Resp.command.GET,key.getBytes()));
        return lubanSocket.read();
    }


    public String incr(String key){
        lubanSocket.send(commandUtil(Resp.command.INCR,key.getBytes()));
        return lubanSocket.read();
    }


    public static String commandUtil(Resp.command command,byte[]... bytes){
        StringBuilder stringBuilder=new StringBuilder();
        stringBuilder.append(Resp.star).append(1+bytes.length).append(Resp.line);
        stringBuilder.append(Resp.StringLength).append(command.toString().length()).append(Resp.line);
        stringBuilder.append(command.toString()).append(Resp.line);
        for (byte[] aByte : bytes) {
            stringBuilder.append(Resp.StringLength).append(aByte.length).append(Resp.line);
            stringBuilder.append(new String(aByte)).append(Resp.line);
        }
        return stringBuilder.toString();
    }
}
客户端层
public class LubanSocket {

    private Socket socket;
    public InputStream inputStream;
    public OutputStream outputStream;

    public LubanSocket(String ip, int port) {
        try {
            socket=new Socket(ip,port);
            inputStream=socket.getInputStream();
            outputStream=socket.getOutputStream();
        } catch (IOException e) {
            e.printStackTrace();
        }
    }


    //str 向redis服务器端发送的数据
    public void send(String str){
        try {
            outputStream.write(str.getBytes());
        } catch (IOException e) {
            e.printStackTrace();
        }
    }

    public String read(){
        byte[] bytes=new byte[1024];
        int count=0;
        try {
            count = inputStream.read(bytes);
        } catch (IOException e) {
            e.printStackTrace();
        }
        return new String(bytes,0,count);
    }
}
协议层
public class Resp {

    public static final String star="*";

    public static final String StringLength="$";

    public static final String line="\r\n";

    public static enum command{
        SET, GET ,INCR
    }
}
NIO
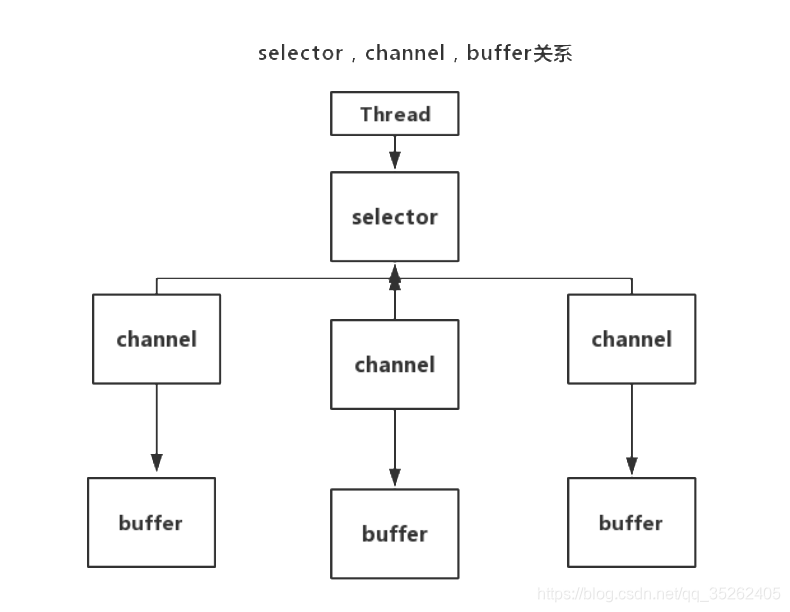
在NIO中没有流的概念,但是取而代之的这是下面三个组件
- buffer
- selector
- channel
buffer
buffer从关系图上来看buffer是用来存储channel上的数据的,因为传输不同的数据类型,所以buffer也有不同的类型。
可以这么来说,不同的数据类型有不同的buffer,例如ByteBuffer,IntBuffer,LongBuffer,ShortBuffer等等,分别对应的数据类型为byte,int,long,short。
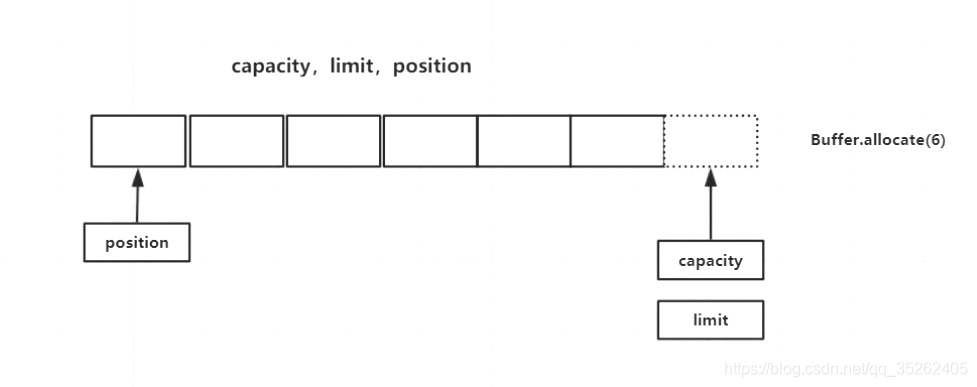
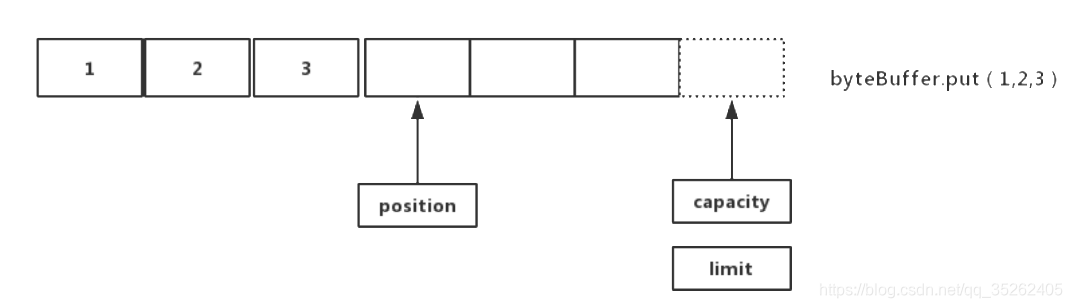
buffer有三个重要的属性capacity,limit和position,可以看作buffer存储数据时指向数据的指针。
- capacity:代表buffer的最大容量,这个指针始终指向buffer的尾部,同时永远不会改变
- limit:起着限制和标识的作用,创建buffer初始和capacity指向同一位置,在buffer执行
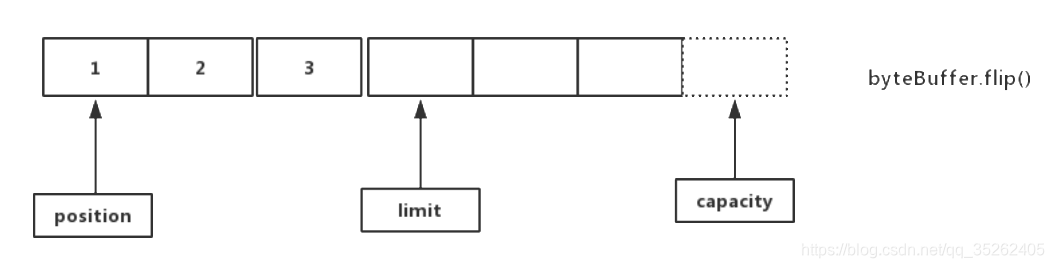
flip()时会指向上一次position指向的位置 - position:指向当前操作的位置,在执行
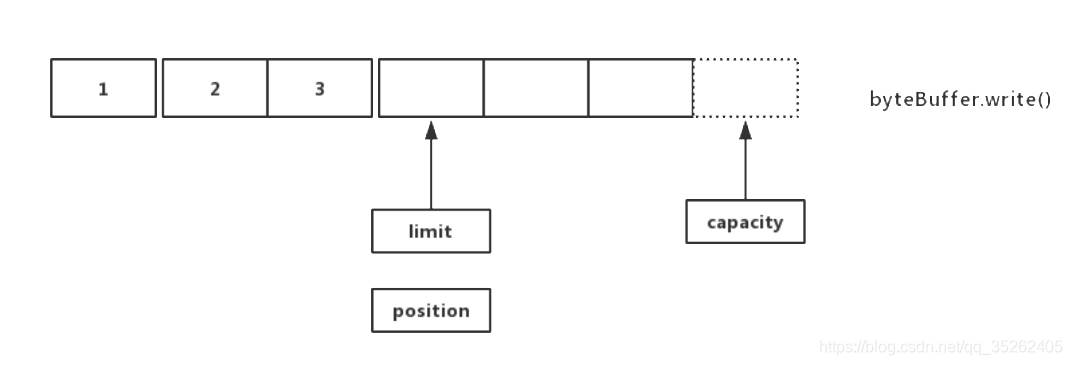
write()会在position指向的位置执行写操作,在执行flip()会重新指向buffer一开始(头)的位置
例程
简单存储和遍历
public static void main(String[] args) {
    IntBuffer buffer = IntBuffer.allocate(8);
    for (int i=0;i<buffer.capacity();i++){
        int nextInt = new SecureRandom().nextInt(20);
        buffer.put(nextInt);
    }
    buffer.flip();
    while (buffer.hasRemaining()){
        System.out.println(buffer.get());
    }
}
从文件里读数据
public static void main(String[] args) throws Exception {
    FileInputStream fileInputStream=new FileInputStream("dome2.txt");
    FileChannel channel = fileInputStream.getChannel();
    ByteBuffer byteBuffer=ByteBuffer.allocate(1024);
    channel.read(byteBuffer);
    byteBuffer.flip();
    while (byteBuffer.remaining()>0){
        System.out.println((char)byteBuffer.get());
    }
    fileInputStream.close();
}
向文件中写数据
public static void main(String[] args) throws Exception {
    FileOutputStream fileOutputStream=new FileOutputStream("dome3.txt");
    FileChannel channel = fileOutputStream.getChannel();
    byte[] bytes="taibai".getBytes();
    ByteBuffer byteBuffer=ByteBuffer.allocate(1024);
    byteBuffer.put(bytes);
    byteBuffer.flip();
    channel.write(byteBuffer);
    fileOutputStream.close();
}
从文件中边读边写
public static void main(String[] args) throws Exception {
FileOutputStream fileOutputStream=new FileOutputStream("dome4write.txt");
FileInputStream fileInputStream=new FileInputStream("dome4read.txt");
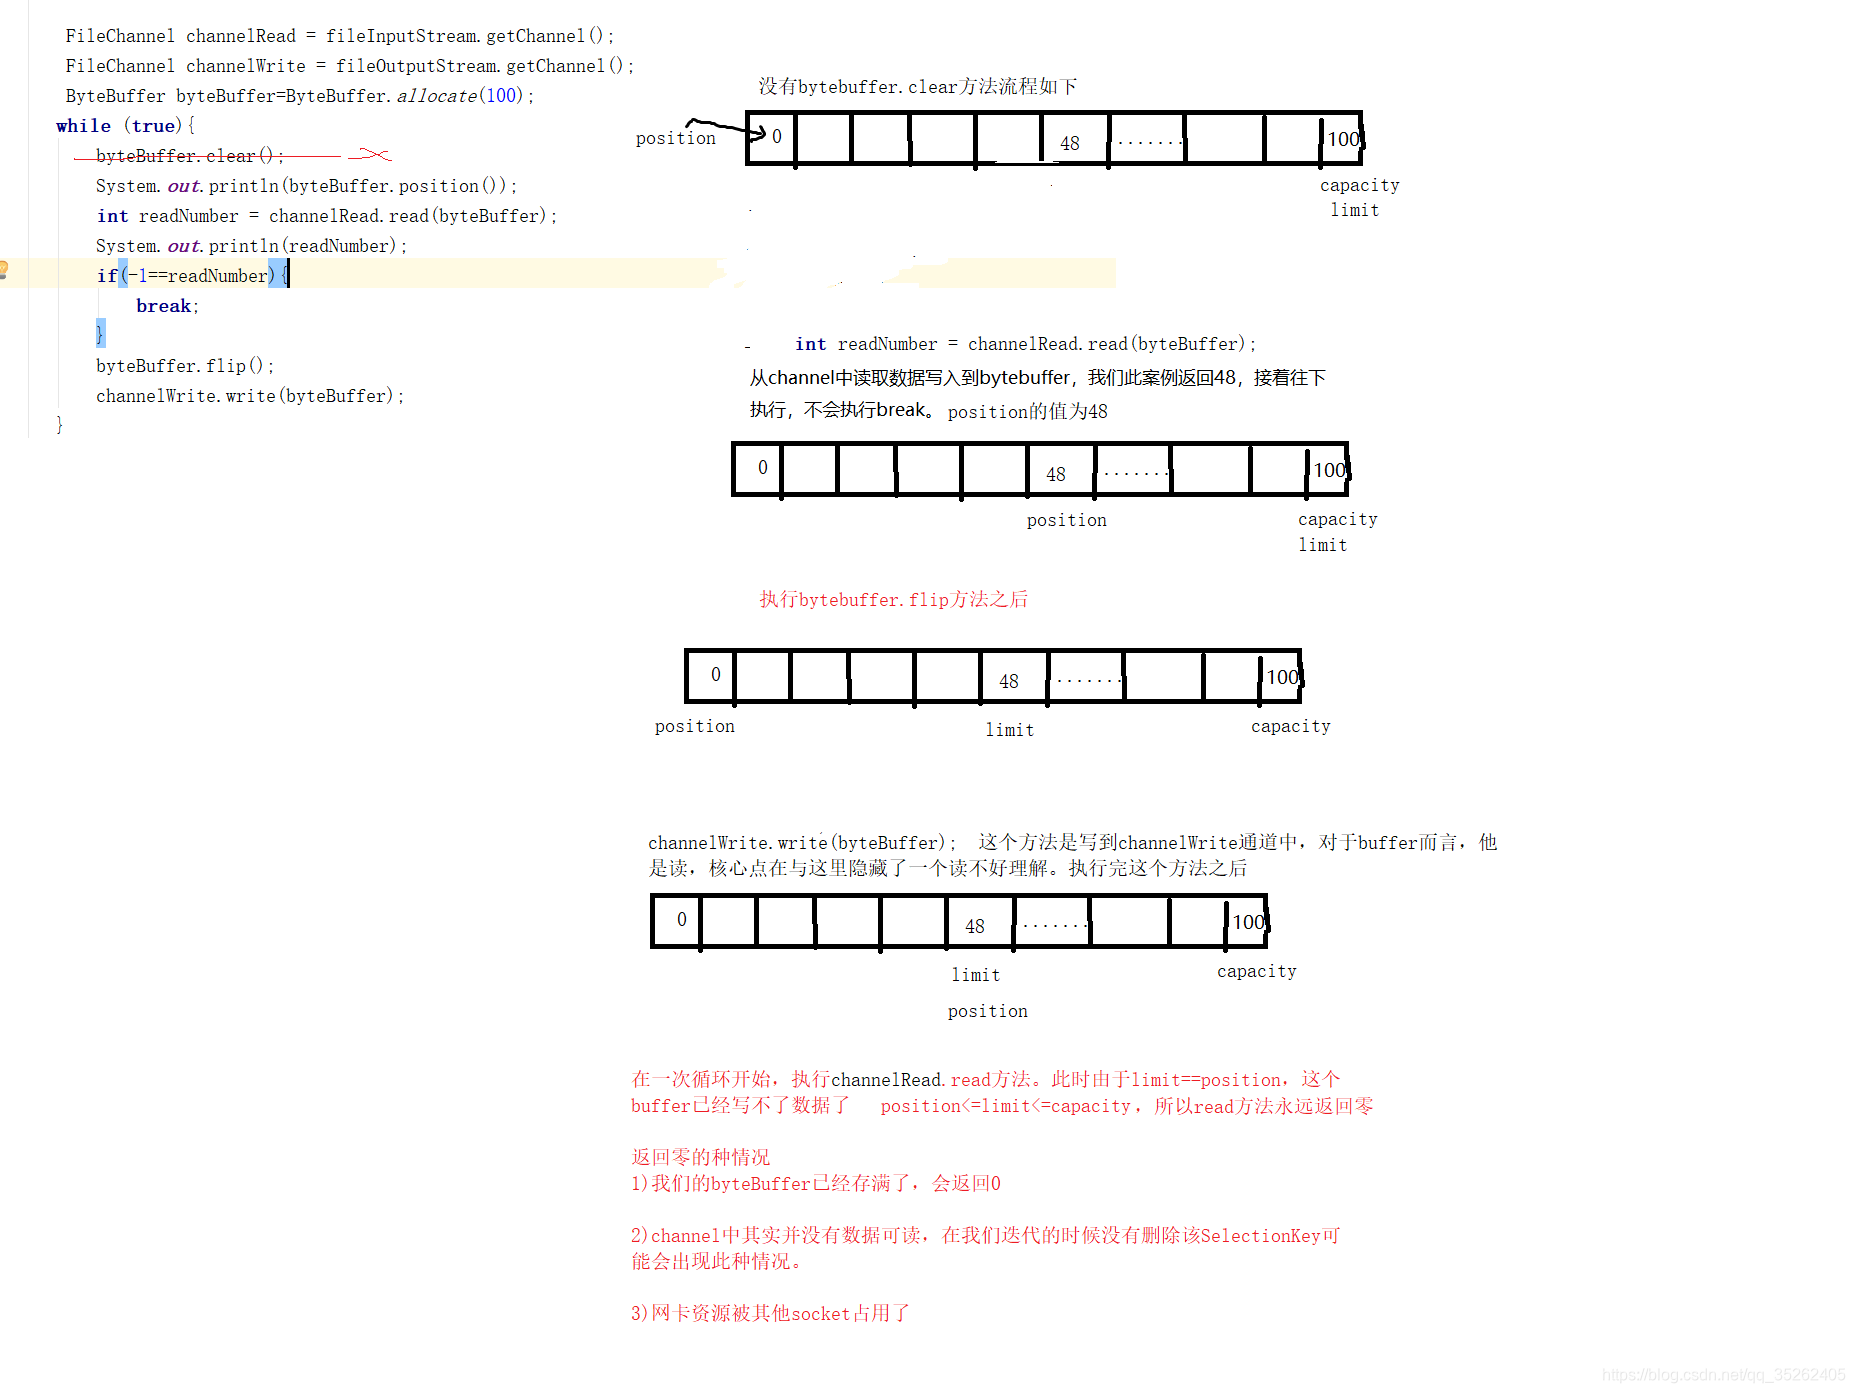
FileChannel channelRead = fileInputStream.getChannel();
FileChannel channelWrite = fileOutputStream.getChannel();
ByteBuffer byteBuffer=ByteBuffer.allocate(100);
while (true){
byteBuffer.clear();
System.out.println(byteBuffer.position());
int readNumber = channelRead.read(byteBuffer);
System.out.println(readNumber);
if(-1==readNumber){
break;
}
byteBuffer.flip();
channelWrite.write(byteBuffer);
}
fileOutputStream.close();
fileInputStream.close();
}
从buffer中存取不同类型的数据
public static void main(String[] args) {
    ByteBuffer allocate = ByteBuffer.allocate(100);
    allocate.putChar('a');
    allocate.putDouble(1.24d);
    allocate.putFloat(1.1f);
    allocate.putShort((short)2);
    allocate.putLong(100000l);
    System.out.println(allocate.position());
    allocate.flip();
    System.out.println(allocate.getChar());
    System.out.println(allocate.getDouble());
    System.out.println(allocate.getFloat());
    System.out.println(allocate.getShort());
    System.out.println(allocate.getLong());
}
需要注意的是存和取的顺序要相同
从buffer中截取一段拷贝对象(可以影响本体)
public static void main(String[] args) {
    ByteBuffer byteBuffer=ByteBuffer.allocate(10);
    for(int i=0;i<byteBuffer.capacity();++i){
        byteBuffer.put((byte)i);
    }
    byteBuffer.position(2);
    byteBuffer.limit(8);
    ByteBuffer resetBuffer = byteBuffer.slice();
    for(int i=0;i<resetBuffer.capacity();i++){
        byte anInt = resetBuffer.get();
        resetBuffer.put(i, (byte) (anInt*2));
    }
    byteBuffer.position(0);
    byteBuffer.limit(byteBuffer.capacity());
    while (byteBuffer.hasRemaining()){
        System.out.println(byteBuffer.get());
    }
}
结果如下
0
1
4
6
8
10
12
14
8
9
可以看到截取的buffer也可以改变本体的数据,截取的位置是从position到limit,包含position不包含limit
获得一份buffer镜像(仅可读)
public static void main(String[] args) {
    ByteBuffer byteBuffer=ByteBuffer.allocate(10);
    for(int i=0;i<byteBuffer.capacity();i++){
        byteBuffer.put((byte)i);
    }
    ByteBuffer byteBuffer1 = byteBuffer.asReadOnlyBuffer();
    System.out.println(byteBuffer.getClass());
    System.out.println(byteBuffer1.getClass());
    byteBuffer1.flip();
    System.out.println(byteBuffer.position());
    System.out.println(byteBuffer1.position());
    for(int i=0;i<byteBuffer1.capacity();i++){
        System.out.println(byteBuffer1.get());
    }
}
结果如下
class java.nio.HeapByteBuffer
class java.nio.HeapByteBufferR
10
0
0
1
2
3
4
5
6
7
8
9
源数据会影响的buffer
public static void main(String[] args) throws Exception {
    byte[] bytes=new byte[]{'a','b','c'};
    ByteBuffer byteBuffer=ByteBuffer.wrap(bytes);
    bytes[0]='b';
    byteBuffer.put(2,(byte)'b');
    for(int i=0;i<byteBuffer.capacity();i++){
        System.out.println((char)byteBuffer.get());
    }
}
用wrap()创建的buffer,存入的源数据发生改变也会影响buffer中的值
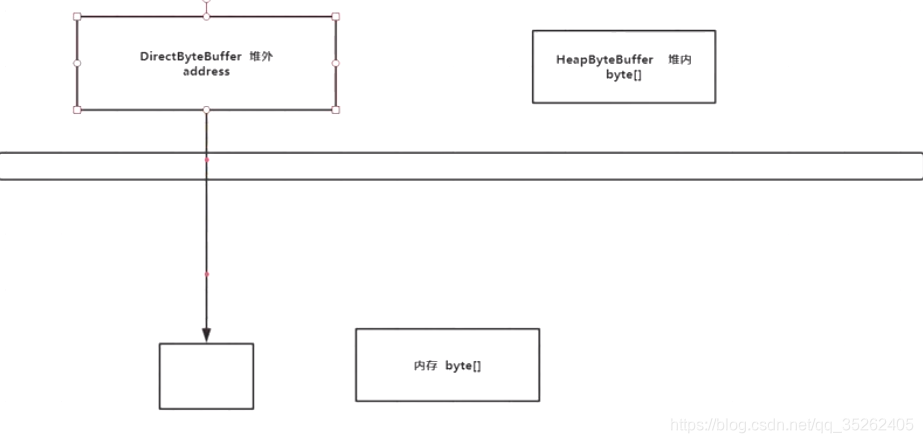
创建堆内内存的buffer和堆外内存的buffer
allocateDirect()创建的buffer使用的是堆外内存
allocate()创建的buffer使用的是堆内内存
下面是使用堆外内存的buffer实现文件的读写
public static void main(String[] args) throws Exception {
    FileOutputStream fileOutputStream=new FileOutputStream("dome8write.txt");
    FileInputStream fileInputStream=new FileInputStream("dome8read.txt");

    FileChannel channelRead = fileInputStream.getChannel();
    FileChannel channelWrite = fileOutputStream.getChannel();

    ByteBuffer byteBuffer=ByteBuffer.allocateDirect(100);
   while (true){
       byteBuffer.clear();
       int readNumber = channelRead.read(byteBuffer);
       System.out.println(readNumber);
       if(readNumber==-1){
           break;
       }
       byteBuffer.flip();
       channelWrite.write(byteBuffer);
   }
   fileOutputStream.close();
   fileInputStream.close();
}
- 堆外内存:操作系统的内存
- 堆内内存:在JVM管理的内存
效率会比堆内内存的高,因为写入磁盘中的文件还是需要先将堆内内存中的数据拷贝到在堆外去,所以使用堆外内存会省下这一步骤


 413
413

 被折叠的 条评论
为什么被折叠?
被折叠的 条评论
为什么被折叠?
 到【灌水乐园】发言


