


本地运行和调试
目标
- 应用速览。
-实战环境初体验。
实战环境准备
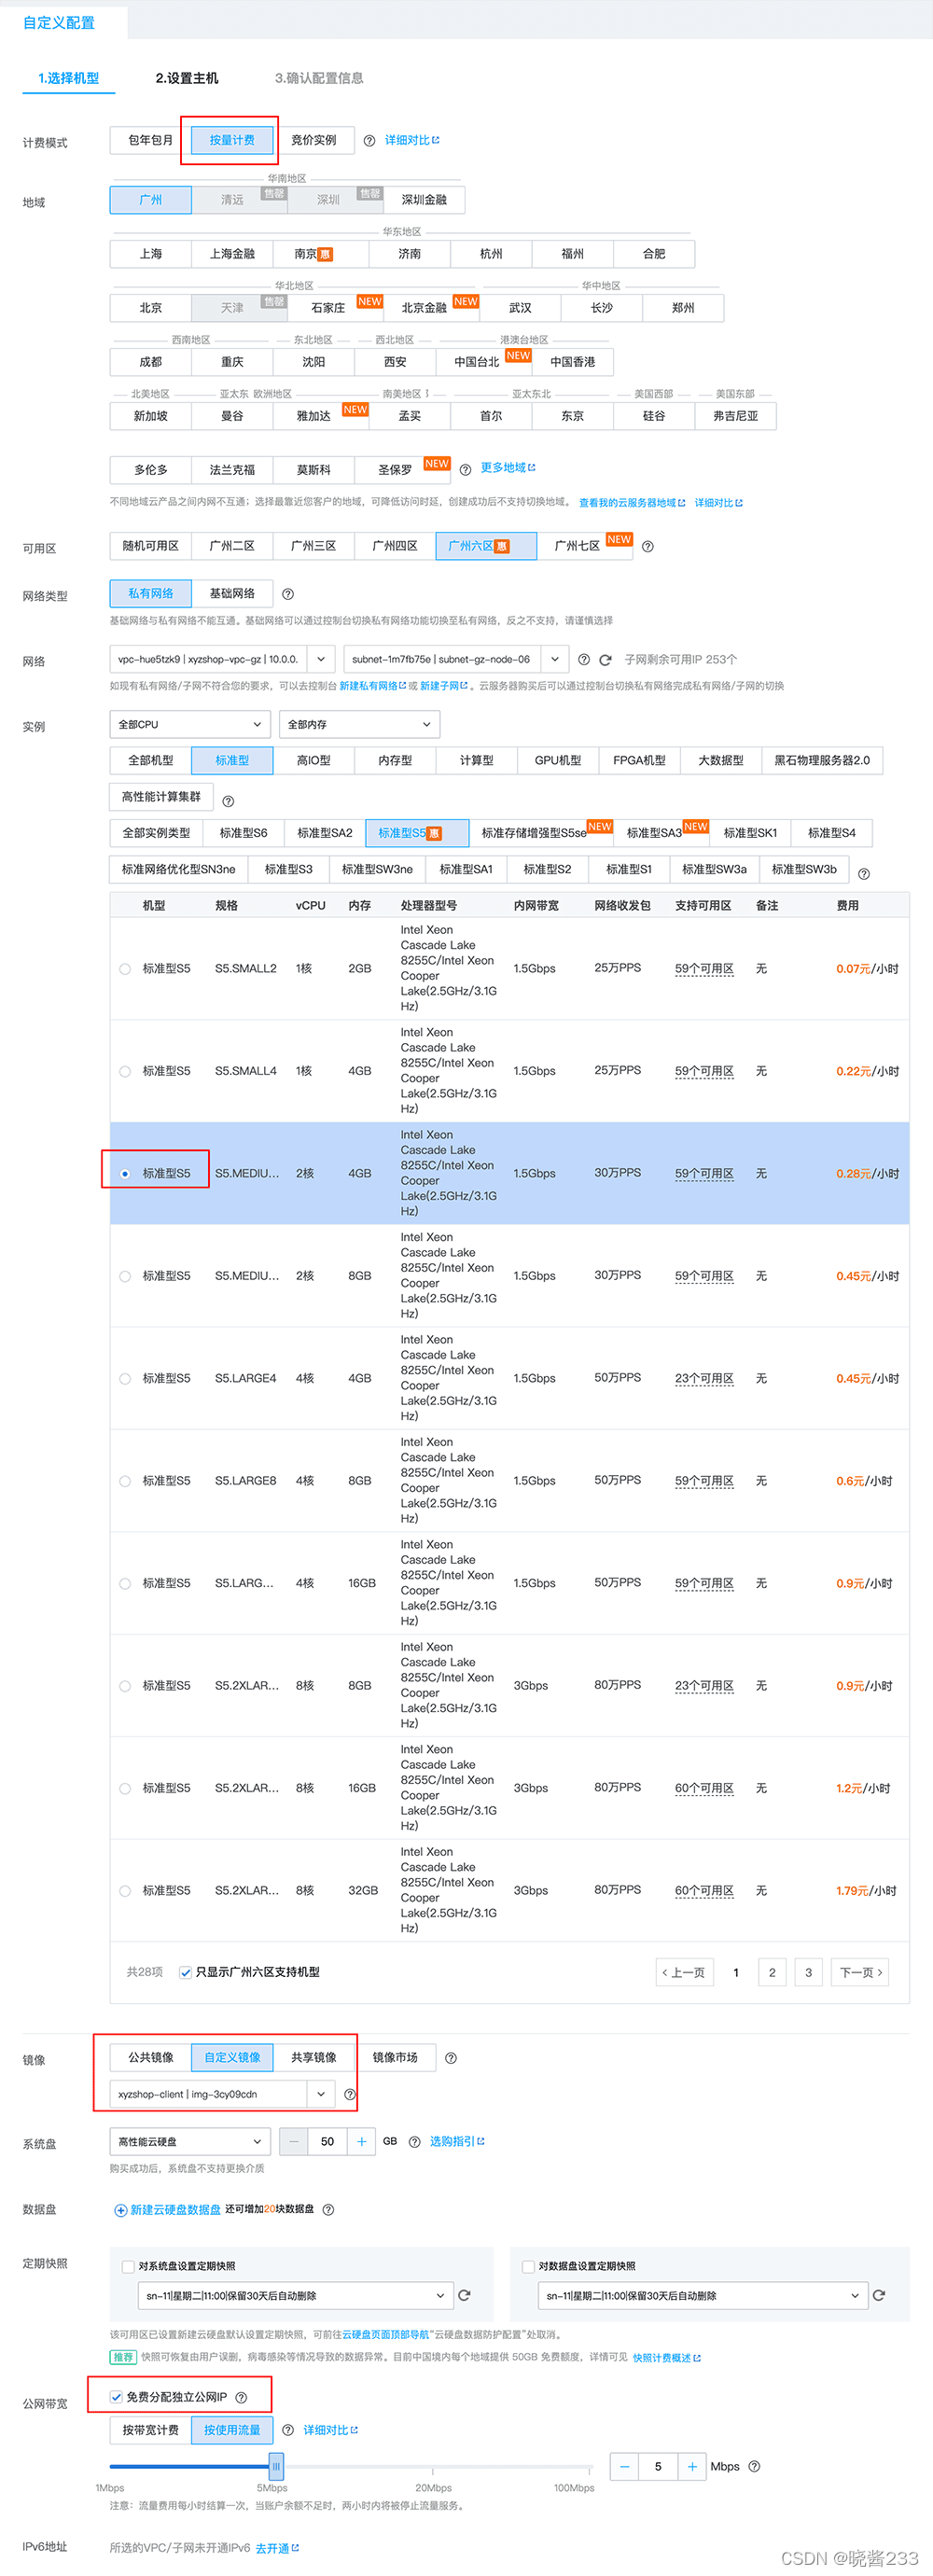
请到腾讯云控制台,打开 “云服务器 - 镜像”。
选择广州地域,选择“共享镜像”的 tab,在镜像列表中,使用 xyzshop-client 的镜像创建实例。
如果您的列表中没有这个镜像,请现场培训老师或者其他有镜像的同学分享(需要分享给主账号)。
按照指引,创建一个 CVM 实例(机型可选择 SA2 或者 S5,CPU:2核、内存:4GB),子网选择 node 子网(例如:subnet-gz-node-06),并开启公网访问。
实例创建完成之后,使用相应的 ssh 终端登录到这个 CVM。
开启 “ip forwarding”:
echo 'net.ipv4.ip_forward=1' >> /usr/lib/sysctl.d/00-system.conf
修改完成之后,重启系统。
登入 CVM 后,请首先更新最新的代码仓库:
git pull
一键启动应用
本教程的 Demo 已经制作好了一键启动脚本。
启动应用
启动程序:
bash ./install/local/start.sh
请等待应用执行完成,看到前端应用启动完成后的提示:
Compiled successfully!

You can now view mall in the browser.

  Local:            http://localhost:8000
  On Your Network:  http://10.10.0.1:8000

Note that the development build is not optimized.
To create a production build, use yarn build.
现在宿主机浏览器上访问 http://:8000
清理应用
请用如下命令清理本地运行的应用:
bash ./install/local/stop.sh
docker stop xyz-mysql xyz-redis
延伸:应用单独运行说明
1. 服务:MySQL
启动 MySQL 实例
首先启动 MySQL 实例,我们在 Docker 下运行 MySQL。
下面的命令脚本应该整体拷贝,并在项目根目录下运行。
# 环境变量
export DB_PASSWORD='P@ssword123'
# 启动 MySQL
docker run --rm --name xyz-mysql --health-cmd='mysqladmin ping --silent' \
    -p 3306:3306 \
    -v $(pwd)/install/db:/dumpdata \
    -e MYSQL_ROOT_PASSWORD=${DB_PASSWORD} -d \
    mysql:5.7 \
    --character-set-server=utf8mb4 \
    --collation-server=utf8mb4_unicode_ci \
    --skip-character-set-client-handshake \
    --default-authentication-plugin=mysql_native_password
导入数据
上述步骤完成后,请确保 MySQL 已经完全启动,开始初始化数据。
export DB_PASSWORD='P@ssword123'
docker exec xyz-mysql sh -c "mysql -uroot -p${DB_PASSWORD} < /dumpdata/dump.sql"
2. 服务:Redis
启动 Redis 实例
Redis 也以 Docker 方式运行。
export REDIS_PASSWORD='red1sP@ss'
docker run --rm --name=xyz-redis \
  -e REDIS_PASSWORD=${REDIS_PASSWORD} \
  -p 6379:6379 \
  -d redis \
  sh -c 'exec redis-server --requirepass "$REDIS_PASSWORD"'
3. 应用:product
这个应用是商品服务,使用了 JAVA SpringBoot 框架开发。
切换到应用目录:
cd /microservices-demo/src/product/
启动脚本:
export DB_HOST='127.0.0.1'
export DB_PASSWORD='P@ssword123'
export DB_USERNAME='xyzshop_user'
export DB_DATABASE='xyzshop'
mvn clean compile
mvn exec:java
4. 应用:passport
这个应用是用户注册登录服务,使用了 eggjs 框架开发。
切换到应用目录:
cd /microservices-demo/src/passport/
安装依赖:
npm install
启动应用
开发模式下使用:
export DB_HOST='127.0.0.1'
export DB_PASSWORD='P@ssword123'
export DB_USERNAME='xyzshop_user'
export DB_DATABASE='xyzshop'
npm run dev
联调/生产模式:
export DB_HOST='127.0.0.1'
export DB_PASSWORD='P@ssword123'
export DB_USERNAME='xyzshop_user'
export DB_DATABASE='xyzshop'
node index.js
5. 应用:review
这个应用是商品评论服务,使用了 php 流行的 Lavarel 框架开发。
切换到应用目录:
cd /microservices-demo/src/review/
安装依赖包:
composer install
启动应用:
export APP_NAME=xyzshop
export DB_HOST='127.0.0.1'
export DB_PASSWORD='P@ssword123'
export DB_USERNAME='xyzshop_user'
export DB_DATABASE='xyzshop'
export SERVICE_PASSPORT='http://127.0.0.1:5000'

cat <<EOF > ./.env
APP_NAME=${APP_NAME}
APP_KEY=base64:QHVH+p7eTaKkYNtJI5+0koXGH1FdXfFrLdj6N3KPdbM=
APP_DEBUG=true
APP_ENV=local
APP_URL=http://localhost:4000

LOG_CHANNEL=stack
LOG_LEVEL=debug

DB_CONNECTION=mysql
DB_HOST=${DB_HOST}
DB_PORT=3306
DB_DATABASE=${DB_DATABASE}
DB_USERNAME=${DB_USERNAME}
DB_PASSWORD=${DB_PASSWORD}
SERVICE_PASSPORT=${SERVICE_PASSPORT}

BROADCAST_DRIVER=log
CACHE_DRIVER=file
FILESYSTEM_DRIVER=local
QUEUE_CONNECTION=sync
SESSION_DRIVER=file
SESSION_LIFETIME=120
EOF

php artisan serve --port=4000
6. 应用:order
这个应用是订单管理服务,使用 .NET Core 开发。
切换到应用目录(请注意:工作目录为 order 目录下的 order 目录):
cd /microservices-demo/src/order/order/
安装依赖:
dotnet restore
启动脚本:
dotnet run
7. 应用:shopcart
这个应用是购物车服务,使用 Golang 编写,依赖了 Redis 服务。
切换到应用目录:
cd /microservices-demo/src/shopcart/
启动脚本:
go run main.go
8. 应用:mall
这个应用前端应用,使用 ReactJS 编写,使用 antd 前端。
切换到应用目录:
cd /microservices-demo/src/mall/
启动脚本:
export SERVICE_PASSPORT='http://127.0.0.1:5000'
export SERVICE_PRODUCT='http://127.0.0.1:3000'
export SERVICE_SHOPCART='http://127.0.0.1:6000'
export SERVICE_ORDER='http://127.0.0.1:7000'
export SERVICE_REVIEW='http://127.0.0.1:4000'

npm start


 1105
1105

 被折叠的 条评论
为什么被折叠?
被折叠的 条评论
为什么被折叠?
 到【灌水乐园】发言


