


 本文详细介绍了Spring框架的使用步骤,从添加依赖开始,到配置applicationContext.xml,再到实体类的编写与注入,最后通过测试验证。涵盖懒加载、scope、DI注入、注解等核心概念,以及如何重构Dao层和服务层。
Sprint
第一步:添加依赖
<dependencies>
    <dependency>
      <groupId>junit</groupId>
      <artifactId>junit</artifactId>
      <version>4.11</version>
      <scope>test</scope>
    </dependency>
    <dependency>
      <groupId>org.springframework</groupId>
      <artifactId>spring-context</artifactId>
      <version>4.3.11.RELEASE</version>
    </dependency>
    <!-- https://mvnrepository.com/artifact/commons-logging/commons-logging    -->
    <dependency>
      <groupId>commons-logging</groupId>
      <artifactId>commons-logging</artifactId>
      <version>1.1.3</version>
    </dependency>
  </dependencies>
第二步:.添加applicationContext.xml模板
<?xml version="1.0" encoding="UTF-8"?>
<!-- 约束文件 -->
<beans xmlns="http://www.springframework.org/schema/beans"
       xmlns:xsi="http://www.w3.org/2001/XMLSchema-instance"
       xmlns:context="http://www.springframework.org/schema/context"
       xmlns:aop="http://www.springframework.org/schema/aop"
       xmlns:tx="http://www.springframework.org/schema/tx"

       xsi:schemaLocation="http://www.springframework.org/schema/beans
           http://www.springframework.org/schema/beans/spring-beans-4.0.xsd
           http://www.springframework.org/schema/context
           http://www.springframework.org/schema/context/spring-context-4.0.xsd
            http://www.springframework.org/schema/tx
            http://www.springframework.org/schema/tx/spring-tx-4.0.xsd
    		 http://www.springframework.org/schema/aop
     		http://www.springframework.org/schema/aop/spring-aop-4.0.xsd
           ">
    <!-- spring配置 -->
    <!--
		一个bean就是一个被spring容器管理的类   管理他的生命周期 IOC
			class  就是被spring管理的类
			id是bean的标志  id必须唯一  id的值一般情况下是类名的首字母小写
	 -->


</beans>
第三步:编写一个实体类
public class User {
    private String name;
    private int age;
    //该注释用于给department赋值
    @Resource(name = "Department")
	private Department department
    public User() {
    }

    public User(String name, int age) {
        this.name = name;
        this.age = age;
    }

    public String getName() {
        return name;
    }

    public void setName(String name) {
        this.name = name;
    }

    public int getAge() {
        return age;
    }

    public void setAge(int age) {
        this.age = age;
    }

    public void say(){
        System.out.println("我被使用");
    }

    public void init(){
        System.out.println("我被创建");
    }

    public void destory(){
        System.out.println("我被销毁");
    }
}
第四步:把该类交给spring容器
设置对象创建时调用的方法,对象被销毁时调用的方法
	<!--init-method对应被创建时我们调用的方法,destroy-method对应被销毁时我们使用的方法-->
    <bean id="user" class="com.njdf.bean.User" init-method="init" destroy-method="destory"></bean>
    <bean id="user1" class="com.njdf.bean.User" init-method="init" destroy-method="destory" ></bean>
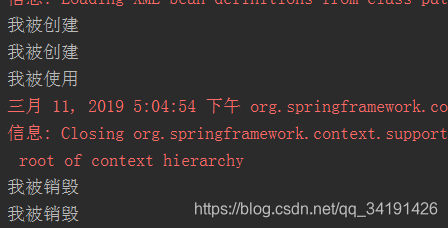
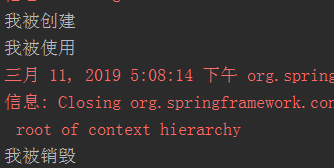
第五步:进行测试
public static void main(String[] args) {
        //加载配置文件,并加载所有bean标签和@Component所对应类的空参构造,同时运行对象被创建时调用的方法
        ClassPathXmlApplicationContext context = new ClassPathXmlApplicationContext("applicationContext.xml");
        //提取id为user的bean标签的对象
        User user = (User) context.getBean("user");
        user.say();
        //销毁对象
        context.close();
    }
运行结果:
懒加载
懒加载lazy-init不写的话就是default等价于false,在加载xml文件时被加载,占用系统内存,耗费时间,如果改成true则不会在加载xml文件时被加载
<bean id="user1" class="com.njdf.bean.User" init-method="init" destroy-method="destory" lazy-init="true"></bean>
运行结果:
scope
<!--scope的使用singlon对应一个bean对应一个实例,prototype一个bean对应多个实例,默认不写为singlon-->
    <bean id="user2" class="com.njdf.bean.User" lazy-init="false" scope="singleton"></bean>
DI注入
DI注入用的是有参构造
<!--DI注入-->
    <bean id="user3" class="com.njdf.bean.User" >
        <constructor-arg index="0" value="Tony"></constructor-arg>
        <constructor-arg index="1" value="23"></constructor-arg>
    </bean>
下标注入
下标注入用的是set方法
	<bean id="d1" class="com.njdf.bean.Department">
        <constructor-arg index="0" value="财务部"></constructor-arg>
        <constructor-arg index="1" value="1"></constructor-arg>
    </bean>
	<bean id="user4" class="com.njdf.bean.User">
        <property name="age" value="18"></property>
        <property name="name" value="zhangsan"></property>
        <property name="list">
            <list>
                <value>"123</value>
                <value type="int">121</value>
            </list>
        </property>
        <property name="d">
                <ref bean="d1"></ref>
        </property>
    </bean>
注解
第一步:在applicationContext.xml配置文件里面添加注解扫描器

<context:component-scan base-package="com.njdf"></context:component-scan>
第二步:在User实体类上添加注解@Component("")
import org.springframework.stereotype.Component;
import java.util.List;
@Component("user10")
public class User {
第三步:在测试类中运行
用学过的知识改写Dao层和service层
如果一个类加上了@Component注解,就会进行以下法则
@Component相当于
有三个注解相当于Component
dao层:@Repository
Service层:@Service
Controller层:@Controller
Dao层接口
public interface UserDao {
    public void add();
}
Dao层实现
@Repository("UserDaoImpl")
public class UserDaoImpl implements UserDao {
    @Override
    public void add() {
        System.out.println("添加学生");
    }
}
Service层接口
public interface UserService {
    public void add();
}
Service层实现
@Service("UserServiceImpl")
public class UserServiceImpl implements UserService {
    //这两个注释用于区分这个实现UserDao接口的对象的类是哪一个
    @Autowired
    @Qualifier("UserDaoImpl")
    private UserDao udi;
    @Override
    public void add() {
        this.udi.add();
    }
}


 1万+
1万+

 被折叠的 条评论
为什么被折叠?
被折叠的 条评论
为什么被折叠?
 到【灌水乐园】发言


