


一、前言
最近在项目开发中遇到许多关于webpack打包配置问题,特意写一篇博文进行总结。
二、解决的一些配置问题
1、webpack打包react项目
2、打包.scss类型文件
3、打包图片类型文件【小于10kb转为base64格式】,并将打包后的图片放置指定目录下
4、copy-webpack-plugin插件的使用
5、html-webpack-plugin插件的使用
6、配置多入口
7、clean-webpack-plugin插件的使用
【如果有你目前需要解决的问题或者想要了解相关知识那就耐心往下看哦~】
三、配置步骤
1、创建src、public目录,创建webpack.config.js文件
src目录:用于放置项目的源代码
public目录:放置一些不需要打包编译的一些静态资源或者js插件
webpack.config.js: 用于配置webpack打包信息
2、src下新建三个模块,download、help、index,用于模拟项目三个页面入口
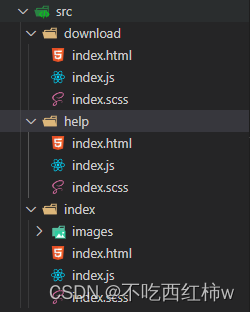
以index模块为例:
(1)index.html中创建一个div,id为root,用于挂载dom元素
<!DOCTYPE html>
<html lang="en">

<head>
    <meta charset="UTF-8">
    <meta http-equiv="X-UA-Compatible" content="IE=edge">
    <meta name="viewport" content="width=device-width, initial-scale=1.0">
    <title>Document</title>
</head>

<body>
    <div id="root"></div>
</body>

</html>
(2)index.js中引用react和react-dom,创建组件,并挂载到页面上
import React from 'react';
import ReactDOM from 'react-dom';
import "./index.scss";
function App(props){
    return (
        <div>
            <h2>我是首页</h2>
            <div className='cover-image'></div>
            <div className='logo-image'></div>
        </div>
    )
}

ReactDOM.render(<App />, document.getElementById('root'));
(3)index.scss引用图片
body {
    width: 100vw;
    height: 100vh;
    background-color: #f5f5f5;
    .cover-image {
        width: 200px;
        height: 200px;
        background-image: url(./images/cover.png);
        background-position: center;
        background-repeat: no-repeat;
    }
    .logo-image {
        width: 200px;
        height: 200px;
        background-image: url(./images/logo.png);
        background-position: center;
        background-repeat: no-repeat;
    }
}
3、创建好以后,开始进行打包配置
(1)首先引入webpack、webpack-cli
npm/cnpm i webpack webpack-cli
(2)配置多入口,这里用了html-webpack-plugin用于生成入口index.html,并将配置的chunk注入其中。
const HTMLWebpackPlugin = require('html-webpack-plugin');
const path = require('path');

module.exports = function(webpackEnv){
    const jsArray = ['index', 'help', 'download'];
    const entrys = {};
    jsArray.map(item=>entrys[item] = `./src/${item}/index.js`);
    const htmlPluginList = jsArray.map(item=>
        new HTMLWebpackPlugin({
            template: `./src/${item}/index.html`,   //模板文件,挂载相关dom的index.html
            filename: `html/${item}/index.html`,   //打包后的页面地址
            inject: true,   //  注入静态资源
            chunks: [item]   // 允许注入的chunk列表
        })
    )
    return {
        mode: 'production',
        entry: entrys,
        output: {
            path: path.resolve(__dirname, 'build'),
            // publicPath: "../../",
            filename: `html/[name]/index.js`,  //打包模块js放置到 JS/xxx/index.js
        },
        module: {

        },
        plugins: [
            ...htmlPluginList
        ]
    }

}
在output中有运用到[name],这里webpack会自动将其替换成entry对象中的键值,从而生成不同的目录。
(3)打包react项目
引入babel-loader,@babel/core,@babel/preset-react,@babel/preset-env
npm/cnpm i babel-loader ‘@babel/core’ ‘@babel/preset-react’ ‘@babel/preset-env’
注意:
这里需要注意几个点,babel-loader和@babel/core的版本需要匹配,假如要使用babel 7.x,@babel/core的版本则需要达到6.x,以此类推。
另外在npm i 含有@字符的包时,需要利用单引号将其逐个包裹起来,否则会提示无法识别的字符。
在webpack.config.js文件中进行配置:
module: {
    rules: [
      {
         test: /\.(js|jsx)$/,
         loader: 'babel-loader',
         exclude: /node_modules/
      },
    ]
},
在项目根目录下创建.babelrc文件
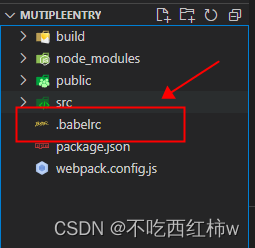
{
  "presets": [
    "@babel/preset-react",
    "@babel/preset-env"
  ]
}
(4)打包scss文件
引入sass-loader,css-loader,style-loader
module: {
    rules: [
      {
         test: /\.(css|scss)$/i,
         use: ["style-loader", "css-loader", "sass-loader"],
      },
      {
         test: /\.(js|jsx)$/,
         loader: 'babel-loader',
         exclude: /node_modules/
      },
    ]
},
use列表中,优先使用的loader放在最后,因为webpack在打包时,执行顺序是从右往左。
(5)打包图片
引入url-loader,file-loader,配置如下:
module: {
    rules: [
      {
         test: /\.(css|scss)$/i,
         use: ["style-loader", "css-loader", "sass-loader"],
      },
      {
         test: /\.(js|jsx)$/,
         loader: 'babel-loader',
         exclude: /node_modules/
      },
      {
         test: /\.(svg|png|jpe?g|gif)$/i,
         loader: 'url-loader',
         options: {
            limit: 10*1024,
            outputPath: './image',
            publicPath: './image'
         }
      }
    ]
},
options中,相关配置含义如下:
1、limit: 单位为b,图片大小小于该数字以下将会被转成base64格式
2、outputPath: 设置一个目录,用于打包后统一将图片放置该目录下
3、publicPath: 图片在css中添加的引用前缀,这个根据自身项目目录层级设置
至此我们已经可以将项目成功打包了,为了让项目打包更为丝滑,我还引用了2个插件,分别是:
copy-webpack-plugin: 将指定目录/文件复制在另一个目录中
clean-webpack-plugin: 每次打包时会将上一次打包生成的build文件清空
完成的webpack.config.js配置如下:
const CopyWebpackPlugin = require('copy-webpack-plugin');
const HTMLWebpackPlugin = require('html-webpack-plugin');
const { CleanWebpackPlugin } = require('clean-webpack-plugin');
const path = require('path');

module.exports = function(webpackEnv){
    const jsArray = ['index', 'help', 'download'];
    const entrys = {};
    jsArray.map(item=>entrys[item] = `./src/${item}/index.js`);
    const htmlPluginList = jsArray.map(item=>
        new HTMLWebpackPlugin({
            template: `./src/${item}/index.html`,   //模板文件,挂载相关dom的index.html
            filename: `html/${item}/index.html`,   //打包后的页面地址
            inject: true,   //  注入静态资源
            chunks: [item]   // 允许注入的chunk列表
        })
    );
    return {
        mode: 'production',
        entry: entrys,
        output: {
            path: path.resolve(__dirname, 'build'),
            // publicPath: "../../",
            filename: `html/[name]/index.js`,  //打包模块js放置到 JS/xxx/xxx.js
        },
        module: {
            rules: [
                {
                    test: /\.(css|scss)$/i,
                    use: ["style-loader", "css-loader", "sass-loader"],
                },
                {
                    test: /\.(js|jsx)$/,
                    loader: 'babel-loader',
                    exclude: /node_modules/
                },
                {
                    test: /\.(svg|png|jpe?g|gif)$/i,
                    loader: 'url-loader',
                    options: {
                        limit: 10*1024,
                        outputPath: './image',
                        publicPath: './image'
                    }
                }
            ]
        },
        plugins: [
            ...htmlPluginList,
            new CopyWebpackPlugin(['public']),
            new CleanWebpackPlugin()
        ]
    }

}
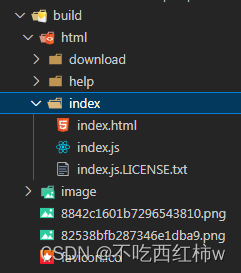
打包后的目录如下:
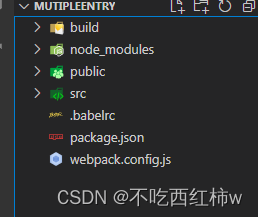
整体的目录结构如下:
关于react项目利用webpack从0开始配置多入口到这就结束了,如果这篇文章有帮助到你,希望给个收藏和点赞~


 810
810

 被折叠的 条评论
为什么被折叠?
被折叠的 条评论
为什么被折叠?
 到【灌水乐园】发言


