


 本文详细介绍如何使用Android的TextView组件实现文字阴影效果、设置复杂背景、解析HTML文本及利用SpannableString进行高级文本定制,包括颜色、链接、样式、删除线、下划线等。
关于TextView的简单用法我就直接省略了
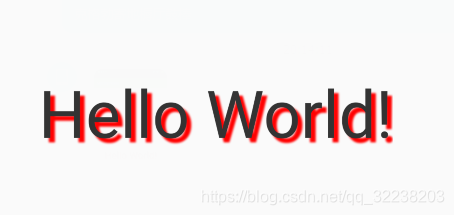
一、文字阴影
<TextView
        android:id="@+id/hello8"
        android:layout_width="wrap_content"
        android:layout_height="wrap_content"
        android:textSize="50sp"
        android:textColor="#333333"
        android:shadowColor="#ff0000"
        android:shadowRadius="3.0"
        android:shadowDx="10.0"
        android:shadowDy="10.0"
        android:text="Hello World!"/>
- android:shadowColor:设置阴影颜色,需要与shadowRadius一起使用
- android:shadowRadius:设置阴影的模糊程度,设为0.1就变成字体颜色了,建议使用3.0
- android:shadowDx:设置阴影在水平方向的偏移,就是水平方向阴影开始的横坐标位置
- android:shadowDy:设置阴影在竖直方向的偏移,就是竖直方向阴影开始的纵坐标位置
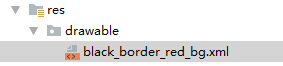
二、设置背景
我们可以在res>drawable下创建一个xml文件
<?xml version="1.0" encoding="utf-8"?>
<shape xmlns:android="http://schemas.android.com/apk/res/android">

    <!-- 背景颜色 -->
    <!--<solid android:color="#218ff0"/>-->
    <!-- 边框 宽度、颜色 -->
    <stroke android:width="2dp" android:color="#333333"/>
    <!-- 内边距 -->
    <padding android:top="2dp" android:bottom="2dp"/>
    <!-- 半径(圆角) -->
    <corners android:radius="6dp"/>
    <!-- 渐变 -->
    <gradient
        android:startColor="#90218ff0"
        android:centerColor="#a0218ff0"
        android:endColor="#218ff0"
        android:angle="270"
        android:type="linear"/>

</shape>
然后给TextView设置背景
<TextView
        android:id="@+id/hello"
        android:layout_width="wrap_content"
        android:layout_height="wrap_content"
        android:textSize="50sp"
        android:textColor="#333333"
        android:shadowColor="#ff0000"
        android:shadowRadius="3.0"
        android:shadowDx="10.0"
        android:shadowDy="10.0"
        android:background="@drawable/black_border_red_bg"
        android:text="Hello World!"/>
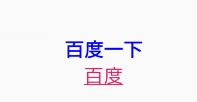
三、TextView还支持HTML
当然不是支持所有的Html标签,常用的有<font/>、<big/>、<small/>、<i/>、<b/>、<a/>、<image/>
- 要使用Html很简单,首先导入andriod.text.Html包,注意andriod-sdk自带的包,不需要去找,看一下效果
布局文件
<TextView
        android:id="@+id/baidu"
        android:layout_width="wrap_content"
        android:layout_height="wrap_content"
        android:text=""
        android:layout_marginTop="10dp"
        android:textSize="15sp"
        android:textColor="#333"/>
java代码
TextView textView1 = findViewById(R.id.baidu);
        String baidu = "<font color='blue'><b>百度一下</b></font><br/>";
        baidu += "<a href='https://www.baidu.com'>百度</a>";
        textView1.setText(Html.fromHtml(baidu));
        textView1.setMovementMethod(LinkMovementMethod.getInstance());
效果
使用Img标签
TextView imgView = findViewById(R.id.img);
        String img = "<img src='icon'/><br/>";
        imgView.setText(Html.fromHtml(img, new Html.ImageGetter() {
            @Override
            public Drawable getDrawable(String s) {
                Drawable drawable = null;
                try {
                    Field field = R.drawable.class.getField(s);
                    int resourceId = Integer.parseInt(field.get(s).toString());
                    drawable = getResources().getDrawable(resourceId);
                    drawable.setBounds(0,0,drawable.getMinimumWidth(),drawable.getMinimumHeight());
                }catch (Exception e){
                    e.printStackTrace();
                }
                return drawable;
            }
        },null));
四、使用SpannableString定制TextView
        TextView textView2 = findViewById(R.id.text2);
        SpannableString span = new SpannableString("红色打电话斜体删除线绿色下划线图片:.");
        //1.设置背景色,setSpan时需要指定的flag,Spanned.SPAN_EXCLUSIVE_EXCLUSIVE(前后都不包括)
        span.setSpan(new ForegroundColorSpan(Color.RED),0,2, Spannable.SPAN_EXCLUSIVE_EXCLUSIVE);
        //2.用超链接标记文本
        span.setSpan(new URLSpan("tel:18873248805"),2,5,Spannable.SPAN_EXCLUSIVE_EXCLUSIVE);
        //3.用样式标记文本(斜体)
        span.setSpan(new StyleSpan(Typeface.BOLD_ITALIC),5,7,Spannable.SPAN_EXCLUSIVE_EXCLUSIVE);//4.用删除线标记文本
        span.setSpan(new StrikethroughSpan(), 7, 10, Spanned.SPAN_EXCLUSIVE_EXCLUSIVE);
        //5.用下划线标记文本
        span.setSpan(new UnderlineSpan(), 10, 16, Spanned.SPAN_EXCLUSIVE_EXCLUSIVE);
        //6.用颜色标记
        span.setSpan(new ForegroundColorSpan(Color.GREEN), 10, 13,Spanned.SPAN_EXCLUSIVE_EXCLUSIVE);
        //7.//获取Drawable资源
        textView2.setText(span);


 6762
6762

 被折叠的 条评论
为什么被折叠?
被折叠的 条评论
为什么被折叠?
 到【灌水乐园】发言


