


NIO简介
java NIO(New IO)从Java 1.4版本开始引入的一个新的IO API,可以替代标准的Java IO API。NIO与原来的IO有同样的作用和目的,却提供了与标准IO不同的IO工作方式。
标准的IO基于字节流和字符流进行操作的,而NIO是基于通道(Channel)和缓冲区(Buffer)进行操作,数据总是从通道读取到缓冲区中,或者从缓冲区写入到通道中。
Java NIO 与 IO 的主要区别
| IO | NIO |
|---|---|
| 面向流(Stream Oriented) | 面向缓冲区(Buffer Oriented) |
| 阻塞IO(Blocking IO) | 非阻塞IO(Non Blocking IO) |
| (无) | 选择器(Selectors) |
缓冲(Buffer)
Java NIO的核心就是Channel(通道)和Buffer(缓冲)。
一个用于特定基本数据类型的容器。由 java.nio 包定义的,所有缓冲区都是 Buffer 抽象类的子类,其本质是数组。
Java NIO 中的 Buffer 主要用于与 NIO 通道进行
交互,数据是从通道读入缓冲区,从缓冲区写
入通道中的。
Buffer的常用子类
-
为了可以保存多个相同类型的数据。NIO根据数据类型不同(boolean 除外) ,有多种子类
- ByteBuffer
- CharBuffer
- ShortBuffer
- IntBuffer
- LongBuffer
- FloatBuffer
- DoubleBuffer
Buffer的分类
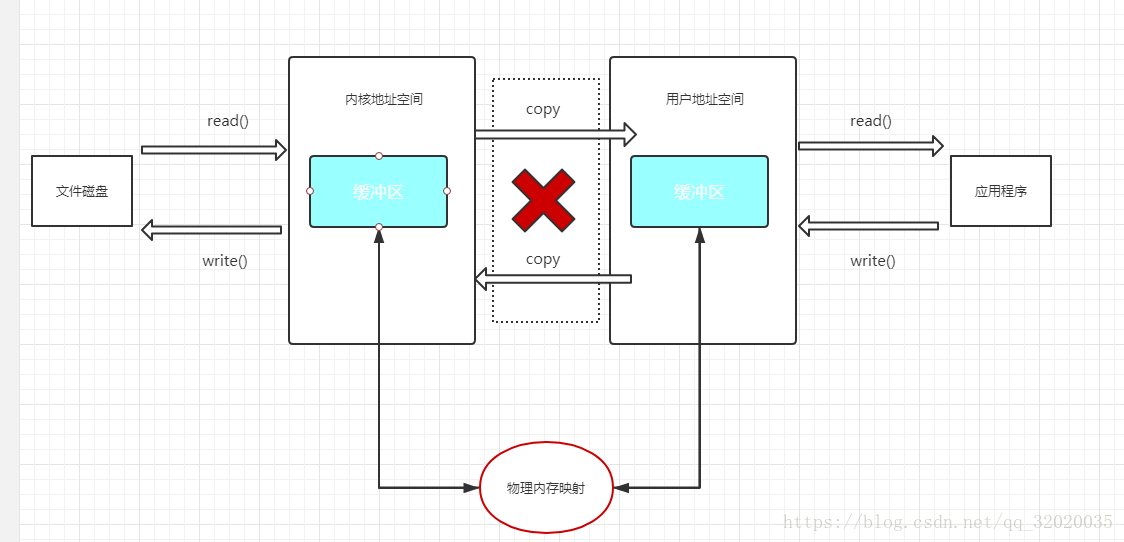
缓冲分为直接缓冲区和非直接缓冲区
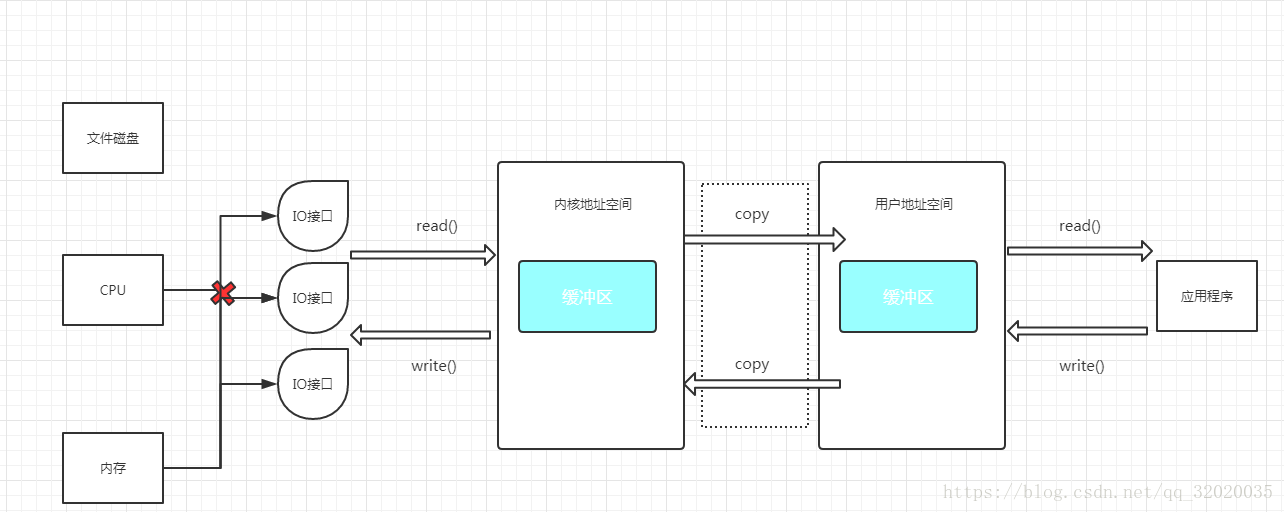
他们两者最标志的区别是,非直接缓冲区是需要把缓冲区的内容复制到中间缓冲区的,而直接缓冲区没有复制这项,而是进行映射到物理内存来进行的。
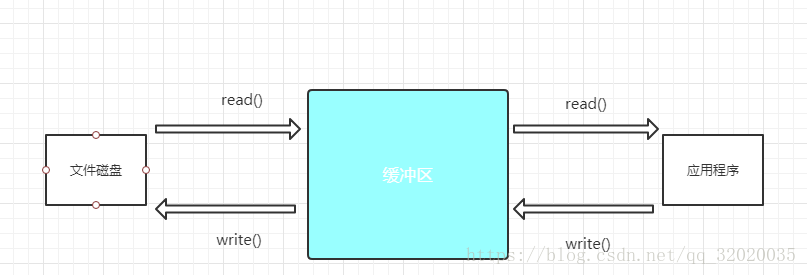
如图,这就是非直接缓冲区,也是最常用的方式,一般所指的Buffer也就是这个。它有一个复制的动作,所以相对于直接缓冲区,它的速度并不是很快

这是直接缓冲区的,他针对于物理内存,会将缓冲区的数据映射到内存中,然后在另一边通过映射拿到数据,没有复制的动作。因为作用于内存,所以速度快,但成本较高,所占内存和CPU运速较高。
- 非直接缓冲区:通过 allocate() 方法分配缓冲区,将缓冲区建立在 JVM 的内存中
- 直接缓冲区:通过 allocateDirect() 方法分配直接缓冲区,将缓冲区建立在物理内存中。可以提高效率
- 字节缓冲区是直接缓冲区还是非直接缓冲区可通过调用其 isDirect() 方法来确定。
- static XxxBuffer allocate(int capacity) : 静态方法,创建一个容量为 capacity 的 XxxBuffer 对象。如:
ByteBuffer buf = ByteBuffer.allocate(1024);Buffer的基本属性
Buffer有一些基本属性需要知道
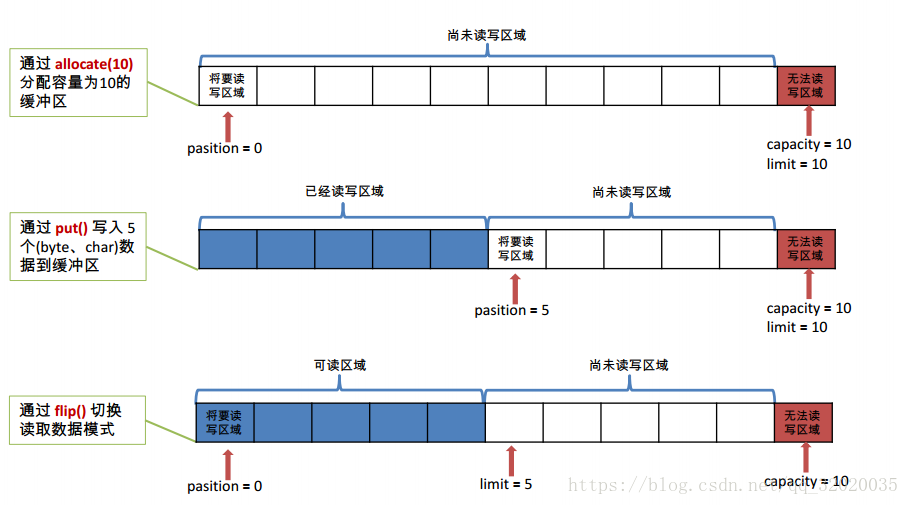
容量 (capacity) :表示 Buffer 最大数据容量,缓冲区容量不能为负,并且创建后不能更改。通过开始的allocate()或allocateDirect()来指定创建。
限制 (limit):第一个不应该读取或写入的数据的索引,即位于 limit后的数据不可读写。缓冲区的限制不能为负,并且不能大于其容量。默认是容量的大小为限定,当使用flip()方法会将当前位置设为界限,也可以使用limit(int n)方法设置界限
位置 (position):下一个要读取或写入的数据的索引。缓冲区的位置不能为负,并且不能大于其限制。可以通过position(int n)设置位置
标记 (mark)与重置 (reset):标记是一个索引,通过 Buffer 中的 mark() 方法指定 Buffer 中一个特定的 position,之后可以通过调用 reset() 方法恢复到这个 position
- 0 <= mark <= position <= limit <= capacity
示例图:
Buffer的常用方法
| 方 法 | 描 述 |
|---|---|
| Buffer clear() | 清空缓冲区并返回对缓冲区的引用 |
| Buffer flip() | 将缓冲区的界限设置为当前位置,并将当前位置充值为 0。该方法一般用于将缓冲区从写模式切换到读模式,不使用该方法,将无法读取到数据 |
| int capacity() | 返回 Buffer 的 capacity 大小 |
| boolean hasRemaining() | 判断缓冲区中是否还有元素 |
| int limit() | 返回 Buffer 的界限(limit) 的位置 |
| Buffer limit(int n) | 将设置缓冲区界限为 n, 并返回一个具有新 limit 的缓冲区对象 |
| Buffer mark() | 对缓冲区设置标记 |
| int position() | 返回缓冲区的当前位置 position |
| Buffer position(int n) | 将设置缓冲区的当前位置为 n , 并返回修改后的 Buffer 对象 |
| int remaining() | 返回 position 和 limit 之间的元素个数 |
| Buffer reset() | 将位置 position 转到以前设置的 mark 所在的位置 |
| Buffer rewind() | 将位置设为为 0, 取消设置的 mark |
如何向Buffer中写数据
有两种方式
- 读取Channel数据写到Buffer
- 通过put方法将数据写Buffer
读取Channel数据写到Buffer的例子
int bytesRead = inChannel.read(buf); //read into buffer.通过put方法将数据写Buffer的例子:
buf.put(127);put()方法有很多重载方法,常用的有
put(byte b):将给定单个字节写入缓冲区的当前位置
put(byte[] src):将 src 中的字节写入缓冲区的当前位置
- put(int index, byte b):将指定字节写入缓冲区的索引位置(不会移动 position)
如何向Buffer中读取数据
有两种方式
- 读取Buffer的数据写入Channel。
- 使用get()方法从Buffer中读取数据。
读取Buffer的数据写入Channel的例子:
int bytesWritten = inChannel.write(buf);使用get()方法从Buffer中读取数据的例子
byte aByte = buf.get();get()方法有很多重载方法,常用的有
get() :读取单个字节
get(byte[] dst):批量读取多个字节到 dst 中
- get(int index):读取指定索引位置的字节(不会移动 position)
代码示例方法
    @Test
    public void test1() {
        String str = "aaaaa";

        //1. 分配一个指定大小的缓冲区
        ByteBuffer buf = ByteBuffer.allocate(1024);
        System.out.println("----------------allocate()----------------");
        System.out.println(buf.capacity());//1024
        System.out.println(buf.limit());//1024
        System.out.println(buf.position());//0

        //2. 利用 put() 存入数据到缓冲区中
        buf.put(str.getBytes());
        System.out.println("----------------put()----------------");
        System.out.println(buf.capacity());//1024
        System.out.println(buf.limit());//1024
        System.out.println(buf.position());//5

        //3. 切换读取数据模式
        //4. 利用 get() 读取缓冲区中的数据
        buf.flip();
        byte[] dst = new byte[buf.limit()];
        buf.get(dst);
        System.out.println("----------------flip()----------------");
        System.out.println(new String(dst,0,dst.length));//aaaaa
        System.out.println(buf.capacity());//1024
        System.out.println(buf.limit());//5
        System.out.println(buf.position());//5

        //5. rewind() : 可重复读
        buf.rewind();
        System.out.println("----------------rewind()----------------");
        System.out.println(buf.capacity());//1024
        System.out.println(buf.limit());//5
        System.out.println(buf.position());//0


        //6. clear() : 清空缓冲区. 但是缓冲区中的数据依然存在,但是处于“被遗忘”状态
        buf.clear();
        System.out.println("----------------clear()----------------");
        System.out.println(buf.capacity());//1024
        System.out.println(buf.limit());//1024
        System.out.println(buf.position());//0

        System.out.println((char)buf.get());//a
    }
@Test
public void test2(){
String str = "abcdef";
ByteBuffer buf = ByteBuffer.allocate(1024);
buf.put(str.getBytes());
buf.flip();
byte[] dst = new byte[buf.limit()];
buf.get(dst, 0, 2);
System.out.println(new String(dst,0,2));//ab
System.out.println(buf.position());//2
//mark() : 标记
buf.mark();
buf.get(dst, 2, 2);
System.out.println(new String(dst,2,2));//cd
System.out.println(buf.position());//4
//reset() : 恢复到 mark 的位置
buf.reset();
System.out.println(buf.position());//2
//判断缓冲区中是否还有剩余数据
if(buf.hasRemaining()){
//获取缓冲区中可以操作的数量
System.out.println(buf.remaining());//4
System.out.println(buf.limit());//6
int j = buf.remaining();
for(int i=0;i<j;i++){
System.out.println((char)buf.get());//c d e f
}
}
} @Test
public void test3(){
ByteBuffer buf = ByteBuffer.allocateDirect(1024);
System.out.println(buf.isDirect());//true
}通道(Channel)
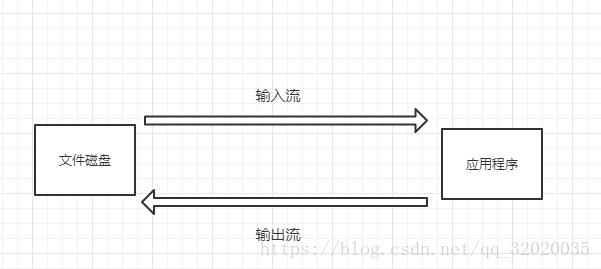
Java NIO的通道表示打开到 IO 设备(例如:文件、套接字)的连接,类似流,但又有些不同:
- 通道是双向的,可以向通道读取数据,也可以向通道写数据。但是流的读写是单向。
- 通道的数据是不负责存储,而是先读取或者写入一个Buffer中,只负责负责缓冲区中数据的传输
Java 为 Channel 接口提供的最主要实现类如下:
由 java.nio.channels 包定义的。
- FileChannel:用于读取、写入、映射和操作文件的通道。
- DatagramChannel:通过 UDP 读写网络中的数据通道。
- SocketChannel:通过 TCP 读写网络中的数据。
- ServerSocketChannel:可以监听新进来的 TCP 连接,对每一个新进来的连接都会创建一个SocketChannel。
示意图
获取通道
Java 针对支持通道的类提供了 getChannel() 方法
本地 IO:
- FileInputStream/FileOutputStream
- RandomAccessFile
网络IO:
- Socket
- ServerSocket
- DatagramSocket
在 JDK 1.7 中的 NIO.2 针对各个通道提供了静态方法 open()
在 JDK 1.7 中的 NIO.2 的 Files 工具类的 newByteChannel()
非直接缓冲区–通道–文件复制
//利用通道完成文件的复制(非直接缓冲区)
    @Test
    public void test1(){
        long start = System.currentTimeMillis();

        //获取文件
        FileInputStream in = null;
        FileOutputStream out = null;
        //获取通道
        FileChannel inChannel = null;
        FileChannel outChannel = null;
        try {
            in = new FileInputStream("1.jpg");
            out = new FileOutputStream("2.jpg");

            inChannel = in.getChannel();
            outChannel = out.getChannel();

            //分配指定大小的缓冲区
            ByteBuffer buf = ByteBuffer.allocate(1024);

            //读取通道中的数据存入缓冲区中
            while(inChannel.read(buf)!=-1){
                buf.flip();//切换读取数据的模式

                //将缓冲区中的数据写入通道中
                outChannel.write(buf);
                buf.clear();//清空缓冲区
            }
        } catch (Exception e) {
            e.printStackTrace();
        //关闭通道和文件
        }finally{
            if(outChannel != null){
                try {
                    outChannel.close();
                } catch (IOException e) {
                    e.printStackTrace();
                }
            }

            if(inChannel != null){
                try {
                    inChannel.close();
                } catch (IOException e) {
                    e.printStackTrace();
                }
            }

            if(in != null){
                try {
                    in.close();
                } catch (IOException e) {
                    e.printStackTrace();
                }
            }

            if(out != null){
                try {
                    out.close();
                } catch (IOException e) {
                    e.printStackTrace();
                }
            }
        }
        long end = System.currentTimeMillis();

        System.out.println(end-start);
    }
直接缓冲区–通道–文件复制
    @Test
    //使用直接缓冲区完成文件的复制(内存映射文件)
    public void test2() throws IOException{
        long start = System.currentTimeMillis();

        //只读
        FileChannel inChannel = FileChannel.open(Paths.get("1.jpg"), StandardOpenOption.READ);
        //读,写,创建
        FileChannel outChannel = FileChannel.open(Paths.get("3.jpg"), StandardOpenOption.WRITE,StandardOpenOption.READ,StandardOpenOption.CREATE);

        //内存映射文件
        MappedByteBuffer inMapperedBuf = inChannel.map(MapMode.READ_ONLY, 0, inChannel.size());
        MappedByteBuffer outMapperedBuf = outChannel.map(MapMode.READ_WRITE,0, inChannel.size());

        //直接对缓冲区进行数据的读写操作
        byte[] dst = new byte[inMapperedBuf.limit()];
        inMapperedBuf.get(dst);
        outMapperedBuf.put(dst);

        inChannel.close();
        outChannel.close();

        long end = System.currentTimeMillis();
        System.out.println(end-start);
    }
通道间进行数据传输
如何在通道间进行数据传输呢?主要是依靠
transferFrom()
transferTo()
这两个方法。
public abstract long transferFrom(ReadableByteChannel src,long position,long count)
                           throws IOException
将数据从源通道(方法内的通道)传输到其他 Channel(对象的通道) 中

如   outChannel.transferFrom(inChannel, 0, inChannel.size());为将inChannel通道的数据传输到outChannel。
public abstract long transferTo(long position,
long count,
WritableByteChannel target)
throws IOException
将数据从源通道(对象的通道)传输到目标Channel(方法的通道) 中
如 inChannel.transferTo(0, inChannel.size(), outChannel);为将inChannel通道的数据传输到outChannel例子
    @Test
    public void test03() throws IOException{
        //只读
        FileChannel inChannel = FileChannel.open(Paths.get("1.jpg"), StandardOpenOption.READ);
        //读,写,创建
        FileChannel outChannel = FileChannel.open(Paths.get("4.jpg"), StandardOpenOption.WRITE,StandardOpenOption.READ,StandardOpenOption.CREATE);

        //inChannel.transferTo(0, inChannel.size(), outChannel);
        outChannel.transferFrom(inChannel, 0, inChannel.size());

        inChannel.close();
        outChannel.close();
    }
分散(Scatter)和聚集(Gather)
分散读取(Scattering Reads)是指从 Channel 中读取的数据“分散”到多个 Buffer 中。
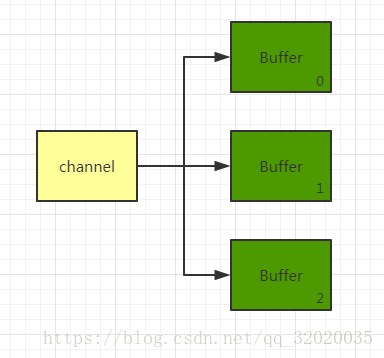
注意:按照缓冲区的顺序,从 Channel 中读取的数据依次将 Buffer 填满。
聚集写入(Gathering Writes)是指将多个 Buffer 中的数据“聚集”到 Channel。
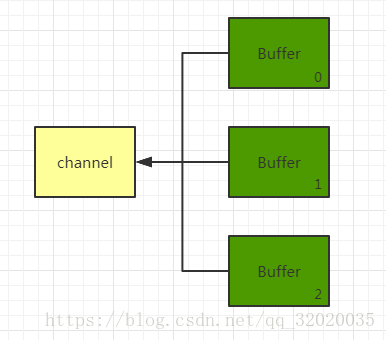
注意:按照缓冲区的顺序,写入 position 和 limit 之间的数据到 Channel 。
示例代码
    @Test
    public void test04() throws Exception{
        RandomAccessFile raf1 = new RandomAccessFile("1.txt","rw");

        //获取通道
        FileChannel channel1 = raf1.getChannel();

        //分配指定大小的缓冲区
        ByteBuffer buf1 = ByteBuffer.allocate(1024);
        ByteBuffer buf2 = ByteBuffer.allocate(1024);

        //分散读取
        ByteBuffer[] bufs = {buf1,buf2};
        channel1.read(bufs);

        for(ByteBuffer byteBuffer:bufs){
            byteBuffer.flip();
        }

        System.out.println(new String(bufs[0].array(),0,bufs[0].limit()));
        System.out.println("------------------------------------------------");
        System.out.println(new String(bufs[1].array(),0,bufs[1].limit()));

        //聚集写入
        RandomAccessFile raf2 = new RandomAccessFile("2.txt","rw");
        FileChannel channel2 = raf2.getChannel();
        channel2.write(bufs);
    }
字符集
数据在传输的过程中可能出现乱码情况,这是因为数据在编码和解码阶段并没有达成统一的字符集
- 编码:字符串 -> 字节数组
- 解码:字节数组 -> 字符串
这是所有支持的字符集
    @Test
    public void test05(){
        Map<String,Charset> map = Charset.availableCharsets();

        Set<Entry<String,Charset>> set = map.entrySet();

        for(Entry<String,Charset> entry:set){
            System.out.println(entry.getKey()+"------"+entry.getValue());
        }
    }
编码解码示例
    @Test
    public void test06() throws CharacterCodingException{
        Charset cs1 = Charset.forName("GBK");

        //获取编码器
        CharsetEncoder ce = cs1.newEncoder();

        //获取解码器
        CharsetDecoder cd = cs1.newDecoder();

        CharBuffer cBuf = CharBuffer.allocate(1024);
        cBuf.put("大唐帝国");
        cBuf.flip();

        //编码
        ByteBuffer bBuf = ce.encode(cBuf);

        for(int i = 0;i < bBuf.limit();i++){
            System.out.println(bBuf.get());
        }

        //解码
        bBuf.flip();
        CharBuffer cBuf2 = cd.decode(bBuf);
        System.out.println(cBuf2.toString());

        //错误解码,造成乱码
        Charset cs2 = Charset.forName("UTF-8");
        bBuf.flip();
        CharBuffer cBuf3 = cs2.decode(bBuf);
        System.out.println(cBuf3.toString());
    }


 4070
4070

 被折叠的 条评论
为什么被折叠?
被折叠的 条评论
为什么被折叠?
 到【灌水乐园】发言


