


主要讲启动原理 运行流程 启动配置原理 作为我springboot结课的最后一篇博客
github地址:https://github.com/FandyWw/spring-boot-07
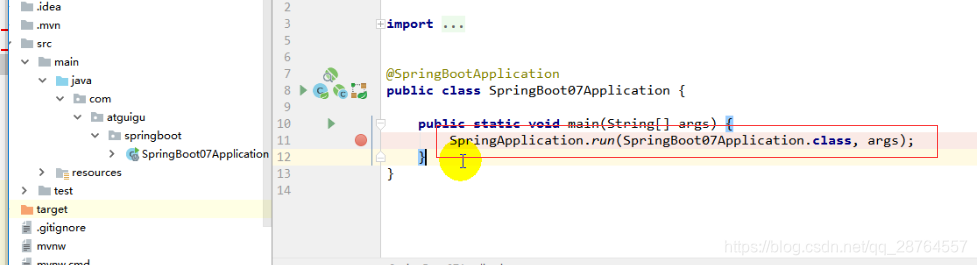
运行这个:点进去run。


第一步创建SpringApplication对象
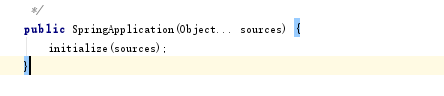 调用initialize方法。
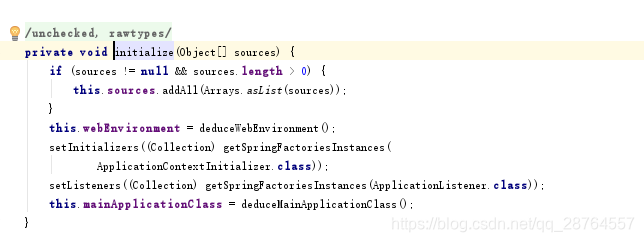
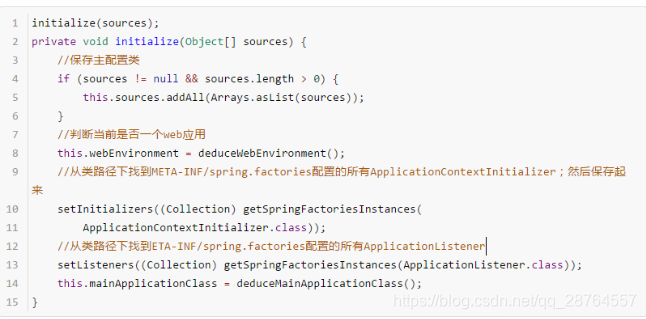
private void initialize(Object[] sources) {
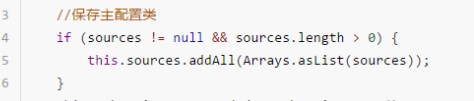
//第一步保存主配置类
if (sources != null && sources.length > 0) {
this.sources.addAll(Arrays.asList(sources));
}
//第二步决定是不是web应用
this.webEnvironment = deduceWebEnvironment();
//第三步实际上就是赋值 主要看getSpringFactoriesInstances方法
setInitializers((Collection) getSpringFactoriesInstances(
ApplicationContextInitializer.class));
//第四步还是啊找,此时是找listener
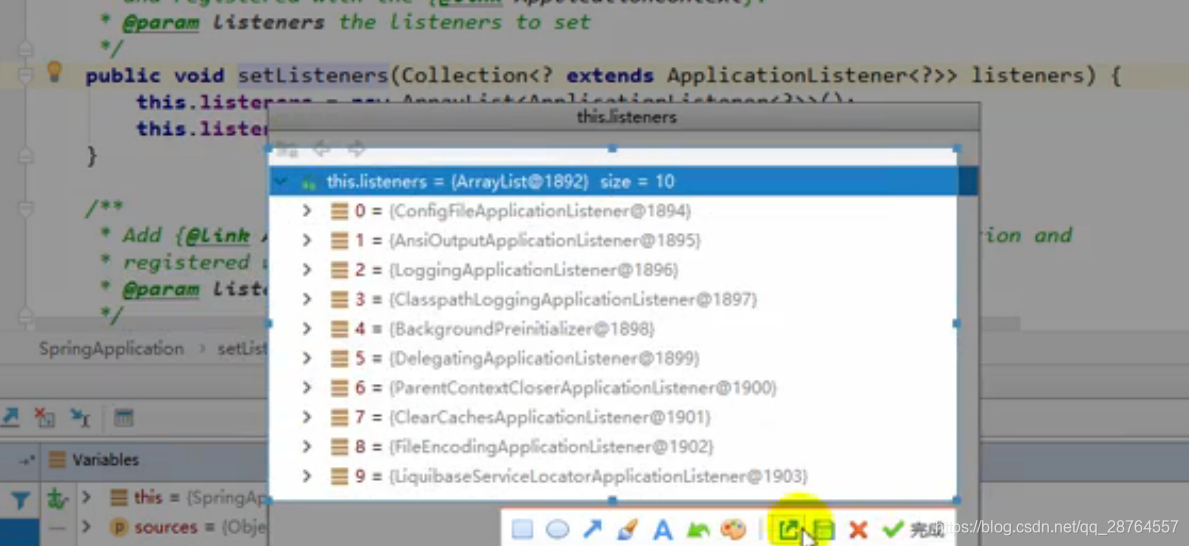
setListeners((Collection) getSpringFactoriesInstances(ApplicationListener.class));
this.mainApplicationClass = deduceMainApplicationClass();
}注意看这个流程里面做了什么事情。
 加载保存主配置类
第2步:
![]() 判断当前的应用是不是web应用
判断当前的应用是不是web应用
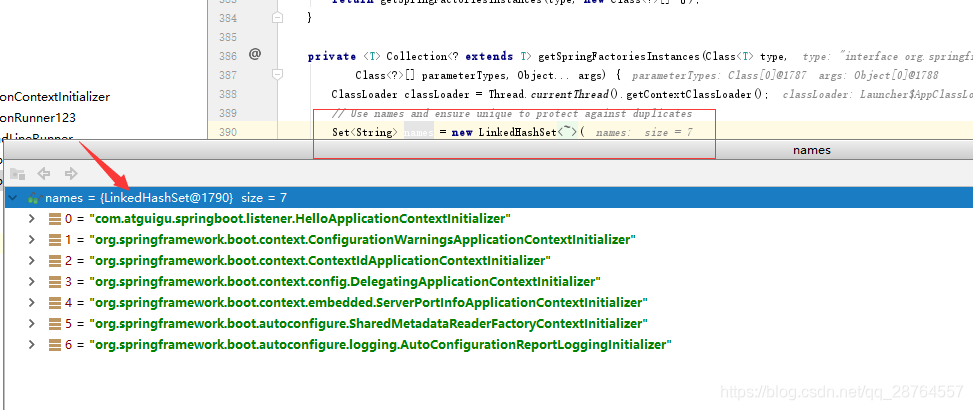
第3步的核心方法是:getSpringFactoriesInstances,点进去。
private <T> Collection<? extends T> getSpringFactoriesInstances(Class<T> type,
			Class<?>[] parameterTypes, Object... args) {
		ClassLoader classLoader = Thread.currentThread().getContextClassLoader();
		// Use names and ensure unique to protect against duplicates
		Set<String> names = new LinkedHashSet<String>(
				SpringFactoriesLoader.loadFactoryNames(type, classLoader));
		List<T> instances = createSpringFactoriesInstances(type, parameterTypes,
				classLoader, args, names);
		AnnotationAwareOrderComparator.sort(instances);
		return instances;
	}
上面的loadFactoryNames,点进去。
public static List<String> loadFactoryNames(Class<?> factoryClass, ClassLoader classLoader) {
String factoryClassName = factoryClass.getName();
try {
Enumeration<URL> urls = classLoader != null ? classLoader.getResources("META-INF/spring.factories") : ClassLoader.getSystemResources("META-INF/spring.factories");
ArrayList result = new ArrayList();
while(urls.hasMoreElements()) {
URL url = (URL)urls.nextElement();
Properties properties = PropertiesLoaderUtils.loadProperties(new UrlResource(url));
String factoryClassNames = properties.getProperty(factoryClassName);
result.addAll(Arrays.asList(StringUtils.commaDelimitedListToStringArray(factoryClassNames)));
}
return result;
} catch (IOException var8) {
throw new IllegalArgumentException("Unable to load [" + factoryClass.getName() + "] factories from location [" + "META-INF/spring.factories" + "]", var8);
}
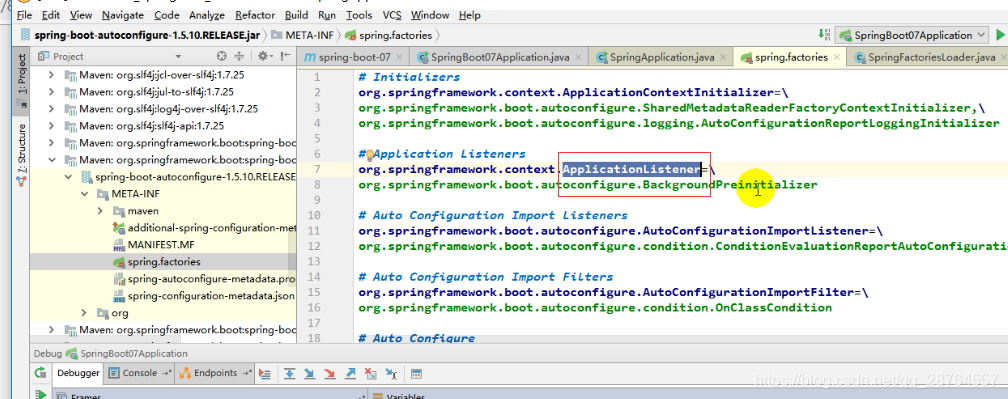
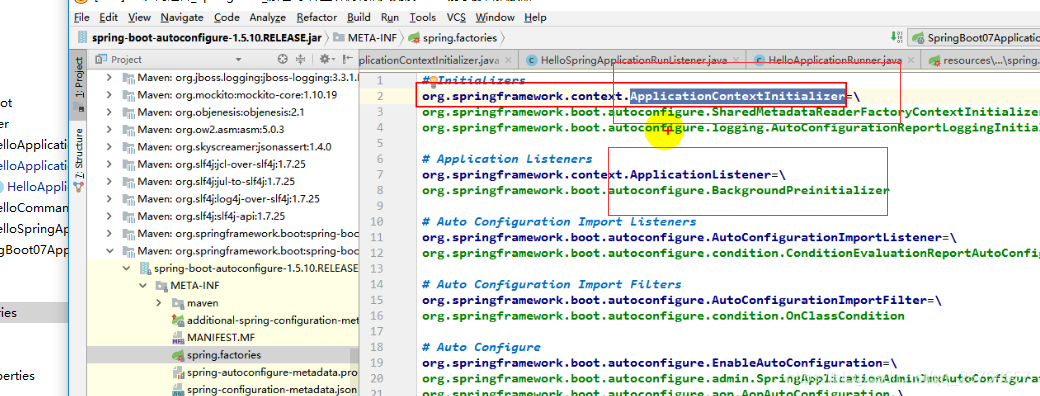
}实际上就是从,类路径下META-INF/spring.factories找到配置的所有的ApplicationContextInitializer,保存起来。
就在这里面:
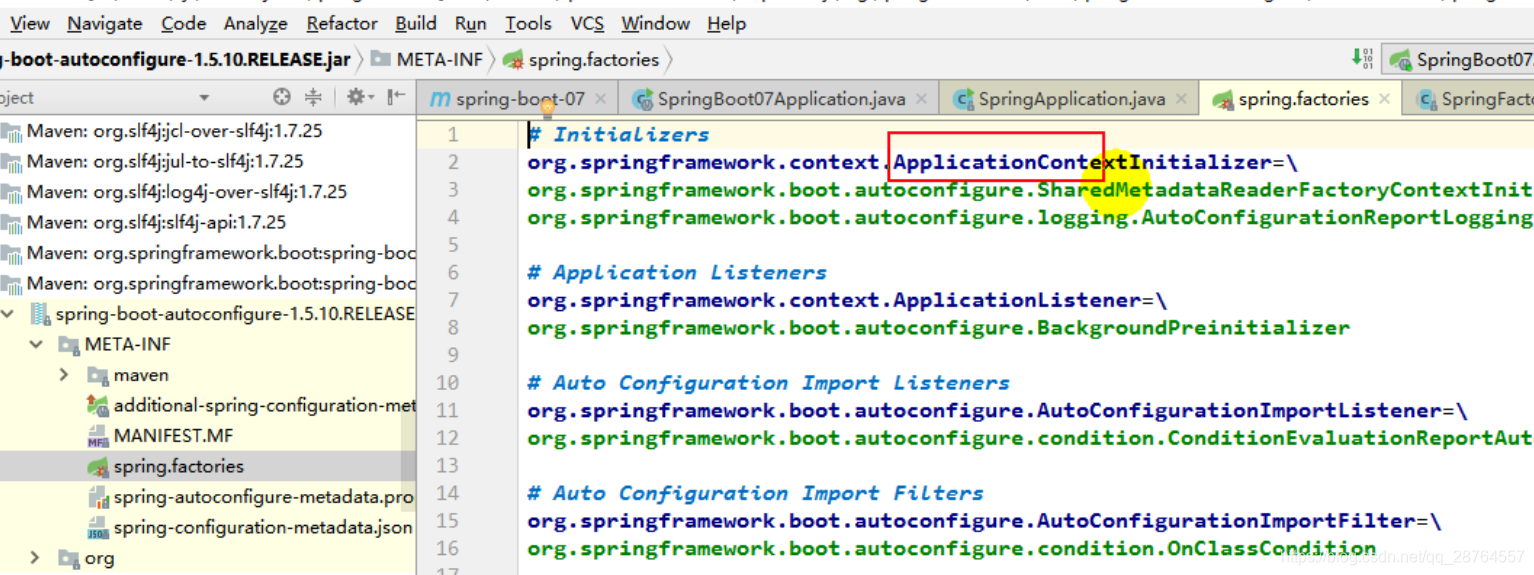
好多包都有这个的,接下来还是从类路径下找
最后一步:
this.mainApplicationClass = deduceMainApplicationClass();点进去:
private Class<?> deduceMainApplicationClass() {
		try {
			StackTraceElement[] stackTrace = new RuntimeException().getStackTrace();
			for (StackTraceElement stackTraceElement : stackTrace) {
				if ("main".equals(stackTraceElement.getMethodName())) {
					return Class.forName(stackTraceElement.getClassName());
				}
			}
		}
		catch (ClassNotFoundException ex) {
			// Swallow and continue
		}
		return null;
	}
这个是从多个配置类中找到主配置类,就是看那个类有main方法,可以传多个看哪个又main方法。
-------------------------------------------------------------------------------------------------------------------------------------------68
第二步执行run方法。
//运行。
public ConfigurableApplicationContext run(String... args) {
        //开启关闭监听
		StopWatch stopWatch = new StopWatch();
		stopWatch.start();
        //声明ioc容器
		ConfigurableApplicationContext context = null;
		FailureAnalyzers analyzers = null;
		configureHeadlessProperty();
        //这个十分重要得,火气监听器就是那五个组件里面的
		SpringApplicationRunListeners listeners = getRunListeners(args);
        //开启监听器,回调所有的starting方法。
		listeners.starting();
		try {
            //不重要就是封装命令行参数
			ApplicationArguments applicationArguments = new DefaultApplicationArguments(
					args);
            //准备环境这个方法里同样回调所有的监听器的方法
			ConfigurableEnvironment environment = prepareEnvironment(listeners,
					applicationArguments);
            //打印banner图标
			Banner printedBanner = printBanner(environment);
            //创建ioc容器这里也要回调listener
			context = createApplicationContext();
            //不重要 异常分析报告
			analyzers = new FailureAnalyzers(context);
            //准备上下文环境  这里面又三个回调方法
			prepareContext(context, environment, listeners, applicationArguments,
					printedBanner);
            //重要
			refreshContext(context);
            //回调runner
			afterRefresh(context, applicationArguments);
            //回调所有的listener方法
			listeners.finished(context, null);
			stopWatch.stop();
			if (this.logStartupInfo) {
				new StartupInfoLogger(this.mainApplicationClass)
						.logStarted(getApplicationLog(), stopWatch);
			}
			return context;
		}
		catch (Throwable ex) {
			handleRunFailure(context, listeners, analyzers, ex);
			throw new IllegalStateException(ex);
		}
	}
解析:
StopWatch stopWatch = new StopWatch();监听不用管。
ConfigurableApplicationContext context = null;声明一个ioc容器。
进入这个方法:configureHeadlessProperty();
	private void configureHeadlessProperty() {
		System.setProperty(SYSTEM_PROPERTY_JAVA_AWT_HEADLESS, System.getProperty(
				SYSTEM_PROPERTY_JAVA_AWT_HEADLESS, Boolean.toString(this.headless)));
	}
jwt相关可以先不要看。
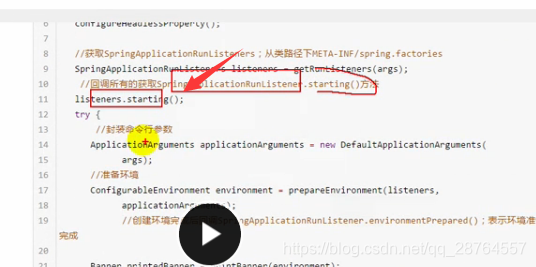
接下来获取比较重要的一个监听器:SpringApplicationRunListeners listeners = getRunListeners(args);
	private SpringApplicationRunListeners getRunListeners(String[] args) {
		Class<?>[] types = new Class<?>[] { SpringApplication.class, String[].class };
		return new SpringApplicationRunListeners(logger, getSpringFactoriesInstances(
				SpringApplicationRunListener.class, types, this, args));
	}
由getSpringFactoriesInstances可知,是在类路径下的META-INF/spring.factories,获取的。
打开监听器。
public void starting() {
		for (SpringApplicationRunListener listener : this.listeners) {
			listener.starting();
		}
	}
回调所有的starting方法。
这个starting方法是SpringApplicationRunListener类的,下面是这个类的代码
/*
 * Copyright 2012-2016 the original author or authors.
 *
 * Licensed under the Apache License, Version 2.0 (the "License");
 * you may not use this file except in compliance with the License.
 * You may obtain a copy of the License at
 *
 *      http://www.apache.org/licenses/LICENSE-2.0
 *
 * Unless required by applicable law or agreed to in writing, software
 * distributed under the License is distributed on an "AS IS" BASIS,
 * WITHOUT WARRANTIES OR CONDITIONS OF ANY KIND, either express or implied.
 * See the License for the specific language governing permissions and
 * limitations under the License.
 */

package org.springframework.boot;

import java.util.ArrayList;
import java.util.Collection;
import java.util.List;

import org.apache.commons.logging.Log;

import org.springframework.context.ConfigurableApplicationContext;
import org.springframework.core.env.ConfigurableEnvironment;
import org.springframework.util.ReflectionUtils;

/**
 * A collection of {@link SpringApplicationRunListener}.
 *
 * @author Phillip Webb
 */
class SpringApplicationRunListeners {

	private final Log log;

	private final List<SpringApplicationRunListener> listeners;

	SpringApplicationRunListeners(Log log,
			Collection<? extends SpringApplicationRunListener> listeners) {
		this.log = log;
		this.listeners = new ArrayList<SpringApplicationRunListener>(listeners);
	}

	public void starting() {
		for (SpringApplicationRunListener listener : this.listeners) {
			listener.starting();
		}
	}

	public void environmentPrepared(ConfigurableEnvironment environment) {
		for (SpringApplicationRunListener listener : this.listeners) {
			listener.environmentPrepared(environment);
		}
	}

	public void contextPrepared(ConfigurableApplicationContext context) {
		for (SpringApplicationRunListener listener : this.listeners) {
			listener.contextPrepared(context);
		}
	}

	public void contextLoaded(ConfigurableApplicationContext context) {
		for (SpringApplicationRunListener listener : this.listeners) {
			listener.contextLoaded(context);
		}
	}

	public void finished(ConfigurableApplicationContext context, Throwable exception) {
		for (SpringApplicationRunListener listener : this.listeners) {
			callFinishedListener(listener, context, exception);
		}
	}

	private void callFinishedListener(SpringApplicationRunListener listener,
			ConfigurableApplicationContext context, Throwable exception) {
		try {
			listener.finished(context, exception);
		}
		catch (Throwable ex) {
			if (exception == null) {
				ReflectionUtils.rethrowRuntimeException(ex);
			}
			if (this.log.isDebugEnabled()) {
				this.log.error("Error handling failed", ex);
			}
			else {
				String message = ex.getMessage();
				message = (message == null ? "no error message" : message);
				this.log.warn("Error handling failed (" + message + ")");
			}
		}
	}

}
这几个函数就是用来回调的。
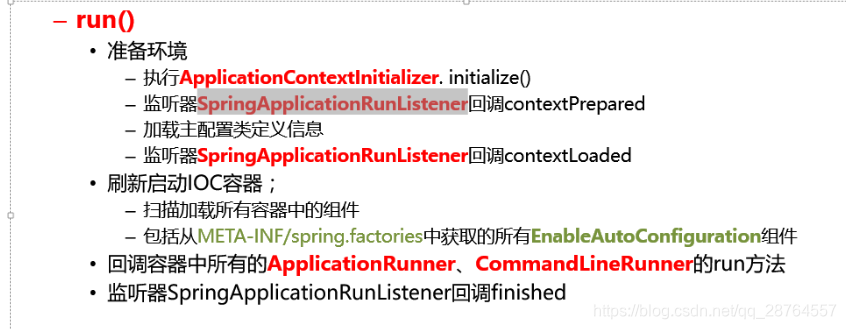
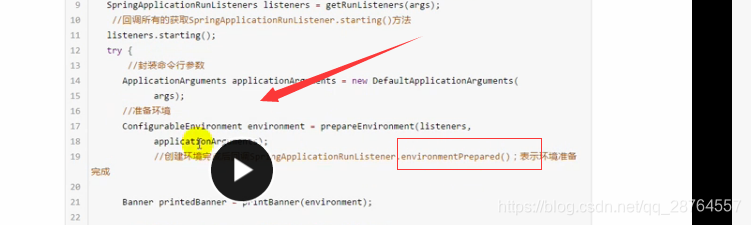
接下来看准备环境做了什么?
ConfigurableEnvironment environment = prepareEnvironment(listeners,
					applicationArguments);
private ConfigurableEnvironment prepareEnvironment(
SpringApplicationRunListeners listeners,
ApplicationArguments applicationArguments) {
// Create and configure the environment
ConfigurableEnvironment environment = getOrCreateEnvironment();
configureEnvironment(environment, applicationArguments.getSourceArgs());
//注意创建环境完成后回调这个方法表示环境准备完成
listeners.environmentPrepared(environment);
if (!this.webEnvironment) {
environment = new EnvironmentConverter(getClassLoader())
.convertToStandardEnvironmentIfNecessary(environment);
}
return environment;
}准备环境就不看了,注意这个:listeners.environmentPrepared(environment);
所以创建环境完成后回调SpringApplicationRunListeners.environmentPrepared(environment)方法。表示环境准备完成。
接下来:
Banner printedBanner = printBanner(environment);打印banner图标。
-------------------------------------------------------------------------------------------------------------------------------------------------------------------------
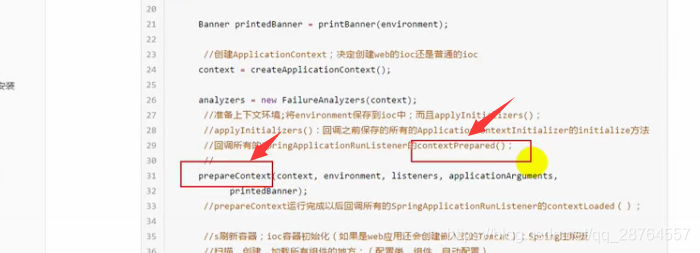
接下来很重要:
context = createApplicationContext();进入方法创建ioc容器。
protected ConfigurableApplicationContext createApplicationContext() {
		Class<?> contextClass = this.applicationContextClass;
		if (contextClass == null) {
			try {
				contextClass = Class.forName(this.webEnvironment
						? DEFAULT_WEB_CONTEXT_CLASS : DEFAULT_CONTEXT_CLASS);
			}
			catch (ClassNotFoundException ex) {
				throw new IllegalStateException(
						"Unable create a default ApplicationContext, "
								+ "please specify an ApplicationContextClass",
						ex);
			}
		}
		return (ConfigurableApplicationContext) BeanUtils.instantiate(contextClass);
	}
创建web的ioc容器还是其他的普通的容器 。。。。。。。。。。。。
return (ConfigurableApplicationContext) BeanUtils.instantiate(contextClass);利用反射最终创建ioc容器。

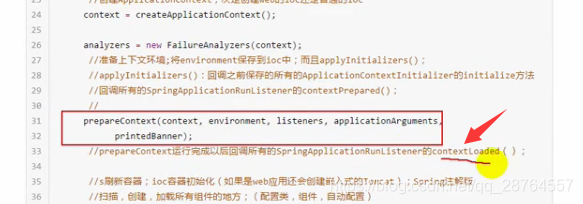
接下来:
analyzers = new FailureAnalyzers(context);出现异常的时候做分析报告的。
接下来:
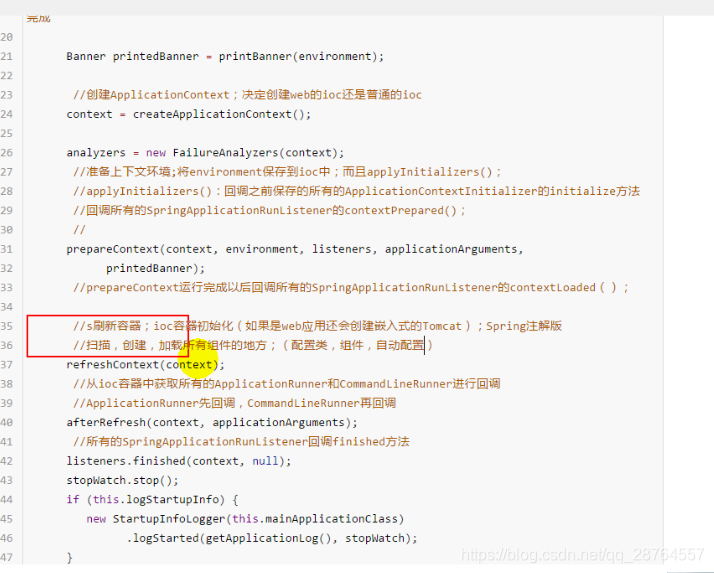
prepareContext(context, environment, listeners, applicationArguments,
					printedBanner);
准备上下文环境,点进去。将environment环境保存到ioc中,applyInitializers(context);
private void prepareContext(ConfigurableApplicationContext context,
			ConfigurableEnvironment environment, SpringApplicationRunListeners listeners,
			ApplicationArguments applicationArguments, Banner printedBanner) {
        //环境保存到ioc中
		context.setEnvironment(environment);
                 //后置处理器组装了一些小组件
		postProcessApplicationContext(context);
        //回调所有的ApplicationInatializer的initialize方法
		applyInitializers(context);
                 //回调
		listeners.contextPrepared(context);
		if (this.logStartupInfo) {
			logStartupInfo(context.getParent() == null);
			logStartupProfileInfo(context);
		}

		// Add boot specific singleton beans 注册命令行参数对象
		context.getBeanFactory().registerSingleton("springApplicationArguments",
				applicationArguments);
		if (printedBanner != null) {
			context.getBeanFactory().registerSingleton("springBootBanner", printedBanner);
		}

		// Load the sources
		Set<Object> sources = getSources();
		Assert.notEmpty(sources, "Sources must not be empty");
		load(context, sources.toArray(new Object[sources.size()]));
                  //最后一步listener回调
		listeners.contextLoaded(context);
}进去applyInitializers(context)------准备上下文环境;获取所有的 ApplicationContextInitializer调用initialize方法。
ApplicationContextInitializer是之前加入进去的
	protected void applyInitializers(ConfigurableApplicationContext context) {
		for (ApplicationContextInitializer initializer : getInitializers()) {
			Class<?> requiredType = GenericTypeResolver.resolveTypeArgument(
					initializer.getClass(), ApplicationContextInitializer.class);
			Assert.isInstanceOf(requiredType, context, "Unable to call initializer.");
			initializer.initialize(context);
		}
	}
10.16
10.16

就是回调这个。
进去这个方法:listeners.contextPrepared(context); 回调所有的listener.contextPrepared()方法。
public void contextPrepared(ConfigurableApplicationContext context) {
		for (SpringApplicationRunListener listener : this.listeners) {
			listener.contextPrepared(context);
		}
	}
这句:
![]()
listeners.contextLoaded(context);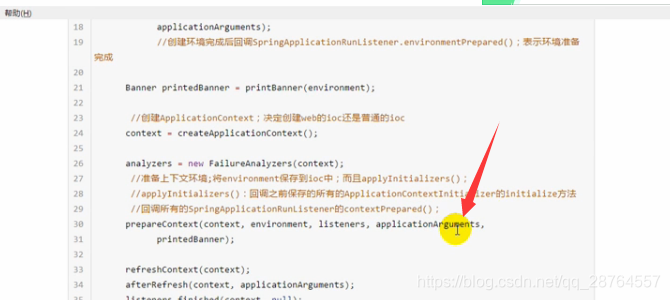
几个方法的回调都是之前保存好的。
接下来重要的之前讲过 刷新容器:
refreshContext(context);刷新容器,就是ioc容器初始化的过程,扫描配置类,初始化bean。如果是web应用还会创建嵌入式的tomcat。
refresh方法:
@Override
	public void refresh() throws BeansException, IllegalStateException {
		synchronized (this.startupShutdownMonitor) {
			// Prepare this context for refreshing.
			prepareRefresh();

			// Tell the subclass to refresh the internal bean factory.
			ConfigurableListableBeanFactory beanFactory = obtainFreshBeanFactory();

			// Prepare the bean factory for use in this context.
			prepareBeanFactory(beanFactory);

			try {
				// Allows post-processing of the bean factory in context subclasses.
				postProcessBeanFactory(beanFactory);

				// Invoke factory processors registered as beans in the context.
				invokeBeanFactoryPostProcessors(beanFactory);

				// Register bean processors that intercept bean creation.
				registerBeanPostProcessors(beanFactory);

				// Initialize message source for this context.
				initMessageSource();

				// Initialize event multicaster for this context.
				initApplicationEventMulticaster();

				// Initialize other special beans in specific context subclasses.
				onRefresh();

				// Check for listener beans and register them.
				registerListeners();

				// Instantiate all remaining (non-lazy-init) singletons.
				finishBeanFactoryInitialization(beanFactory);

				// Last step: publish corresponding event.
				finishRefresh();
			}

			catch (BeansException ex) {
				if (logger.isWarnEnabled()) {
					logger.warn("Exception encountered during context initialization - " +
							"cancelling refresh attempt: " + ex);
				}

				// Destroy already created singletons to avoid dangling resources.
				destroyBeans();

				// Reset 'active' flag.
				cancelRefresh(ex);

				// Propagate exception to caller.
				throw ex;
			}

			finally {
				// Reset common introspection caches in Spring's core, since we
				// might not ever need metadata for singleton beans anymore...
				resetCommonCaches();
			}
		}
	}

这个方法初始化剩下的单实例的bean,就是所有的组件。
再次进入这个方法:
afterRefresh(context, applicationArguments);
protected void afterRefresh(ConfigurableApplicationContext context,
			ApplicationArguments args) {
		callRunners(context, args);
	}
private void callRunners(ApplicationContext context, ApplicationArguments args) {
List<Object> runners = new ArrayList<Object>();
//在ioc容器获取所有的这个两种runner
runners.addAll(context.getBeansOfType(ApplicationRunner.class).values());
runners.addAll(context.getBeansOfType(CommandLineRunner.class).values());
AnnotationAwareOrderComparator.sort(runners);
for (Object runner : new LinkedHashSet<Object>(runners)) {
if (runner instanceof ApplicationRunner) {
callRunner((ApplicationRunner) runner, args);
}
if (runner instanceof CommandLineRunner) {
callRunner((CommandLineRunner) runner, args);
}
}
}
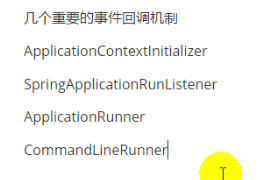
注意这两个时间监听的组件:ApplicationRunner CommandLineRunner
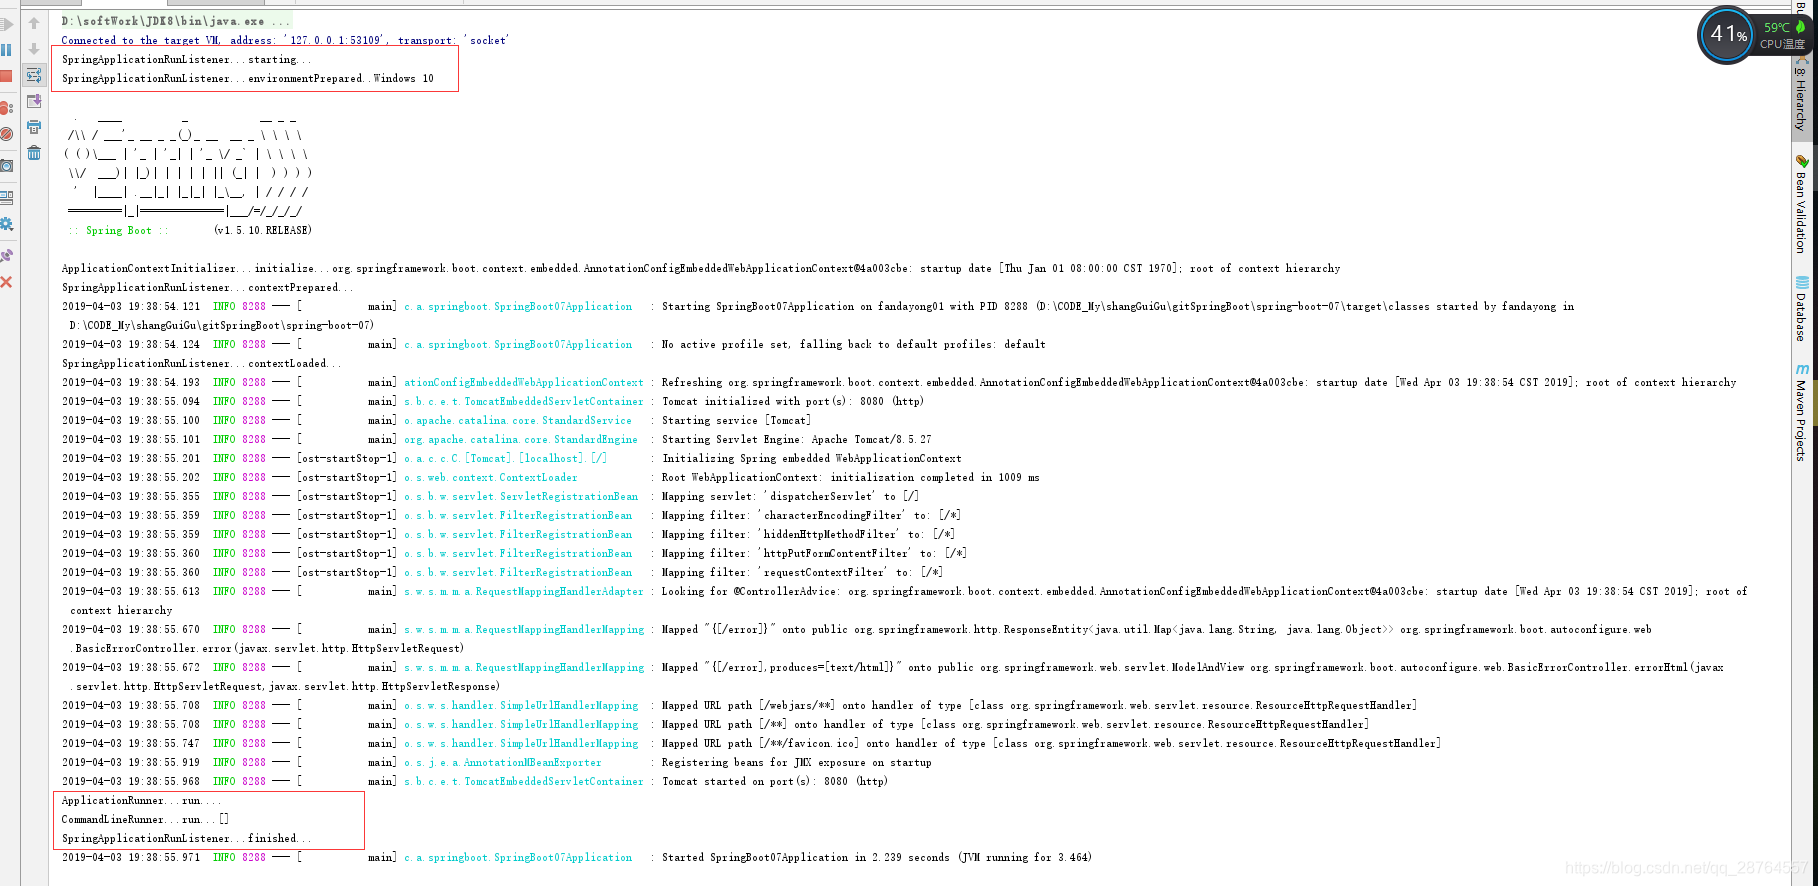
![]()
有优先级的ApplicationRunner先回调,CommandLineRunner再来回调。
再下来:
listeners.finished(context, null);所有的listener回调finished方法。
最后返回ioc容器。
总结:

下面是几个事件监听机制。有些是初始化器。
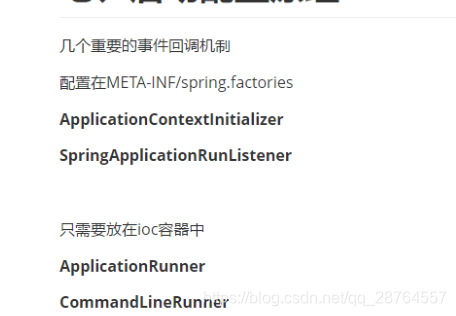
70-------------------------------------------------------------------------------------------------
事件监听机制,插手监听类。
首先是初始化器ApplicationContextInitializer的实现类,是来监听启动的:
package com.atguigu.springboot.listener;

import org.springframework.context.ApplicationContextInitializer;
import org.springframework.context.ConfigurableApplicationContext;

public class HelloApplicationContextInitializer implements ApplicationContextInitializer<ConfigurableApplicationContext> {
    @Override
    public void initialize(ConfigurableApplicationContext applicationContext) {
        System.out.println("ApplicationContextInitializer...initialize..."+applicationContext);
    }
}

传入的泛型是用来监听什么的具体的,我们监听ioc容器的启动。
ctrl+H快捷键
------------------------------------------------------------------------------------------------
下一个组件:HelloSpringApplicationRunListener
package com.atguigu.springboot.listener;

import org.springframework.boot.SpringApplication;
import org.springframework.boot.SpringApplicationRunListener;
import org.springframework.context.ConfigurableApplicationContext;
import org.springframework.core.env.ConfigurableEnvironment;

public class HelloSpringApplicationRunListener implements SpringApplicationRunListener {

    //必须有的构造器
    public HelloSpringApplicationRunListener(SpringApplication application, String[] args){

    }

    //调用时机源码有
    @Override
    public void starting() {
        System.out.println("SpringApplicationRunListener...starting...");
    }

    @Override
    public void environmentPrepared(ConfigurableEnvironment environment) {
        Object o = environment.getSystemProperties().get("os.name");
        System.out.println("SpringApplicationRunListener...environmentPrepared.."+o);
    }

    @Override
    public void contextPrepared(ConfigurableApplicationContext context) {
        System.out.println("SpringApplicationRunListener...contextPrepared...");
    }

    @Override
    public void contextLoaded(ConfigurableApplicationContext context) {
        System.out.println("SpringApplicationRunListener...contextLoaded...");
    }

    @Override
    public void finished(ConfigurableApplicationContext context, Throwable exception) {
        System.out.println("SpringApplicationRunListener...finished...");
    }
}
几个时机:
starting()方法在ioc容器还没创建调用的
基本环境准备好了调用。
prepareContext准备好了调用
prepareContext运行完了调用
--------------------------------------------------------------------
下一个组件:HelloApplicationRunner
package com.atguigu.springboot.listener;

import org.springframework.boot.ApplicationArguments;
import org.springframework.boot.ApplicationRunner;
import org.springframework.stereotype.Component;

@Component
public class HelloApplicationRunner implements ApplicationRunner {
    @Override
    public void run(ApplicationArguments args) throws Exception {
        System.out.println("ApplicationRunner...run....");
    }
}
下一个组件:HelloCommandLineRunner
package com.atguigu.springboot.listener;

import org.springframework.boot.CommandLineRunner;
import org.springframework.stereotype.Component;

import java.util.Arrays;


@Component
public class HelloCommandLineRunner implements CommandLineRunner {
    @Override
    public void run(String... args) throws Exception {
        System.out.println("CommandLineRunner...run..."+ Arrays.asList(args));
    }
}
------------------------------------------------------------------------------------------------------------------------------------------------------------------------
重要的:
放在容器中的只要加一个注解@Component
配置的话就是要按照原来的规则:类路径下建文件夹。
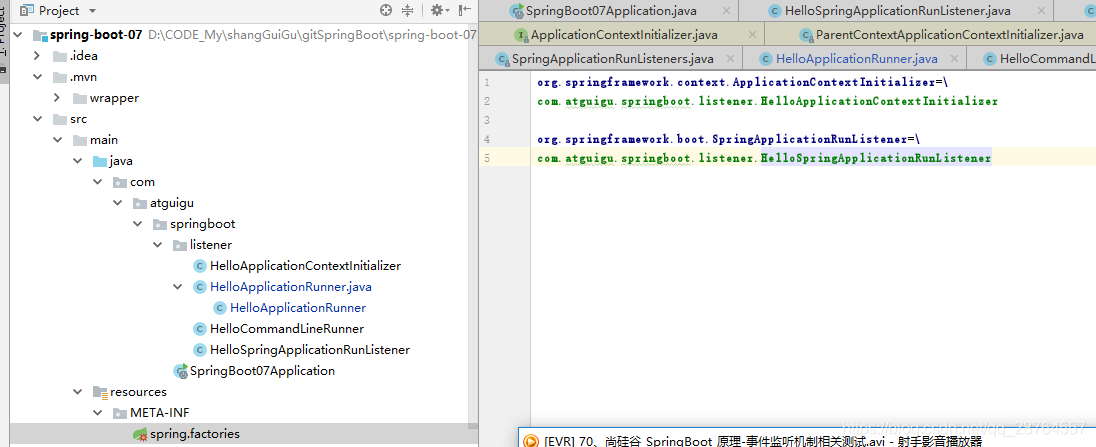
org.springframework.context.ApplicationContextInitializer=\
com.atguigu.springboot.listener.HelloApplicationContextInitializer

org.springframework.boot.SpringApplicationRunListener=\
com.atguigu.springboot.listener.HelloSpringApplicationRunListener
原理源码:
启动查看结果:
71--------------------------------------------------------------------------------
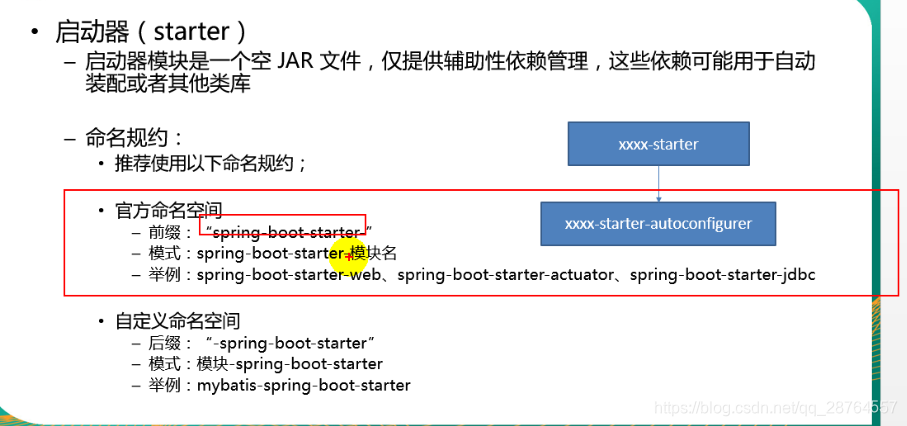
自定义starts场景启动器
 已经自动配置好了只要写属性就可以了。
starter:
1.场景使用的依赖
2.如何编写自动配置
例子:找到这个类
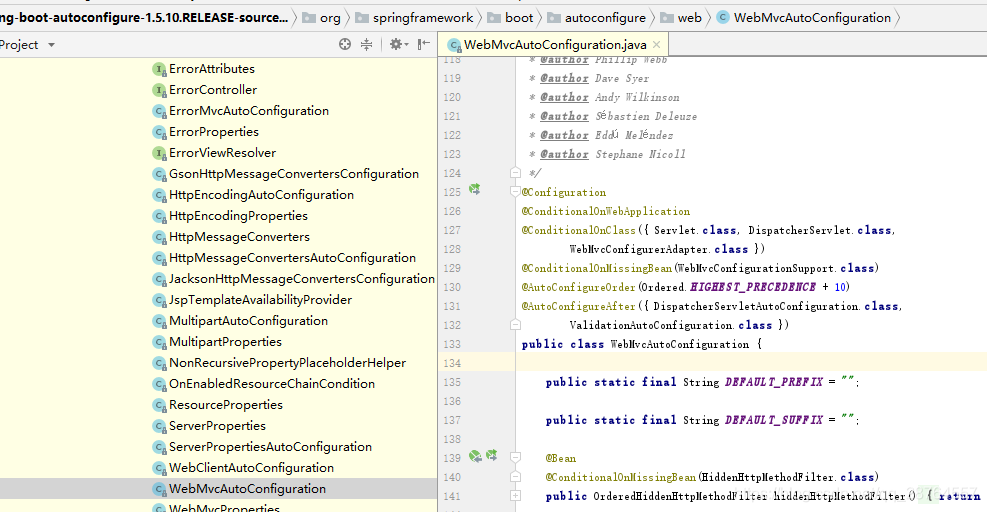
使用@configure注解指定是配置类
@ConditionalOnXXX指定条件成立再启动
判断@AutoConfigureOrder(Ordered.HIGHEST_PRECEDENCE + 10)指定自动配置类的顺序
@Bean添加组件。
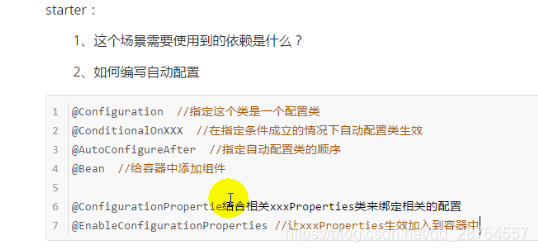
自动配置类要是能加载的话:
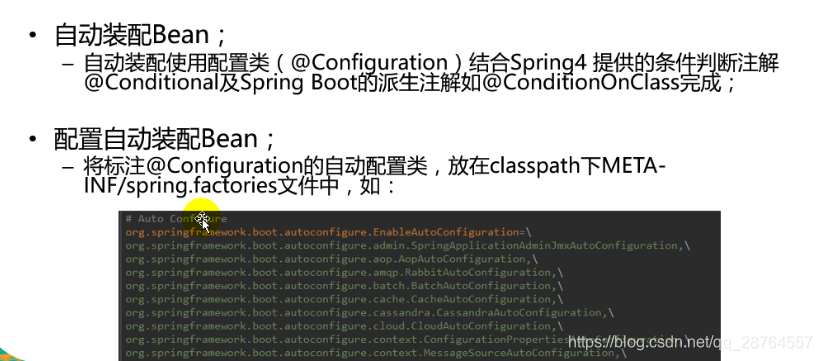
模式:启动器只是用来做依赖导入,专门写一个自动配置模块,启动器依赖自动配置模块,别人只需要引入启动器。
启动器依赖自动配置 别人使用依赖启动器。
![]()
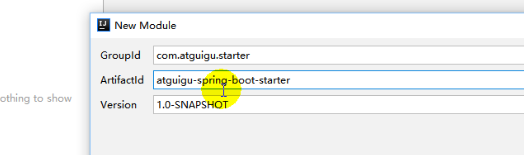 导入模块。
导入模块。
最后自定义启动器,移步我的博客:https://blog.youkuaiyun.com/qq_28764557/article/details/89005008


 1万+
1万+

 被折叠的 条评论
为什么被折叠?
被折叠的 条评论
为什么被折叠?
 到【灌水乐园】发言


