


 本文详细介绍如何使用Webpack创建一个数字与英文单词互转的插件,包括项目搭建、模块安装、代码编写、配置文件设置及发布流程。
1,首先创建一个文件夹,建议是插件的名称且小写,否则在发布插件时会失败
2,运行npm init -y 生成package.json文件
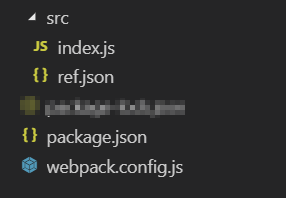
3,建立以下目录
4,安装基本的模块webpack, webpack-cli, lodash
npm install --save-dev webpack lodash webpack-cli
index.js
import _ from 'lodash';
import numRef from './ref.json';

export function numToWord(num) {
  return _.reduce(numRef, (accum, ref) => {
    return ref.num === num ? ref.word : accum;
  }, '');
};

export function wordToNum(word) {
  return _.reduce(numRef, (accum, ref) => {
    return ref.word === word && word.toLowerCase() ? ref.num : accum;
  }, -1);
};
ref.json
[{
  "num": 1,
  "word": "One"
}, {
  "num": 2,
  "word": "Two"
}, {
  "num": 3,
  "word": "Three"
}, {
  "num": 4,
  "word": "Four"
}, {
  "num": 5,
  "word": "Five"
}, {
  "num": 0,
  "word": "Zero"
}]
webpack.config.js
var path = require('path');

module.exports = {
  entry: './src/index.js',
  output: {
    path: path.resolve(__dirname, 'dist'),
    filename: 'webpack-numbers.js',
    library: 'webpackNumbers',  // 打包成库
    libraryTarget: 'umd'  // 多种运行环境
  },
  externals: {  // 让lodash交由用户控制
    lodash: {
      commonjs: 'lodash',
      commonjs2: 'lodash',
      amd: 'lodash',
      root: '_'
    }
  }
};
package.json
{
  "name": "testwebpacklibrary",
  "version": "1.0.0",
  "description": "",
  "main": "dist/webpack-numbers.js",
  "repository": "仓库地址",
  "scripts": {
    "test": "echo \"Error: no test specified\" && exit 1",
    "build": "webpack"
  },
  "keywords": [],
  "author": "",
  "license": "ISC",
  "devDependencies": {
    "lodash": "^4.17.11",
    "webpack": "^4.29.6",
    "webpack-cli": "^3.3.0"
  }
}
运行npm run build打包
运行命令npm login登录到npm,输入用户名,密码和邮箱,如果是注册,则需要在所输入的邮箱里激活
最后npm publish . 看到插件名+版本号就成功了
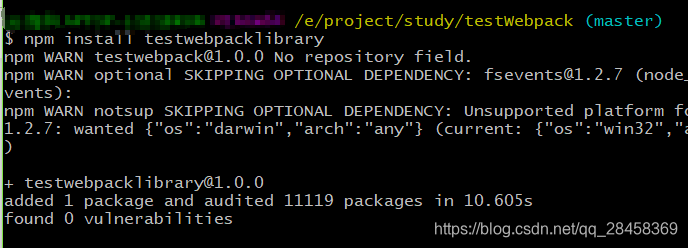
然后我们在别的项目里安装我们发布的插件
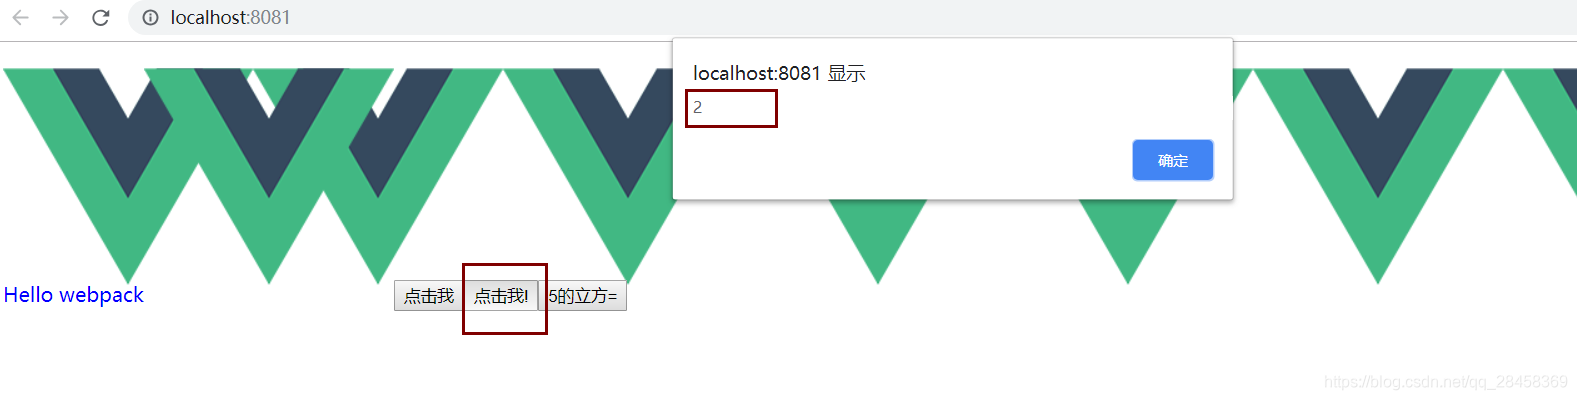
使用
import * as webpackNumbers from 'testwebpacklibrary';
export default function print() {
alert(webpackNumbers.wordToNum('Two'))
}
结果


 1625
1625

 被折叠的 条评论
为什么被折叠?
被折叠的 条评论
为什么被折叠?
 到【灌水乐园】发言


