


 本文详细介绍了如何在Spring Boot项目中集成ActiveMQ消息中间件,包括P2P和Pub/Sub两种消息模型的实现,以及如何配置和使用ActiveMQ进行消息生产和消费。
ActiveMQ介绍
消息中间件ActiveMQ是JMS(Java Message Service)规范的一种实现。
两个重要概念
- 目的地(destination):消息发送到哪里
- 消息代理(message broker):提供一种通信机制
当消息发送者发送消息以后,将由消息代理接管,消息代理保证消息传递到指定目的地。
两种消息模型
- P2P模式:点对点消息通信(point-to-point)
- Pub/Sub模式:发布(publish)/订阅(subscribe)消息通信
消息中间件的使用场景
- 异步处理
- 流量削峰
- 系统解耦
Spring boot中使用ActiveMQ
添加activemq启动器
<dependency>
	<groupId>org.springframework.boot</groupId>
	<artifactId>spring-boot-starter-activemq</artifactId>
</dependency>
配置ActiveMQ
#配置ActiveMQ
#指定ActiveMQ broker的URL
spring.activemq.broker-url=tcp://192.168.25.128:61616
#是否是内存模式
spring.activemq.in-memory=true
#是否创建PooledConnectionFactory,而非ConnectionFactory
spring.activemq.pool.enabled=false
点对点模式
1、每个消息只有一个消费者,消息一旦被消费,就从消息队列中消失
2、消息的发送者和接收者在时候上没有依赖性,当发送者发送了消息之后,不管接收者有没有处于运行状态,消息都会发送到消息队列中
3、接收者在成功接收消息之后需要向队列应答成功如果希望发送的每个消息都被成功处理,就可以采用点对点的消息模型
- 消息生产者(Producer)
@Service
public class Producer {
    @Autowired
    private JmsTemplate jmsTemplate;
    @Autowired
    private Queue queue;
    public void sendQueueMessage(String message) {
    	/*
    	* 发送消息自动转换成原始消息
    	* 消息不需要实现MessageCreate接口
    	*/
        jmsTemplate.convertAndSend(queue,message);
    }
}
- 消息目的地
@Configuration
public class JmsConfig {
    @Bean
    public Queue queue() {
        return new ActiveMQQueue("wang.zx.queue");
    }
}
- 消息接收者(Consumer)
@Component
public class ConsumerQueue {
private static final Logger logger = LoggerFactory.getLogger(ConsumerQueue.class);
//监听者的方式来监听指定地点的消息,采用注解@JmsListener来设置监听方法。
@JmsListener(destination = "wang.zx.queue")
public void receiveQueue(String message) {
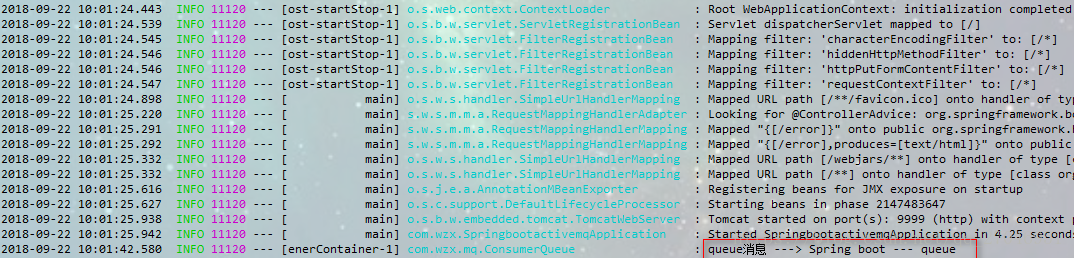
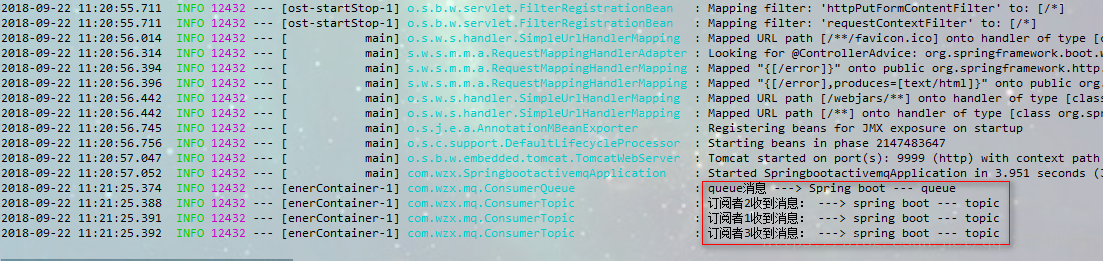
logger.info("queue消息 ---> {}",message);
}
}
- 发送消息
@RunWith(SpringRunner.class)
@SpringBootTest
@EnableJms//对 JMS 注解的支持
public class SpringbootactivemqApplicationTests {
	@Autowired
	private Producer producer;
	@Test
	public void contextLoads() {
		producer.sendQueueMessage("Spring boot --- queue");
	}
}
- 效果展示
发布订阅模式
1、每个消息可以有多个消费者
2、发布者和订阅者之间有时间上的依赖性,针对某个主题的订阅者,必须创3、建一个订阅者之后,才能发布者发布的消息
为了消息可以消费,订阅者必须保存运行状态
Spring boot默认发送的消息模型为点对点模型,如果需要发布/订阅模型,就需要在配置文件中配置,配置之后就不支持点对点模型了(后面会将同时发布点对点消息和发布/订阅消息)
spring.jms.pub-sub-domain=true
- 消息发布者
@Service
public class Producer {
    @Autowired
    private JmsTemplate jmsTemplate;
    @Autowired
    private Topic topic;
    public void sendQueueMessage(String message) {
    	/*
    	* 发送消息自动转换成原始消息
    	* 消息不需要实现MessageCreate接口
    	*/
    	//topic:目的地 message:要发送的消息
        jmsTemplate.convertAndSend(topic,message);
    }
}
- 消息目的地
public class JmsConfig {
    @Bean
    public Topic topic() {
        return new ActiveMQTopic("wang.zx.topic");
    }
}
- 消息订阅者(多个订阅者)
@Component
public class ConsumerTopic {
private static final Logger logger = LoggerFactory.getLogger(ConsumerTopic.class);
@JmsListener(destination = "wang.zx.topic")
public void receiveTopic1(String message) {
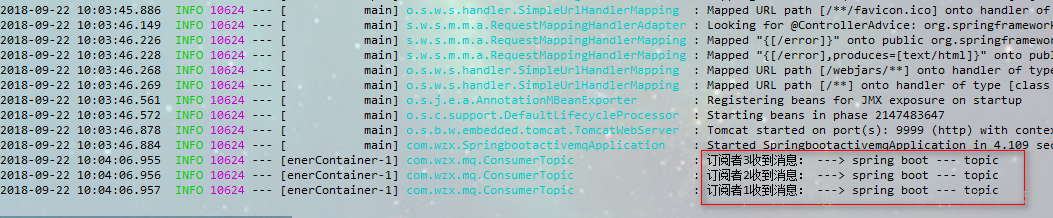
logger.info("订阅者1收到消息: ---> {}",message);
}
@JmsListener(destination = "wang.zx.topic")
public void receiveTopic2(String message) {
logger.info("订阅者2收到消息: ---> {}",message);
}
@JmsListener(destination = "wang.zx.topic")
public void receiveTopic3(String message) {
logger.info("订阅者3收到消息: ---> {}",message);
}
}
- 发布消息
@RunWith(SpringRunner.class)
@SpringBootTest
@EnableJms//对 JMS 注解的支持
public class SpringbootactivemqApplicationTests {
	@Autowired
	private Producer producer;
	@Test
	public void contextLoads() {
		producer.sendTopicMessage("spring boot --- topic");
	}
}
- 效果展示
同时支持点对点和发布/订阅
消息的接收,也就是@JmsListener如果不指定独立的containerFactory的话是只能消费queue消息的,如果要能够同时接收topic消息,需要给topic对应的@JmsListener增加containerFactory配置
- JmsConfig 配置JmsListenerContainerFactory
/**
 * @author WangZX
 * @create 2018-09-22 9:38
 */
@Configuration
public class JmsConfig {
    @Bean
    public Queue queue() {
        return new ActiveMQQueue("wang.zx.queue");
    }
    @Bean
    public Topic topic() {
        return new ActiveMQTopic("wang.zx.topic");
    }
	//配置发布/订阅模式的JmsListenerContainerFactory
    @Bean
    public JmsListenerContainerFactory<?> jmsListenerContainerFactoryTopic(ConnectionFactory activeMQConnectionFactory) {
        DefaultJmsListenerContainerFactory bean = new DefaultJmsListenerContainerFactory();
        //支持发布订阅功能
        bean.setPubSubDomain(true);
        bean.setConnectionFactory(activeMQConnectionFactory);
        return bean;
    }
	//配置点对点模式的JmsListenerContainerFactory
    @Bean
    public JmsListenerContainerFactory<?> jmsListenerContainerFactoryQueue(ConnectionFactory activeMQConnectionFactory) {
        DefaultJmsListenerContainerFactory bean = new DefaultJmsListenerContainerFactory();
        bean.setConnectionFactory(activeMQConnectionFactory);
        bean.setPubSubDomain(false);
        return bean;
    }
}
- 消息生产者
@Service
public class Producer {
    @Autowired
    private JmsTemplate jmsTemplate;
    @Autowired
    private Queue queue;
    @Autowired
    private Topic topic;

    public void sendQueueMessage(String message) {
    	//queue:目的地 message:要发送的消息
        jmsTemplate.convertAndSend(queue,message);
    }

    public void sendTopicMessage(String message) {
    	//topic:目的地 message:要发送的消息
        jmsTemplate.convertAndSend(topic,message);
    }
}
- 点对点消费者
@Component
public class ConsumerQueue {
    private static final Logger logger = LoggerFactory.getLogger(ConsumerQueue.class);
    //同时支持点对点和消息队列需要指定 containerFactory
    @JmsListener(destination = "wang.zx.queue", containerFactory = "jmsListenerContainerFactoryQueue")
    public void receiveQueue(String message) {
        logger.info("queue消息 ---> {}",message);
    }
}
- 订阅者
@Component
public class ConsumerTopic {
    private static final Logger logger = LoggerFactory.getLogger(ConsumerTopic.class);
    //指定支持发布订阅的containerFactory
    @JmsListener(destination = "wang.zx.topic", containerFactory = "jmsListenerContainerFactoryTopic")
    public void receiveTopic1(String message) {
        logger.info("订阅者1收到消息: ---> {}",message);
    }
    @JmsListener(destination = "wang.zx.topic", containerFactory = "jmsListenerContainerFactoryTopic")
    public void receiveTopic2(String message) {
        logger.info("订阅者2收到消息: ---> {}",message);
    }
    @JmsListener(destination = "wang.zx.topic", containerFactory = "jmsListenerContainerFactoryTopic")
    public void receiveTopic3(String message) {
        logger.info("订阅者3收到消息: ---> {}",message);
    }
}
- 消息发送
@RunWith(SpringRunner.class)
@SpringBootTest
@EnableJms
public class SpringbootactivemqApplicationTests {
	@Autowired
	private Producer producer;
	@Test
	public void contextLoads() {
		//点对点消息
		producer.sendQueueMessage("Spring boot --- queue");
		//发布/订阅消息
		producer.sendTopicMessage("spring boot --- topic");
	}
}
效果展示
代码已上传到github:spring-boot-activemq


 978
978

 被折叠的 条评论
为什么被折叠?
被折叠的 条评论
为什么被折叠?
 到【灌水乐园】发言


