


背景:1,我们自己写的类,对于熟悉Spring的人来说,再熟悉不过随处可用的注解了,如我们控制器中的@Controller,service层中的@Service,dao层中的@Repository;2,集成其他框架,如集成shiro权限框架,集成Redis缓存框架,第三方框架的核心类都要交于Spring这个大管家来管理
一,@Configuration与@Bean 与配置xml对比
1,@Configuration(启动容器) 等同于spring的配置文件xml里的<beans>标签;
2,@Bean(注册Bean) 等同于spring的配置文件xml里面的<bean>标签。
二,@Configuration与@Bean之定义与规则
从Spring3.0开始,@Configuration用于定义配置类,可替换xml配置文件,被注解的类内部包含有一个或多个被@Bean注解的方法,这些方法将会被AnnotationConfigApplicationContext或AnnotationConfigWebApplicationContext类进行扫描,并用于构建bean定义,初始化Spring容器。
注意:@Configuration注解的配置类有如下要求:
1,@Configuration不可以是final类型;
2,@Configuration不可以是匿名类;
3,嵌套的@Configuration必须是静态类。
三,@Configuation加载Spring方法
3.1,@Configuration配置spring并启动spring容器。@Configuration标注在类上,相当于把该类作为spring的xml配置文件中的<beans>,其作用为:配置spring容器(应用上下文)
import org.springframework.context.annotation.Configuration;

@Configuration
public class TestConfiguration {
    public TestConfiguration () {
        System.out.println("TestConfiguration容器启动...");
    }
}
测试类:
import org.springframework.context.ApplicationContext;
import org.springframework.context.annotation.AnnotationConfigApplicationContext;

public class Test {
    public static void main(String[] args) {
        // 使用AnnotationConfigApplicationContext加载@Configuration注解的spring容器
        ApplicationContext applicationContext = new AnnotationConfigApplicationContext(TestConfiguration.class);
    }
}
运行结果:

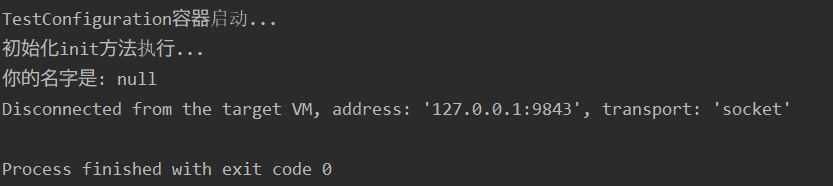
3.2,@Configuration启动容器+@Bean注册Bean,@Bean标注在方法上(返回某个实例的方法),等价于spring的xml配置文件中的<bean>,作用为:注册bean对象
import org.springframework.context.annotation.Bean;
import org.springframework.context.annotation.Configuration;

@Configuration
public class TestConfiguration {
    public TestConfiguration () {
        System.out.println("TestConfiguration容器启动...");
    }

    @Bean
    public TestBean testBean () {
        return new TestBean();
    }
}
public class TestBean {
private String name;
public void say() {
System.out.println("你的名字是: "+name);
}
@Override
public String toString() {
return "TestBean{" +
"name='" + name + '\'' +
'}';
}
}测试类:
import org.springframework.context.ApplicationContext;
import org.springframework.context.annotation.AnnotationConfigApplicationContext;

public class Test {
    public static void main(String[] args) {
        // 使用AnnotationConfigApplicationContext加载@Configuration注解的spring容器
        ApplicationContext applicationContext = new AnnotationConfigApplicationContext(TestConfiguration.class);
        TestBean testBean = (TestBean) applicationContext.getBean("testBean");
        testBean.say();
    }
}
运行结果:

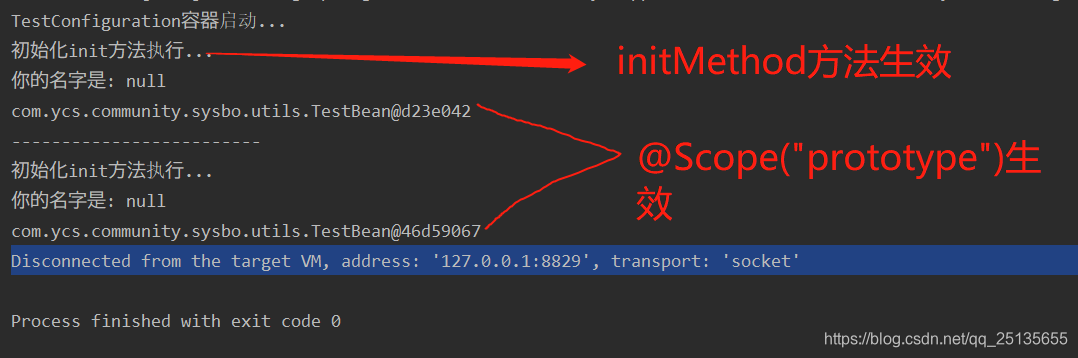
3.3,@Bean(name = "testBean", initMethod = "init", destroyMethod = "destroy") 管理bean 的生命周期。@Bean 支持两种属性,即 initMethod 和destroyMethod,这些属性可用于定义生命周期方法。在实例化 bean 或即将销毁它时,容器便可调用生命周期方法。生命周期方法也称为回调方法,因为它将由容器调用。
import org.springframework.context.annotation.Bean;
import org.springframework.context.annotation.Configuration;
import org.springframework.context.annotation.Scope;

@Configuration
public class TestConfiguration {
    public TestConfiguration () {
        System.out.println("TestConfiguration容器启动...");
    }

    // @Bean注解注册bean,同时指定初始化和销毁方法
    @Bean(name = "testBean", initMethod = "init", destroyMethod = "destroy")
    @Scope("prototype")
    public TestBean testBean () {
        return new TestBean();
    }
}
public class TestBean {
private String name;
public void say() {
System.out.println("你的名字是: "+name);
}
public void init() {
System.out.println("初始化init方法执行...");
}
public void destroy() {
System.out.println("销毁destroy方法执行...");
}
}
测试类:
import org.springframework.context.ApplicationContext;
import org.springframework.context.annotation.AnnotationConfigApplicationContext;
public class Test {
public static void main(String[] args) {
// 使用AnnotationConfigApplicationContext加载@Configuration注解的spring容器
ApplicationContext applicationContext = new AnnotationConfigApplicationContext(TestConfiguration.class);
TestBean testBean1 = (TestBean) applicationContext.getBean("testBean");
testBean1.say();
System.out.println(testBean1);
System.out.println("-------------------------");
TestBean testBean2 = (TestBean) applicationContext.getBean("testBean");
testBean2.say();
System.out.println(testBean2);
}
}运行结果:
3.4,使用@Configuration启动容器+@Component注册Bean
import org.springframework.context.annotation.Bean;
import org.springframework.context.annotation.ComponentScan;
import org.springframework.context.annotation.Configuration;
import org.springframework.context.annotation.Scope;
@Configuration
//添加自动扫描注解,basePackages为TestBean包路径
@ComponentScan(basePackages = "com.ycs.community.sysbo.utils")
public class TestConfiguration {
public TestConfiguration () {
System.out.println("TestConfiguration容器启动...");
}
// @Bean注解注册bean,同时指定初始化和销毁方法
@Bean(name = "testBean", initMethod = "init", destroyMethod = "destroy")
@Scope("prototype")
public TestBean testBean () {
return new TestBean();
}
}import org.springframework.stereotype.Component;
@Component
public class TestBean {
    private String name;

    public void say() {
        System.out.println("你的名字是: "+name);
    }

    public void init() {
        System.out.println("初始化init方法执行...");
    }

    public void destroy() {
        System.out.println("销毁destroy方法执行...");
    }
}
测试类:
import org.springframework.context.ApplicationContext;
import org.springframework.context.annotation.AnnotationConfigApplicationContext;

public class Test {
    public static void main(String[] args) {
        // 使用AnnotationConfigApplicationContext加载@Configuration注解的spring容器
        ApplicationContext applicationContext = new AnnotationConfigApplicationContext(TestConfiguration.class);
        TestBean testBean = (TestBean) applicationContext.getBean("testBean");
        testBean.say();
    }
}
运行结果:
四,配置Web应用程序(web.xml中配置AnnotationConfigApplicationContext)
过去,通常要利用XmlWebApplicationContext 上下文来配置 Spring Web 应用程序,即在 Web 部署描述符文件web.xml 中指定外部xml上下文文件的路径。XmlWebApplicationContext 是Web 应用程序使用的默认上下文类。以下代码描述了web.xml 中指向将由ContextLoaderListener 监听器类载入的外部xml上下文文件的元素。
<web-app>
    <context-param>
        <param-name>contextConfigLocation</param-name>
        <param-value>/WEB-INF/spring-applicationContext.xml</param-value>
    </context-param>
    <listener>
        <listener-class>
            org.springframework.web.context.ContextLoaderListener
        </listener-class>
    </listener>
    <servlet>
    <servlet-name>sampleServlet</servlet-name>
    <servlet-class>
        org.springframework.web.servlet.DispatcherServlet
    </servlet-class>
    </servlet>
    ...
</web-app>
现在,要将web.xml 中的上述代码更改为使用AnnotationConfigApplicationContext 类。切记,XmlWebApplicationContext 是 Spring为Web 应用程序使用的默认上下文实现,因此就不必在web.xml配置文件中显式指定这个上下文类。现在,使用基于Java 的配置,因此在配置Web 应用程序时,需要在web.xml 文件中指定AnnotationConfigApplicationContext 类。上述代码将修改如下:
<web-app>
    <context-param>
        <param-name>contextConfigLocation</param-name>
        <param-value>
            com.ycs.community.demo.DemoApplicationContext
        </param-value>
    </context-param>
    <context-param>
        <param-name>contextClass</param-name>
        <param-value>
            org.springframework.web.context.support.AnnotationConfigWebApplicationContext
        </param-value>
    </context-param>
    <listener>
        <listener-class>
            org.springframework.web.context.ContextLoaderListener
        </listener-class>
    </listener>
    <servlet>
    <servlet-name>sampleServlet</servlet-name>
    <servlet-class>
        org.springframework.web.servlet.DispatcherServlet
    </servlet-class>
    <init-param>
        <param-name>contextClass</param-name>
        <param-value>
            org.springframework.web.context.support.AnnotationConfigWebApplicationContext
        </param-value>
    </init-param>
    </servlet>

...
</web-app>
以上修改后的web.xml 定义了AnnotationConfigWebApplicationContext 上下文类,并将其作为上下文参数和servlet 元素的一部分。上下文配置位置现在指向TestApplicationContext 配置类。
参考博客:https://blog.youkuaiyun.com/liuyinfei_java/article/details/82011805
完


 4354
4354

 被折叠的 条评论
为什么被折叠?
被折叠的 条评论
为什么被折叠?
 到【灌水乐园】发言


