 跨域请求实战


 本文详细介绍了一种在Vue前端与SpringBoot后端间实现跨域请求的方法。通过使用axios库进行前后端数据交互,展示了如何在main.js中配置axios,以及在Login.vue组件中设置后端接口地址。同时,介绍了后端通过@Controller注解实现跨域访问的策略。
简单描述一下项目情况:
我们目前暂时是在本地电脑上不同localhost端口直接实现跨域,请求数据。这么简简单单的问题。我花了好多时间去查资料。结果没想到很简单就实现了。
前端部分:
使用axios获取后端数据:
1.安装axios:
npm install axios
2.main.js中导入
import axios from 'axios'; /* 引入axios进行地址访问*/
Vue.prototype.$http = axios;
(注意:不使用use来使用该例,而是用prototype原型来使用)
3.login.vue中:设置后端的接口地址
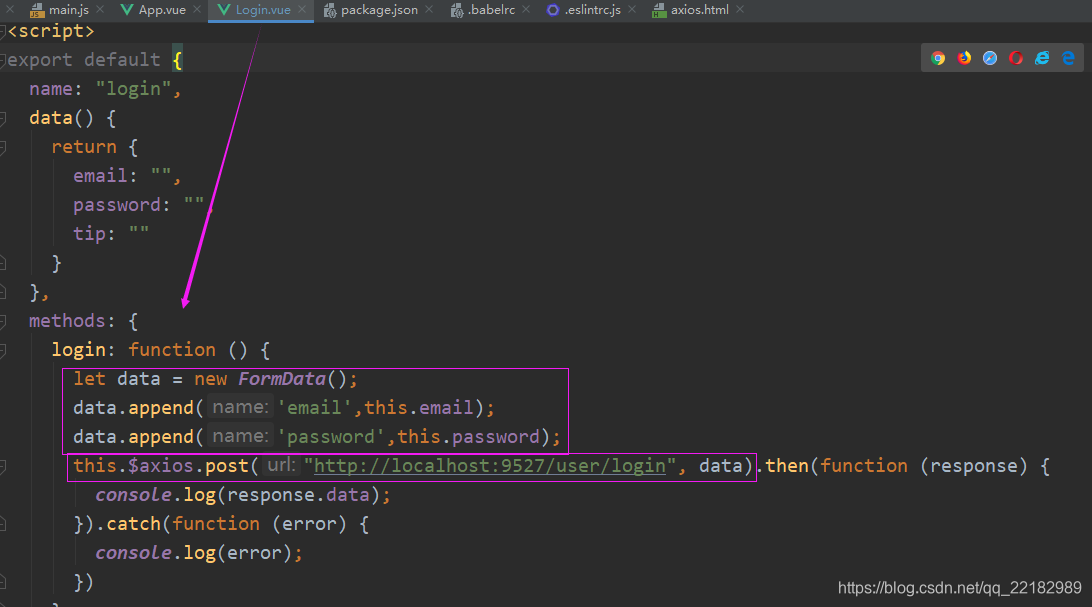
Login.vue
<template>
  <div>
    <div>
      <label>邮箱:<input type="text" v-model="email" placeholder="请输入你的邮箱"></label>
    </div>
    <div>
      <label>密码:<input type="password" v-model="password" placeholder="请输入你的密码"></label>
    </div>
    <div>
      <p>{{tip}}</p>
      <a href="#" id="forget">忘记密码?</a>
    </div>
    <div>
      <button @click="login">登录</button>
      <button @click="register">注册</button>
    </div>
  </div>
</template>

<script>
export default {
  name: "login",
  data() {
    return {
      email: "",
      password: "",
      tip: ""
    }
  },
  methods: {
    login: function () {
      let data = new FormData();
      data.append('email',this.email);
      data.append('password',this.password);
      this.$axios.post("http://localhost:9527/user/login", data).then(function (response) {
        console.log(response.data);
      }).catch(function (error) {
        console.log(error);
      })
    },

    register: function () {
      let data = new FormData();
      data.append('email',this.email);
      data.append('password',this.password);
      this.$axios.post("http://localhost:9527/user/register", data).then(function (response) {
        console.log(response.data);
      }).catch(function (error) {
        console.log(error);
      })
    }
  }

}
</script>

<style scoped>

</style>
4.在index.js里面添加路由
import Login from '@/components/Login'routes:{
path: '/login',
name: Login,
component: Login
}
后端部分:
在控制器类里面设置,前端的地址:
@CrossOrigin(origins = "http://localhost:8080", maxAge = 3600)
就完成了。
不可思议。
也许还有很多其他办法。等以后遇到了再总结。
参考别人:
https://www.cnblogs.com/xintao/p/10751806.html
Vue安装Axios及使用
1.安装:npm install axios --save-dev


2.main.js中导入
  import axios from 'axios'; /* 引入axios进行地址访问*/
  Vue.prototype.$http = axios;
  (注意:不使用use来使用该例,而是用prototype原型来使用)

3.login.vue中:
  import axios from 'axios';

  axios.post("/api/login?", params).then(function(res) {
    var data = res.data;
    // console.log(data);
    let role = data.result.user.role;
    let token = data.result.token;
    localStorage.setItem("currentUser_token", token); //将token存到本地的localStorage中
    // console.log(localStorage);
    if (data.code == 1) {
    alert(data.msg);
    let _username;
    // console.log(localStorage.getItem("currentUser_token"))
    // console.log(userName)
    that.$router.push({path: "/index",query: { name: userName, role: role }});	//跳转到 index页面中并传递name和role的值

    (在index页面中接受参数:PS:let userName = this.$route.query.name;let userRole = this.$route.query.role;)

  } else {

    alert(data.msg);
  }
  }).catch(function(err) {
    console.log("LOGIN_" + err);
  });
(注意:若要使用全局路径访问请求则需要在config中的index.js中配置proxyTable)
举例:proxyTable: {
    '/api': {
      target: 'IP+端口', //后端接口地址
      changeOrigin: true, //是否允许跨越
      pathRewrite: {
      '^/api': '/api', //重写,
      }
     }
   },
https://www.jb51.net/article/146888.htm
跨域资源共享CORS(Cross-origin Resource Sharing),是W3C的一个标准,允许浏览器向跨源的服务器发起XMLHttpRequest请求,克服ajax请求只能同源使用的限制。关于CORS的详细解读,可参考阮一峰大神的博客:跨域资源共享CORS详解。本文为通过一个小demo对该博客中分析内容的一些验证。
1.springboot+vue项目的构建和启动
细节不在此赘述,任何简单的springboot项目就可以,而前端vue项目只需用axios发ajax请求即可。
我的demo里填写用户名和密码,然后点击登录按钮向后台发起登录请求,js代码如下:
| 1 2 3 4 5 6 7 8 9 |
|
后台控制器部分,对登录请求的处理:
| 1 2 3 4 5 6 7 8 9 10 11 12 13 14 15 16 |
|
后台以8080端口启动,前台以8081启动,此时无法跨域,浏览器控制台会报错:
2.springboot设置CORS
此处主要有两种方法(但是貌似有其他博客还有更多种),在springboot中实现都比较简单(反正springboot好像就是各种省事各种简单)。
方法1:
| 1 |
|
直接在控制器方法前注解,设置可以跨域的源ip和端口,以及预检有效期maxAge等参数。
方法2:
编写配置类,配置全局的CORS设置。
| 1 2 3 4 5 6 7 8 9 10 11 12 13 14 15 16 17 18 |
|
如果路径配置成以上的 /**则对所有源路径均接受跨域访问,当然也可以配置更详细的路径。
这样可以成功访问后台,浏览器中可以看到http请求和响应的结果如下图:
3.CORS非简单请求预检请求的抓包验证
根据阮一峰大神的博客所述,CORS简单请求只发送一次请求,服务器设置支持CORS则会在响应内容中添加Acess-Control-Allow-Origin等字段,否则不添加,浏览器知道出错,从而抛出异常;CORS非简单请求时,会先进行一次预检(preflight)请求,浏览器根据响应内容进行正式的XMLHttpRequest请求。
在我的demo中,我通过将http请求的 content-type 设置为application/json进行非简单请求。此处要说明一下,axios默认情况下发送请求的格式是application/json而不是我之前用jQuery发送ajax请求的application/x-www-form-urlencoded, 而我之前用的另一种方法构造查询字符串,最终发送请求的content-type会变为application/x-www-form-urlencoded。
| 1 |
|
前台请求代码如本文第一节中所示,在axios请求中直接传入User对象即可。在后端不设置CORS的时候,控制器信息为:
协议内容为:
而设置了CORS,预检请求结果为:
请求成功,并且在响应头中添加了各种字段。
再次发起XHR请求后,结果为:
以上实验验证证明了两种CORS请求的过程正如预期。


 2002
2002

 被折叠的 条评论
为什么被折叠?
被折叠的 条评论
为什么被折叠?
 到【灌水乐园】发言


