


课前作业:
- Service 的 start 和 bind 状态的区别?
- 同一个 Service,先 startService,然后再 bindService,如何把它停止掉?
- 注意过 Service 的 onStartCommand 方法的返回值吗?不同返回值有什么区别?
- Service 的生命周期方法 onCreate、onStart、onBind 等运行在哪个线程?
正式开始
一、Service 的启动方式:startService() 和 bindService()
MyService.java:
public class MyService extends Service {

    private static final String TAG = "MyService";

    @Override
    public void onCreate() {
        Log.i(TAG, "onCreate: ");
        super.onCreate();
    }

    @Override
    public void onStart(Intent intent, int startId) {
        Log.i(TAG, "onStart: ");
        super.onStart(intent, startId);
    }

    @Override
    public int onStartCommand(Intent intent, int flags, int startId) {
        Log.i(TAG, "onStartCommand: ");
        return super.onStartCommand(intent, flags, startId);
    }

    @Override
    public void onDestroy() {
        Log.i(TAG, "onDestroy: ");
        super.onDestroy();
    }

	public class  MyBinder extends Binder {

        public MyService getService() {
            return MyService.this;
        }

    }

    @Nullable
    @Override
    public IBinder onBind(Intent intent) {
        Log.i(TAG, "onBind: ");
        return null;
    }
}
记得在 AndroidManifest.xml 中 application 标签下配置
<service android:name=".MyService"/>
MainActivity.java:
public class MainActivity extends AppCompatActivity {
    private Intent mIntent;

    @Override
    protected void onCreate(Bundle savedInstanceState) {
        super.onCreate(savedInstanceState);
        setContentView(R.layout.activity_main);

        mIntent = new Intent(MainActivity.this, MyService.class);
    }

	//======测试 startService() 的代码,开始======
	//点击按钮,执行 startService()
    public void start_Service(View view) {
        startService(mIntent);
    }

	//点击按钮,执行 stopService()
    public void stop_Service(View view) {
        stopService(mIntent);
    }
    //======测试 startService() 的代码,结束======

	//======测试 bindService() 的代码,开始======
	//声明 Service
	private MyService myService;
	//是否已绑定 Service
    private boolean isBind;

    ServiceConnection conn = new ServiceConnection() {
        @Override
        public void onServiceConnected(ComponentName name, IBinder service) {
            isBind = true;
            //得到了 myService,就可以调用 Service 中的方法
            myService = ((MyService.MyBinder) service).getService();
            Log.i(TAG, "onServiceConnected: ");
        }

        /**
         * 一般不会被调用,异常情况下才被调用
         * 当服务丢失时调用,这通常当托管服务的进程崩溃或被杀死时发生
         */
        @Override
        public void onServiceDisconnected(ComponentName name) {
            myService = null;
            Log.i(TAG, "onServiceDisconnected: ");
        }
    };

	//点击按钮,执行 bindService()
	public void bind_Service(View view) {
        bindService(mIntent, conn, BIND_AUTO_CREATE);
    }

	//点击按钮,执行 unbindService()
    public void unbind_Service(View view) {
        if (isBind) {
            unbindService(conn);
            isBind = false;
        }
    }
    //======测试 bindService() 的代码,结束======

	@Override
    protected void onDestroy() {
        super.onDestroy();
        if (isBind) {
            unbindService(conn);
            isBind = false;
        }
    }
}
Activity_main.xml
<?xml version="1.0" encoding="utf-8"?>
<RelativeLayout xmlns:android="http://schemas.android.com/apk/res/android"
    xmlns:app="http://schemas.android.com/apk/res-auto"
    xmlns:tools="http://schemas.android.com/tools"
    android:layout_width="match_parent"
    android:layout_height="match_parent">

	<Button
        android:id="@+id/bind_service"
        android:layout_width="match_parent"
        android:layout_height="wrap_content"
        android:layout_above="@id/unbind_service"
        android:onClick="bind_Service"
        android:text="bind service"
        android:textAllCaps="false" />

    <Button
        android:id="@+id/unbind_service"
        android:layout_width="match_parent"
        android:layout_height="wrap_content"
        android:layout_above="@id/start_service"
        android:onClick="unbind_Service"
        android:text="unbind service"
        android:textAllCaps="false" />

    <Button
        android:id="@+id/start_service"
        android:layout_width="match_parent"
        android:layout_height="wrap_content"
        android:layout_above="@id/stop_service"
        android:onClick="start_Service"
        android:text="start service"
        android:textAllCaps="false" />

    <Button
        android:id="@+id/stop_service"
        android:layout_width="match_parent"
        android:layout_height="wrap_content"
        android:layout_alignParentBottom="true"
        android:onClick="stop_Service"
        android:text="stop service"
        android:textAllCaps="false" />

</RelativeLayout>
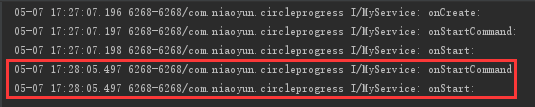
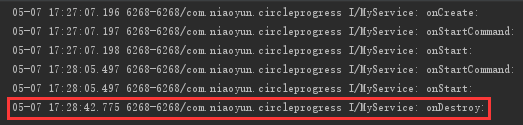
1. startService() 情况下的生命周期
首次调用 startService():执行 onCreate()、onStartCommand()、onStart()

之后调用 startService() 或按返回键退出再进入后再调用 startService():执行 onStartCommand()、onStart(),不再执行 onCreate()
多次调用 stopService():只打印一次 onDestroy()
2. bindService() 情况下的生命周期
多次 bindService():只执行一次 onCreate()、onBind()、onServiceConnected()

多次 unBind():会抛异常,可声明一个 boolean,在 bindService() 置为 true,在 unBind() 中置为 false,防止多次 unBind() 后抛异常

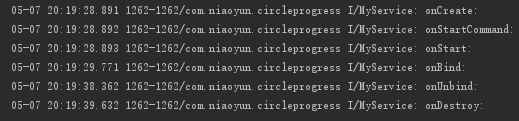
二、同一个 Service,先 startService,然后再 bindService
先 startService(),再 bindService(),经测试,要停止那个 Service 需要执行完 stopService() 和 unbindService(),执行顺序不分先后
只要 stopService() 和 unbindService() 这两个方法执行完,就可以停止那个 Service,只是打印的效果不一样
a. 先 stopService() 后 unbindService() 时,先执行 stopService(),但是不打印 onDestory,当执行 unbindService() 后依次打印 onUnbind: 、onDestory
b. 先 unbindService() 后 stopService() 时,执行 unbindService() 打印 onUnbind,执行 stopService() 打印 onDestroy
MyService 对应的打印结果:
三、Service 的 onStartCommand 方法的返回值
1.START_STICKY:
系统会保留启动状态但不会保存 Intent 对象,之后系统会用一个 null 的 Intent 对象来调用 onStartCommand() 方法,在这个情况下,除非有一些被发送的 Intent 对象在等待启动服务,Intent 可能为空,需要做非空判断
2.START_NOT_STICKY:
除非重新执行 startService() 接收到新的 Intent,否则系统不会保留启动状态并重新创建该 Service
3.START_REDELIVER_INTENT:
系统在 onStartCommand() 方法返回后,系统会自动重启该服务(调用 stopSelf() 方法的除外),并且用发送给这个服务的最后的 Intent 对象调用了 onStartCommand() 方法,在该服务调用 stopSelf() 方法之前,能够一直保留 Intent 对象数据
4.START_STICKY_COMPATIBILITY:
START_STICKY 的兼容版本,但不保证服务被终止后一定能重启
四、Service 的生命周期方法运行在哪个线程
Service 的生命周期方法运行在主线程,不能在 Service 中做耗时操作
作业答案:
1.Service 的 start 和 bind 状态的区别?
a. 首次调用 startService():执行 onCreate()、onStartCommand(),之后再次调用 startService():只执行 onStartCommand()
b. 多次 bindService():只执行一次 onCreate()、onBind()、onServiceConnected()
2.同一个 Service,先 startService,然后再 bindService,如何把它停止掉?
先 startService(),再 bindService(),经测试,要停止那个 Service 需要执行完 stopService() 和 unbindService(),执行顺序不分先后
3.注意过 Service 的 onStartCommand 方法的返回值吗?不同返回值有什么区别?
参考上方 三、Service 的 onStartCommand 方法的返回值
4.Service 的生命周期方法 onCreate、onStart、onBind 等运行在哪个线程?
主线程


 325
325

 被折叠的 条评论
为什么被折叠?
被折叠的 条评论
为什么被折叠?
 到【灌水乐园】发言


