


 本文详细介绍了 Android 中 SearchView 组件的基本使用方法,包括如何在布局文件中添加 SearchView、设置提示文本、启用提交按钮及自定义样式。此外,还展示了如何通过 SQLite 数据库为 SearchView 提供建议数据,并实现文本变化监听。
http://my.oschina.net/summerpxy/blog/175061
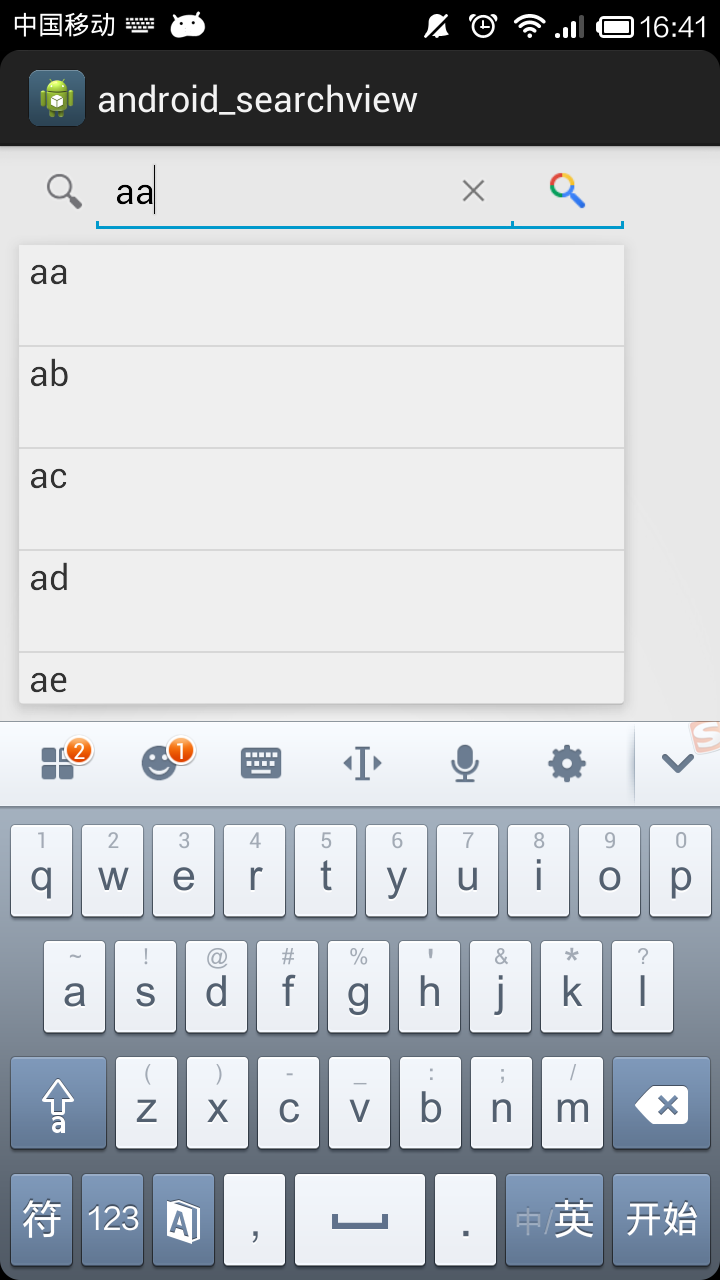
SearchView是android系统中内置的一个搜索框组件,可以很方便在添加在用户界面之上,但是也带来了一些问题,那就是searchview的UI是固定的,定制起来会很麻烦,如果对SearchView的要求比较高,完全可以采用button和EditText自己实现。这里先简单的说说SearchView的使用:
main.xml:
|
1
2
3
4
5
6
7
8
9
10
11
12
13
14
|
<
LinearLayout
xmlns:android
=
"http://schemas.android.com/apk/res/android"
xmlns:tools
=
"http://schemas.android.com/tools"
android:layout_width
=
"match_parent"
android:layout_height
=
"match_parent"
android:orientation
=
"vertical"
tools:context
=
".Main"
>
<
SearchView
android:id
=
"@+id/sv"
android:layout_width
=
"wrap_content"
android:layout_height
=
"wrap_content"
android:imeOptions
=
"actionGo"
/>
</
LinearLayout
>
|
在显示suggestion的时候会用到下面的布局文件:mytextview.xml
|
1
2
3
4
5
6
7
8
9
10
11
12
13
14
15
|
<?
xml
version
=
"1.0"
encoding
=
"utf-8"
?>
<
LinearLayout
xmlns:android
=
"http://schemas.android.com/apk/res/android"
android:layout_width
=
"match_parent"
android:layout_height
=
"50sp"
android:orientation
=
"vertical"
>
<
TextView
android:id
=
"@+id/textview"
android:layout_width
=
"match_parent"
android:layout_height
=
"wrap_content"
android:gravity
=
"center_vertical"
android:paddingLeft
=
"5sp"
android:textSize
=
"18sp"
/>
</
LinearLayout
>
|
main.java:
|
1
2
3
4
5
6
7
8
9
10
11
12
13
14
15
16
17
18
19
20
21
22
23
24
25
26
27
28
29
30
31
32
33
34
35
36
37
38
39
40
41
42
43
44
45
46
47
48
49
50
51
52
53
54
55
56
57
58
59
60
61
62
63
64
65
66
67
68
69
70
71
72
73
74
75
76
77
78
79
80
81
82
83
84
85
86
87
88
89
90
91
92
93
94
95
96
97
98
99
100
101
102
103
104
105
106
107
108
109
110
111
112
113
114
115
116
117
118
119
120
121
122
123
124
125
126
127
128
129
130
131
132
133
|
package
com.app.main;
import
java.lang.reflect.Field;
import
android.app.Activity;
import
android.database.Cursor;
import
android.database.sqlite.SQLiteDatabase;
import
android.os.Bundle;
import
android.view.View;
import
android.widget.ImageView;
import
android.widget.ListView;
import
android.widget.SearchView;
import
android.widget.SearchView.OnQueryTextListener;
import
android.widget.SimpleCursorAdapter;
import
android.widget.Toast;
public
class
Main
extends
Activity {
SearchView sv =
null
;
ListView lv =
null
;
@Override
protected
void
onCreate(Bundle savedInstanceState) {
super
.onCreate(savedInstanceState);
setContentView(R.layout.main);
sv = (SearchView)
this
.findViewById(R.id.sv);
sv.setIconifiedByDefault(
false
);
sv.setSubmitButtonEnabled(
true
);
sv.setQueryHint(
"查询"
);
//通过反射,修改默认的样式,可以从android的search_view.xml中找到需要的组件
try
{
Field field = sv.getClass().getDeclaredField(
"mSubmitButton"
);
field.setAccessible(
true
);
ImageView iv = (ImageView) field.get(sv);
iv.setImageDrawable(
this
.getResources().getDrawable(
R.drawable.pointer));
}
catch
(Exception e) {
e.printStackTrace();
}
Cursor cursor =
this
.getTestCursor();
@SuppressWarnings
(
"deprecation"
)
SimpleCursorAdapter adapter =
new
SimpleCursorAdapter(
this
,
R.layout.mytextview, cursor,
new
String[] {
"tb_name"
},
new
int
[] { R.id.textview });
sv.setSuggestionsAdapter(adapter);
sv.setOnQueryTextListener(
new
OnQueryTextListener() {
@Override
public
boolean
onQueryTextChange(String str) {
return
false
;
}
@Override
public
boolean
onQueryTextSubmit(String str) {
Toast.makeText(Main.
this
, str, Toast.LENGTH_SHORT).show();
return
false
;
}
});
}
//添加suggestion需要的数据
public
Cursor getTestCursor() {
SQLiteDatabase db = SQLiteDatabase.openOrCreateDatabase(
this
.getFilesDir() +
"/my.db3"
,
null
);
Cursor cursor =
null
;
try
{
String insertSql =
"insert into tb_test values (null,?,?)"
;
db.execSQL(insertSql,
new
Object[] {
"aa"
,
1
});
db.execSQL(insertSql,
new
Object[] {
"ab"
,
2
});
db.execSQL(insertSql,
new
Object[] {
"ac"
,
3
});
db.execSQL(insertSql,
new
Object[] {
"ad"
,
4
});
db.execSQL(insertSql,
new
Object[] {
"ae"
,
5
});
String querySql =
"select * from tb_test"
;
cursor = db.rawQuery(querySql,
null
);
}
catch
(Exception e) {
String sql =
"create table tb_test (_id integer primary key autoincrement,tb_name varchar(20),tb_age integer)"
;
db.execSQL(sql);
String insertSql =
"insert into tb_test values (null,?,?)"
;
db.execSQL(insertSql,
new
Object[] {
"aa"
,
1
});
db.execSQL(insertSql,
new
Object[] {
"ab"
,
2
});
db.execSQL(insertSql,
new
Object[] {
"ac"
,
3
});
db.execSQL(insertSql,
new
Object[] {
"ad"
,
4
});
db.execSQL(insertSql,
new
Object[] {
"ae"
,
5
});
String querySql =
"select * from tb_test"
;
cursor = db.rawQuery(querySql,
null
);
}
return
cursor;
}
}
|


 1059
1059

 被折叠的 条评论
为什么被折叠?
被折叠的 条评论
为什么被折叠?
 到【灌水乐园】发言


