


文章目录
上一篇我们记录了requests的GET、POST请求和Response,这篇我们记录requests库的一些高级用法,比如文件上传,Cookies设置,代理设置。
1、文件上传
import requests

mfile = {'file': open("D:\\favicon.ico", 'rb')}
response = requests.post("https://httpbin.org/post", files=mfile)
print(response.status_code)
print(response.text)
编译结果:
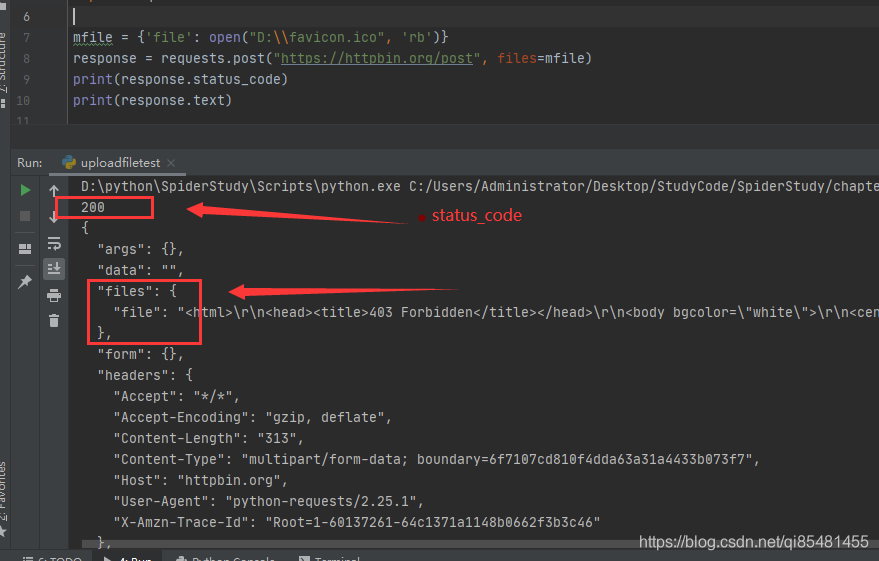 文件上传中,在response中,里面会包含一个files字段,而form字段是空的。
2、Cookies(cookies)
response = requests.get("https://www.baidu.com")
print(response.cookies)
for key, value in response.cookies.items():
    print(key + "=" + value)
编译结果:
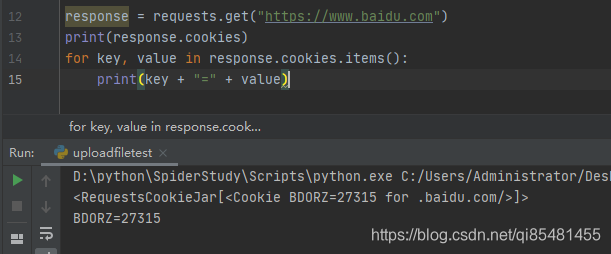 我们调用Cookies属性即可成功得到Cookie,类型是RequestsCookieJar类型的,然后调用items()方法将其转化为元组组成的列表,遍历输出每一个Cookie的属性和值。
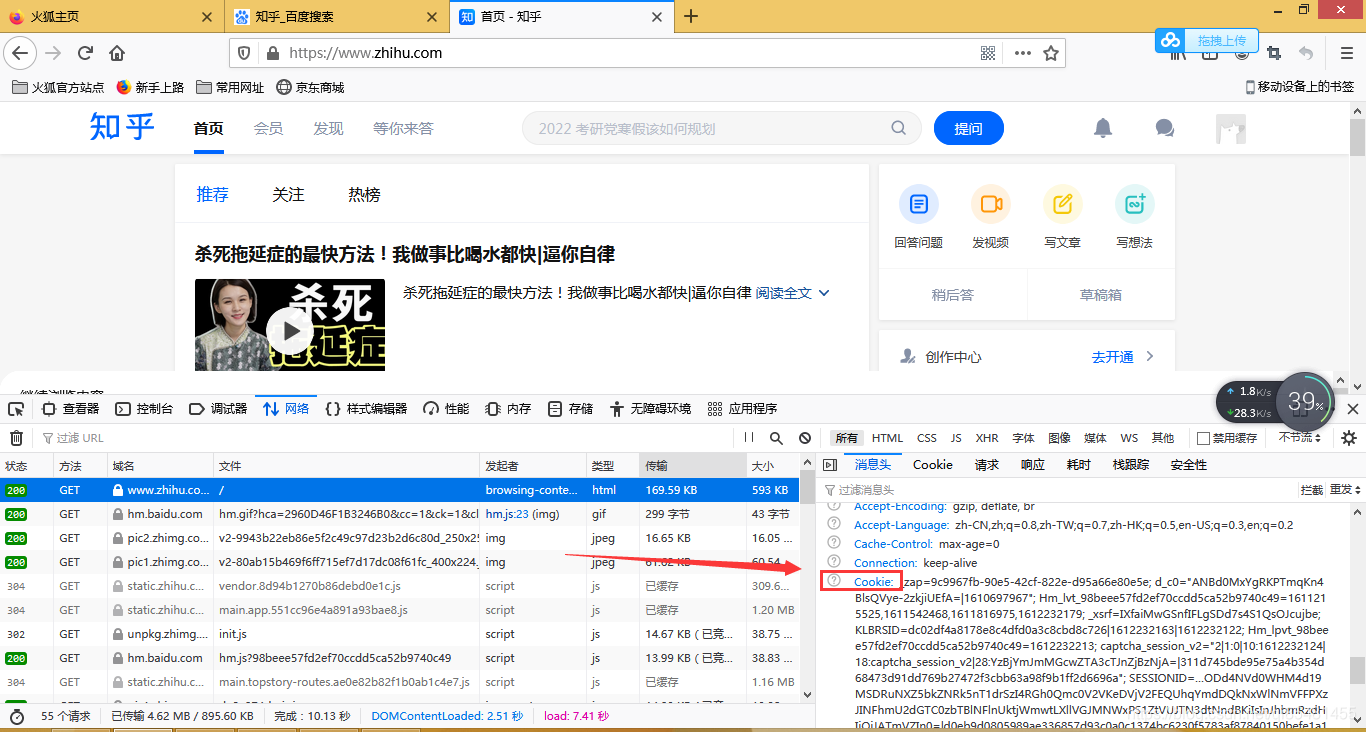
我们可以使用Cookie来维持登录状态,首先登录知乎,将headers里面的cookie复制下来。
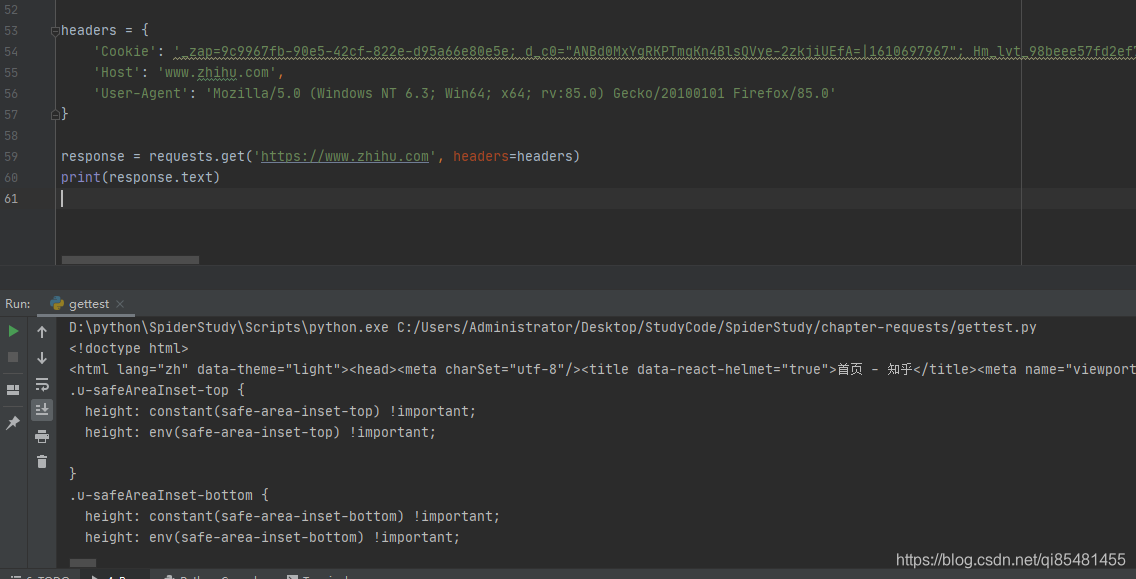
headers = {
    'Cookie': '...',
    'Host': 'www.zhihu.com',
    'User-Agent': 'Mozilla/5.0 (Windows NT 6.3; Win64; x64; rv:85.0) Gecko/20100101 Firefox/85.0'
}

response = requests.get('https://www.zhihu.com', headers=headers)
print(response.text)
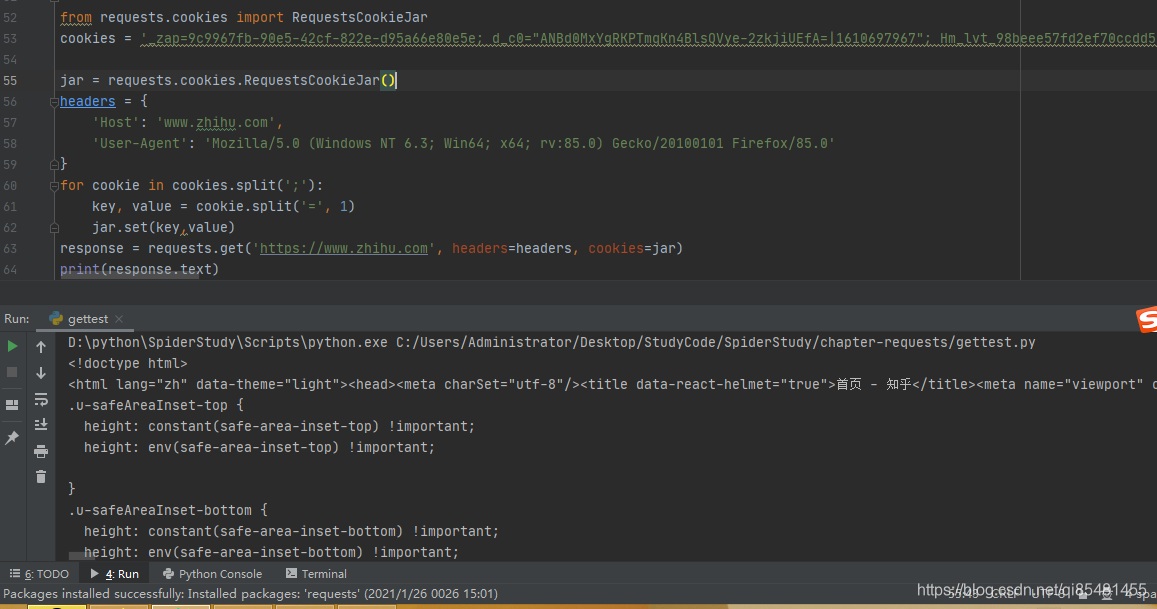
 也可以通过RequestsCookieJar对象设置Cookies参数来设置,比较麻烦
from requests.cookies import RequestsCookieJar
cookies = '...'
#  新建一个RequestsCookieJar对象
jar = requests.cookies.RequestsCookieJar()
headers = {
    'Host': 'www.zhihu.com',
    'User-Agent': 'Mozilla/5.0 (Windows NT 6.3; Win64; x64; rv:85.0) Gecko/20100101 Firefox/85.0'
}
# 利用cookies的split方法进行分割,然后利用set方法设置好每个Cookie的key和value
for cookie in cookies.split(';'):
    key, value = cookie.split('=', 1)
    jar.set(key,value)
response = requests.get('https://www.zhihu.com', headers=headers, cookies=jar)
print(response.text)
编译结果:
3、会话维持(Session)
在requests中,如果直接利用get()或者post()等方法可以去模拟网页的请求,但是实际上相当于不同的会话,也就是相当于使用了两个浏览器打开了不同的页面。
requests提供了Session对象去进行维持同一个会话,相当于一次登录打开了不同的选项卡。
import requests

# 设置一个cookie 名称叫做number,值是123456789
response1 = requests.get('http://httpbin.org/cookies/set/number/123456789')
response = requests.get('http://httpbin.org/cookies')
print(response1.text)
print(response.text)
 访问同一个网站,获取的cookies却不一样,接下来使用session()
import requests


# 使用Session维持会话
s = requests.Session()
# 设置一个cookie 名称叫做number,值是123456789
response1 = s.get('http://httpbin.org/cookies/set/number/123456789')
response = s.get('http://httpbin.org/cookies')
print(response1.text)
print(response.text)
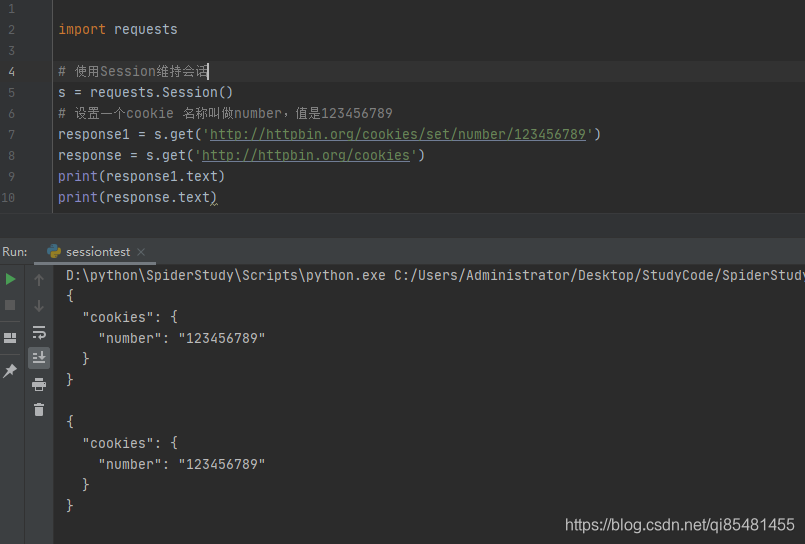 两次请求的cookie一致了,利用Session通常用于模拟登录成功后进行下一次操作。可模拟在一个浏览器中打开同一个网站的不同页面。
4、SSL验证(verify)
requests提供了证书验证功能,当发送HTTP请求的时候,它会检查SSL证书,我们可以使用verify参数控制是否检查此证书,如果不加verify参数,默认是True。
response = requests.get('https://www.12306.cn')
print(response.status_code)
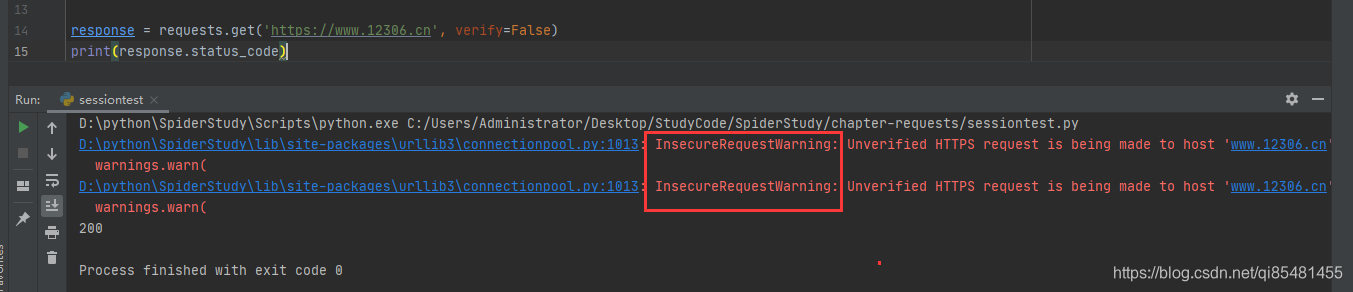 这里发现一个警告,建议我们给它指定一个证书,我们可以通过设置忽略警告的方式来屏蔽警告,或者通过获取警告到日志的方式忽略警告.
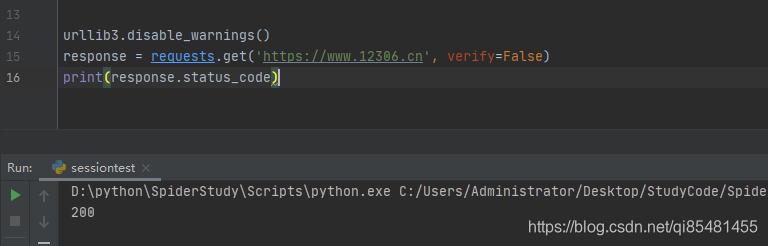
import requests
from requests.packages import urllib3
import logging

# 屏蔽警告
urllib3.disable_warnings()
# 通过获取警告到日志的方式忽略警告
logging.captureWarnings(True)

response = requests.get('https://www.12306.cn', verify=False)
print(response.status_code)
 我们也可以指定一个本地证书作为客户端证书,可以是一个单个文件(包含秘钥和证书)或一个包含两个文件路径的元组
response = requests.get('https://www.12306.cn', cert=('/path/server.crt', '/path/key'))
print(response.status_code)
5、代理设置(proxies)
import requests

proxies = {
    'http': 'http://localhost:5050/',
    'https': 'https://localhost:5050/'
}

response = requests.get('http://www.baidu.com/', proxies=proxies)
print(response.text)
如果代理使用HTTP Basic Auth,可以使用类似http://user:password@host:port这样的语法来设置代理:
proxies = {
    'http': 'http://user:password@127.0.0.1:5050/'
}

response = requests.get('http://www.baidu.com/', proxies=proxies)
print(response.text)
除了基本的HTTP代理外,还支持Socket代理
需要安装socks库
pip install socks
import requests


proxies = {
    'http': 'socks5://user:password@host:port',
    'https': 'socks5://user:password@host:port'
}

response = requests.get('http://www.baidu.com/', proxies=proxies)
print(response.text)
6、超时设置(timeout)
为了防止服务器不能及时响应,应该设置一个超时时间,即超过这个时间还没有得到响应,那就报错。这时候需要用到timeout参数。
import requests

#  设置超时时间为1秒,如果1秒没有响应,就抛出异常
response = requests.get('http://www.taobao.com/', timeout=1)
print(response.text)
实际上,请求分为两个阶段,连接(connect)和读取(read),timeout设置的为两个时长总和,也可以设置成为一个元组。
response = requests.get('http://www.taobao.com/', timeout=(5,11,30))
如果想永久等待,可以直接将timeout设置为None,或者不设置直接留空。,因为默认的是None、这样永远不会返回超时错误。
7、身份认证(auth)
import requests
from requests.auth import HTTPBasicAuth

response = requests.get('http://localhost:5000', auth=HTTPBasicAuth('username', 'password'))
print(response.status_code)
如果用户名和密码正确的话,请求时会自动认证成功,会返回200的状态码,否则认证失败,返回401状态码。
为了避免每个参数都传入一个HTTPBasicAuth类,过于麻烦,所以requests提供了一个更简单的写法,可以直接传入一个元组,它会默认使用HTTPBasicAuth这个类进行认证
response = requests.get('http://localhost:5000', auth=('username', 'password'))
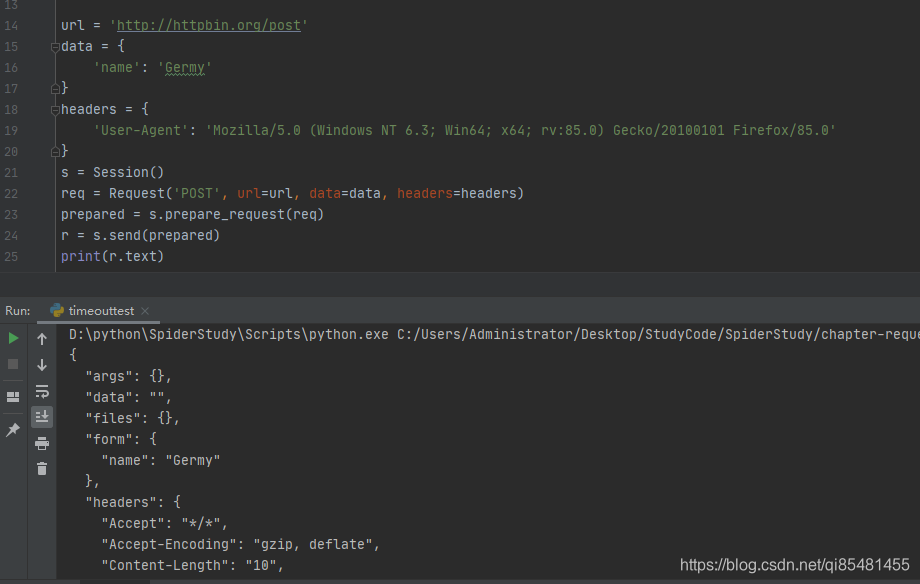
8、Prepared Request
作用:将请求表示为数据结构,其中各个参数都可以通过一个Request对象来表示
from requests import Request, Session

url = 'http://httpbin.org/post'
data = {
    'name': 'Germy'
}
headers = {
    'User-Agent': 'Mozilla/5.0 (Windows NT 6.3; Win64; x64; rv:85.0) Gecko/20100101 Firefox/85.0'
}
s = Session()
req = Request('POST', url=url, data=data, headers=headers)
prepared = s.prepare_request(req)
r = s.send(prepared)
print(r.text)
我们引入Request,然后用url,data,headers构造一个Request对象,这时需要调用Session方法的prepare_request方法将其转换为一个Prepared Request对象,然后再调用send方法发送就行。


 被折叠的 条评论
为什么被折叠?
被折叠的 条评论
为什么被折叠?
 到【灌水乐园】发言


