


 本文详细解读了axios如何同时作为函数和对象调用,介绍了Axios类、默认axios与create的区别,拦截器和执行流程,并展示了取消请求的机制。通过源码解析,揭示了其设计理念和内部构造。
前端网络基础 - axios使用_qfc_128220的博客-优快云博客
在上一节中,我们分析了axios的基本使用,其中有很多让人一时无法参悟透奥妙的设计。我们来逐一通过源码解析下。
目录
axios为什么既可以作为函数发送AJAX,也可以作为对象调用get,post等方法发送AJAX?
默认的axios函数和axios.create新建的axios函数的差别在哪?
axios为什么既可以作为函数发送AJAX,也可以作为对象调用get,post等方法发送AJAX?
首先,我们需要认识到,在JS中函数也是对象,所以axios既可以作为函数,也可以作为对象调用方法。
而axios既能作为函数发送AJAX,也可以当成对象调用get,post等方法发送AJAX的设计初衷,我觉得应该是向jQuery.ajax设计靠拢,毕竟jQuery.ajax是AJAX封装库的老大哥,虽然现在已经没落了,但是它的设计思想依旧指的借鉴。
那么axios是如何在代码上实现这种设计的呢?在具体说之前,我们需要了解一下几个东西
Axios类
首先说明一下axios函数不是Axios类的实例。我们看一下Axios类的源码片段:
function Axios(config){
    this.defaults = config
    this.interceptors = {
        request: new InterceptorManager(),
        response: new InterceptorManager()
    }
}

Axios.prototype.request = function(config){
    // ...
}

['get', 'head', 'options', 'delete'].forEach(method => {
    Axios.prototype[method] = function(url, config){
        Object.assign(config, {url, method})
        return Axios.prototype.request(config)
    }
})

['post', 'put', 'patch'].forEach(method => {
    Axios.prototype[method] = function(url, data, config){
        Object.assign(config, {url, method, data})
        return Axios.prototype.request(config)
    }
})
可以发现Axios类有两个实例属性defaults,interceptors,它们其实就是axios函数的默认配置,以及拦截器,(PS:有人问题,你不是说axios不是Axios的实例吗,为啥axios会有Axios类的实例属性呢?别急,后面说)
另外Axios原型上绑定了多个HTTP METHOD同名的方法,但是这些方法其实都是基于Axios.prototype.request实现的。
而实际上,Axios.prototype.request就是axios库的核心,包括拦截器,取消请求,底层xhr都是该方法的逻辑组成部分。
axios
直接上axios源码片段(代码略作修改,但是源码逻辑不变)
function createInstance(config) {
    const context = new Axios(config)
    const instance = Axios.prototype.request.bind(context)

    Object.assign(instance, Axios.prototype)
    Object.assign(instance, context)

    // ...

    return instance
}

const axios = createInstance(defaultConfig)

// ...

module.exports = axios
可以发现axios其实就是instance,而instance就是Axios.prototype.request(bind调用者为Axios实例),这解释了为啥默认axios是一个函数,因为它来源于Axios.prototype.request方法。
那么axios为啥有defaults,interceptors属性,以及get,post等方法呢?
Object.assign(target, source) 作用是将source对象上可遍历的直接属性复制到target对象上。
所以
Object.assign(instance, Axios.prototype) 将 Axios.prototype上的request,get,post,delete,put等放啊复制到了instance,即axios函数上。
Object.assign(instance, context) 将 new Axios()上的defaults,interceptors属性复制到了instance,即axios函数上。
这就解释了标题疑问了。
默认的axios函数和axios.create新建的axios函数的差别在哪?
我们再来看下axios源码
function createInstance(config) {
    const context = new Axios(config)
    const instance = Axios.prototype.request.bind(context)

    Object.assign(instance, Axios.prototype)
    Object.assign(instance, context)

    /*
        axios.create源码
    */
    instance.create = function(instanceConfig) {
        return createInstance(Object.assign(config, instanceConfig))
    }
}

const axios = createInstance(defaultConfig)

axios.Axios = Axios

axios.CancelToken = function(executor) {
    // ...
}

// ...

module.exports = axios
可以发现默认axios函数,以及axios.create新建axios函数都是基于createInstance创建的,但是默认axios从createInstance创建好后,继续挂载了如Axios,CancelToken等属性,而axios.create新建的axios函数从createInstance创建好后,直接返回了。
而这也是二者的差别所在。
二者的相同点是,createInstance保证了返回的instance具备了defaults,interceptors属性,以及request,get,post,delete,put,patch,head,options等方法。
axios拦截器是如何实现的
我们先来回顾下axios拦截器的实现步骤
axios.interceptors.request.use(config => {
    // do something...
    return config
}, err => {
    // do something...
    throw err
})

axios.interceptors.response.use(response => {
    // do something...
    return response
}, err => {
    // do something...
    throw err
})
我们已经知道了axios.interceptors的来源是Axios类实例属性了,而axios.interceptors.request/response 是 InterceptorManager的实例,如下源码所示
function Axios(config) {
    this.defaults = config
    this.interceptors = {
        request: new InterceptorManager(),
        response: new InterceptorManager()
    }
}
我们再来看下InterceptorManager源码
function InterceptorManager(){
    this.handler = []
}

InterceptorManager.prototype.use = function(fulfilled, rejected) {
    this.handler.push({
        fulfilled,
        rejected
    })
}

// ...
可以发现我们通过use注册的fulfilled,rejected函数实际上都被缓存在了axios.interceptors.request/response.handler数组中了。
到目前为止,还都是拦截器实现的准备工作,拦截器正在实现在Axios.prototype.request方法中
Axios.prototype.request = fucntion(config) {
    // ...

    let promise = Promise.resolve(config)

    const chain = [dispatchRequest, undefined]

    this.interceptors.request.handler.forEach(interceptor => {
        chain.unshift(interceptor.fulfilled, interceptor.rejected)
    })

    this.interceptors.response.handler.forEach(interceptor => {
        chain.push(interceptor.fulfilled, interceptor.rejected)
    })

    while(chain.length > 0) {
        promise = promise.then(chain.shift(), chain.shift())
    }

    return promise
}
我们知道无论是axios函数,还是axios.METHOD方法,它们的底层都是调用的Axios.prototype.request方法,所以最终的实现都会写在Axios.prototype.request中。
这里关于拦截器的实现原理其实很简单,就是准备一个数组chain,或者叫执行链chain
初始时,chain数组只有两个元素 dispatchRequest和undefined
其中dispatchRequest用于实现正在的AJAX发送逻辑,undefined是用于占位的,为啥需要占位,请听后面解释。
所以,我们如果不使用拦截器,则chain中就只有 dispatchRequest和undefined,然后走到while逻辑,此时chain.length = 2 > 0 所以进入循环体
第一个chain.shift()返回为dispatchRequest,第二个chain.shift()返回为undefined
即: promise = promise.then(dispatchRequest, undefined)
而promise初始为Promise.resolve(config),所以顺势将config作为了dispatchRequest的入参,完成了AJAX的发送,而undefined不会被调用。
如果我们加入了拦截器,比如请求拦截器
this.interceptors.request.handler.forEach(interceptor => {
chain.unshift(interceptor.fulfilled, interceptor.rejected)
})
则会将通过use缓存进this.interceptors.request.handler数组的拦截器fulfilled,rejected函数,unshift进chain中,即此时chain数组应该有四个元素,且如下
[ fulfilledReq1, rejectedReq1, dispatchRequest, undefined]
如果还有多个请求拦截器,则chain数组元素如下
[ fulfilledReq2, rejectedReq2, fulfilledReq1, rejectedReq1, dispatchRequest, undefined]
这也是为啥请求拦截器注册顺序和执行顺序相反的原因。
因为while循环体中,chain数组中元素会每次shift出前两个
同理,响应拦截器是将this.interceptors.response.handler数组中fulfilled,rejected函数,push进chain中
[ dispatchRequest, undefined,fulfilledRes1,rejectedRes1]
这也是为啥响应拦截器注册顺序和执行顺序相同的原因。
此时,我们就能理解,为啥初始时,需要使用undefined占位了,因为当有拦截器时,入chain数组的都是一对一对的,而chain取出时,也是一对一对的取。
正是由于chain维护了执行拦截器和dispatchRequest的执行顺序,所以可以实现切面处理。
另外,我们也可以解释下为啥拦截器use的fulfilled,rejected函数需要返回一个Promise对象,以及为啥Axios.prototype.request中需要将config包装为Promise对象,这都是因为方便逻辑处理,避免if,else出现。有时候Promise的then可以很好的取代if,else。而Promise.then不仅可以处理异步回调,也可以处理同步回调。
axios执行流程
当我们使用axios发送AJAX时,必然经过一下几个流程
axios/axios.METHOD → Axios.prototype.request → dispatchRequest → adapter
其实axios不仅支持基于浏览器端的XMLHttpRequest发送异步的HTTP请求,还支持基于nodejs端的http模块发送异步的HTTP请求,并且axios可以自动识别环境做适配,其中adapter就是适配器,它用于识别当前环境,并自动选择是xhrAdapter,还是httpAdapter。
我们这里只讨论xhrAdapter流程。
function dispatchRequest(config) {
    return adapter(config).then(response => response).catch(err => {throw err})
}

function adapter(config) {
    return new Promise((resolve, reject)=>{
        const xhr = new XMLHttpRequest()

        xhr.open(config.method, config.url)

        for(let key in config.headers) {
            xhr.setRequestHeader(key, config.headers[key])
        }

        if(config.data) {
            xhr.send(JSON.stringify(config.data))
        } else {
            xhr.send()
        }

        xhr.onreadystatechange = function(){
            if(xhr.readyState === 4) {
                if(xhr.readyState >= 200 && xhr.readyState < 300) {
                    resolve({
                        status: xhr.status,
                        statusText: xhr.statusText,
                        headers: xhr.getAllResponseHeaders(),
                        data: xhr.response,
                        config: config,
                        request: xhr
                    })
                } else {
                    reject({
                        response: {
                            status: xhr.status,
                            statusText: xhr.statusText,
                            headers: xhr.getAllResponseHeaders(),
                            data: xhr.response,
                            config: config,
                            request: xhr
                        },
                        message: xhr.statusText
                    })
                }
            }
        }

    })
}
以上就是adapter的实现,其实就是普通的XMLHttpRequest的实现片段,但是加入了Promise和对返回结果的结构做了调整。
axios取消请求
我们来回顾下axios取消请求的实现
let c;

axios({
    url: 'http://localhost:3000/test',
    method: 'post',
    data: {
        name: 'qfc',
        age: 18
    },
    cancelToken: new axios.CancelToken(cancel => {
        c = cancel
    })
})

setTimeout(c, 1000, '终止请求了') // 服务器2s返回
我们直接上源码片段
/*
    取消请求实现
*/
axios.CancelToken = function(executor) {
    let resolvePromise;

    this.promise = new Promise(resolve => {
        resolvePromise = resolve
    })

    executor(reason=>{
        resolvePromise(reason)
    })
}

function adapter(config) {
    return new Promise((resolve, reject)=>{
        const xhr = new XMLHttpRequest()

        xhr.open(config.method, config.url)

        for(let key in config.headers) {
            xhr.setRequestHeader(key, config.headers[key])
        }

        if(config.data) {
            xhr.send(JSON.stringify(config.data))
        } else {
            xhr.send()
        }

        /*
            取消请求实现
        */
        if(config.cancelToken) {
            config.cancelToken.promise.then(reason => {
                xhr.abort()
                reject(reason)
            })
        }

        xhr.onreadystatechange = function(){
            if(xhr.readyState === 4) {
                if(xhr.readyState >= 200 && xhr.readyState < 300) {
                    resolve({
                        status: xhr.status,
                        statusText: xhr.statusText,
                        headers: xhr.getAllResponseHeaders(),
                        data: xhr.response,
                        config: config,
                        request: xhr
                    })
                } else {
                    reject({
                        response: {
                            status: xhr.status,
                            statusText: xhr.statusText,
                            headers: xhr.getAllResponseHeaders(),
                            data: xhr.response,
                            config: config,
                            request: xhr
                        },
                        message: xhr.statusText
                    })
                }
            }
        }

    })
}
其中滋味需要自己细品,不可言传。
简略版axios实现
/*
InterceptorManager实现
*/
function InterceptorManager() {
this.handler = []
}
InterceptorManager.prototype.use = function (fulfilled, rejected) {
this.handler.push({
fulfilled,
rejected
})
}
/*
Axios实现
*/
function Axios(config) {
this.defaults = config
this.interceptors = {
request: new InterceptorManager(),
response: new InterceptorManager()
}
}
Axios.prototype.request = function (config) {
let promise = Promise.resolve(config)
const chain = [dispatchRequest, undefined]
this.interceptors.request.handler.forEach(interceptor => {
chain.unshift(interceptor.fulfilled, interceptor.rejected)
})
this.interceptors.response.handler.forEach(interceptor => {
chain.push(interceptor.fulfilled, interceptor.rejected)
})
while (chain.length > 0) {
promise = promise.then(chain.shift(), chain.shift())
}
return promise
}
function dispatchRequest(config) {
return adapter(config)
.then(response => Promise.resolve(response))
.catch(err => Promise.reject(err))
}
function adapter(config) {
return new Promise((resolve, reject) => {
const xhr = new XMLHttpRequest()
xhr.open(config.method, config.url)
for (let key in config.headers) {
xhr.setRequestHeader(key, config.headers[key])
}
xhr.responseType = config.responseType || 'json'
if (config.data) {
xhr.send(JSON.stringify(config.data))
} else {
xhr.send()
}
if (config.cancelToken) {
config.cancelToken.promise.then(reason => {
reject({
message: reason
})
xhr.abort()
})
}
xhr.onreadystatechange = function () {
if (xhr.readyState === 4) {
if (xhr.status >= 200 && xhr.status < 300) {
resolve({
status: xhr.status,
statusText: xhr.statusText,
headers: xhr.getAllResponseHeaders(),
data: xhr.response,
config: config,
request: xhr
})
} else {
reject({
response: {
status: xhr.status,
statusText: xhr.statusText,
headers: xhr.getAllResponseHeaders(),
data: xhr.response,
config: config,
request: xhr
},
message: xhr.statusText
})
}
}
}
})
}
/*
axios实现
*/
function createInstance(config) {
const context = new Axios(config)
const instance = Axios.prototype.request.bind(context)
Object.assign(instance, Axios.prototype)
Object.assign(instance, context)
instance.create = function (instanceConfig) {
return createInstance(Object.assign(config, instanceConfig))
}
return instance
}
const axios = createInstance({
method: 'get'
})
axios.Axios = Axios
axios.CancelToken = function (executor) {
let resolvePromise;
this.promise = new Promise(resolve => {
resolvePromise = resolve
})
executor(reason => {
resolvePromise(reason)
})
}
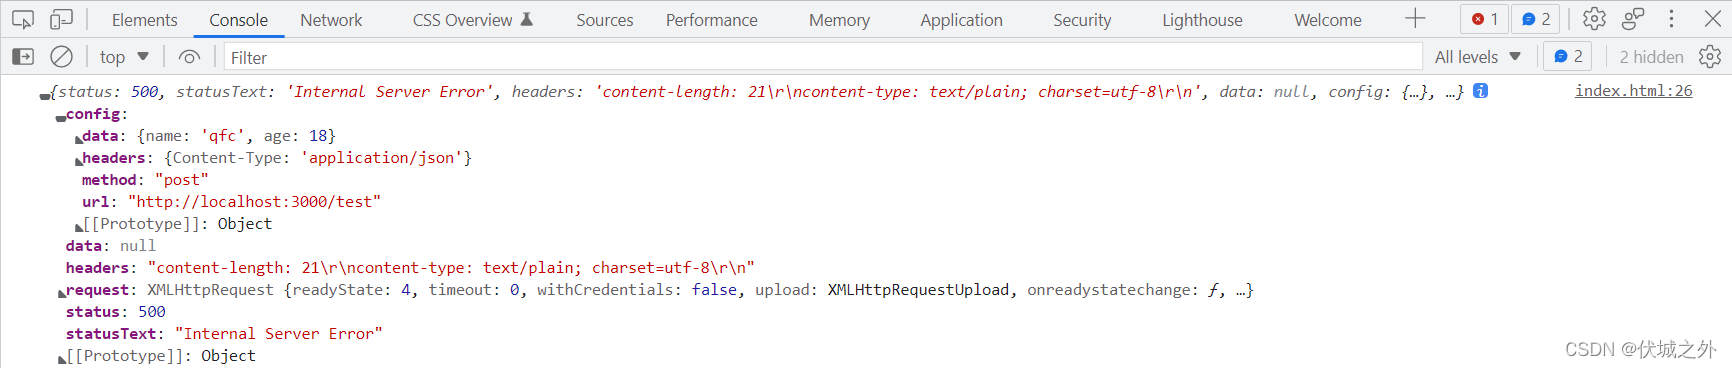
export default axios测试基本功能
<!DOCTYPE html>
<html lang="en">
<head>
  <meta charset="UTF-8">
  <meta http-equiv="X-UA-Compatible" content="IE=edge">
  <meta name="viewport" content="width=device-width, initial-scale=1.0">
  <title>Document</title>
</head>
<body>
  <script type="module">
    import axios from './axios.js'

    axios({
      url: 'http://localhost:3000/test',
      method: 'post',
      headers: {
        'Content-Type': 'application/json'
      },
      data: {
        name: 'qfc',
        age: 18
      }
    }).then(response => {
      console.log(response);
    }).catch(err => {
      console.log(err.response || err.message)
    })
  </script>
</body>
</html>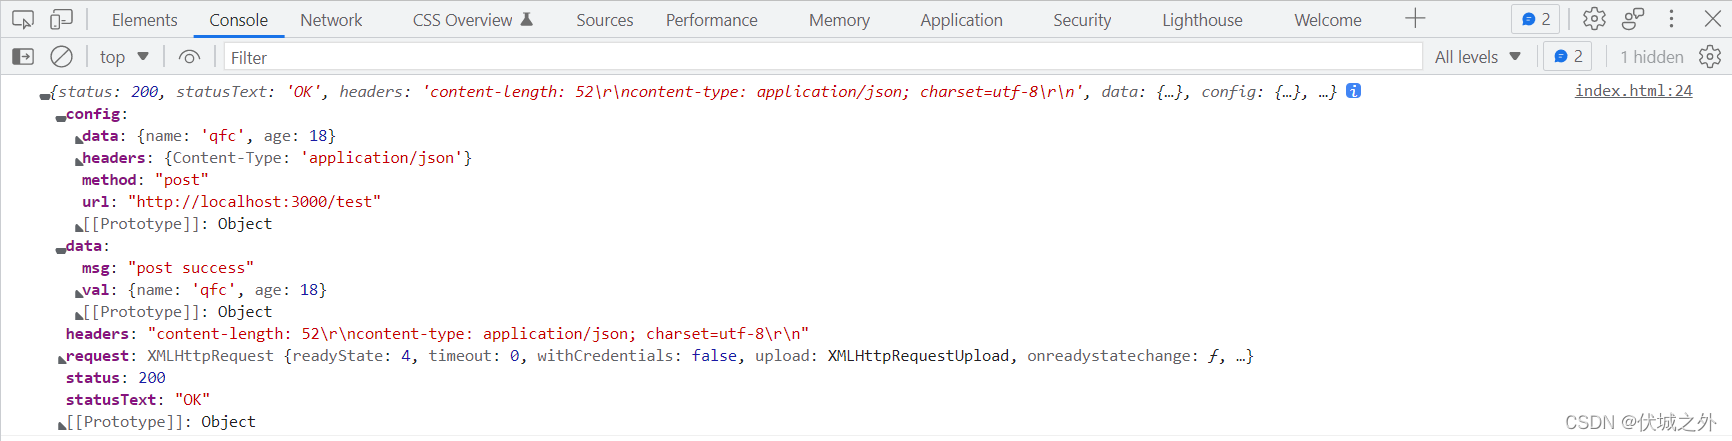
测试拦截器功能
<!DOCTYPE html>
<html lang="en">
<head>
  <meta charset="UTF-8">
  <meta http-equiv="X-UA-Compatible" content="IE=edge">
  <meta name="viewport" content="width=device-width, initial-scale=1.0">
  <title>Document</title>
</head>
<body>
  <script type="module">
    import axios from './axios.js'

    axios.interceptors.request.use(config => {
      console.log('请求拦截器1')
      config.headers.test1 = 'test1'
      return config
    }, err => {
      throw err
    })

    axios.interceptors.request.use(config => {
      console.log('请求拦截器2')
      config.headers.test2 = 'test2'
      return config
    }, err => {
      throw err
    })

    axios.interceptors.response.use(response => {
      console.log('响应拦截器1')
      return response.data
    }, err => {
      throw err
    })

    axios.interceptors.response.use(response => {
      console.log('响应拦截器2')
      return response
    }, err => {
      throw err
    })

    axios({
      url: 'http://localhost:3000/test',
      method: 'post',
      headers: {
        'Content-Type': 'application/json'
      },
      data: {
        name: 'qfc',
        age: 18
      }
    }).then(response => {
      console.log(response);
    }).catch(err => {
      console.log(err.response || err.message)
    })
  </script>
</body>
</html>

测试取消请求功能
<!DOCTYPE html>
<html lang="en">
<head>
  <meta charset="UTF-8">
  <meta http-equiv="X-UA-Compatible" content="IE=edge">
  <meta name="viewport" content="width=device-width, initial-scale=1.0">
  <title>Document</title>
</head>
<body>
  <script type="module">
    import axios from './axios.js'

    let c;

    axios({
      url: 'http://localhost:3000/test',
      method: 'post',
      headers: {
        'Content-Type': 'application/json'
      },
      data: {
        name: 'qfc',
        age: 18
      },
      cancelToken: new axios.CancelToken(cancel => {
        c = cancel
      })
    }).then(response => {
      console.log(response);
    }).catch(err => {
      console.log(err)
    })

    setTimeout(c, 1000, '中之亲求')
  </script>
</body>
</html>


 996
996

 被折叠的 条评论
为什么被折叠?
被折叠的 条评论
为什么被折叠?
 到【灌水乐园】发言


