


 本文详细介绍pytest单元测试框架的安装、配置及实战应用,包括项目创建、代码编写、测试执行、参数化、初始化和清除操作,以及如何使用Allure生成美观的测试报告。
pytest
是一个单元测试框架,简单易用,第三方库丰富,可以使用allure生成美观的测试报告
官网:https://docs.pytest.org/en/stable/
主流单元测试框架 unittest nose pytest
安装
安装pytest包
pip install -U pytest
配置
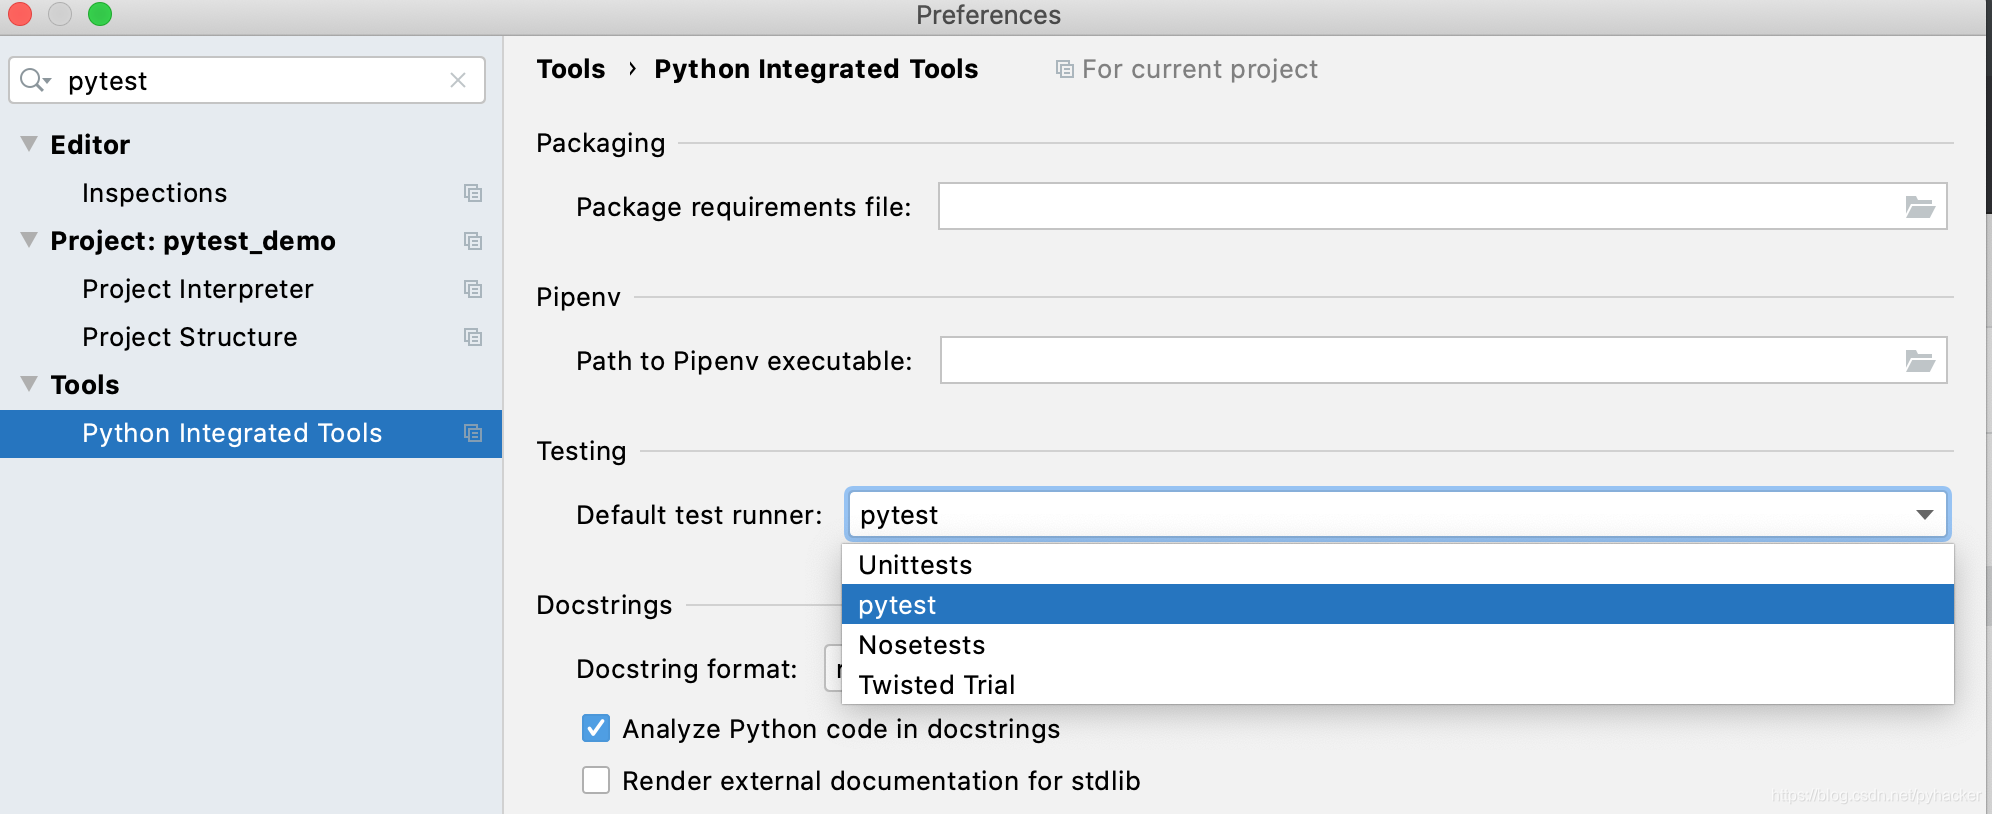
在Preferences 中的Tools->Python Interated Tools中配置Testing Default testing runner 为pytest,默认为unittest
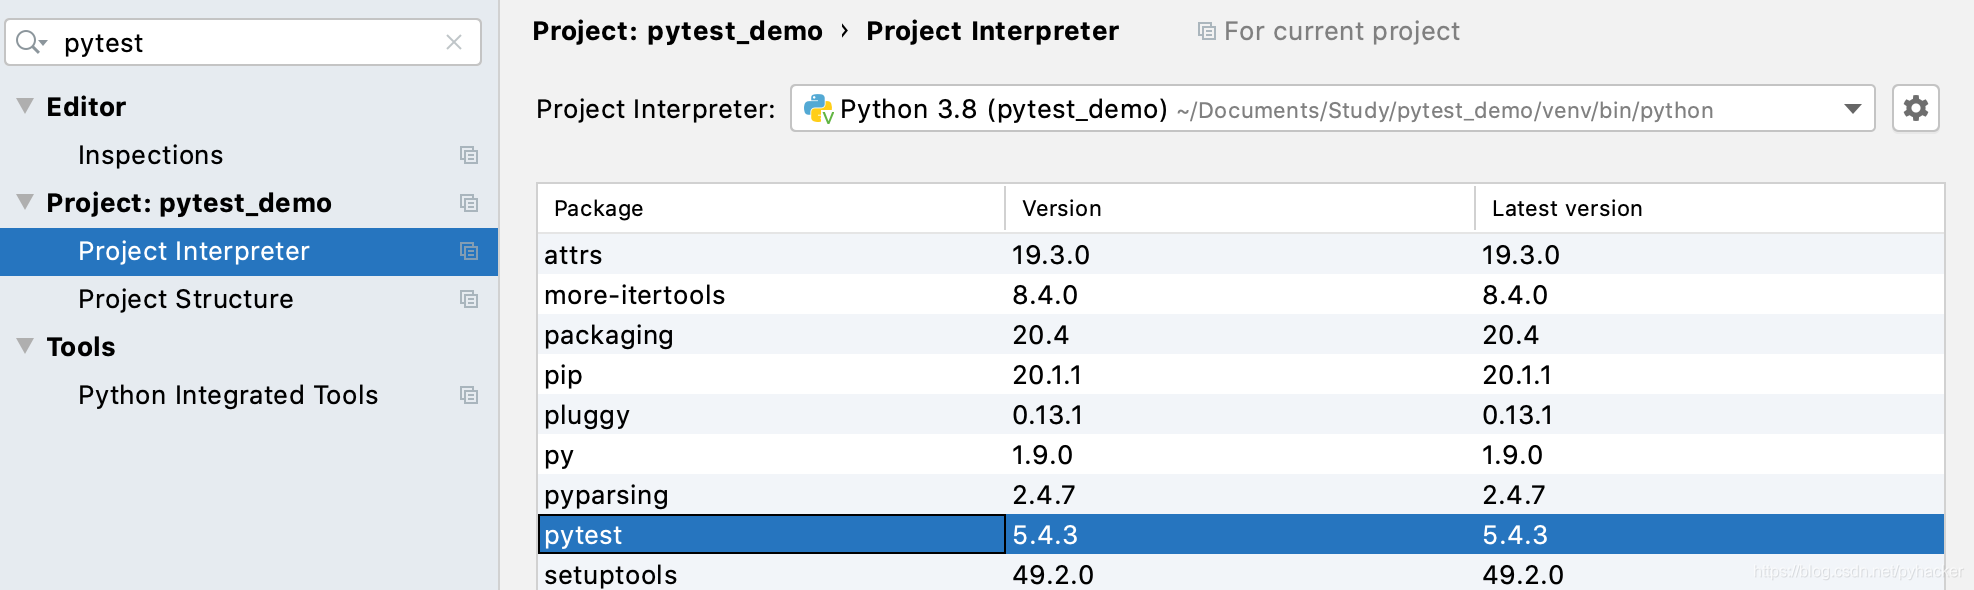
在project interpreter中安装pytest
实战
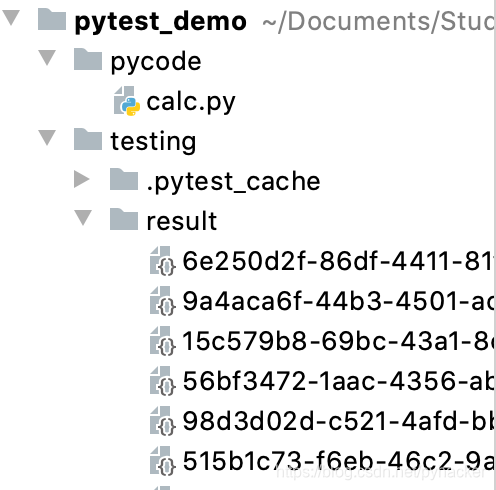
创建项目
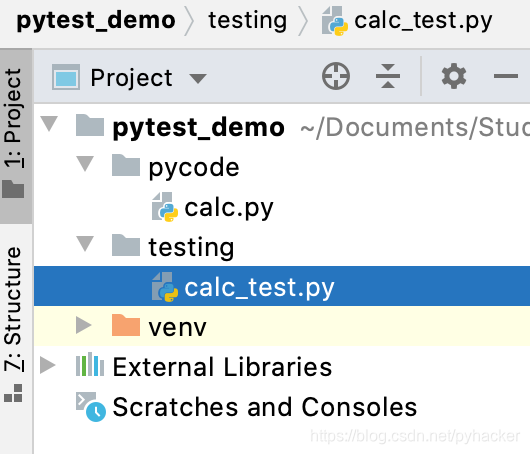
在pycharm中创建pytest_demo项目,并创建pycode(代码)和testing(测试)目录,在pycode中创建calc.py,coding中创建calc_test.py,目录结构如下:
注意:不要使用code,test,pytest等关键字命名项目或者目录,否则会导致引用出错的问题
写代码
pytest 代码规范
- 文件名必须以test_开头
- 类名必须以Test开头,首字母大写,方法名test_开头
calc.py
class Calculator:

    def add(self,a,b):
        return a + b

    def div(self,a,b):
        return a / b
calc_test.py
from pycode.calc import Calculator

# 文件名必须以test_开头,类名必须以Test开头,首字母大写,方法名test_开头
class TestCalc:
    def test_add(self):
        calc = Calculator()
        assert 2 == calc.add(1,1)
执行测试
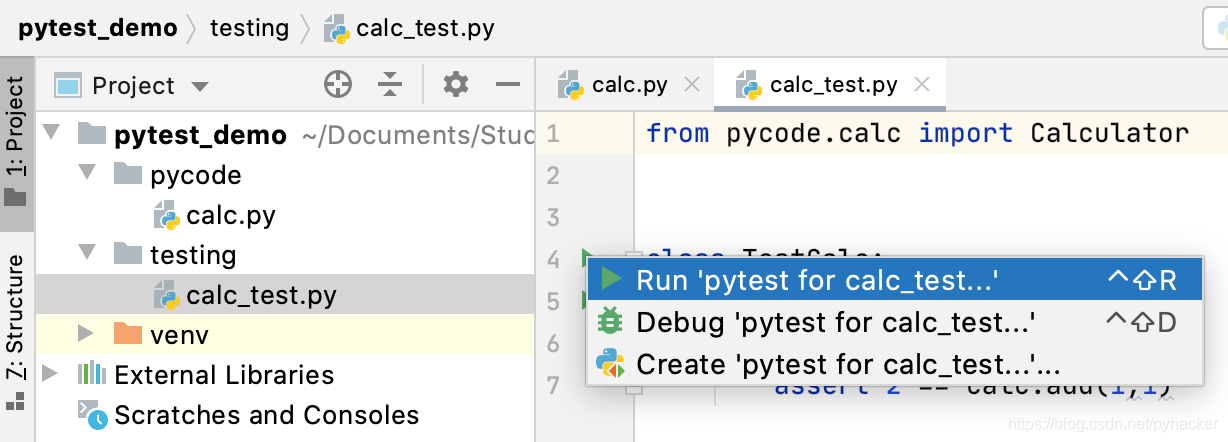
在calc_test.py中右键绿色箭头,选择Run “pytest for …”
查看执行结果

参数化
待测试的输入和输出是一组数据,可以把测试数据组织起来,用不同的测试数据调用相同的测试方法(将可变数据处理成参数的形式来方便自动化测试过程中使用)
- 将变化的参数提取出来,以数据的形式传入到测试方法中
- 参数化会为每一条数据生成一条测用例,如果其中一条执行失败,不会影响其他用例的执行结果
calc_test.py
import pytest
from pycode.calc import Calculator

class TestCalc:

    @pytest.mark.parametrize("a,b,c",[
        (1,1,2),
        (0.1,0.1,0.2),
        (-1,-1,-2),
        (100,50,200)
    ])
    def test_add(self,a,b,c):
        calc = Calculator()
        assert c == calc.add(a,b)
执行结果
四条用例都执行了
测试通过,展示测试进度
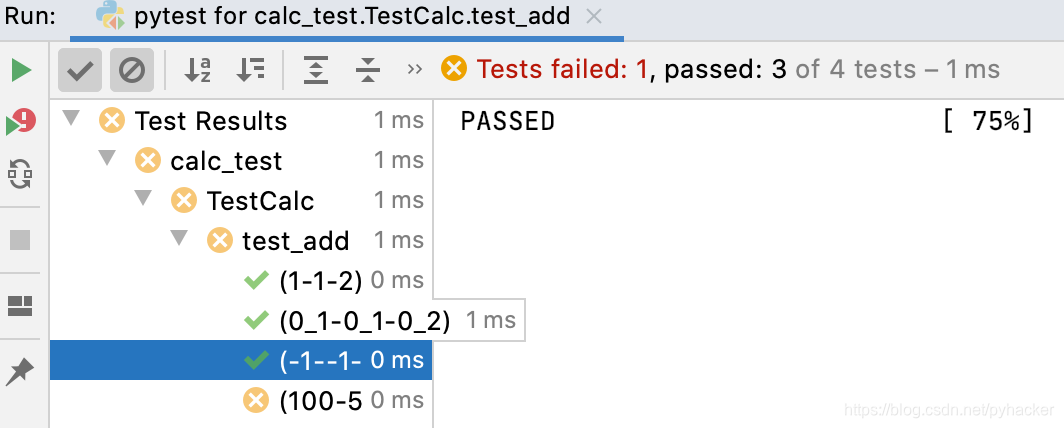
测试失败,提示失败原因

初始化和清除
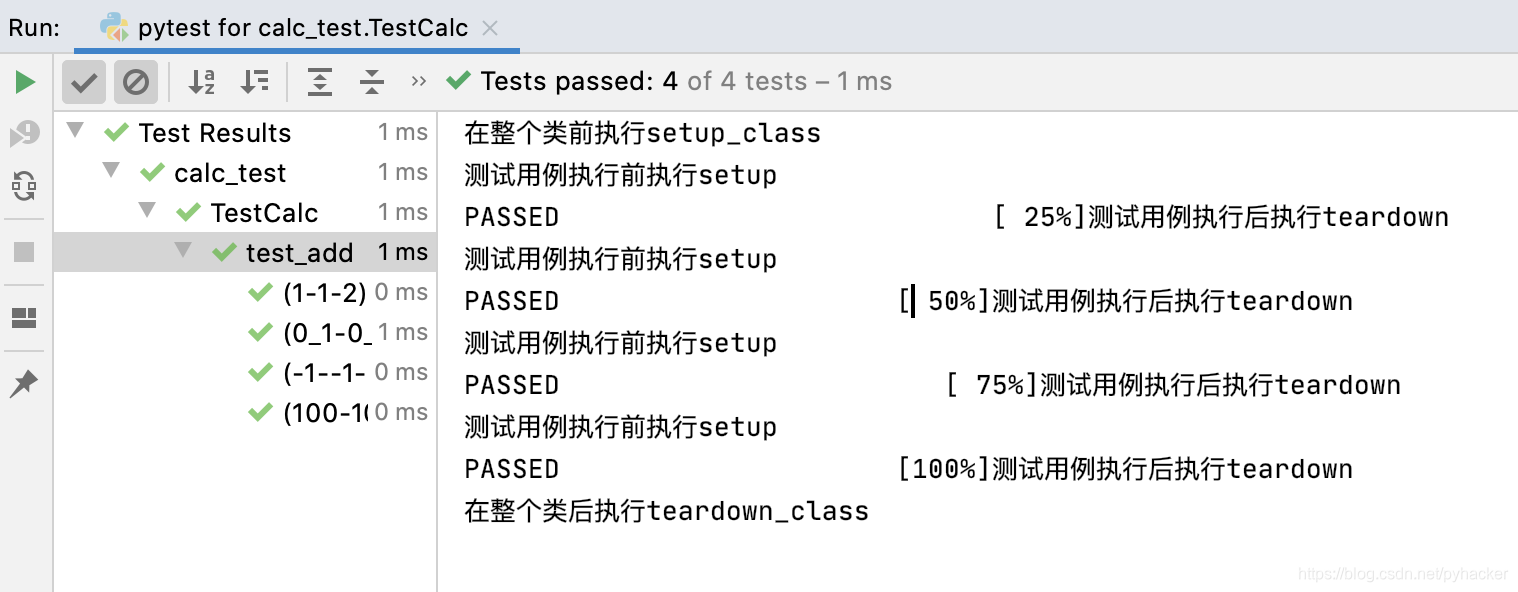
在每条测试用例执行之前,执行setup()
在每条测试用例执行之后,执行teardown()
在整个测试类执行之前执行setup_class()
在整个测试类执行之后执行teardown_class()
import pytest
from pycode.calc import Calculator

class TestCalc:

    # setup_class、teardown 是类级别的
    def setup_class(self):
        print("在整个类前执行setup_class")
        self.calc = Calculator()

    def teardown_class(self):
        print("在整个类后执行teardown_class")

    # setup、teardown是方法级别的
    def setup(self):
        print("测试用例执行前执行setup")
        self.calc = Calculator()

    def teardown(self):
        print("测试用例执行后执行teardown")

    @pytest.mark.parametrize("a,b,c",[
        (1,1,2),
        (0.1,0.1,0.2),
        (-1,-1,-2),
        (100,100,200)
    ])
    def test_add(self,a,b,c):
        assert c == self.calc.add(a,b)
执行结果:
Allure
Allure是一个轻量级,灵活的,支持多语言的测试报告工具
跨平台,奢华的报告框架
可以为开发和测试提供详尽的测试报告,测试步骤和日志
也可以为管理层提供high level 统计报告
Java语言开发,支持pytest、Javascript、PHP、ruby等
可以集成到Jenkins
官网:http://allure.qatools.ru/
安装Allure和Allure-pytest
brew install allure
pip install -U allure-pytest
运行Allure
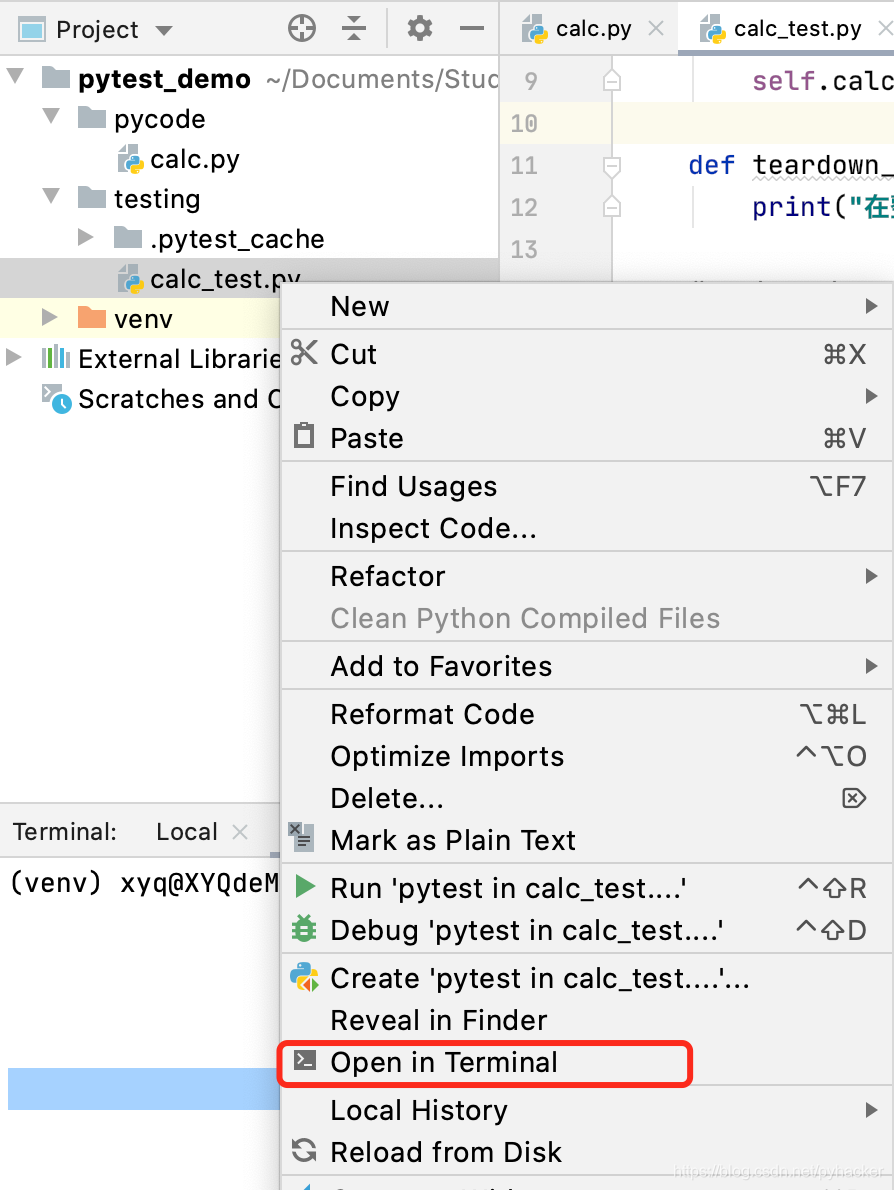
在calc_test.py上右键,选择open in terminal
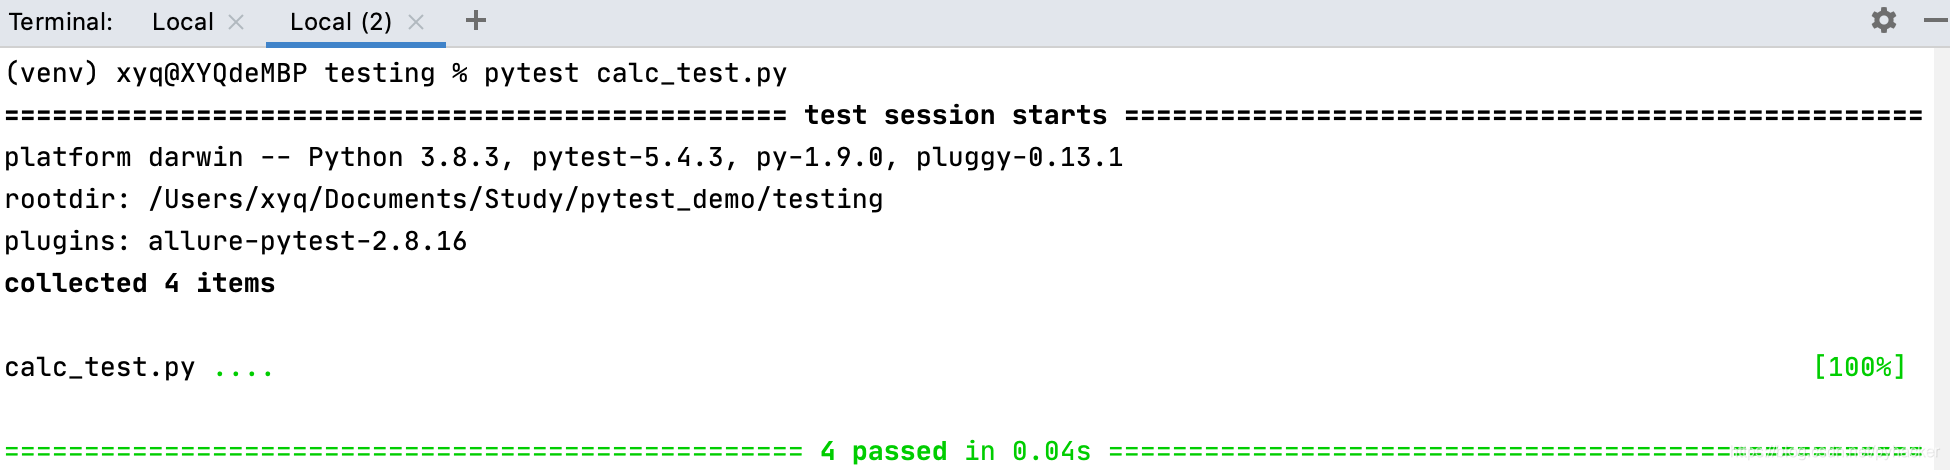
在terminal 中输入
pytest calc_test.py
运行结果
收集结果
在pytest运行的时候收集结果
# --alluredir用于指定测试结果的存储路径
pytest calc_test.py -s -q --alluredir=./result/
执行结果
生成result文件夹并生成很多结果文件
获取报告
在线分析报告
allure serve ./result/
执行结果
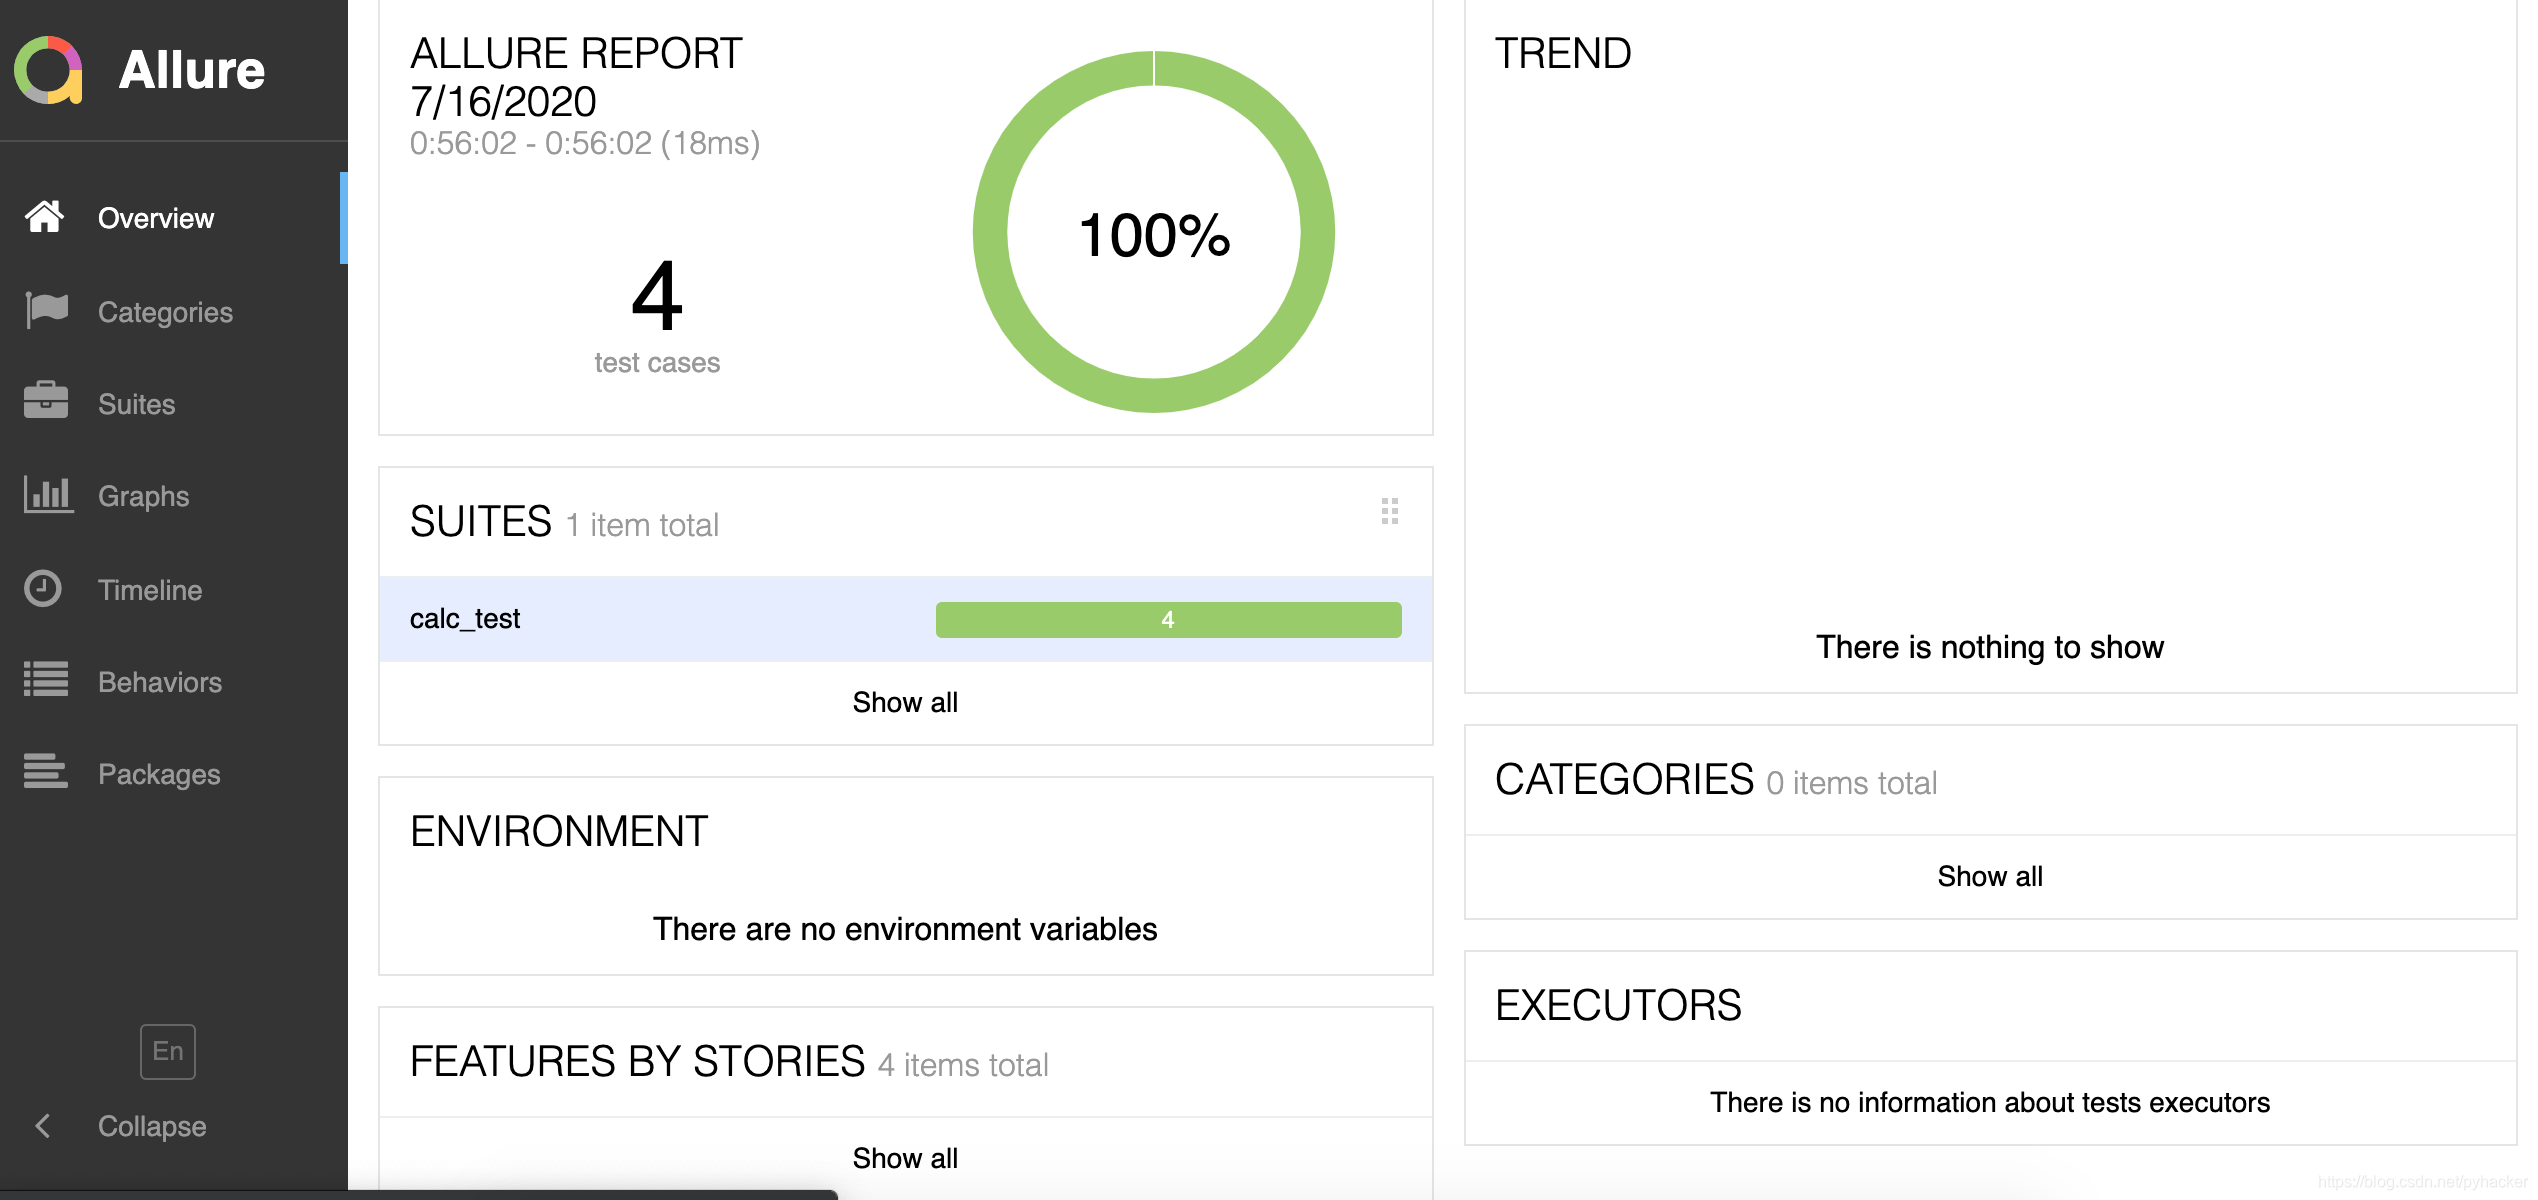
生成测报告文件
# --clean表示覆盖路径
allure generate ./result/ -o ./report/ --clean
# 打开报告文件,也可以直接打开html文件
allure open -h 127.0.0.1 -p 8883 ./report/
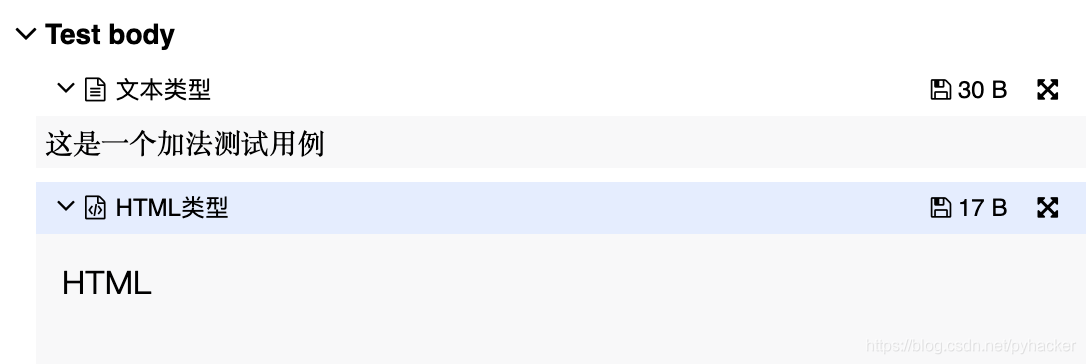
报告中添加文本
# 文本
allure.attach(str(data),attachment_type=allure.attachment_type.TEXT)
# HTML片段
allure.attach("<body>首页</body>",attachment_type=allure.attachment_type.HTML)
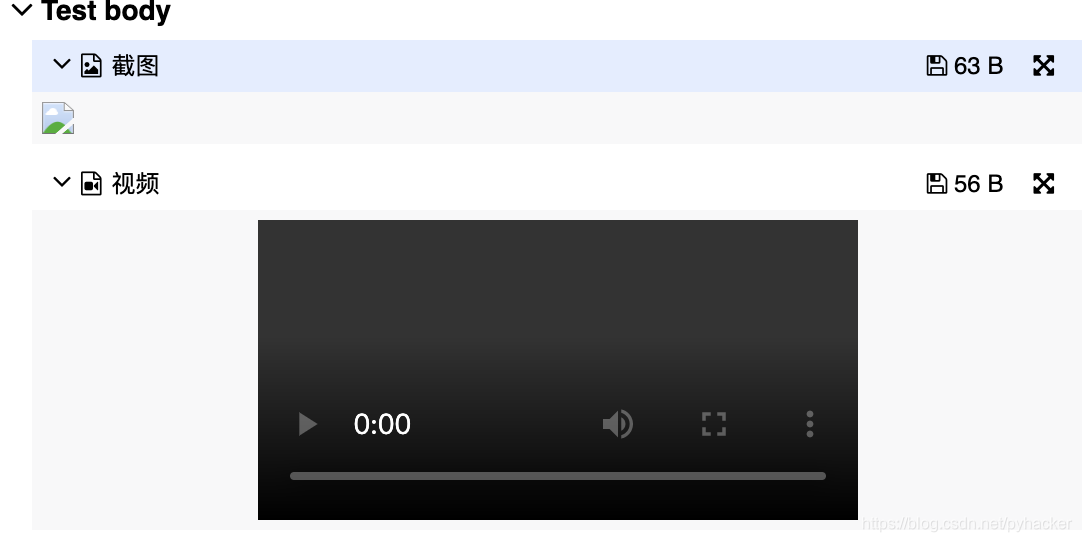
# 图片
allure.attach("imagefile",name='截图',attachment_type=allure.attachment_type.PNG)
# 视频
allure.attach("videofile",name='视频',attachment_type=allure.attachment_type.MP4)
import pytest,sys,allure
sys.path.append("..")

from pycode.calc import Calculator


class TestCalc:

    # setup_class、teardown 是类级别的
    def setup_class(self):
        print("在整个类前执行setup_class")
        self.calc = Calculator()

    def teardown_class(self):
        print("在整个类后执行teardown_class")

    # setup、teardown是方法级别的
    def setup(self):
        print("测试用例执行前执行setup")
        self.calc = Calculator()

    def teardown(self):
        print("测试用例执行后执行teardown")

    @pytest.mark.parametrize("a,b,c",[
        (1,1,2),
        (0.1,0.1,0.2),
        (-1,-1,-2),
        (100,100,200)
    ])
    def test_add(self,a,b,c):
        allure.attach("这是一个加法测试用例", name="文本类型",attachment_type=allure.attachment_type.TEXT)
        allure.attach("<body>HTML</body>", name="HTML类型", attachment_type = allure.attachment_type.HTML)
        assert c == self.calc.add(a,b)

    def test_div(self):
        allure.attach("/Users/xyq/Documents/Study/pytest_demo/testing/Python_notes.png", name='截图',attachment_type=allure.attachment_type.PNG)
        allure.attach("/Users/xyq/Documents/Study/pytest_demo/testing/video.mp4", name='视频',attachment_type=allure.attachment_type.MP4)
        assert 2 == self.calc.div(4,2)
执行结果:
数据驱动
数据驱动就是测试数据的改变从而驱动自动化测试的执行,最终引起测试结果的改变,说直白些就是参数化的应用


 5027
5027

 被折叠的 条评论
为什么被折叠?
被折叠的 条评论
为什么被折叠?
 到【灌水乐园】发言


