


 这篇博客介绍了Linux系统编程中的chmod函数,用于管理文件和目录的权限。通过man命令学习了chmod和fchmod两个函数的用法,以及如何使用它们改变文件描述符或路径的权限。此外,还提供了编译和运行测试chmod函数的步骤,展示了在Ubuntu系统及开发板上执行文件权限修改的实际操作。
-------------------------------------资源来源于网络,仅供自学使用,如有侵权,联系我必删.
第一:
实验-chmod 权限函数
使用 man 学习 chmod 函数
1)如下图所示,使用命令“man 2 chmod”

2)如下图所示,有 chmod 和 fchmod 两个函数。

3)再看一下相关函数,如下图所示。

4)接着介绍一下 chmod 和 fchmod 的用法。
• int chmod(const char *path, mode_t mode);
– 参数*path:文件路径。
– 参数mode:直接使用数字即可。和前面命令中chmod 777 xxx 中的777 这个参数含义类似,也可以使用文档中的组合值。
– 返回值:成功返回0,错误返回-1。
• int fchmod(int fd, mode_t mode);
– 参数fd:文件描述符。
– 参数mode:直接使用数字即可。和前面命令中chmod 777 xxx 中的777 这
个参数含义类似,也可以使用文档中的组合值。
– 返回值:成功返回0,错误返回-1。
第二:
chmod 函数例程
#include <stdio.h>

#include <sys/types.h>
#include <sys/stat.h>
#include <fcntl.h>

//通过 main 函数可以传参数,也就是文件的路径,需要传两个路径
int main(int argc,char *argv[])
{
	int fd,ret;

    //检测是否有传入参数
	if(argc <3){
		printf("\nPlease input file path\n");
		return 1;
	}

//chmod函数测试
    //将第一个参数指向的文件的权限修改为 0777
	ret = chmod(argv[1],0777);
	if(ret<0){
		printf("Please make sure file path\n");
		return 1;
	}
	printf("chmod %s 0777 is success!\n",argv[1]);

//fchmod函数测试
    //使用 open 函数获取文件句柄
	fd = open(argv[2],O_RDWR|O_NOCTTY|O_NDELAY);
	if(fd<0)
	{
		printf("Please make sure file path\n");
		return 1;
	}
    //将第二个参数指向的文件的权限修改为 0555
	ret = fchmod(fd,0555);
	if(ret<0){
		printf("Please make sure file path\n");
		return 1;
	}
	printf("fchmod %s 0555 is success!\n",argv[1]);

	return 0;
}
第三:
编译运行测试
1)在 Ubuntu 系统下,如下图所示,进入前面实验创建的目录
“/home/linuxsystemcode/CatlogFile”,将源码chmod.c拷贝进去,进入文件夹CatlogFile,如下图所示。

2)使用命令“arm-none-linux-gnueabi-gcc -o chmod chmod.c -static”编译 chmod 文件,如下图所示,使用命令“ls”可以看到生成了 chmod 可执行文件。

3)将文件拷贝到挂载点

4)开发板执行文件
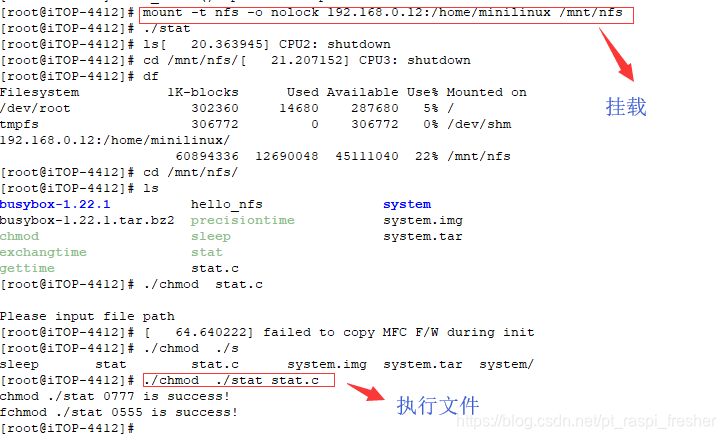

如上图所示,将./mnt/udisk 中的 stat 和 stat.c 文件权限修改,然后使用命令“ls -l”查看权限,可以看到修改成功。


 139
139

 被折叠的 条评论
为什么被折叠?
被折叠的 条评论
为什么被折叠?
 到【灌水乐园】发言


