


 本文是关于Android使用POST方法与后台Tomcat服务器交互的教程。内容包括如何在HTTP请求头中设置参数,并在数据包中传递JSON对象。示例代码展示了如何在服务器端解析header和请求流中的数据,成功实现了数据的双向传输。
关于本项目应做的准备及介绍,见上一篇博客,上一篇讲的是get方法
https://blog.youkuaiyun.com/ppsiri/article/details/93471790
本文主要讲一下POST方法与后台Tomcat交互。
由于http包含header和数据包两个部分,因此我们可以用两种方式同时传输,即,我在header里设置username和pwd的属性,再在数据包中也包含这两部分数据,实际使用中我建议使用第二种。现在我们来试一下。
    public void sendLogReq(){
        new Thread(new Runnable() {
            @Override
            public void run() {
                JSONObject jsonObject = new JSONObject();
                JSONArray jsonArray = new JSONArray();
                try {
                    jsonObject.put("username",  email);
                    jsonObject.put("password", password );
                } catch (JSONException e) {
                    e.printStackTrace();
                }
                String svrUrl="http://192.168.43.184:8080/blog/TestServlet";
               String result = getDataFromServer(svrUrl, jsonObject.toString(), email, password);
            }
        }).start();
    }
    public String getDataFromServer(String svrUrl, String ParamStr, String a, String b) {
        try {
            // 转成指定格式
            Log.d("AAAAA",""+ParamStr);
            byte[] requestData = ParamStr.getBytes("UTF-8");
            HttpURLConnection conn = null;
            DataOutputStream outStream = null;
            String MULTIPART_FORM_DATA = "multipart/form-data";
            // 构造一个post请求的http头
            URL url = new URL(svrUrl); // 服务器地址
            conn = (HttpURLConnection) url.openConnection();
            conn.setDoInput(true); // 允许输入
            conn.setDoOutput(true); // 允许输出
            conn.setUseCaches(false); // 不使用caches
            conn.setRequestMethod("POST");
            conn.setRequestProperty("Connection", "Keep-Alive");
            conn.setRequestProperty("Content-Type", MULTIPART_FORM_DATA);
            conn.setRequestProperty("Content-Length", Long.toString(requestData.length));
            conn.setRequestProperty("username", a + "");
            conn.setRequestProperty("password", b + "");
            // 请求参数内容, 获取输出到网络的连接流对象
            outStream = new DataOutputStream(conn.getOutputStream());
            outStream.write(requestData, 0, requestData.length);
        //将json转换成的数据写到输出流。
            outStream.flush();
            outStream.close();
            ByteArrayOutputStream outStream2 = new ByteArrayOutputStream();
            int cah = conn.getResponseCode();
            if (cah != 200) {
                Log.v("data", "服务器响应错误代码:" + cah);
                return "0";
            }else if(cah == 200){
                Log.v("data", "服务器响应成功:" + cah);
            }
//下面是读取来自服务器的输入流数据
            InputStream inputStream = conn.getInputStream();
            int len = 0;
            byte[] data = new byte[1024];
            while ((len = inputStream.read(data)) != -1) {
                outStream2.write(data, 0, len);
            }
            outStream2.close();
            inputStream.close();
            String responseStr = new String(outStream2.toByteArray());
            Log.v("data", "data = " + responseStr);
            return responseStr;
        } catch (Exception e) {
            return "";
        }
    }
下面是服务器的部分
服务器的部分需要导入json 的jar包,请大家自行搜索下载,位置为
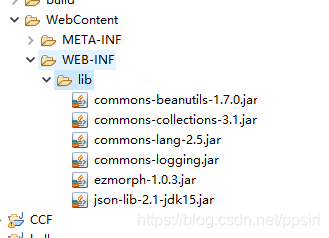
服务器端对应代码,doPost方法为对request的header进行的解析,而下面的getData方法是对请求流的数据的解析,因为我们在android端附着了一个jsonObject的字符串。
	/**
	 * @see HttpServlet#doPost(HttpServletRequest request, HttpServletResponse response)
	 */
	protected void doPost(HttpServletRequest request, HttpServletResponse response) throws ServletException, IOException {
		// TODO Auto-generated method stub
		System.out.println("---------00000000----");
	    String result;
	    String name = request.getHeader("username").toString();
	    String pwd = request.getHeader("password").toString();

	    System.out.println("/" + name + "/" + pwd);
	        result=" I get your name is "+name+" and "+"pwd is "+pwd;
	        response.setCharacterEncoding("utf-8");
	        response.getWriter().append(result + "");
	        getData(request);//对数据包的解析
	}
	public String getData(HttpServletRequest req){
	    String result = null;
	    try {
	        //包装request的输入流
	        BufferedReader br = new BufferedReader(
	        new InputStreamReader((ServletInputStream) req.getInputStream(), "utf-8"));
	        //缓冲字符
	        StringBuffer sb=new StringBuffer("");
	        String line;
	        while((line=br.readLine())!=null){
	            sb.append(line);
	        }
	        br.close();//关闭缓冲流
	        result=sb.toString();//转换成字符
	        System.out.println("result = " + result);
	        JSONObject resultObject = JSONObject.fromObject(result);//将数据转换成jsonObject
	        System.out.println("from json   "+ resultObject.get("username")+"////"+resultObject.get("password"));
	    } catch (Exception e) {
	        e.printStackTrace();
	    }
	    return result;
	}
下面我们运行一下试试。

而服务器给我们返回的数据是这样的

可以看到我们成功通过两种方式读取到了数据。
以上就是我们通过post与后台进行的交互。


 3583
3583


 到【灌水乐园】发言


