


 本文深入讲解Spring AOP的原理及应用,包括AOP的概念、作用、本质,以及三种动态代理方式。详细介绍基于XML和注解的配置方法,并通过示例展示如何在实际项目中运用。
点击查看Spring系列文章
目录
一.什么是AOP
AOP即Aspect Oriented Programming,面向切面编程,它是相对于OOP(Object Oriented Programming)面向对象编程的另一种编程思想,它旨在抽离出代码的公共部分,就像一个切面一样,横切在许多代码中,使得所有的代码都可以执行到这个切面的公共代码,而不必要为一个需要它的地方重新写一遍同样的代码,降低代码的冗余,加强了代码的可读性。
1.AOP的作用
- 抽取公共代码,减少代码冗余(如日志、事务处理等)
- 提高开发效率,使得维护更加方便
- 动态地增强代码而不需要改变原代码
2.AOP的本质是什么
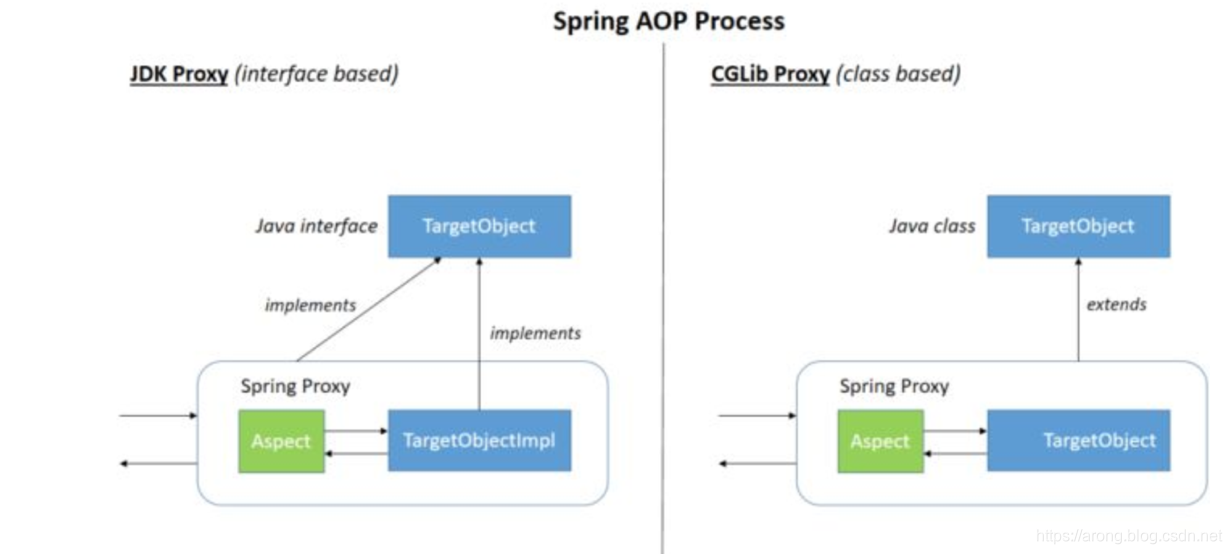
AOP的本质是Java的动态代理技术。
- 当被代理类实现了某个接口时:使用JDK动态代理技术实现AOP
- 当被代理类没有实现某个接口时:使用CGLIB动态代理技术来实现AOP
- Spring还集成了AspectJ来完成动态代理
3.三种动态代理的实现本质是什么
- JDK动态代理的实质是通过反射在运行时获取到被代理类的方法然后进行增强(过程可以参考静态代理的做法,动态代理相对于静态代理的差异其实就算能在运行时获取到方法)。
- CGLIB动态代理技术的实质是在编译时,通过ASM来处理字节码,生成一个被代理类的子类对象,并拦截其方法,通过子类来增强。
- AspectJ技术原本是独立于Spring的一种基于编译时增强的动态代理技术,它可以在编译时修改类的字节码,而使其真正地含有增强的代码,所以无需在运行时去做其他操作,运行效率比JDK动态代理和CGLIB动态代理要高。目前Spring已经继承了AspectJ技术。
二.Spring AOP的配置和使用过程
1.基于xml配置文件的使用
1.AOP核心概念
-
横切关注点:对哪些方法进行拦截,拦截后怎么处理,这些关注点称之为横切关注点
-
切面(aspect):类是对物体特征的抽象,切面就是对横切关注点的抽象
-
连接点(joinpoint):被拦截到的点,因为Spring只支持方法类型的连接点,所以在Spring中连接点指的就是被拦截到的方法,实际上连接点还可以是字段或者构造器
-
切入点(pointcut):对连接点进行拦截的定义
-
通知(advice) 所谓通知指的就是指拦截到连接点之后要执行的代码,通知分为前置、后置、异常、最终、环绕通知五类
-
目标对象 代理的目标对象
-
织入(weave)
将切面应用到目标对象并导致代理对象创建的过程
- 引入(introduction)
在不修改代码的前提下,引入可以在运行期为类动态地添加一些方法或字段
2.Spring对AOP的支持
Spring中AOP代理由Spring的IOC容器负责生成、管理,其依赖关系也由IOC容器负责管理。因此,AOP代理可以直接使用容器中的其它bean实例作为目标,这种关系可由IOC容器的依赖注入提供。Spring创建代理的规则为:
1、默认使用Java动态代理来创建AOP代理,这样就可以为任何接口实例创建代理了
2、当需要代理的类不是代理接口的时候,Spring会切换为使用CGLIB代理,也可强制使用CGLIB
对于Spring的AOP编程,我们只需要做三件事:
-
定义需要被代理的代码组件(或被增强的代码)
-
定义切入点,一个切入点可能横切多个代码组件
-
定义增强方法,它会被Spring织入到被代理的对象的特点切点方法上,在被代理方法执行之前增强被称为前置通知、在被代理的方法执行之后增强被称为后置通知、在被代理的方法中和其一起执行则被称为环绕通知、在被代理的方法发生异常后执行被称为异常通知。
即:代理对象的方法=增强处理+被代理对象的方法。
3.代码实现
- aop.xml【模板】
<?xml version="1.0" encoding="UTF-8"?>
<beans xmlns="http://www.springframework.org/schema/beans"
    xmlns:xsi="http://www.w3.org/2001/XMLSchema-instance"
    xmlns:aop="http://www.springframework.org/schema/aop"
    xmlns:tx="http://www.springframework.org/schema/tx"
    xsi:schemaLocation="http://www.springframework.org/schema/beans
        http://www.springframework.org/schema/beans/spring-beans-4.2.xsd
        http://www.springframework.org/schema/aop
        http://www.springframework.org/schema/aop/spring-aop-4.2.xsd">

</beans>
- 导入两个AOP所需的Jar包
- aopalliance.jar
- aspectjweaver.jar
- 定义被代理类要实现的接口(这里使用的是JDK动态代理)
public interface HelloWorld
{
    void printHelloWorld();
    void doPrint();
}
- 被代理的类
public class HelloWorldImpl1 implements HelloWorld
{
    public void printHelloWorld()
    {
        System.out.println("Enter HelloWorldImpl1.printHelloWorld()");
    }

    public void doPrint()
    {
        System.out.println("Enter HelloWorldImpl1.doPrint()");
        return ;
    }
}

public class HelloWorldImpl2 implements HelloWorld
{
    public void printHelloWorld()
    {
        System.out.println("Enter HelloWorldImpl2.printHelloWorld()");
    }

    public void doPrint()
    {
        System.out.println("Enter HelloWorldImpl2.doPrint()");
        return ;
    }
}
- 增强类与增强方法
public class TimeHandler
{
    public void printTime()
    {
        System.out.println("CurrentTime = " + System.currentTimeMillis());
    }
}
- applicationContext.xml:AOP配置
<?xml version="1.0" encoding="UTF-8"?>
<beans xmlns="http://www.springframework.org/schema/beans"
    xmlns:xsi="http://www.w3.org/2001/XMLSchema-instance"
    xmlns:aop="http://www.springframework.org/schema/aop"
    xmlns:tx="http://www.springframework.org/schema/tx"
    xsi:schemaLocation="http://www.springframework.org/schema/beans
        http://www.springframework.org/schema/beans/spring-beans-4.2.xsd
        http://www.springframework.org/schema/aop
        http://www.springframework.org/schema/aop/spring-aop-4.2.xsd">


        <!--注册两个被代理类和增强类--!>
        <bean id="helloWorldImpl1" class="com.xrq.aop.HelloWorldImpl1" />
        <bean id="helloWorldImpl2" class="com.xrq.aop.HelloWorldImpl2" />
        <bean id="timeHandler" class="com.xrq.aop.TimeHandler" />

        <!--配置AOP--!>
        <aop:config>
            <!--AOP的id号,引用增强类--!>
            <aop:aspect id="time" ref="timeHandler">
                <!--切点配置--!>
                <aop:pointcut id="addAllMethod" expression="execution(* com.xrq.aop.HelloWorld.*(..))" />
                <!--expression="xx.package.HelloWorld.*(..)"表明增强HelloWorld类的全部方法--!>

                <!--配置前置通知--!>
                <aop:before method="printTime" pointcut-ref="addAllMethod" />
                <!--配置后置通知--!>
                <aop:after method="printTime" pointcut-ref="addAllMethod" />
            </aop:aspect>
        </aop:config>
</beans>
- 测试
public static void main(String[] args)
{
    ApplicationContext ctx =
            new ClassPathXmlApplicationContext("aop.xml");

    HelloWorld hw1 = (HelloWorld)ctx.getBean("helloWorldImpl1");
    HelloWorld hw2 = (HelloWorld)ctx.getBean("helloWorldImpl2");
    hw1.printHelloWorld();
    System.out.println();
    hw1.doPrint();

    System.out.println();
    hw2.printHelloWorld();
    System.out.println();
    hw2.doPrint();
}
- 测试结果
CurrentTime = 1446129611993
Enter HelloWorldImpl1.printHelloWorld()
CurrentTime = 1446129611993

CurrentTime = 1446129611994
Enter HelloWorldImpl1.doPrint()
CurrentTime = 1446129611994

CurrentTime = 1446129611994
Enter HelloWorldImpl2.printHelloWorld()
CurrentTime = 1446129611994

CurrentTime = 1446129611994
Enter HelloWorldImpl2.doPrint()
CurrentTime = 1446129611994
看到给HelloWorld接口的两个实现类的所有方法都加上了代理,代理内容就是打印时间
2.基于注解配置的使用
1.applicationContext.xml
<?xml version="1.0" encoding="UTF-8"?>
<beans xmlns="http://www.springframework.org/schema/beans"
       xmlns:xsi="http://www.w3.org/2001/XMLSchema-instance"
       xmlns:context="http://www.springframework.org/schema/context"
       xmlns:aop="http://www.springframework.org/schema/aop"
       xsi:schemaLocation="http://www.springframework.org/schema/beans
http://www.springframework.org/schema/beans/spring-beans.xsd http://www.springframework.org/schema/context http://www.springframework.org/schema/context/spring-context.xsd http://www.springframework.org/schema/aop http://www.springframework.org/schema/aop/spring-aop.xsd">

    <!-- 激活组件扫描功能,在包spring_demo.aop_demo及其子包下面自动扫描通过注解配置的组件 -->
    <context:component-scan base-package="spring_demo.aop_demo"/>
    <!-- 强制CGLIB动态代理 -->
    <aop:aspectj-autoproxy proxy-target-class="true"/>
    <!-- 被代理对象 -->
    <bean id="targetClass" class="spring_demo.aop_demo.TargetClass" />
</beans>
2.TargetClass
package spring_demo.aop_demo;

/**
 * @Auther: ARong
 * @Description: AOP的被代理对象(目标对象)
 */
public class TargetClass {
    public void method() {
        System.out.println("TargetClass执行method");
    }
}
3.ProxyClass
package spring_demo.aop_demo;

import org.apache.commons.logging.Log;
import org.apache.commons.logging.LogFactory;
import org.aspectj.lang.JoinPoint;
import org.aspectj.lang.ProceedingJoinPoint;
import org.aspectj.lang.annotation.*;
import org.springframework.stereotype.Component;

/**
 * @Auther: ARong
 * @Description: 代理对象也被成为切面,它用于织入切入点形成通知
 */
@Component
// 声明为一个切面
@Aspect
public class ProxyClass {
    private static final Log log = LogFactory.getLog(ProxyClass.class);

    // 配置切入点,这里切入点是TargetClass的所有方法
    @Pointcut("execution(* spring_demo.aop_demo.TargetClass.*(..))")
    public void aspect(){}

    /*
     * @Author ARong
     * @Description 前置通知
     * @Param
     * @return
     **/
    @Before("aspect()")
    public void before(JoinPoint point) {
        log.warn("前置通知生效....");
    }


    /*
     * @Author ARong
     * @Description 后置通知
     * @Param
     * @return
     **/
    @After("aspect()")
    public void after(JoinPoint point) {
        log.warn("后置通知生效");
    }


    /*
     * @Author ARong
     * @Description 环绕通知,proceedingJoinPoint用于放行方法和获取方法的相关数据,相当于拦截器
     * @Param
     * @return
     **/
    @Around("aspect()")
    public void around(JoinPoint point) throws Throwable {
        ProceedingJoinPoint proceedingJoinPoint = (ProceedingJoinPoint) point;
        // 方法开始执行时间
        Long star = System.currentTimeMillis();
        // 拦截方法放行
        proceedingJoinPoint.proceed();
        // 方法执行结束时间
        Long end = System.currentTimeMillis();
        String methodName = proceedingJoinPoint.getSignature().getName();
        log.warn("环绕通知生效,方法"+ methodName +"执行时间为"+(end - star)+"ms");
    }
}
4.TestAOP
package spring_demo.aop_demo.test;

import org.junit.Test;
import org.springframework.context.support.ClassPathXmlApplicationContext;
import spring_demo.aop_demo.TargetClass;

/**
 * @Auther: ARong
 * @Description: 测试基于注解的AOP测试
 */
public class TestAOP {
    @Test
    public void testAOP() {
       @Test
    public void testAOP() {
        ClassPathXmlApplicationContext context = new ClassPathXmlApplicationContext("applicationContext.xml");
        TargetClass targetClass = (TargetClass)context.getBean("targetClass");
        System.out.println(targetClass.getClass());
        targetClass.method();
    }
    }
}
输出分析
class spring_demo.aop_demo.TargetClass$$EnhancerBySpringCGLIB$$7eb9621b
十二月 06, 2019 2:09:11 下午 spring_demo.aop_demo.ProxyClass before
警告: 前置通知生效....
TargetClass执行method
十二月 06, 2019 2:09:11 下午 spring_demo.aop_demo.ProxyClass around
警告: 环绕通知生效,方法method执行时间为50ms
十二月 06, 2019 2:09:11 下午 spring_demo.aop_demo.ProxyClass after
警告: 后置通知生效
从输出结果可以看到,由于由于我们强制使用了CGLIB动态代理,所以这里生成的代理对象是class spring_demo.aop_demo.TargetClass$$EnhancerBySpringCGLIB$$7eb9621b,即TargetClass的一个子类。
三.JDK动态代理和CGLIB动态代理的使用
Spring的AOP是基于JDK动态代理和CGLIB动态代理的,理解JDK动态代理的基本实现和CGLIB动态代理的基本实现能够更好地让我们理解Spring AOP对代码的增强过程。


 被折叠的 条评论
为什么被折叠?
被折叠的 条评论
为什么被折叠?
 到【灌水乐园】发言


